Springboot项目简单案例-登陆
项目代码已上传至github,下载地址:https://github.com/snowlavenderlove/springbootLogin.git
1.通过springboot官网新建项目springbootLogin

2.点击 generate the project
![]()
3.将压缩包解压并导入到eclipse中,Eclipse->file->import->maven->maven project->existing maven project,结构如图

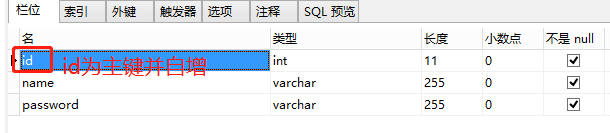
4.在数据库建立spring_login数据库,并新建user表,表结构如图
5.通过generator-mybatis自动生成java代码,generator-mybatis使用教程可见博文:https://blog.csdn.net/qq_37231511/article/details/90692784
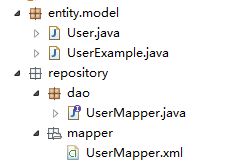
6.将自动生成的代码放到src/main/java下,如图:
7.编辑pom.xml,在其中添加logging和druid依赖

8.编辑application.propertis文件
#mysql
spring.datasource.driver-class-name=com.mysql.jdbc.Driver
spring.datasource.url=jdbc:mysql://127.0.0.1:3306/spring_login
spring.datasource.username=root
spring.datasource.password=123456

#druid
spring.datasource.type=com.alibaba.druid.pool.DruidDataSource
#dao
mybatis.type-aliases-package==com.xue.repository.dao
mybatis.mapper-locations=classpath*:com/xue/repository/mapper/*.xml
9.在src/main/resources/templates下创建登陆页面和注册页面,分别为loginHtml和registerHtml,代码如下
Insert title here
Insert title here
10. 在项目中新建controller包,创建LoginController类,编辑代码
package com.xue.controller;

import java.util.List;

import javax.servlet.http.HttpServletRequest;

import org.slf4j.Logger;
import org.slf4j.LoggerFactory;
import org.springframework.beans.factory.annotation.Autowired;
import org.springframework.stereotype.Controller;
import org.springframework.web.bind.annotation.RequestMapping;
import org.springframework.web.bind.annotation.ResponseBody;

import com.xue.entity.model.User;
import com.xue.service.LoginService;

@Controller
public class LoginController {

	private Logger logger = LoggerFactory.getLogger(this.getClass());

	@Autowired
	private LoginService loginService;

//	登陆页面
	@RequestMapping("/loginHtml")
	public String loginHtml(){

		return "loginHtml";

	}
//	注册页面
	@RequestMapping("/registerHtml")
	public String registerHtml(){

		return "registerHtml";
	}

//	登陆验证
	@RequestMapping("/login")
	@ResponseBody //不返回页面,返回json对象需加@ResponseBody
	public String login(User user,HttpServletRequest request){

		User result = null;

		result = loginService.login(user);

		if(null != result){

			return "登陆成功    "+"name:"+user.getName()+"   password:"+user.getPassword();
		}else{
			return "登陆失败";
		}

		}
	//注册验证
			@RequestMapping("/register")
			@ResponseBody //不返回页面,返回json对象需加@ResponseBody
			public String register(User user){

				int result =0;


				result = loginService.register(user);

				if(0 != result){
					return "注册成功";
				}else{
					return "注册失败";
				}

			}


	}
11. 在项目中创建service包,并在报下创建LoginService接口,同时创建子包Impl,在报下创建LoginServiceImpl实现LoginServcie接口,代码分别为
package com.xue.service;

import java.util.List;

import com.xue.entity.model.User;

public interface LoginService {
	//注册
	public int register(User user);
	//登陆
	public User login(User user);


}
package com.xue.service.Impl;

import java.util.List;

import org.slf4j.Logger;
import org.slf4j.LoggerFactory;
import org.springframework.beans.factory.annotation.Autowired;
import org.springframework.stereotype.Service;

import com.xue.entity.model.User;
import com.xue.repository.dao.UserMapper;
import com.xue.service.LoginService;
@Service
public class LoginServiceImpl implements LoginService {


	@Autowired
	private UserMapper dao;

	@Override
	public int register(User user) {
		// TODO Auto-generated method stub
		System.out.println("Impl");
		int result = 0;
		System.out.println(user);
		try {
			result = dao.insertUser(user);
		} catch (Exception e) {
			// TODO Auto-generated catch block
			e.printStackTrace();
		}
		return result;
	}

	@Override
	public User login(User user) {
		// TODO Auto-generated method stub


		try {
			user = dao.selectUser(user);
		} catch (Exception e) {
			// TODO Auto-generated catch block
			e.printStackTrace();
		}
		return user;
	}


}
12. 编写UserMapper.java,在文件最后添加
    User selectUser(User user);

    int insertUser(User user);
13.在UserMapper.xml中添加
insert user(name,password) values(#{name},#{password})
14.编辑SpringBootLoginApplication启动类
package com.xue;

import org.mybatis.spring.annotation.MapperScan;
import org.springframework.boot.SpringApplication;
import org.springframework.boot.autoconfigure.SpringBootApplication;
import org.springframework.context.annotation.ComponentScan;

@SpringBootApplication
@MapperScan("com.xue.repository.dao")
public class SpringbootLoginApplication {

	public static void main(String[] args) {
		SpringApplication.run(SpringbootLoginApplication.class, args);
	}

}
15.为项目添加日志配置,在pom.xml中添加
		    org.springframework.boot
		    spring-boot-starter-log4j2
		    1.5.2.RELEASE
16.将springboot默认日志排除,将spring-boot-starter-web依赖修改为
			org.springframework.boot
			spring-boot-starter-web


					org.springframework.boot
					spring-boot-starter-logging
17.在src/main/resources中创建log4j2-spring.xml文件,并编辑
%d{yyyy-MM-dd HH:mm:ss.SSS} |-%-5level [%thread] %c [%L] -| %msg%n
18.在application.properties中添加
#log4j2
logging.config=classpath:log4j2-spring.xml
19. 在相关代码中添加,至此,项目代码完成
private Logger logger = LoggerFactory.getLogger(this.getClass());20.在浏览器输入localhost:8080/registerHtml

21.输入用户名a密码123456,点击提交

22.在浏览器输入localhost:8080/loginHtml
![]()
23.输入登陆信息
