PyTorch实战手写数字识别
PyTorch实战手写数字识别
- 目录
- 1. 导包
- 2.数据下载
- 3. 数据变换
- 4. 数据装载
- 4. 数据预览
- 报错
- 5. 搭建卷积神经网络
- 6. 确定损失函数和优化函数
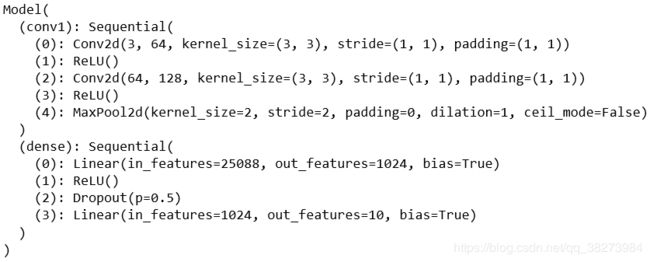
- 7. 查看搭建好的模型结构
- 8. 模型训练和参数优化
- 报错
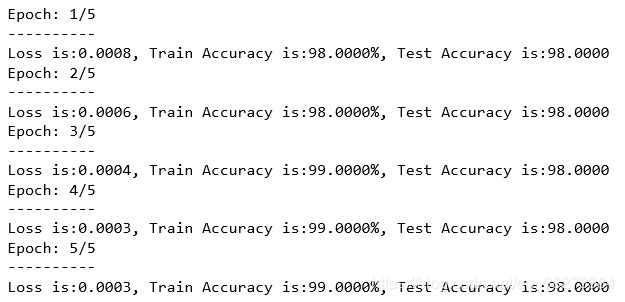
- 训练结果
- 9. 验证模型的准确率
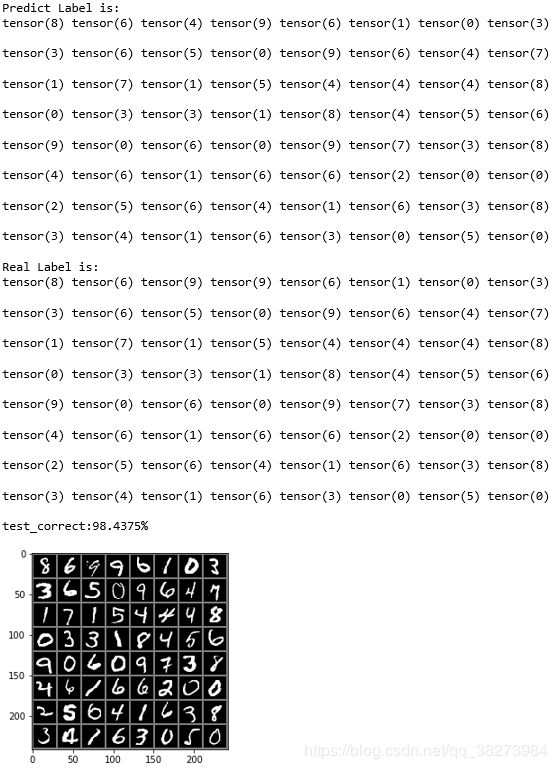
- 测试结果
目录
1. 导包
import torch
from torchvision import datasets, transforms, utils
from torch.autograd import Variable
from torch.utils.data import DataLoader
import matplotlib.pyplot as plt
2.数据下载
数据下载过于缓慢,可在网上搜索MNIST数据包(共有四个文件),将其存放到相应的文件目录下(即文件结构图中的raw文件夹),再运行程序,进行数据处理。
- 数据
手写数字数据集,共有60000张训练图片和10000张测试图片。
官方网站:http://yann.lecun.com/exdb/mnist/
百度云网盘
链接:https://pan.baidu.com/s/1fp3E279lOOwcx_Zq62-iaQ
提取码:p3tb - MNIST数据包中包含的文件:

- 最终得到的文件结构:

- 代码
data_train = datasets.MNIST(root="./data/",
                           transform=transform,
                           train=True,
                            download=True)

data_test = datasets.MNIST(root="./data/",
                          transform=transform,
                          train=False)
3. 数据变换
程序下载代码中的transform=transform这一句,等式右端的transform是在《深度学习之PyTorch实战计算机视觉》6.4.2部分定义的,所以在编程时,要将transform的定义放在数据下载代码的前面。
- 代码
transform = transforms.Compose([transforms.ToTensor(),
                                transforms.Normalize(mean=[0.5, 0.5, 0.5], std=[0.5, 0.5, 0.5])])
4. 数据装载
- 代码
data_loader_train = torch.utils.data.DataLoader(dataset=data_train,
                                               batch_size=64,
                                               shuffle=True)
data_loader_test = torch.utils.data.DataLoader(dataset=data_test,
                                              batch_size=64,
                                              shuffle=True)
4. 数据预览
- 代码
images, labels = next(iter(data_loader_train))
img = torchvision.utils.make_grid(images)

img = img.numpy().transpose(1, 2, 0)
std = [0.5, 0.5, 0.5]
mean = [0.5, 0.5, 0.5]
img = img * std + mean
print([labels[i] for i in range(64)])
plt.imshow(img)
报错
RuntimeError: output with shape [1, 28, 28] doesn’t match the broadcast shape [3, 28, 28]
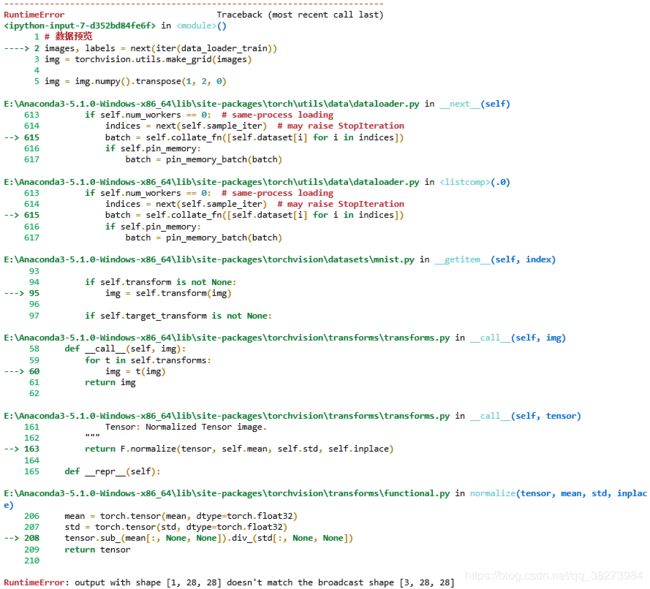
在网上查阅解决方案,看到一位博主说出错原因在于MNIST图片是灰度图,channel=1,需要将其变为RGB图,所以他做了如下修改:
transform = transforms.Compose([transforms.ToTensor(),
                                transforms.Normalize(mean=[0.5, 0.5, 0.5], std=[0.5, 0.5, 0.5])])
修改为:
transform = transforms.Compose([transforms.ToTensor(),
                                transforms.Lambda(lambda x: x.repeat(3,1,1)), # 修改的位置
                                transforms.Normalize(mean=[0.5, 0.5, 0.5], std=[0.5, 0.5, 0.5])])
修改之后,重新运行程序,成功:
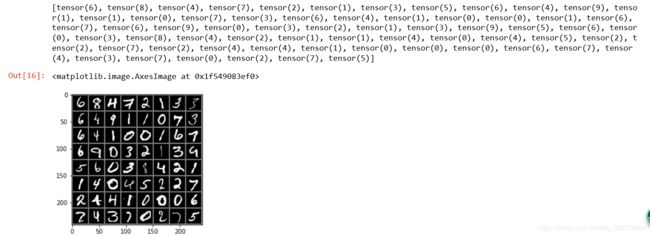
原博文地址:https://blog.csdn.net/weixin_43159148/article/details/88778371
注:之后看到另外一种解决方案
仍是由于通道的问题
transform = transforms.Compose([transforms.ToTensor(),
                                transforms.Normalize(mean=[0.5], std=[0.5])])# 修改的位置
5. 搭建卷积神经网络
- 代码说明
- 函数意义
torch.nn.Conv2d:用于搭建卷积神经网络的卷积层
torch.nn.MaxPool2d:用于实现神经网络中的最大池化层
torch.nn.Dropout:实现Dropout,防止过拟合- 前向传播
先经过self.conv1进行卷积处理;
进行x.view(-1, 14*14*128),对参数实现扁平化(因为之后就是全连接层,需要使实际输出的参数维度与定义的一致);
通过self.dense定义的全连接进行最后的分类。
- 代码
# 使用了两个卷积层,一个最大池化层,两个全连接层
class Model(torch.nn.Module):
    def __init__(self):
        super(Model, self).__init__()
        self.conv1 = torch.nn.Sequential(
            torch.nn.Conv2d(1, 64, kernel_size=3, stride=1, padding=1),
            torch.nn.ReLU(),
            torch.nn.Conv2d(64, 128, kernel_size=3, stride=1, padding=1),
            torch.nn.ReLU(),
            torch.nn.MaxPool2d(stride=2, kernel_size=2)
        )

        self.dense = torch.nn.Sequential(
            torch.nn.Linear(14*14*128, 1024),
            torch.nn.ReLU(),
            torch.nn.Dropout(p=0.5),
            torch.nn.Linear(1024, 10)
        )

    def forward(self, x):
        x = self.conv1(x)
        x = x.view(-1, 14*14*128)
        x = self.dense(x)
        return x
6. 确定损失函数和优化函数
- 代码
model = Model()
cost = torch.nn.CrossEntropyLoss()
optimizer = torch.optim.Adam(model.parameters())
7. 查看搭建好的模型结构
- 代码
print(model)
8. 模型训练和参数优化
- 代码
epoch_n = 5

for epoch in range(1, epoch_n+1):
    running_loss = 0.0
    running_correct = 0
    print('Epoch: {}/{}'.format(epoch, epoch_n))
    print('-'*10)

    for data in data_loader_train:
        X_train, y_train = data
        X_train, y_train = Variable(X_train), Variable(y_train)
        outputs = model(X_train)
        _, pred = torch.max(outputs.data, 1)
        optimizer.zero_grad()
        loss = cost(outputs, y_train)

        loss.backward()
        optimizer.step()
        running_loss += loss.data
        running_correct += torch.sum(pred==y_train.data)

    testing_correct = 0
    for data in data_loader_test:
        X_test, y_test = data
        X_test, y_test = Variable(X_test), Variable(y_test)
        outputs = model(X_test)
        _, pred = torch.max(output.data, 1)
        testing_correct += torch.sum(pred==y_test.data)

    print('Loss is:{:.4f}, Train Accuracy is:{:.4f}%, Test Accuracy is:{:.4f}'.format
          (running_loss/len(data_train), 100*running_correct/len(data_train), 100*testing_correct/len(data_test)))
报错
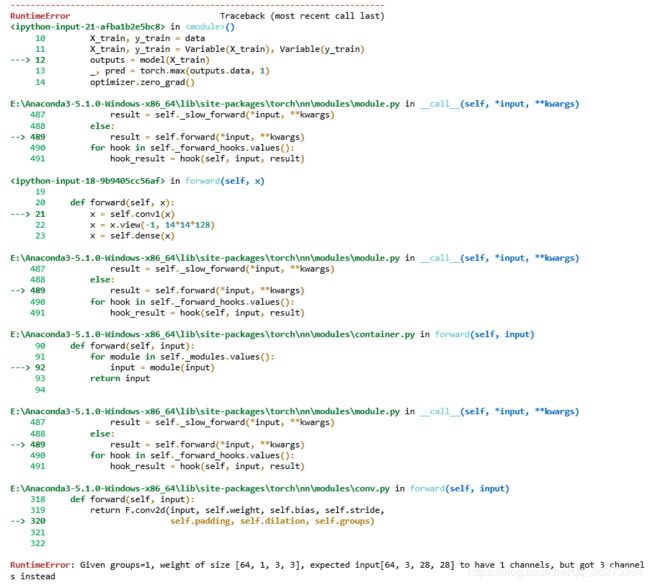
RuntimeError: Given groups=1, weight of size [64, 1, 3, 3], expected input[64, 3, 28, 28] to have 1 channels, but got 3 channels instead
分析:
我们在上一个出错点,将MNIST图片的channel=1修改为了channel=3,但是在书中却并未进行这一操作,所以,在定义卷积神经网络时,它的第一层卷积层输入通道数设置为了1,所以我们将其修改为3
注:
若是在数据预览那一步采用第二种方式解决,此处第一层卷积输入通道设置为1不会出错。
# 使用了两个卷积层,一个最大池化层,两个全连接层
class Model(torch.nn.Module):
    def __init__(self):
        super(Model, self).__init__()
        self.conv1 = torch.nn.Sequential(
            torch.nn.Conv2d(1, 64, kernel_size=3, stride=1, padding=1),
            torch.nn.ReLU(),
            torch.nn.Conv2d(64, 128, kernel_size=3, stride=1, padding=1),
            torch.nn.ReLU(),
            torch.nn.MaxPool2d(stride=2, kernel_size=2)
        )

        self.dense = torch.nn.Sequential(
            torch.nn.Linear(14*14*128, 1024),
            torch.nn.ReLU(),
            torch.nn.Dropout(p=0.5),
            torch.nn.Linear(1024, 10)
        )

    def forward(self, x):
        x = self.conv1(x)
        x = x.view(-1, 14*14*128)
        x = self.dense(x)
        return x
修改为:
# 使用了两个卷积层,一个最大池化层,两个全连接层
class Model(torch.nn.Module):
    def __init__(self):
        super(Model, self).__init__()
        self.conv1 = torch.nn.Sequential(
            torch.nn.Conv2d(3, 64, kernel_size=3, stride=1, padding=1),#修改处
            torch.nn.ReLU(),
            torch.nn.Conv2d(64, 128, kernel_size=3, stride=1, padding=1),
            torch.nn.ReLU(),
            torch.nn.MaxPool2d(stride=2, kernel_size=2)
        )

        self.dense = torch.nn.Sequential(
            torch.nn.Linear(14*14*128, 1024),
            torch.nn.ReLU(),
            torch.nn.Dropout(p=0.5),
            torch.nn.Linear(1024, 10)
        )

    def forward(self, x):
        x = self.conv1(x)
        x = x.view(-1, 14*14*128)
        x = self.dense(x)
        return x
训练结果
9. 验证模型的准确率
- 代码
data_loader_test = torch.utils.data.DataLoader(dataset=data_test,
                                              batch_size=64,
                                              shuffle=True)
X_test, y_test = next(iter(data_loader_test))
inputs = Variable(X_test)
pred = model(inputs)
_, pred = torch.max(pred, 1)

print('Predict Label is:')
for i in range(len(pred.data)):
    print(pred.data[i], end=' ')
    if (i+1) % 8 == 0:
        print('\n')

print('Real Label is:')
for i in range(len(y_test)):
    print(y_test.data[i], end=' ')
    if (i+1) % 8 == 0:
        print('\n')

img = torchvision.utils.make_grid(X_test)
img = img.numpy().transpose(1, 2, 0)

std = [0.5, 0.5, 0.5]
mean = [0.5, 0.5, 0.5]
img = img * std + mean
plt.imshow(img)

test_correct = 0
for i in range(len(pred)):
    if pred.data[i]==y_test.data[i]:
        test_correct += 1
print('test_correct:{:.4f}%'.format(100*test_correct/len(pred)))
