1. Slax 简介#
Slax是一个基于linux操作系统的live发行版,Slax启动后会把整个系统存储在内存中,并通过aufs联合挂载程序模块和可写层的方式,实现系统运行和修改。Slax采用模块化的设计的程序包管理方式(启用、禁用程序包模块),并提供了广泛的预安装软件,包括优良架构的图形用户界面,以及为系统管理员准备的高效的修复工具。
2. Slax 安装#
slax通过运行slax/boot目录下的脚本bootinst.sh完成安装,该脚本将检测slax目录所在分区和硬盘情况,并将syslinux安装至boot目录,使用dd将bootload写入mbr并设置为活动,实现对系统的引导。同时,boot目录下提供系统启动需要的配置文件、内核等。
[root@localhost boot]# ls
bootinst.bat  CHANGELOG    initrfs.img  mbr.bin    runadmin.vbs  syslinux.com  vmlinuz
bootinst.sh  extlinux.exe  isolinux.bin  memtest    samedisk.vbs  syslinux.exe  zblack.png
bootlogo.png  help.txt      makeiso.sh    pxelinux.0  syslinux.cfg  vesamenu.c32
bootinst.sh 关键步骤:
  "$EXTLINUX" --install "$BOOT"
  dd bs=440 count=1 conv=notrunc if="$BOOT/mbr.bin" of="$DEV" 2>/dev/null
3. Slax 目录结构#
所有Slax 文件被放在根目录下的slx目录内,slax目录下主要存放了以.sb结尾的程序模块,启动过程中所有模块将被依次挂载,组成真正的根目录文件系统。其余重要子目录有:1. boot目录,用于保存内核、虚拟镜像、引导程序等与启动相关的内容;2. changes目录,作为可写层用于保存数据;3. modules目录,用于存放用户自定义的程序模块,该目录下所有模块启动时也将被系统挂载;4. bootcopy目录,存放其他需要植入根文件系统且不便或不需要制作成模块的文件,启动时将在所有模块挂载完成后,复制到根文件系统中。
slax
├───boot
│ ├───isolinux.bin
│ ├───syslinux.cfg
│ ├───initrfs.img
│ ├───vmlinuz
│ └───...
├───changes
├───rootcopy
├───01-core.sb
├───02-xorg.sb
├───03-kdeps.sb
├───04-kde.sb
└───...
4. Slax 启动过程#
BootLoader引导内核启动后,将进入initrfs.img构建的虚拟根环境,为了研究slax 的启动过程,我们将initrfs解压缩。
[root@localhost initrfs]# mv ../initrfs.img{.xz}
[root@localhost initrfs]# xz -d ../initrfs.img.xz
[root@localhost initrfs]# cpio -i -F ../initrfs.img
[root@localhost initrfs]# ls
bin  dev  etc  **init**  lib  lib64  mnt  proc  root  run  sys  tmp  usr  var
[root@localhost initrfs]# **ls lib -A**
cleanup  **.config  livekitlib**  modules
控制启动过程的即为initrfs中的init、lib/.config、lib/livekitlib 三个脚本文件,其中lib/.config设置系统变量,lib/livekitlib提供函数,init为主程序,通过调动以上变量、函数,完成系统初始化和根切换。另一个重要脚本为cleanup,它将在关机时被执行,确保所有挂载项目顺利卸载后关机。启动过程的主要阶段有:
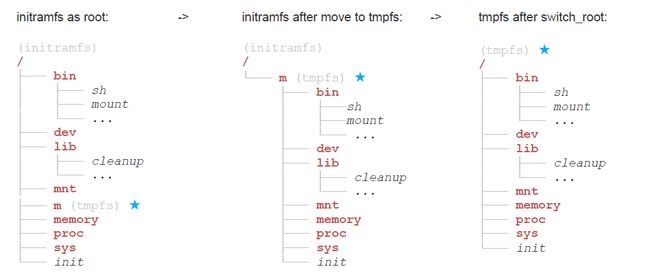
*(1)Escaping initramfs ** BootLoader引导内核启动,挂载initrfs虚拟根镜像。init脚本将在根下创建m目录,并将之作为挂载点,将100%内存空间挂载为tmpfs。通过cp -a /?? /m 命令,巧妙地将除m之外的其他文件夹复制/m下(内存)。然后运行switch_root命令,将根切换至m目录(tmpfs)。
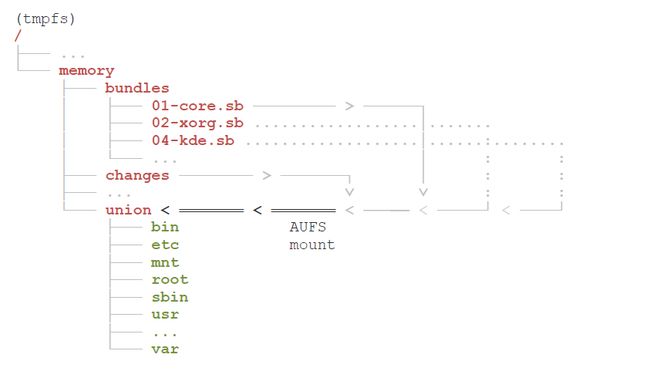
(2)Slax data lookup&Putting it together with AUFS 在创建必要目录挂载,挂载proc、sys虚拟目录,并通过mdev -s 、insert mod 自动、手动加载必要模块,完成系统初始化后,脚本逐一挂载并搜索预设目录,确认.sb文件;或在得到pxe参数时,连接远程http或tftp服务器下载所需的.sb文件。待.sb文件备齐,脚本创建toram目录,将硬盘中的.sb文件复制到内存,创建changes目录作为可写层首先挂载至aufs,后建立union目录并逐一将.sb合并挂载至aufs文件系统中,完成根文件系统构建过程。
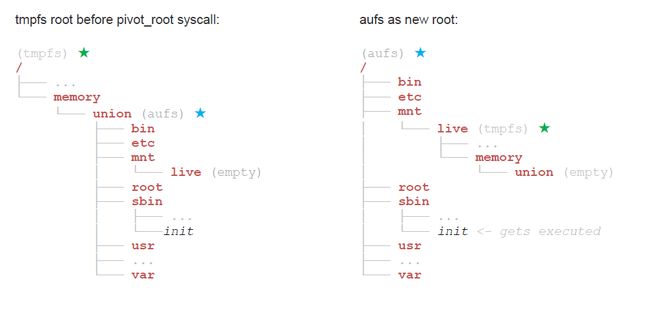
**(3)Switching to the real root ** 在切换到真正的根目录前还需要一些准备工作,创建fstab文件和必要的设备文件。为了关机时进行逆操作,保证数据被完整写入磁盘,脚本创建live目录,并执行pivot_root 现有根目录折叠至live目录。最后chroot至真正的根目录,运行/sbin/init,进入正常系统引导过程。
**(4)Run startup files ** /sbin/init --->/etc/inittab ---> /etc/rc.d/rc.S (略)
**(5)Shutdown ** 关机时的操作与开机相反,首先运行/mnt/live/lib/cleanup,脚本通过pivot_root 将根折回mnt/live/memory/union,随后逐步卸载挂载点,关闭电源。 (略)
5. Slax 启动脚本分析#
本部分以注释的形式分析系统启动脚本的实现过程:
(1) .config 文件:设置各种变量,可能是版本关系,多数并没有用到
#!/bin/bash
# This is a config file for Linux Live Kit build script.
# You shouldn't need to change anything expect LIVEKITNAME
# Live Kit Name. Defaults to 'mylinux';
# For example, Slax changes it to 'slax'
# Must not contain any spaces.
# If you change it, you must run ./tools/isolinux.bin.update script
# in order to update isolinux.bin for CD booting.
LIVEKITNAME="slax" #设定用来存放.sb模块的目录;

# Kernel file, will be copied to your Live Kit
VMLINUZ=/boot/vmlinuz #确定内核文件位置;

# Kernel version. Change it to "3.2.28" for example, if you are building
# Live Kit with a different kernel than the one you are actually running
KERNEL=$(uname -r) #确定内核模块目录;
# List of directories which will be modularized
# No subdirectories are allowed, no slashes,
# so You can't use /var/tmp here for example
# Exclude directories like proc sys tmp
MKMOD="bin etc home lib lib64 opt root sbin srv usr var" #设置模块加载需要的目录

# List of files and directories you'd like to exclude from your Live Kit
EXCLUDE="/etc/fstab /etc/mtab" #设置除外文件

# Temporary directory to store livekit filesystem
LIVEKITDATA=/tmp/$LIVEKITNAME-data-$$  #设置临时目录名

# Bundle extension, for example 'sb' for .sb extension
BEXT=sb #设置模块后缀;

# Directory with kernel .ko modules, can be different in some distros
LMK="lib/modules/$KERNEL" #设置内核模块目录
(2) livekitlib文件,提供启动需要的各种功能,重点在于各种判断和获取,实现自动化和普遍适用能力
#!/bin/sh
# Functions library :: for Linux Live Kit scripts
# Author: Tomas M. http://www.linux-live.org
#
# =================================================================
# debug and output functions
# =================================================================
debug_start() #判断启动参数是否包含“debug”;
{
if grep -q debug /proc/cmdline; then
DEBUG_IS_ENABLED=1
else
DEBUG_IS_ENABLED=
fi
}
debug_log() #若工作在debug模式,在日志中加入- debug标签;
{
if [ "$DEBUG_IS_ENABLED" ]; then
echo "- debug: $" >&2
log "- debug: $"
fi
}
# header
# $1 = text to show
#
header() #设置显示样式;
{
echo "[0;1m""$@""[0;0m"
}
# echo green star #设置显示样式;
#
echo_green_star()
{
echo -ne "[0;32m""* ""[0;39m"
}
# log - store given text in /var/log/livedbg #
log() #记录日志
{
echo "$@" 2>/dev/null >>/var/log/livedbg
}
echolog() #显示并记录日志
{
echo "$@"
log "$@"
}
# show information about the debug shell
show_debug_banner() #进入debug模式提示信息;
{
echo
echo "====="
echo ": Debugging started. Here is the root shell for you."
echo ": Type your desired commands or hit Ctrl+D to continue booting."
echo
}
# debug_shell
# executed when debug boot parameter is present
#
debug_shell() #若工作在debug模式下,则启动shell界面;
{
if [ "$DEBUG_IS_ENABLED" ]; then
show_debug_banner
setsid sh -c 'exec sh < /dev/tty1 >/dev/tty1 2>&1'
echo
fi
}
fatal() #发生致命错误,显示日志、错误信息,启动shell界面;
{
echolog
header "Fatal error occured - $1"
echolog "Something went wrong and we can't continue. This should never happen."
echolog "Please reboot your computer with Ctrl+Alt+Delete ..."
echolog
setsid sh -c 'exec sh < /dev/tty1 >/dev/tty1 2>&1'
}
# get value of commandline parameter $1
# $1 = parameter to search for
#
cmdline_value() #取出内核参数分项;
{
cat /proc/cmdline | egrep -o "(|[[:space:]])$1=[[:space:]]+" | tr -d " " | cut -d "=" -f 2- | tail -n 1
}
# test if the script is started by root user. If not, exit
#
allow_only_root() #判断root用户;
{
if [ "0$UID" -ne 0 ]; then
echo "Only root can run $(basename $0)"; exit 1
fi
}
# Create bundle
# call mksquashfs with apropriate arguments
# $1 = directory which will be compressed to squashfs bundle
# $2 = output file
# $3..$9 = optional arguments like -keep-as-directory or -b 123456789
#
create_bundle() #制作squash文件,启动过程用不到此函数
{
debug_log "create_module" "$"
rm -f "$2" # overwrite, never append to existing file
mksquashfs "$1" "$2" -comp xz -b 512K $3 $4 $5 $6 $7 $8 $9>/dev/null
}
# Move entire initramfs tree to tmpfs mount.
# It's a bit tricky but is necessray to enable pivot_root
# even for initramfs boot image
#
transfer_initramfs() # 用于完成第一次根切换
{
if [ ! -r /lib/initramfs_escaped ]; then #第一次切换根之前,该文件不存在;
echo "switch root from initramfs to ramfs"
SWITCH=/m # one letter directory,建立m目录作为临时根目录位置;
mkdir -p $SWITCH
mount -t tmpfs -o size="100%" tmpfs $SWITCH #将全部内存空间作为tmpfs挂载至m目录;
cp -a /?? $SWITCH 2>/dev/null # only copy two-and-more-letter directories,复制根目录下所有文件到m目录,利用m目录的单字符特性,避开m目录本身;
cd $SWITCH #进入m目录;
echo "This file indicates that we successfully escaped initramfs" > $SWITCH/lib/initramfs_escaped #创建initramfs_escaped文件,提示成功切换至m目录;
exec switch_root -c /dev/console . $0 #执行切换根操作,切根后执行init文件;
fi
}
# mount virtual filesystems like proc etc
#
init_proc_sysfs() #建立虚拟目录;
{
debug_log "init_proc_sysfs" "$" #debug日志
mkdir -p /proc /sys /etc $MEMORY #MEMORY=/memory,建立proc sys etc memory 目录
mount -n -t proc proc /proc #挂载porc
echo "0" >/proc/sys/kernel/printk #设置日志级别为0
mount -n -t sysfs sysfs /sys #挂载sys
mount -n -o remount,rw rootfs / #重新根分区支持写操作
ln -sf /proc/mounts /etc/mtab #创建/etc/mtab文件
}
# make sure some devices are there
init_devs() #插入必要模块
{
debug_log "init_devs" "$"
echo /sbin/mdev > /proc/sys/kernel/hotplug #设置系统的hotplug程序为mdev
mdev -s #自动加载模块
modprobe zram 2>/dev/null #手动加载zram模块
modprobe loop 2>/dev/null #手动加载loop模块
modprobe squashfs 2>/dev/null #手动加载squahfs模块
modprobe fuse 2>/dev/null #手动加载fuse模块
}
# Activate zram (auto-compression of RAM)
# Compressed RAM consumes 1/2 or even 1/4 of original size
# Setup static size of 500MB
#
init_zram()
{
debug_log "init_zram" "$"
echo_green_star
echo "Setting dynamic RAM compression using ZRAM"
echo 536870912 > /sys/block/zram0/disksize # 创建一个512MB的内存空间设备
mkswap /dev/zram0 >/dev/null #将该设备作为交换分区
swapon /dev/zram0 -p 32767 #启用交换分区 -p指定优先级
echo 100 > /proc/sys/vm/swappiness #设置内核参数,优先使用100%交换分区
}
# load the AUFS kernel module if needed
#
init_aufs() #插入aufs模块,目前版本aufs支持被编译入内核中,无需加载模块
{
debug_log "init_aufs" "$"
# TODO maybe check here if aufs support is working at all
# and procude useful error message if user has no aufs
modprobe aufs 2>/dev/null
}
# Setup empty union
# $1 = changes directory (ramfs or persistent changes)
# $2 = union directory where to mount the union
#
init_union() #$CHANGES" "$UNION" #用于将changes目录挂载为aufs顶层可写层
{
debug_log "init_union" "$"
echo_green_star
echo "Setting up union using AUFS 3"
mkdir -p "$1"
mkdir -p "$2"
# mount -t aufs -o xino="/.xino",trunc_xino,br="$1" aufs "$2"
mount -t aufs -o xino="/.xino",br="$1" aufs "$2" #设置外部inode表为.xino,挂载$1目录组到$2
}
# Return device mounted for given directory
# $1 = directory
#
mounted_device() #探测目录所在的块设备
{
debug_log "mounted_device" "$"
local MNT TARGET
MNT="$1"
while [ "$MNT" != "/" -a "$MNT" != "." -a "$MNT" != "" ]; do
TARGET="$(grep -F " $MNT " /proc/mounts | cut -d " " -f 1)"
if [ "$TARGET" != "" ]; then
echo "$TARGET"
return
fi
MNT="$(dirname "$MNT")" #mount表中无该目录则查询其上级目录,直到找到为止;
done
}
# Return mounted dir for given directory
# $1 = directory
#
mounted_dir() #探测挂载点
{
debug_log "mounted_dir" "$"
local MNT
MNT="$1"
while [ "$MNT" != "/" -a "$MNT" != "." -a "$MNT" != "" ]; do
if mountpoint -q "$MNT" 2>/dev/null; then
echo "$MNT"
return
fi
MNT="$(dirname "$MNT")"
done
}
# Make sure to mount FAT12/16/32 using vfat
# in order to support long filenames
# $1 = device
#
device_bestfs() #探测文件系统类型;
{
debug_log "device_bestfs" "$"
local FS
FS="$(blkid "$1" | sed -r "s/.TYPE=//" | tr -d '"' | tr [A-Z] [a-z])"
if [ "$FS" = "msdos" -o "$FS" = "fat" -o "$FS" = "vfat" ]; then
FS="vfat"
elif [ "$FS" = "ntfs" ]; then
FS="ntfs-3g"
fi
echo "-t $FS" #输出 -t 文件系统类型
}
# Filesystem options for mount
# $1 = filesystem or '-t filesystem'
#
fs_options()
{
debug_log "fs_options" "$"
if [ "$1" = "-t" ]; then
shift
fi
if [ "$1" = "vfat" ]; then
echo "-o check=s,shortname=mixed,iocharset=utf8" #设置fat系列的挂载参数
fi
}
# Modprobe network kernel modules until a working driver is found.
# These drivers are (or used to be) probed in Slackware's initrd.
# The function returns the first device found, yet it doesn't have
# to be a working one, eg. if the computer has two network interfaces
# and ethernet cable is plugged only to one of them.
#
init_network_dev()
{
debug_log "init_network_dev" "$"
local MODULE ETH
for MODULE in 3c59x acenic de4x5 e1000 e1000e e100 epic100 hp100
ne2k-pci pcnet32 8139too 8139cp tulip via-rhine r8169 atl1e yellowfin
tg3 dl2k ns83820 atl1 b44 bnx2 skge sky2 tulip depca 3c501 3c503
3c505 3c507 3c509 3c515 ac3200 at1700 cosa cs89x0 de600 de620 e2100
eepro eexpress eth16i ewrk3 forcedeth hostess_sv11 hp-plus hp ni52
ni65 sb1000 sealevel smc-ultra sis900 smc9194 wd; do
modprobe $MODULE 2>/dev/null #按顺序插入各类网卡模块
ETH="$(cat /proc/net/dev | grep : | grep -v lo: | cut -d : -f 1 | tr -d " " | head -n 1)"
if [ "$ETH" != "" ]; then #检查插入模块后是否可以正常识别网卡
echo $ETH
return 0 #成功识别网卡后退出
fi
rmmod $MODULE 2>/dev/null #无法识别网卡则删除模块,进入下一循环
done
# If we are here, none of the above specified modules worked.
# As a last chance, try to modprobe everything.
find /lib/modules/ | xargs -n 1 modprobe #以上网卡模块均无效后,尝试挂载所有模块
cat /proc/net/dev | grep : | grep -v lo: | cut -d : -f 1 | tr -d " " | head -n 1 #获取第一块网卡名称
}
# Download data from tftp
# $1 = target (store downloaded files there)
#
download_data_pxe()
{
debug_log "download_data_pxe" "$"
local CMD CLIENT SERVER GW MASK PORT ETH PROTOCOL
mkdir -p "$1/$LIVEKITNAME"
cmdline_value ip | while IFS=":" read CLIENT SERVER GW MASK PORT; do
echo_green_star >&2
echo "Downloading files from $SERVER ..." >&2
ETH=$(init_network_dev)
if [ "$PORT" = "" ]; then PORT="7529"; fi
# set IP address as given by boot paramter
if [ "$CLIENT" != "" -a "$MASK" != "" ]; then #若启动参数给定了静态ip
ifconfig $ETH "$CLIENT" netmask "$MASK" #设置网卡ip地址和掩码
route add default gw "$GW" #设置网关
else
# if client ip is unknown, try to get a DHCP lease
udhcpc -i $ETH -f -q #若启动参数未给定ip,则尝试自动获取
fi
# well known IP address of Google public DNS service
echo nameserver 8.8.8.8 >> /etc/resolv.conf #设置dns为8.8.8.8
PROTOCOL=http #设置pxe协议为http
wget -q -O "$1/PXEFILELIST" "http://$SERVER:$PORT/PXEFILELIST?$(uname -r):$(uname -m)" #从服务器下载启动文件;
if [ $? -ne 0 ]; then #若下载失败
echo "Error downloading from http://$SERVER:$PORT, trying TFTP" >&2
PROTOCOL=tftp #将协议调整为tftp,并尝试重新下载
tftp -g -r PXEFILELIST -l "$1/PXEFILELIST" $SERVER
fi
cat "$1/PXEFILELIST" | while read FILE; do #查看下载的pxefilelist文件,逐行读入file变量
if [ "$PROTOCOL" = "http" ]; then
wget -O "$1/$LIVEKITNAME/$FILE" "http://$SERVER:$PORT/$FILE" #使用http协议下载file
else
echo "* $FILE ..." >&2
tftp -g -r $FILE -l "$1/$LIVEKITNAME/$FILE" $SERVER #使用tftp协议下载file
fi
done
done
echo "$1/$LIVEKITNAME" #显示下载模块所在目录位置
}
# Find LIVEKIT data by mounting all devices
# If found, keep mounted, else unmount
# $1 = data directory target (mount here) $MEMORY/data
# $2 = data directory which contains compressed bundles slax
#
find_data_try()
{
debug_log "find_data_try" "$"
local DEVICE FS FROM OPTIONS
mkdir -p "$1" #建立挂载点
blkid | sort | cut -d: -f 1 | grep -E -v "/loop|/ram|/zram" | while read DEVICE; do #获取块设备,排除loop ram zram等虚拟设备,并依次挂载
FROM="$2" #.sb文件相对于挂载点的路径
FS="$(device_bestfs "$DEVICE")" #取得设备文件系统类型
OPTIONS="$(fs_options $FS)" #根据文件系统类型设置挂载参数
mount -r "$DEVICE" "$1" $FS $OPTIONS 2>/dev/null #将设备以只读方式挂载至挂载点
# if the FROM parameter is actual file, mount it again as loop (eg. iso)
if [ -f "$1/$FROM" ]; then #如果预设的查找目录是一个文件,说明其为loop设备,此时重新挂载设备至其父目录为可写,建立../iso目录,将loop文件挂载至../iso目录,设置查找目录为../iso/slax
mount -o remount,rw "$DEVICE" "$1" 2>/dev/null
mkdir -p "$1/../iso"
mount -o loop,ro "$1/$FROM" "$1/../iso" 2>/dev/null
FROM="../iso/$LIVEKITNAME"
fi
# search for bundles in the mounted directory
if [ "$(find "$1/$FROM" -maxdepth 1 -name ".$BEXT" 2>/dev/null)" != "" ]; then #在查找目录中搜索.sb文件
# we found at least one bundle/module here
mount -o remount,rw "$DEVICE" "$1" 2>/dev/null #找到则将挂载点重新挂载为读写
echo "$1/$FROM" | tr -s "/" | sed -r "s:/[^/]+/[.][.]/:/:g" #显示找到的位置
return #/memory/data/slax
fi
# unmount twice, since there could be mounted ISO as loop too. If not, it doesn't hurt
umount "$1" 2>/dev/null #找不到则卸载设备2次,进入下一次循环
umount "$1" 2>/dev/null
done
}
# Retry finding LIVEKIT data several times, find_data 60 "$DATAMNT"
# until timeouted or until data is found $MEMORY/data
# $1 = timeout
# $2 = data directory target (mount here)
#
find_data()
{
debug_log "find_data" "$"
local DATA FROM
if [ "$(cmdline_value ip)" != "" ]; then #若向内核传递ip启动参数,则通过pxe下载必要文件
download_data_pxe "$2"
return
fi
FROM="$(cmdline_value from)"
if [ "$FROM" = "" ]; then FROM="$LIVEKITNAME"; fi #获取启动参数中设定的模块目录,若无则设置为配置文件中设定的查询目录
echo_green_star >&2
echo -n "Looking for $LIVEKITNAME data in /$FROM .." | tr -s "/" >&2
for timeout in $(seq 1 $1); do
echo -n "." >&2
DATA="$(find_data_try "$2" "$FROM")" #通过find_data_try找到并挂载正确的分区,并返回.sb文件位置
if [ "$DATA" != "" ]; then #如果该位置存在
echo "" >&2
echo " Found on $(mounted_device "$2")" >&2
echo "$DATA" #返回$DATA
return
fi
sleep 1
done
echo "" >&2
if [ "$DATA" = "" ]; then
fatal "$LIVEKITNAME data not found" #无法找到.sb文件,显示启动失败信息
fi
}
# Activate persistent changes
# $1 = data directory $DATE /memory/data/slax
# $2 = target changes directory $CHANGES /memory/changes
#
persistent_changes()
{
debug_log "persistent_changes" "$"
local CHANGES T1 T2
CHANGES="$1/$(basename "$2")" #可写目录位置,默认为memory/data/slax/changes
T1="$CHANGES/.empty"
T2="$T1"2
# Setup the directory anyway, it will be used in all cases
mkdir -p "$2" #建立memory/changes目录
# If persistent changes are not requested, end here
if grep -vq perch /proc/cmdline; then #获取启动参数是否存在perch,无则退出此动作
return
fi
# check if changes directory exists and is writable
touch "$T1" 2>/dev/null && rm -f "$T1" 2>/dev/null #测试目录是否可写,/memory/data/memory/change
# if not, simply return back
if [ $? -ne 0 ]; then #不可写则退出动作
echo " Persistent changes not writable or not used"
return
fi
echo_green_star
echo "Testing persistent changes for posix compatibility" #测试change所在的文件系统是支持POSIX的权限管理
touch "$T1" && ln -sf "$T1" "$T2" 2>/dev/null && \
chmod +x "$T1" 2>/dev/null && test -x "$T1" &&
chmod -x "$T1" 2>/dev/null && test ! -x "$T1" &&
rm "$T1" "$T2" 2>/dev/null
if [ $? -ne 0 ]; then #若文件系统如fat系列,不支持权限管理,则创建changes.dat通过loop设备的形式保存变化
echo "* Activating dynamic sized storage for persistent changes"
rm "$T1" "$T2" 2>/dev/null
mount.dynfilefs "$CHANGES/changes.dat" 4000 "$2" #.dynfilefs是作者开发的动态增量文件系统,此段生成/memory/data/memory/changes/changes.dat文件,并loop挂载至 /memory/change 目录
if [ "$(device_bestfs "$2/loop.fs" | tr -d " ")" = "-t" ]; then #若该虚拟磁盘内的loop分区未格式化
mke2fs -F "$2/loop.fs" >/dev/null #将之格式化为ext2格式
fi
mount -o loop,sync "$2/loop.fs" "$2" #将loop文件挂载至/memory/change
rmdir "$2/lost+found" 2>/dev/null
else
echo "* Activating native persistent changes"
mount --bind "$CHANGES" "$2" #若本身支持权限管理等,直接将/memory/data/slax/changes目录绑定挂载至/memory/changes,为此将u盘格式化为ext2系列可以提高性能
fi
}
# Copy content of rootcopy directory to union
# $1 = data directory
# $2 = union directory
copy_rootcopy_content() #将rootcopy目录的内容复制到目标根目录
{
debug_log "copy_rootcopy_content" "$"
if [ "$(ls -1 "$1/rootcopy/" 2>/dev/null)" != "" ]; then
echo_green_star
echo "Copying content of rootcopy directory..."
cp -a "$1"/rootcopy/ "$2"
fi
}
# Copy data to RAM if requested
# $1 = live data directory "$DATA" /memory/data/slax
# $2 = changes directory "$CHANGES" /memory/changes
#
copy_to_ram() #将.sb复制到内存可以提升运行速度
{
debug_log "copy_to_ram" "$"
local MDIR MDEV RAM CHANGES
if grep -vq toram /proc/cmdline; then #启动时BootLoader是否传递toram参数
echo "$1"
return
fi
echo " Copying $LIVEKITNAME data to RAM..." >&2
RAM="$(dirname "$2")"/toram #在changes目录下创建toram目录
mkdir -p "$RAM"
cp -a "$1"/* "$RAM" #将所有sb文件所在目录下文件复制至ram中的toram目录
echo "$RAM"
MDIR="$(mounted_dir "$1")" #获取挂载目录 /memory/data
MDEV="$(mounted_device "$1")" #获取挂载设备 /dev/sda1
MDEV="$(losetup $MDEV 2>/dev/null | cut -d " " -f 3)" #获取loop设备文件
umount "$MDIR" 2>/dev/null #卸载挂载目录
if [ "$MDEV" ]; then # iso was mounted here, try to unmount the FS it resides on too
MDEV="$(mounted_device "$MDEV")"
umount "$MDEV" 2>/dev/null #卸载loop设备
fi
}
# load filter #模块过滤
#
filter_load()
{
local FILTER
FILTER=$(cmdline_value load)
if [ "$FILTER" = "" ]; then
cat -
else
cat - | egrep "$FILTER"
fi
}
# noload filter
#
filter_noload()
{
local FILTER
FILTER=$(cmdline_value noload)
if [ "$FILTER" = "" ]; then
cat -
else
cat - | egrep -v "$FILTER"
fi
}
# sort modules by number even if they are in subdirectory
#
sortmod() #排序.sb文件
{
cat - | sed -r "s,(./(.)),\2:\1," | sort -n | cut -d : -f 2-
}
# Mount squashfs filesystem bundles
# and add them to union
# $1 = directory where to search for bundles
# $2 = directory where to mount bundles
# $3 = directory where union is mounted
#
union_append_bundles() #"$DATA" "$BUNDLES" "$UNION" #将.sb文件分别挂载至bundles对应目录后,联合挂载到union
{
debug_log "union_append_bundles" "$"
local BUN
echo_green_star
echo "Adding bundles to union"
( ls -1 "$1" | sort -n ; cd "$1" ; find modules/ 2>/dev/null | sortmod | filter_load) | grep '[.]'$BEXT'$' | filter_noload | while read BUNDLE; do #查找、排序、过滤程序模块
echo " $BUNDLE"
BUN="$(basename "$BUNDLE")"
mkdir -p "$2/$BUN"
mount -o loop -t squashfs "$1/$BUNDLE" "$2/$BUN" #挂载程序模块
mount -o remount,add:1:"$2/$BUN" aufs "$3" #联合挂载模块目录
done
}
# Create empty fstab properly
# $1 = root directory
#
fstab_create() #创建fstab
{
debug_log "fstab_create" "$"
local FSTAB
FSTAB="$1/etc/fstab"
echo aufs / aufs defaults 0 0 > $FSTAB
echo proc /proc proc defaults 0 0 >> $FSTAB
echo sysfs /sys sysfs defaults 0 0 >> $FSTAB
echo devpts /dev/pts devpts gid=5,mode=620 0 0 >> $FSTAB
echo tmpfs /dev/shm tmpfs defaults 0 0 >> $FSTAB
}
# Change root and execute init
# $1 = where to change root
#
change_root() #用于切换至真实根目录
{
debug_log "change_root" "$"
umount /proc
umount /sys
cd "$1"
# make sure important device files and directories are in union
mkdir -p boot dev proc sys tmp mnt run #创建必要目录和设备文件
chmod 1777 tmp
if [ ! -e dev/console ]; then mknod dev/console c 5 1; fi
if [ ! -e dev/tty ]; then mknod dev/tty c 5 0; fi
if [ ! -e dev/tty0 ]; then mknod dev/tty0 c 4 0; fi
if [ ! -e dev/tty1 ]; then mknod dev/tty1 c 4 1; fi
if [ ! -e dev/null ]; then mknod dev/null c 1 3; fi
if [ ! -e sbin/fsck.aufs ]; then ln -s /bin/true sbin/fsck.aufs; fi
# find chroot and init
if [ -x bin/chroot ]; then CHROOT=bin/chroot; fi
if [ -x sbin/chroot ]; then CHROOT=sbin/chroot; fi
if [ -x usr/bin/chroot ]; then CHROOT=usr/bin/chroot; fi
if [ -x usr/sbin/chroot ]; then CHROOT=usr/sbin/chroot; fi
if [ "$CHROOT" = "" ]; then fatal "Can't find executable chroot command"; fi
if [ -x bin/init ]; then INIT=bin/init; fi
if [ -x sbin/init ]; then INIT=sbin/init; fi
if [ "$INIT" = "" ]; then fatal "Can't find executable init command"; fi
mkdir -p mnt/live
mount -n -o remount,ro aufs .
pivot_root . mnt/live #将根折叠至mnt/live
exec $CHROOT . $INIT < dev/console > dev/console 2>&1 #切换根目录
}
(3) init 脚本:启动过程的主程序,清晰展现了整个系统初始化流程
#!/bin/sh
# Initial script for Linux Live Kit
# Author: Tomas M http://www.linux-live.org/
export PATH=.:/:/usr/sbin:/usr/bin:/sbin:/bin #设置PATH变量
. /lib/.config #导入启动需要的各类变量
. /lib/livekitlib #导入启动需要的各种函数
transfer_initramfs #第一根切换,建立m目录,将根下其余目录复制至m目录后,切换根至m目录,并建立initramfs_escaped文件标示,切根后重新执行init脚本,由于文件标示存在,再次执行init脚本时,会判断并跳过切根操作;
MEMORY=/memory
CHANGES=$MEMORY/changes
UNION=$MEMORY/union
DATAMNT=$MEMORY/data
BUNDLES=$MEMORY/bundles
header "Live Kit init http://www.linux-live.org/"
init_proc_sysfs #挂载各虚拟目录,重新挂载根分区rw,建立mtab
debug_start #检测是否开启debug模式
debug_shell #若开启debug模式则启动shell界面
init_devs #使用mdev动态加载模块,并手动加载确保zram loop squashfs fuse模块被启用
init_aufs #手动启用aufs模块
init_zram #创建512M的zram盘作为交换分区,设置内核参数优先使用全部交换分区
# find data dir with filesystem bundles
DATA="$(find_data 60 "$DATAMNT")" #查找sb文件位置,设置查找最多为60次,挂载点为/memory/data,若启动参数为远程,则通过http或tftp协议,从远程服务器下载文件至data/slax目录,依次挂载本机块设备至data,若启动时向内核传递from参数,则查找data/$from是否包含.sb文件,若data/$from本身为文件,则将其以loop设备挂载后,将查找点定位至该loop文件挂载点,若找到.sb文件则完成查找,并将结果返回,若所有未发现.sb文件则卸载当前块设备,挂载下一块设备,若所有设备中均未发现.sb文件,则提示启动失败。
debug_shell
# setup persistent changes, if possible
persistent_changes "$DATA" "$CHANGES" #为保存修改提供位置,若为fat等非posix标准分区格式,则生成changs.dat文件,通过挂载ext2格式loop文件提供可写支持,若分区支持posix标准,则支持将memory/changes目录绑定至新位置
debug_shell
# copy to RAM if needed
DATA="$(copy_to_ram "$DATA" "$CHANGES")" #所有slax目录复制至/memory/toram目录,并将data指向新位置
debug_shell
# init aufs union
init_union "$CHANGES" "$UNION" #changes目录作为底分支挂载至union
debug_shell
# add data to union
union_append_bundles "$DATA" "$BUNDLES" "$UNION" #将.sb挂载后的内容逐一挂载至union
debug_shell
# rootcopy
copy_rootcopy_content "$DATA" "$UNION" #将slax/rootcopy目录下的文件复制至union
# create empty fstab #为union创建fstab文件
fstab_create "$UNION"
debug_shell
header "Live Kit done, starting $LIVEKITNAME"
change_root "$UNION" #pivot_root将现有根系统移动至union/mnt/live,然后chroot进入真正根目录启动,运行init程序
header "!!ERROR occured, you shouldn't be here.!!" #成功切根后,本行不会被运行,否则报错
/bin/sh
6. Slax 启动过程简单实现
针对个人使用,编写简易启动脚本,略去防卫代码和自动化探查代码,最小限度使用变量,以最原始的方式重现Slax启动流程。
#!/bin/sh
#设置PATH变量
export PATH=.:/:/usr/sbin:/usr/bin:/sbin:/bin
#第一次根切换
if [ ! -r /lib/initramfs_escaped ];then
mkdir /m
mount -t tmpfs -o size="100%" tmpfs /m
cp -av /??* /m
cd /m
touch /m/lib/initramfs_escaped
exec switch_root -c /dev/console . /sbin/init
fi
#挂载虚拟目录
mkdir -p /proc /sys /etc /memory
mount -n -t proc proc /proc
echo "0" > /proc/sys/kernel/printk
mount -n -t sysfs sysfs /sys
mount -n -o remount,rw rootfs /
ln -sf /proc/mounts /etc/mtab
#设备初始化,插入必要模块
echo /sbin/mdev > /proc/sys/kernel/hotplug
mdev -s
modprobe zram
modprobe loop
modprobe squashfs
modprobe fuse
#插入aufs模块,目前版本aufs已直接编译入内核,注释掉本段
#modprobe aufs
#创建swap分区
echo $((51210241024)) > /sys/block/zram0/disksize
mkswap /dev/zram0
swapon /dev/zram0 -p 32767
echo 100 > /proc/sys/vm/swappiness
#挂载硬盘至/memory/data 目录
mkdir -p /memory/data
mount /dev/sda1 /memory/data -t ext2 -o rw
#在硬盘分区上建立changes目录,挂载至内存中changes目录
mkdir -p /memory/data/slax/changes
mkdir -p /memory/changes
mount --bind /memory/data/slax/changes /memory/changes
#建立/memory/toram目录,将data目录下所有文件复制进toram目录,卸载data目录
mkdir -p /memory/toram
cp -a /memory/data/* /memory/toram
umount /memory/data
#挂载/memory/changes目录,创建目标根文件系统可写层
mkdir -p /memory/union
mount -t aufs -o xino="/.xino",br=/memory/changes aufs /memory/union
#挂载内存中slax目录下所有.sb文件
mkdir -p "/memory/bundles"
for BUNDLE in /memory/toram/slax/.sb;do
BUN="$(basename "$BUNDLE")"
mkdir -p /memory/bundles/"$BUN"
mount -t loop -t squashfs "$BUNDLE" /memory/bundles/"$BUN"
done
#挂载内存中slax/modules目录下的所有.sb文件
for BUNDLE in /memory/toram/slax/modules/.sb;do
BUN="$(basename "$BUNDLE")"
mkdir -p /memory/bundles/"$BUN"
mount -t loop -t squashfs "$BUNDLE" /memory/bundles/"$BUN"
done
#以aufs合并所有/bundles/sb目录
for BUN in /memory/bundles/.sb;do
mount -o remount,add:1:"$BUN" aufs /memory/union
done
#创建fstab文件
cat >/memory/union/etc/fstab << EOF
aufs / aufs defaults 0 0
proc /proc /proc defaults 0 0
sysfs /sys sysfs defaults 0 0
devpts /dev/pts devpts gid=5,mode=620 0 0
tmpfs /dev/shm tmpfs defaults 0 0
EOF
#切换根目录
#卸载虚拟目录
umount /proc
umount /sys
#进入准备好的根目录
cd /memory/union
#确保重要目录和设备存在
mkdir -p boot dev proc sys tmp mnt run
chmod 1777 tmp
if [ ! -e dev/console ] ;then mknod dev/console c 5 1;fi
if [ ! -e dev/tty ] ;then mknod dev/tty c 5 0 ;fi
if [ ! -e dev/tty0 ] ;then mknod dev/tty0 c 4 0;fi
if [ ! -e dev/tty1 ] ;then mknod dev/tty1 c 4 1;fi
if [ ! -e dev/null ] ;then mknod dev/null c 1 3;fi
if [ ! -e sbin/fsck.aufs ] ;then ln -s /bin/ture sbin/fsck.aufs; fi
#创建live目录,并将现有根目录转移至live目录
mkdir -p mnt/live
mount -n -o remount,ro aufs .
pivot_root . mnt/live
#进入真正的根目录,启动init进程
exec /bin/chroot . /sbin/init < dev/console > dev/console
7. 手动安装#
使用grub2引导程序,手动安装至硬盘
#用简易启动代码替换init等脚本,重新生成initrfs.img,在initrfs目录下:find . |cpio -o -H newc |gzip -9 >../initrfs.img
#挂载硬盘,将目标分区格式化为ext系列,建立slax、slax/{boot,modules,changes}目录,移动vmlinuz内核文件、initrfs.img镜像文件至slax/boot,移动.sb模块文件至slax目录
#安装grub2
grub2-install --root-directory=/mnt --boot-directory=/mnt/slax/boot /dev/sdb
#手动提供配置文件slax/boot/grub/grub.cfg
cat >slax/boot/grub/grub.cfg<
重启,顺利进入系统,至此slax调教完毕。aufs的分层叠加特性,实现了读写分离,有效提升了系统安全。同时,系统模块化构建的思路,使管理和扩展更加简易、速度。目前aufs技术已经在docker容器领域得到极大的应用。