地图定位签到及离线签到功能实现
公司的项目要实现一个像钉钉一样签到的功能,搜索后发现很少有相关的Demo或者资料,所以在这里抽取出定位签到的功能.
实现步骤:
1.获取高德地图Key,集成高德地图iOS定位SDK.
2.签到界面的初始化以及网络监听.
3.签到功能实现和FMDB储存离线签到的记录.
功能实现:
1.获取高德地图Key,集成高德地图iOS定位SDK.
首先集成高德地图必须要提交你的Bundle Identifier来获取key.
(1)高德控制台创建新应用
进入控制台,创建一个新应用。如果您之前已经创建过应用,可直接跳过这个步骤.

(2)添加新Key
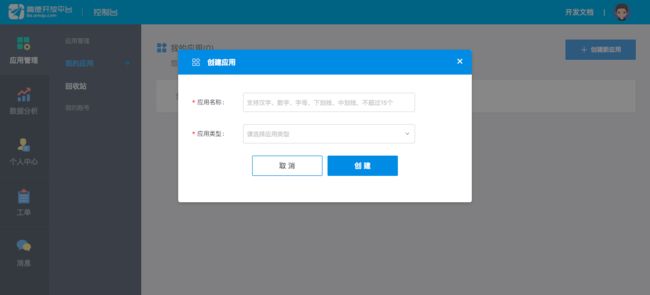
在创建的应用上点击"添加新Key"按钮,在弹出的对话框中,依次输入应用名名称,选择绑定的服务为“iOS平台SDK”,输入安全码 Bundle ID(获取方法请参考:如何获取 Bundle Identifier),如下图所示:
/Users/xiaoqi/Desktop/Sign/创建应用.png
需要注意的是: 1个KEY只能用于一个应用(多渠道安装包属于多个应用),1个Key在多个应用上使用会出现服务调用失败.

在阅读完高德地图API服务条款后,勾选此选项,点击“提交”,完成 Key 的申请,此时您可以在所创建的应用下面看到刚申请的 Key 了.
(3)如何获取 Bundle Identifier
Xcode 切换到 General 标签,查看 Bundle Identifier,如下图所示:

(4)集成高德地图iOS定位SDK
这里可以手动集成或者利用cocospod集成,这里我们使用比较方便的cocospod集成.
创建好Podfile文件,加入
pod 'AMap3DMap' #3D地图SDK
pod 'AMapSearch' #地图SDK搜索功能
然后在相应目录pod install即可.
2.签到界面的初始化以及网络监听.
(1)AppDelegate中的key设置以及网络监听
首先得导入
#import
然后在下面填写得到的key并使用AFNetworking来监听网络状态
- (BOOL)application:(UIApplication *)application didFinishLaunchingWithOptions:(NSDictionary *)launchOptions {
    // 配置高德地图
    [AMapServices sharedServices].apiKey = @"获取的key";

    // 监听网络状态
    [[AFNetworkReachabilityManager sharedManager] startMonitoring];
    [[AFNetworkReachabilityManager sharedManager] setReachabilityStatusChangeBlock:^(AFNetworkReachabilityStatus status) {
        switch (status) {
            case -1:
                Log(@"未知网络");
                break;
            case 0:
                Log(@"网络不可用");
                break;
            case 1:
                Log(@"GPRS网络");
                break;
            case 2:
                Log(@"wifi网络");
                break;
            default:
                break;
        }
        // 这里的User为登录用户,通过属性netState用于在其他界面方便地获取网络状态
        User *user = [User shareUser];
        if(status ==AFNetworkReachabilityStatusReachableViaWWAN || status == AFNetworkReachabilityStatusReachableViaWiFi){
            Log(@"有网");
            user.netState = YES;
        }else {
            Log(@"没有网");
            user.netState = NO;
            // 失去网络弹出警告
            UIAlertController *alertController = [UIAlertController alertControllerWithTitle:@"提示" message:@"失去网络连接" preferredStyle:UIAlertControllerStyleAlert];
            UIAlertAction *cancelAction = [UIAlertAction actionWithTitle:@"好的" style:UIAlertActionStyleCancel handler:nil];
            [alertController addAction:cancelAction];
            [self.window.rootViewController presentViewController:alertController animated:YES completion:nil];
        }
    }];

    self.window = [[UIWindow alloc]initWithFrame:[UIScreen mainScreen].bounds];
    self.window.backgroundColor = [UIColor whiteColor];
    [self.window makeKeyAndVisible];
    UINavigationController *navigationController = [[UINavigationController alloc] initWithRootViewController:[AppViewController new]];
    self.window.rootViewController = navigationController;

    return YES;
}
(2)签到界面的初始化
设置需要的属性
// 高德地图
@property (nonatomic, strong)MAMapView *mapView;
// 有多少个签到范围(可划定多个签到范围)
@property (nonatomic, copy)NSArray *circles;
// 经纬度
@property (nonatomic,strong)NSString *userLongitude;
@property (nonatomic,strong)NSString *userLatitude;
// 公司或者nil(在公司或者不在公司字段,无影响)
@property (nonatomic,strong)NSString *location;
// 用户
@property (nonatomic, strong)User *user;
在进入界面的时候做处理(SDK提供的方法)
- (void)viewDidAppear:(BOOL)animated {
    [super viewDidAppear:YES];
    // 进入界面就以定位点为地图中心
    [self.mapView setCenterCoordinate:CLLocationCoordinate2DMake([self.userLatitude floatValue], [self.userLongitude floatValue]) animated:NO];
    // 将绘制的图形添加到地图上
    [self.mapView addOverlays:self.circles];
}
普通界面的布局就不一一描述了,但这里要初始化MAUserLocationRepresentation对象,也就是定位的小蓝点
- (void)viewDidLoad {
    [super viewDidLoad];
    // 创建导航项
    [self initNavigationItem];
    // 初始化地图
    [self initMapView];
    // 初始化 MAUserLocationRepresentation 对象
    [self initUserLocationRepresentation];
    // 创建按钮
    [self initMapButton];
}
- (void)initUserLocationRepresentation {
    // 初始化小蓝点
    MAUserLocationRepresentation *r = [[MAUserLocationRepresentation alloc] init];
    r.showsAccuracyRing = YES;// 精度圈是否显示,默认YES
    r.enablePulseAnnimation = YES;// 内部蓝色圆点是否使用律动效果, 默认YES
    r.lineWidth = 2;// 精度圈 边线宽度,默认0
    [self.mapView updateUserLocationRepresentation:r];
}
以及高德地图实例的初始化
- (void)initMapView {
    // https配置
    [AMapServices sharedServices].enableHTTPS = YES;
    // 初始化地图
    self.mapView = [[MAMapView alloc] initWithFrame:CGRectMake(0, NAVIGATIONBAR_HEIGHT, SCREEN_WIDTH, SCREEN_HEIGHT - NAVIGATIONBAR_HEIGHT)];
    self.mapView.delegate = self;
    // 显示定位小蓝点
    self.mapView.showsUserLocation = YES;
    // 显示指南针
    self.mapView.showsCompass = NO;
    // 追踪用户的location更新
    self.mapView.userTrackingMode = MAUserTrackingModeFollow;
    // 放大等级
    [self.mapView setZoomLevel:16 animated:YES];
    [self.view addSubview:self.mapView];
}
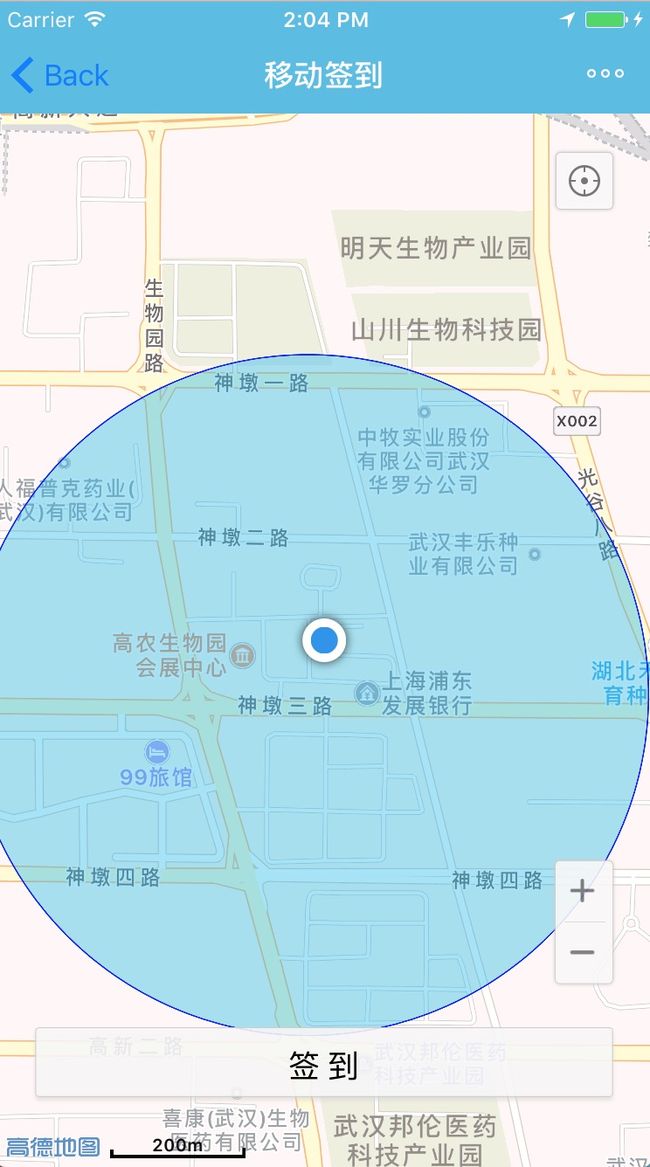
以公司坐标为中心绘制签到范围,以公司为圆心,500为半径
- (void)setAddress {
    // 划定签到范围
    NSMutableArray *arr = [NSMutableArray array];
    MACircle *circle = [MACircle circleWithCenterCoordinate:CLLocationCoordinate2DMake(kLatitude, kLongitude) radius:500];
    [arr addObject:circle];
    self.circles = [NSArray arrayWithArray:arr];
}
初始化界面效果图:
3.签到功能实现和FMDB储存离线签到的记录.
对于点击签到按钮的响应事件就直接上代码了
// 签到
- (void)signWork {

    self.user = [User shareUser];
    BOOL isOnline = self.user.netState;
    // 判断是否离线
    /// 在线
    if (isOnline) {
        // 半径在500米以内就在范围内
        double r = 500;
        double distance = [self distanceBetweenCenterLatitude:kLatitude centerLongitude:kLongitude userLatitude:[self.userLatitude doubleValue]  userLongitude:[self.userLongitude doubleValue]];
        if (distance <= r) {
            // 在范围内的提示
        }else {
            // 不在范围内的提示
        }
        // 接口名称
        NSString *url = @"www.baidu.com";
        // 用户名, 密码以及其他参数
        // 后台配置参数(根据自己公司后台配置)
        NSMutableDictionary *parameters  = [NSMutableDictionary dictionaryWithObjectsAndKeys:@"用户名", @"loginName", @"密码", @"password", nil];
        [parameters setObject:@([self.userLongitude doubleValue]) forKey:@"longitude"];
        [parameters setObject:@([self.userLatitude doubleValue]) forKey:@"latitude"];
        [parameters setObject:@(0) forKey:@"type"];//0高德,1百度
        // 签到请求
        [HttpTool postWithPath:url params:parameters success:^(id responseObject) {
            Log(@"提交成功,签到成功");
        } failure:^(NSError *error) {
            Log(@"%@",error);
        }];
        // 仅作Demo演示(直接签到成功)
        // 签到成功
        [self presentAlertControllerWithTitle:@"提示" message:[NSString stringWithFormat:@"签到成功"] cancelTitle:@"好的"];

        /// 离线
    }else{
        // 半径在500米以内就在范围内
        double r = 500;
        double distance = [self distanceBetweenCenterLatitude:kLatitude centerLongitude:kLongitude userLatitude:[self.userLatitude doubleValue]  userLongitude:[self.userLongitude doubleValue]];
        if (distance <= r) {
            [self presentAlertControllerWithTitle:@"提示" message:@"离线签到,在公司范围内,请注意提交" cancelTitle:@"好的"];
            self.location = @"公司";
        }else {
            [self presentAlertControllerWithTitle:@"提示" message:@"离线签到,不在公司范围内" cancelTitle:@"好的"];
            self.location = @"不在公司";
        }
        // FMDB储存
        [self addData];
    }
}
这里涉及到两点坐标的计算,直接套公式了,大于500米的半径范围即在范围外,小于即在范围内
// 计算两个经纬度点的距离
- (double)distanceBetweenCenterLatitude:(double)centerLatitude centerLongitude:(double)centerLongitude userLatitude:(double)userLatitude  userLongitude:(double)userLongitude{

    double dd = M_PI/180;
    double x1=centerLatitude*dd,x2=userLatitude*dd;
    double y1=centerLongitude*dd,y2=userLongitude*dd;
    double R = 6371004;
    double distance = (2*R*asin(sqrt(2-2*cos(x1)*cos(x2)*cos(y1-y2) - 2*sin(x1)*sin(x2))/2));
    //返回 m
    return  distance;
}
离线签到:离线签到功能运用场景一般存在于现场实施人员面临信号差或者无信号的情况(公司因为有些实施同事会到山区现场考察,有时候没有信号经常签到不成功)签到后,在网络畅通的情况下,进行重新上传提交,这里运用FMDB进行储存
pod 'FMDB'
(在此之前这里需要在Podfile添加集成FMDB)
- (void)addData {
    // 储存signData模型
    SignData *signData = [SignData new];
    signData.createdTime = [self getCurrentTime];
    signData.longitude = self.userLongitude;
    signData.latitude = self.userLatitude;
    signData.name = self.location;
    [[DataBase shareDataBase] addSignData:signData];
}
具体封装的DataBase可见Demo,Demo效果图:
附上Demo地址
有什么问题可以留言,共同学习~