原著链接
https://blog.csdn.net/zyf2333/article/details/77855720
类似于这样,可以编辑删除,然后分页查询信息等。
准备
ssm(spring+springmvc+mybatis)
eclipse
maven
mysql+navicat
ajax……等技术
1)创建maven项目
参考我之前的文章(http://blog.csdn.net/zyf2333/article/details/77803974)
2)配置文件
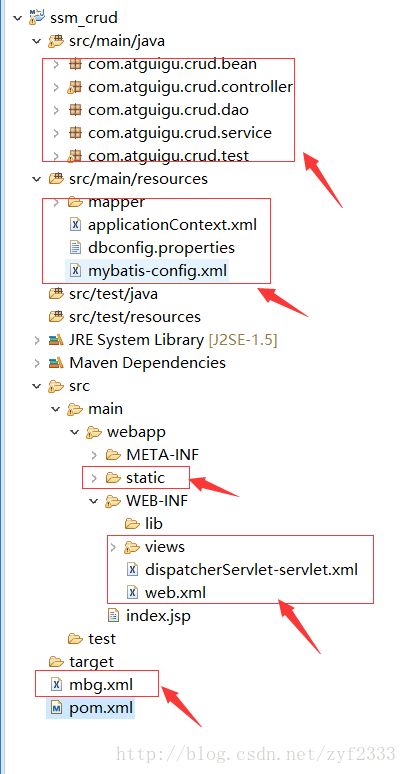
首先看看现在已有的目录(有些文件是后来创的,因此框起来了,请自行添加)
需要自己添加的内容如下:com.atguigu.crud下的五个包(都是空的,里面的内容是我后面加上去的,现在不用管,下面的也一样);mapper文件夹(空)、applicationContext.xml、dbconfig.properties、mybatis-config.xml;static(空);views(空);dispatcherServlet.xml、web.xml;mbg.xml
接下来添加配置信息
2.1)pom.xml(添加所依赖的jar包)
        org.springframework
        spring-webmvc
        4.3.8.RELEASE


        org.springframework
        spring-jdbc
        4.3.8.RELEASE


        org.springframework
        spring-aspects
        4.3.8.RELEASE


        org.springframework
        spring-context
        4.3.8.RELEASE


        org.springframework
        spring-web
        4.3.8.RELEASE


        org.springframework
        spring-test
        4.3.8.RELEASE
        test


        org.springframework
        spring-core
        4.3.8.RELEASE


        org.mybatis
        mybatis
        3.4.2


        org.mybatis
        mybatis-spring
        1.3.1


        c3p0
        c3p0
        0.9.1


        mysql
        mysql-connector-java
        5.1.41


        javax.servlet.jsp.jstl
        jstl-api
        1.2


                javax.servlet
                servlet-api


                javax.servlet.jsp
                jsp-api


        javax.servlet
        javax.servlet-api
        3.0.1
        provided


        junit
        junit
        4.12
        test


         org.aspectj
         aspectjweaver
         1.6.11


        com.github.pagehelper
        pagehelper
        5.0.0
2.2)web.xml(启动spring,并设置springmvc前端控制器)
xsi:schemaLocation="http://xmlns.jcp.org/xml/ns/javaee http://xmlns.jcp.org/xml/ns/javaee/web-app_3_1.xsd"
id="WebApp_ID" version="3.1">
    org.springframework.web.context.ContextLoaderListener


    contextConfigLocation
    classpath:applicationContext.xml


    dispatcherServlet
    org.springframework.web.servlet.DispatcherServlet
    1


    dispatcherServlet
    /


    CharacterEncodingFilter
    org.springframework.web.filter.CharacterEncodingFilter

        encoding
        utf-8


        forceRequestEncoding
        true


        forceResponseEncoding
        true


    CharacterEncodingFilter
    /*
dispatcherServlet-servlet.xml(springmvc配置)
xmlns:tx="http://www.springframework.org/schema/tx" xmlns:context="http://www.springframework.org/schema/context"
xmlns:mvc="http://www.springframework.org/schema/mvc"
xsi:schemaLocation="http://www.springframework.org/schema/mvc http://www.springframework.org/schema/mvc/spring-mvc-4.1.xsd
http://www.springframework.org/schema/beans http://www.springframework.org/schema/beans/spring-beans-4.1.xsd
http://www.springframework.org/schema/context http://www.springframework.org/schema/context/spring-context-4.1.xsd
http://www.springframework.org/schema/tx http://www.springframework.org/schema/tx/spring-tx-4.1.xsd">
2.4)applicationContext.xml(Spring配置)
xmlns:tx="http://www.springframework.org/schema/tx" xmlns:context="http://www.springframework.org/schema/context"
xmlns:aop="http://www.springframework.org/schema/aop"
xsi:schemaLocation="http://www.springframework.org/schema/beans http://www.springframework.org/schema/beans/spring-beans-4.1.xsd
http://www.springframework.org/schema/context http://www.springframework.org/schema/context/spring-context-4.1.xsd
http://www.springframework.org/schema/aop http://www.springframework.org/schema/aop/spring-aop-3.1.xsd
http://www.springframework.org/schema/tx http://www.springframework.org/schema/tx/spring-tx-4.1.xsd">
2.5)dbconfig.properties(数据库基础信息配置,配合上面的xml文件)
jdbc.jdbcUrl=jdbc:mysql://localhost:3306/ssm_crud
jdbc.driverClass=com.mysql.jdbc.Driver
jdbc.user=root
jdbc.password=zyf1998don
2.6)static文件夹下,添加jquery。(直接百度下载个jquery,然后本地找到那个文件后,复制,黏贴到该文件夹下即可)
2.7)mybatis-config.xml(配置mybatis 由于接下来要用到mybatis-generator逆向自动生成dao,sql,实体类等。故我们主要配置下面的mbg.xml)
PUBLIC "-//mybatis.org//DTD Config 3.0//EN"
" http://mybatis.org/dtd/mybatis-3-config.dtd">
2.8)mbg.xml(配置mybatis-generator的信息)
PUBLIC "-//mybatis.org//DTD MyBatis Generator Configuration 1.0//EN"
"http://mybatis.org/dtd/mybatis-generator-config_1_0.dtd">
password="zyf1998don">
3)利用mybatis-generator自动生成所需文件
我们在”com.atguigu.crud.test”下创建个类,然后添加如下代码后,运行该java文件,运行完毕后刷新整个项目(右击项目,找到refresh即可)
package com.atguigu.crud.test;
import java.io.File;
import java.util.ArrayList;
import java.util.List;
import org.mybatis.generator.api.MyBatisGenerator;
import org.mybatis.generator.config.Configuration;
import org.mybatis.generator.config.xml.ConfigurationParser;
import org.mybatis.generator.internal.DefaultShellCallback;
public class MBGTest {
public static void main(String[]args) throws Exception{
    List warnings = new ArrayList();
    boolean overwrite = true;
    File configFile = new File("mbg.xml");
    ConfigurationParser cp = new ConfigurationParser(warnings);
    Configuration config = cp.parseConfiguration(configFile);
    DefaultShellCallback callback = new DefaultShellCallback(overwrite);
    MyBatisGenerator myBatisGenerator = new MyBatisGenerator(config, callback, warnings);
    myBatisGenerator.generate(null);
}
}
然后就会发现,运行完毕后项目自动出现和所需的内容(框中内容都是自动添加的):
到此,基础配置完成


