本编文章让我们一起来实现后台管理页面,包括:
- 标签管理
- 新建文章
- 文章管理
管理首页
后台管理页面的主结构我们采用antd的相关组件。新建一个container,名叫Admin
import React, { Component } from 'react';
import { Switch, Route } from 'react-router-dom';
import './style.css';
import AdminMenu from '../../components/AdminMenu';
import AdminIndex from '../AdminIndex';
import AdminManagerUser from '../AdminManagerUser';
import AdminManagerTags from '../AdminManagerTags';
import AdminManagerArticle from '../AdminManagerArticle';
import AdminManagerComment from '../AdminManagerComment';
import AdminNewArticle from '../AdminNewArticle';
import Detail from '../Detail';
import NotFound from '../NotFound';
class Admin extends Component {
const { url } = this.props.match;
return (
{
}
)
}
我们先抛开管理页面的登录验证问题,主要看一下页面结构。该页面下有以下几个路由:
- 管理页面首页
AdminIndex
- 用户管理页面
AdminManagerUser(我们的博客是支持用户注册的,之后会添加评论模块,预留一个用户管理)
- 标签管理页面
AdminManagerTags
- 新建文章页面
AdminNewArticel
- 文章管理页面
AdminManagerArticle
- 评论管理页面
AdminManagerComment
- 文章详情页面
Detail(从文章管理进入)
最终,我们的管理页面是这样的:
 屏幕快照 2017-10-30 上午10.40.59.png
先创建一个菜单组件,用于显示左侧的菜单,命名为AdminMenu:
import React, { Component } from 'react';
import { Menu, Icon } from 'antd';
const menus = [
{url: '/', name: '首页', iconType: 'home'},
{url: '/managerUser', name: '用户管理', iconType: 'usergroup-delete'},
{url: '/newArticle', name: '发文', iconType: 'file-text'},
{url: '/managerTags', name: '标签管理', iconType: 'tags-o'},
{url: '/managerArticle', name: '文章管理', iconType: 'edit'},
{url: '/managerComment', name: '评论管理', iconType: 'message'},
];
export default class AdminMenu extends Component {
render() {
return(
)
}
}
我们新建了一个数组menus用于包含所有的菜单,这里的iconType可以在这里挑选你喜欢的图标。菜单部分我们使用了antd的组件Menu,它提供了很多参数,具体功能可以查看这里。它实现的功能是,每点击一个菜单时,执行:
this.props.history.push(`/admin${key}`)
跳转到相应的管理页面。
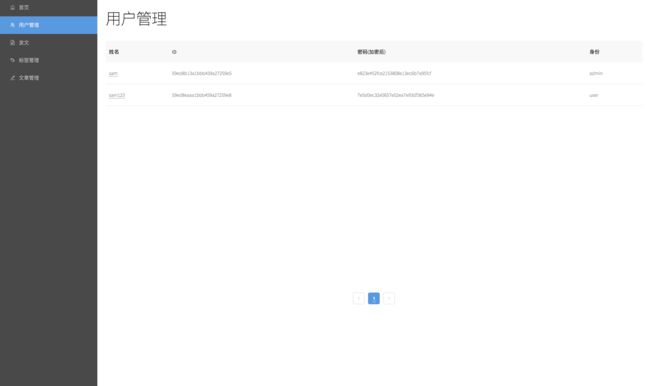
用户管理
 屏幕快照 2017-10-30 上午11.00.16.png
用户管理页面用于管理所有的注册用户(有关注册和数据管理的内容,我们会在第三部分:React技术栈+Express+Mongodb实现个人博客 -- Part 3 Express + Mongodb创建Server端中展开介绍),这里我们先完成页面展示。
用户管理页面,我们将用到antd design中的Table组件,详细内容在这里,它需要传入两个基本参数:
-
dateSource 用于展示的数据
-
column 每一列的数据结构及索引
ok,开始编写AdminManagerUser:
import React, { Component } from 'react';
import './style.css';
import { Tabel } from 'antd';
const dataSource = [{
key: '1',
username: 'sam',
_id: '59ed8b13a1bbb459a27259e5',
password: 'e823e452fce2153808e13ec6b7a95fcf',
type: 'admin'
},{
key: '2',
username: 'sam2',
_id: '59ed8b13a1bbb459a27259e3',
password: 'e823e452fce2153808e13ec6b7a95fcf',
type: 'user'
}];
const columns = [{
title: '姓名',
dataIndex: 'username',
key: 'name'
}, {
title: 'ID',
dataIndex: '_id',
key: 'ID',
}, {
title: '密码(加密后)',
dataIndex: 'password',
key: 'password',
}
, {
title: '身份',
dataIndex: 'type',
key: 'address',
}];
class AdminManagerUser extends Component {
render() {
return (
用户管理
)
}
}
有关分页的问题,这里先不涉及,会在Redux那一节补充。
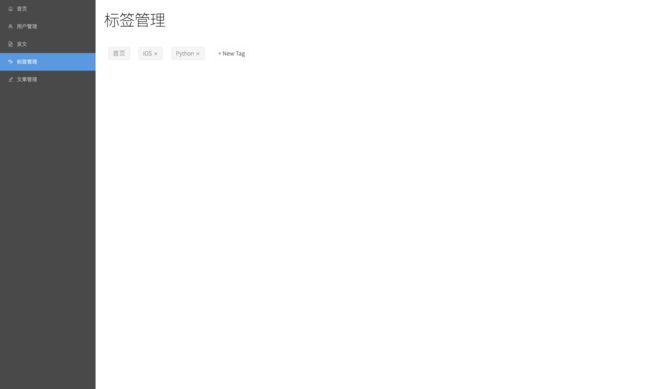
标签管理
 屏幕快照 2017-10-30 上午11.24.54.png
这一部分,会用到
antd中的
Tag, Input, Tooltip, Button组件,页面中的主要操作有:
- 已有标签展示
- 添加调迁
- 删除标签
初始化state,默认展示一些标签:
constructor(props){
super(props);
this.state={
tags: ['首页', 'iOS', 'Python'],
inputVisible: false,
inputValue: '',
}
}
tags是我们要展示的已有标签,inputVisible用于控制New Tag这个按钮,当为false时这里显示添加按钮,当为ture时,显示输入框。inputValue表示输入标签的内容。
在开始之前,先安装一个lodash,方便进行数组的增删减操作:
npm install --save lodash
1.标签展示
render() {
const { inputVisible, inputValue } = this.state;
const { tags } = this.state;
return (
标签管理
{tags.map( (tag, index) => {
const isLongTag = tag.length > 20;
const tagElem = (
this.handleDelete(tag) }>
{isLongTag ? `${tag.slice(0,20)}...` : tag}
);
return isLongTag ? {tagElem} : tagElem;
})}
{inputVisible && (
)}
{ !inputVisible && (
)}
)
}
以上是标签显示部分的代码,有几点细节要细说一下:
- 第一个标签(首页)不能删除,所以在
Tag下我们加入了closable={index != 0}逻辑
- 当标签的长度大于20时,只显示一部分,并通过
Tooltip显示全部内容
- 使用
inputVisible来控制显示输入框,还是添加标签的按钮
2.开始添加标签
showInput方法,用于改变state中inputVisible的值,通过render方法改变按钮状态:
showInput = () => {
this.setState({ inputVisible: true }, () => this.input.focus());
};
Input组件中有两个方法:
-
handleInputChange,当输入内容发生改变时调用
-
handleInputConfirm,点击空白区域,或是按下回车时调用,表示确定输入
handleInputChange = (e) => {
this.setState({ inputValue: e.target.value });
};
handleInputConfirm = () => {
// 添加标签
if (this.state.inputValue.length > 0) {
this.state.tags.push(this.state.inputValue)
this.setState({
tags: this.state.tags,
});
}
this.setState({
inputVisible: false,
inputValue: '',
});
};
3.删除标签
引入lodash:
import _ from 'lodash';
lodash可用于处理数组的增删减查,很方便。
handleDelete = (removeTag) => {
_.remove(this.state.tags, tag => tag === removeTag);
this.setState({ tags: this.state.tags })
}
好啦,标签管理搞定:
 屏幕快照 2017-10-30 下午3.35.01.png
文章列表
文章列表主要有以下功能:
- 展示文章
- 文章的编辑
- 删除文章
- 查看文章详情
 屏幕快照 2017-10-30 下午3.40.09.png
我们先制造两篇文章的假数据用户展示:
const articleList = [{
title: '文章标题1',
author: 'sam',
viewCount: '12',
time: '2017-10-19',
_id: '1213123',
isPublish: '已发布'
},{
title: '文章标题2',
author: 'sam',
viewCount: '132',
time: '2017-10-19',
_id: '12131232323',
isPublish: '草稿'
}];
在render方法中编写展示文章的逻辑:
render() {
return (
文章列表
{
articleList.map( (article, index) {
this.edit_article(id)}
history={this.props.history}
getArticleDetail={(id) => this.getArticleDetail(id)}
delete={(id) => this.delete(id)}
key={index}
data={article}
/>
})
}
)
}
-
ManagerArticleCell是我们创建的一个component,显示文章的功能区域
import React from 'react';
import './style.css';
import { Button } from 'antd';
export const ManagerArticleCell = (props)=>(
{props.data.title}
作者:{props.data.author}
阅读数:{props.data.viewCount}
评论数:{props.data.commentCount}
发表时间:{props.data.time}
{props.data.isPublish?'已发布':'草稿'}
);
-
delete方法表示删除文章
删除方法需要有个确认提醒,这里我们引入antd中的Modal组件:
import { Modal } from 'antd';
const confirm = Modal.confirm
当delete方法被active时,我们执行下面的方法:
delete = (id) => {
var that = this;
confirm({
title: '确定要删除该篇文章吗?',
content: '删除后将无法恢复',
okText: 'Yes',
okType: 'danger',
cancelText: 'No',
onOk() {
_.remove(that.state.articleList, article => article._id === id);
that.setState({ articleList: that.state.articleList });
},
onCancel() {
console.log('Cancel');
},
});
}
 屏幕快照 2017-10-30 下午4.33.00.png
-
edit_article方法用于跳转到/admin/newArticle路径下开始编辑文章
-
getArticleDetail方法,通过传递的文章id,跳转到/detail路径下,显示文章详情
以上两个方法在本篇文章中先不展开,后续文章里会有具体实现。
新建文章
发文页面包含以下功能:
- 填写标题
- 文章正文
- 选择分类
- 文章的发布,保存,预览功能
如下图所示:
 屏幕快照 2017-10-30 下午4.35.27.png
1.页面展示
页面展示部分包括一个标题Input,文章正文textarea, 标签选择Select,以及底部的三个按钮Button,其中Input, Select,Button我们都使用antd提供的组件:
render() {
return (
新建文章
标题
正文
分类
{remark().use(reactRenderer).processSync(this.state.content).contents}
)
}
组件Select有很多种选择方式,包括单选,多选,详情看这里
预览部分我们使用antd中的组件Modal,显示内容同文章详情页一样,我们使用remark来渲染markdown内容:
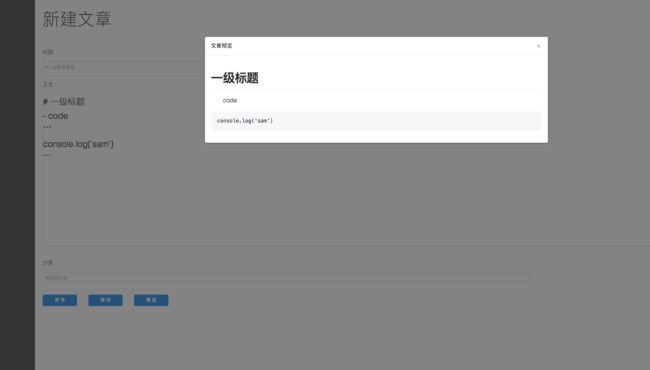 屏幕快照 2017-10-30 下午5.46.21.png
评论管理
待补充
总结
本篇文章主要介绍了管理页面的展示和基本逻辑,数据上的操作逻辑,我们会在之后的文章里补充。本篇文章对应的源码在这里:React技术栈+Express+Mongodb实现个人博客 -- Part 2 后台管理页面。
系列文章
React技术栈+Express+Mongodb实现个人博客
React技术栈+Express+Mongodb实现个人博客 -- Part 1 博客页面展示
React技术栈+Express+Mongodb实现个人博客 -- Part 2 后台管理页面
React技术栈+Express+Mongodb实现个人博客 -- Part 3 Express + Mongodb创建Server端
React技术栈+Express+Mongodb实现个人博客 -- Part 4 使用Webpack打包博客工程
React技术栈+Express+Mongodb实现个人博客 -- Part 5 使用Redux
React技术栈+Express+Mongodb实现个人博客 -- Part 6 部署
你可能感兴趣的:(React技术栈+Express+Mongodb实现个人博客 -- Part 2)