注解
相对于注释,注解能做到更多事情,对于注解更深入的了解还比较少,这里只简单介绍如何去自定义一个注解,并编写自己的注解处理器。
自定义一个注解:ExtractInterface
用途:抽取被注解类的public非static的方法,并生成接口
定义注解
//ExtractInterface.Java
/**
 * Created by liaowm5 on 17/7/31.
 */
@Target(ElementType.TYPE)
@Retention(RetentionPolicy.SOURCE)
public @interface ExtractInterface {
  public String interfaceName(); //指定要生成的接口名
}
定义注解处理器
让自定义Processor继承自AbstractProcessor,其核心是实现process方法,用于获取被注解的对象。
// InterfaceExtractorProcessor.Java
/**
 * Created by liaowm5 on 17/7/31.
 */
@AutoService(Processor.class)
public class InterfaceExtracorProcessor extends AbstractProcessor {

    private Set supportedAnnotationTypes = new HashSet();

    @Override
    public synchronized void init(ProcessingEnvironment processingEnv) {
        super.init(processingEnv);
        supportedAnnotationTypes.add(ExtractInterface.class.getCanonicalName());
    }

    @Override
    public boolean process(Set annotations, RoundEnvironment roundEnv) {
        Messager messager = processingEnv.getMessager();
        for (TypeElement typeElement : annotations) {
            for (Element element : roundEnv.getElementsAnnotatedWith(typeElement)) {
                ExtractInterface annot = element.getAnnotation(ExtractInterface.class);

                if (annot != null) {
                    String interfaceName = annot.value();
                    messager.printMessage(Diagnostic.Kind.NOTE, "ExtractInterface = " + interfaceName);
                    messager.printMessage(Diagnostic.Kind.NOTE, "modifiers=" + element.getModifiers() + " name=" + element.getSimpleName());
                    for (Element e : element.getEnclosedElements()) {
                        messager.printMessage(Diagnostic.Kind.NOTE, "modifiers=" + e.getModifiers() + " name=" + e.getSimpleName());
                    }

                    try {
                        List methodSpecList = new ArrayList<>();
                        for (Element e : element.getEnclosedElements()) {
                            methodSpecList.add(MethodSpec.methodBuilder(e.getSimpleName().toString())
                                    .addModifiers(Modifier.PUBLIC, Modifier.ABSTRACT)
                                    .build());
                        }
                        TypeSpec interfaceJavaFile = TypeSpec.interfaceBuilder(interfaceName)
                                .addModifiers(Modifier.PUBLIC)
                                .addMethods(methodSpecList)
                                .build();

                        JavaFile javaFile = JavaFile.builder(ExtractInterface.class.getPackage().getName(), interfaceJavaFile)
                                .build();

                        messager.printMessage(Diagnostic.Kind.NOTE, "packageName = " + ExtractInterface.class.getPackage().toString());
                        javaFile.writeTo(new File("/Users/liaowm5/Desktop/Learn/Learn/annotationsTest/lib/"));
                        messager.printMessage(Diagnostic.Kind.NOTE, javaFile.toString());
                    } catch (Exception e) {
                        messager.printMessage(Diagnostic.Kind.ERROR, e.toString());
                    }
                }
            }
        }
        return false;
    }

    @Override
    public Set getSupportedAnnotationTypes() {
        return supportedAnnotationTypes;
    }

    @Override
    public SourceVersion getSupportedSourceVersion() {
        return SourceVersion.latestSupported();
    }
}
注解本来可以用apt工具集成,你可以自定义注解处理器继承自Processor并重写Process方法也可以达到效果。但是在Intellij idea上用maven构建时出了一堆问题,只好继承AbstractProcessor。折中的方法: 用谷歌的一个注解框架(com.google.auto.service)并打包生成Jar包。导入你需要使用自定义注解的项目中,要注意的是,Intellij idea需要手动配置注解处理器。
使用自定义注解
@ExtractInterface("IMultipler")
public class Multiplier {

    public Multiplier() {

    }

    public int multiply(int x, int y) {
        int total = 0;
        for (int i = 0; i < x; i++)
            total = add(total, y);
        return total;
    }

    public int add(int x, int y) {
        return x + y;
    }

    public static void main(String args[]) {
        Multiplier m = new Multiplier();
        System.out.println("11*6 = " + m.multiply(11, 6));
    }
}
在idea项目结构中导入刚刚生成的自定义注解jar包
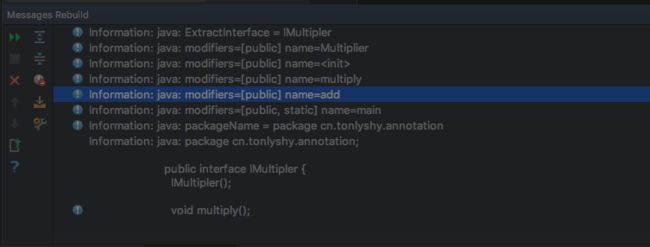
编译整个项目,就可以看到注解处理器在编译时输出的信息
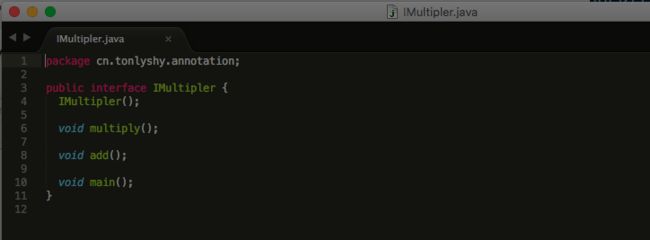
同时生成了IMultipler接口
注意: IntelliJ Idea默认没有开启注解处理,需要在Preferences -> Build,Extension,Deployment -> complier -> Annotation Processors 勾选Enable annotation processing


