前言
本文参考gif 格式图片详细解析。加入了一些自己的理解和解析方面的示例。
GIF格式解析
图像互换格式(GIF,Graphics Interchange Format)是一种位图图形文件格式,以8位色(即256种颜色)重现真彩色的图像。它实际上是一种压缩文档,采用LZW压缩算法进行编码,有效地减少了图像文件在网络上传输的时间。它是目前广泛应用于网络传输的图像格式之一。
图像互换格式主要分为两个版本,即图像互换格式87a和图像互换格式89a。
图像互换格式87a:是在1987年制定的版本。
图像互换格式89a:是在1989年制定的版本。在这个版本中,为图像互换格式文档扩充了图形控制区块、备注、说明、应用程序接口等四个区块,并提供了对透明色和多帧动画的支持。现在我们一般所说的GIF动画都是指89a的格式。
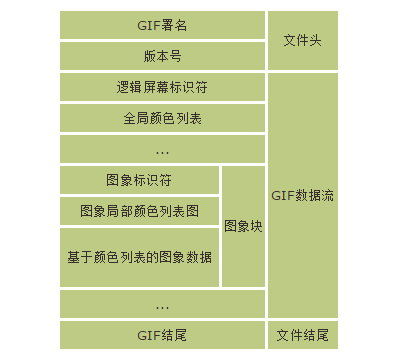
下图是GIF格式的文件结构,阅读时可以把下图放在方便查阅的位置,以便随时查看。
GIF格式的文件结构整体上分为三部分:文件头、GIF数据流、文件结尾。其中,GIF数据流分为全局配置和图像块。接下来我们将逐一分析GIF格式各部分的作用,并结合Glide的代码,学习如何解析。
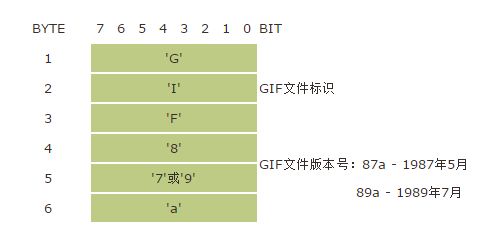
GIF署名(Signature)和版本号(Version):
GIF的前6个字节内容是GIF的署名和版本号。我们可以通过前3个字节判断文件是否为GIF格式,后3个字节判断GIF格式的版本。
GifHeaderParser.java:
    private void readHeader() {
        String id = "";
        for (int i = 0; i < 6; i++) {
            id += (char) read();
        }
        if (!id.startsWith("GIF")) {
            header.status = GifDecoder.STATUS_FORMAT_ERROR;
            return;
        }
       ...
    }
逻辑屏幕标识符(Logical Screen Descriptor)
逻辑屏幕标识符配置了GIF一些全局属性,我们通过读取解析它,获取GIF全局的一些配置。
- 屏幕逻辑宽度:定义了GIF图像的像素宽度,大小为2字节;
- 屏幕逻辑高度:定义了GIF图像的像素高度,大小为2字节;
- m - 全局颜色列表标志(Global Color Table Flag),当置位时表示有全局颜色列表,pixel值有意义;
- cr - 颜色深度(Color ResoluTion),cr+1确定图象的颜色深度;
- s - 分类标志(Sort Flag),如果置位表示全局颜色列表分类排列;
- pixel - 全局颜色列表大小,pixel+1确定颜色列表的索引数(2^(pixel+1));
- 背景颜色:背景颜色在全局颜色列表中的索引(PS:是索引而不是RGB值,所以如果没有全局颜色列表时,该值没有意义);
- 像素宽高比:全局像素的宽度与高度的比值;
GifHeaderParser.java:
    /**
     * Reads Logical Screen Descriptor.
     */
    private void readLSD() {
        // Logical screen size.
        header.width = readShort();
        header.height = readShort();
        // Packed fields
        int packed = read();
        // 1 : global color table flag.
        header.gctFlag = (packed & 0x80) != 0;
        // 2-4 : color resolution.
        // 5 : gct sort flag.
        // 6-8 : gct size.
        header.gctSize = 2 << (packed & 7);
        // Background color index.
        header.bgIndex = read();
        // Pixel aspect ratio
        header.pixelAspect = read();
    }
我们可以看到,Glide中在读取了全局的宽高之后,忽略了颜色深度和分类标志,这两者在实际中使用较少。此外header.pixelAspect也只是读取,后续的解析中并没有使用到。
全局颜色列表(Global Color Table)
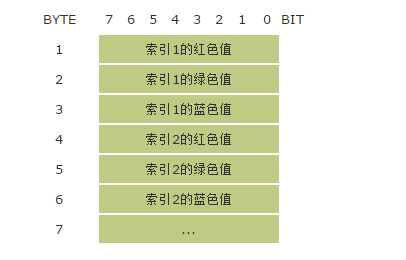
全局颜色列表,在逻辑屏幕标识之后,每个颜色索引由三字节组成,按RGB顺序排列。
这里可以说明一下。整个GIF在每一帧的画面数组时,是不会出现RGB值的,画面中所有像素的RGB值,都是通过从全局/局部颜色列表中取得。可以让颜色列表理解为调色板。我需要什么RGB,我不能直接写,而是写我想要RGB对应颜色列表的索引。
这样做的好处,比如我想对GIF进行调色,如果我每一帧画面直接使用了RGB,那我每一帧都需要进行图像处理。有了调色盘,我只需要对调色板进行处理,每帧画面都会改变。
    /**
     * Reads color table as 256 RGB integer values.
     *
     * @param ncolors int number of colors to read.
     * @return int array containing 256 colors (packed ARGB with full alpha).
     */
    private int[] readColorTable(int ncolors) {
        int nbytes = 3 * ncolors;
        int[] tab = null;
        byte[] c = new byte[nbytes];

        try {
            rawData.get(c);

            // TODO: what bounds checks are we avoiding if we know the number of colors?
            // Max size to avoid bounds checks.
            tab = new int[MAX_BLOCK_SIZE];
            int i = 0;
            int j = 0;
            while (i < ncolors) {
                int r = ((int) c[j++]) & 0xff;
                int g = ((int) c[j++]) & 0xff;
                int b = ((int) c[j++]) & 0xff;
                tab[i++] = 0xff000000 | (r << 16) | (g << 8) | b;
            }
        } catch (BufferUnderflowException e) {

            L.d(TAG, "Format Error Reading Color Table", e);

            header.status = GifDecoder.STATUS_FORMAT_ERROR;
        }

        return tab;
    }
至此,GIF文件的全局配置就完成了,接下来是每一帧的配置or数据。
图像标识符(Image Descriptor)
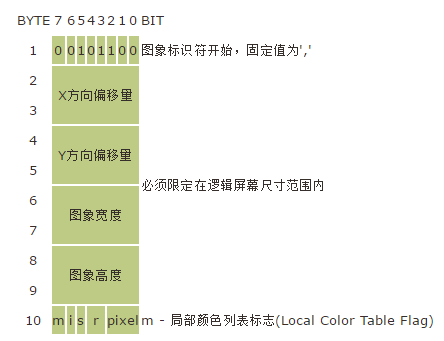
一个GIF文件中可以有多个图像块,每个图像块就会有图像标识符,描述了当前帧的一些属性。下面我们来看看图像标识符中包含的一些信息。
图像标识符以','(0x2c)作为开始标志。接着定义了当前帧的偏移量和宽高。
最后5个标志的意义分别为:
- m - 局部颜色列表标志(Local Color Table Flag)
置位时标识紧接在图象标识符之后有一个局部颜色列表,供紧跟在它之后的一幅图象使用;值否时使用全局颜色列表,忽略pixel值。 - i - 交织标志(Interlace Flag),置位时图象数据使用交织方式排列,否则使用顺序排列。
- s - 分类标志(Sort Flag),如果置位表示紧跟着的局部颜色列表分类排列.
- r - 保留,必须初始化为0.
- pixel - 局部颜色列表大小(Size of Local Color Table),pixel+1就为颜色列表的位数
这一段除了交织标志外,其他的与全局配置类似,比较容易理解。交织标志将在图片的解码时单独解释。
可以来看一下Glide的解析
    /**
     * Reads next frame image.
     */
    private void readBitmap() {
        // (sub)image position & size.
        header.currentFrame.ix = readShort();
        header.currentFrame.iy = readShort();
        header.currentFrame.iw = readShort();
        header.currentFrame.ih = readShort();

        int packed = read();
        // 1 - local color table flag interlace
        boolean lctFlag = (packed & 0x80) != 0;
        int lctSize = (int) Math.pow(2, (packed & 0x07) + 1);
        // 3 - sort flag
        // 4-5 - reserved lctSize = 2 << (packed & 7); // 6-8 - local color
        // table size
        header.currentFrame.interlace = (packed & 0x40) != 0;
        ...
    }
解析的过程类似逻辑屏幕标识符,比较容易理解。
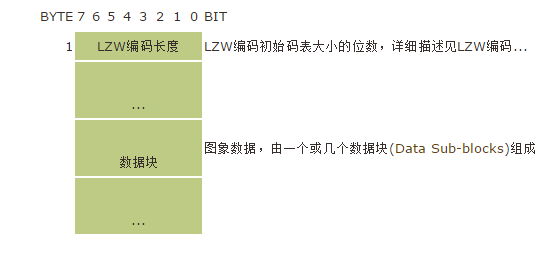
基于颜色列表的图像数据
基于颜色列表的图像数据必须紧跟在图像标识符后面。数据的第一个字节表示LZW编码初始表大小的位数。
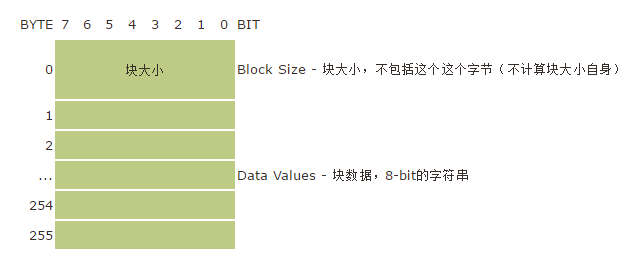
下面我们来看看数据块的结构:
每个数据块,第一个字节表示当前块的大小,这个大小不包括第一个字节。
    /**
     * Reads next frame image.
     */
    private void readBitmap() {
    ...
        if (lctFlag) {
            // Read table.
            header.currentFrame.lct = readColorTable(lctSize);
        } else {
            // No local color table.
            header.currentFrame.lct = null;
        }

        // Save this as the decoding position pointer.
        header.currentFrame.bufferFrameStart = rawData.position();

        // False decode pixel data to advance buffer.
        skipImageData();

        if (err()) {
            return;
        }

        header.frameCount++;
        // Add image to frame.
        header.frames.add(header.currentFrame);
    }

    /**
     * Skips LZW image data for a single frame to advance buffer.
     */
    private void skipImageData() {
        // lzwMinCodeSize
        read();
        // data sub-blocks
        skip();
    }

    /**
     * Skips variable length blocks up to and including next zero length block.
     */
    private void
    skip() {
        int blockSize;
        do {
            blockSize = read();
            if (rawData.position() + blockSize <= rawData.limit()) {
                rawData.position(rawData.position() + blockSize);
            } else {
                L.e(TAG, "Format Error Reading blockSize");
                header.status = GifDecoder.STATUS_FORMAT_ERROR;
                break;
            }

        } while (blockSize > 0);
    }
可以看到,在这里,Glide并没有解析GIF的所有数据。而是调用了skip()。原因是GIF通常较大,一次性解析所有的数据可能会引起OOM,同时也没有必要。
这里Glide只记录了每一帧的数据处在整个数据中的位置:
// Save this as the decoding position pointer.
header.currentFrame.bufferFrameStart = rawData.position();
等到要播放的时候,再逐一解析每一帧。
图形控制扩展(Graphic Control Extension)
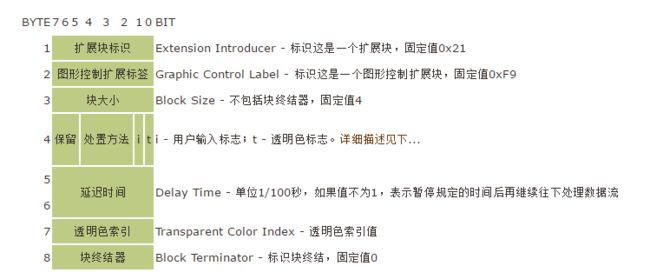
在89a版本,GIF添加了图形控制扩展块。放在一个图象块(图象标识符)的前面,用来控制紧跟在它后面的第一个图象的显示。
处置方法(Disposal Method):指出处置图形的方法,当值为: * 0 - 不使用处置方法
- 1 - 不处置图形,把图形从当前位置移去
- 2 - 回复到背景色
- 3 - 回复到先前状态
- 4-7 - 自定义用户输入标志(Use Input Flag):指出是否期待用户有输入之后才继续进行下去,置位表示期待,值否表示不期待。
- 用户输入可以是按回车键、鼠标点击等,可以和延迟时间一起使用,在设置的延迟时间内用户有输入则马上继续进行,或者没有输入直到延迟时间到达而继续。
- 透明颜色标志(Transparent Color Flag):置位表示使用透明颜色。
Glide中,对于这段的解析:
        ...
              case 0x21:
                    code = read();
                    switch (code) {
                        // Graphics control extension.
                        case 0xf9:
                            // Start a new frame.
                            header.currentFrame = new GifFrame();
                            readGraphicControlExt();
                            break;
        ...
    /**
     * Reads Graphics Control Extension values.
     */
    private void readGraphicControlExt() {
        // Block size.
        read();
        // Packed fields.
        int packed = read();
        // Disposal method.
        header.currentFrame.dispose = (packed & 0x1c) >> 2;
        if (header.currentFrame.dispose == 0) {
            // Elect to keep old image if discretionary.
            header.currentFrame.dispose = 1;
        }
        header.currentFrame.transparency = (packed & 1) != 0;
        // Delay in milliseconds.
        int delayInHundredthsOfASecond = readShort();
        // TODO: consider allowing -1 to indicate show forever.
        if (delayInHundredthsOfASecond < MIN_FRAME_DELAY) {
            delayInHundredthsOfASecond = DEFAULT_FRAME_DELAY;
        }
        header.currentFrame.delay = delayInHundredthsOfASecond * 10;
        // Transparent color index
        header.currentFrame.transIndex = read();
        // Block terminator
        read();
    }
Glide主要解析了GIF的处置方法、延迟时间和透明色索引。其中利用延迟时间,我们可以展示出速度不均匀的GIF.
文件终结
当解析程序读到0x3B时,文件终结。
经过上面的流程,我们完成了对GIF格式除了图像数据之外其他配置的解析。接下来考虑GIF图像数据的解析。
GIF采用LZW压缩算法进行压缩。
在GIF的播放控制时,每当需要渲染下一帧的画面时,我们就去根据帧数找到前文中出储存的GifFrame.bufferFrameStart取得这一帧在整个数据中的位置。
接下来,阅读一下GifDecoder.getNextFrame方法
    /**
     * Get the next frame in the animation sequence.
     *
     * @return Bitmap representation of frame.
     */
    public synchronized Bitmap getNextFrame() {
        if (header.frameCount <= 0 || framePointer < 0) {
            if (Log.isLoggable(TAG, Log.DEBUG)) {
                Log.d(TAG, "unable to decode frame, frameCount=" + header.frameCount + " framePointer="
                        + framePointer);
            }
            status = STATUS_FORMAT_ERROR;
        }
        if (status == STATUS_FORMAT_ERROR || status == STATUS_OPEN_ERROR) {
            if (Log.isLoggable(TAG, Log.DEBUG)) {
                Log.d(TAG, "Unable to decode frame, status=" + status);
            }
            return null;
        }
        status = STATUS_OK;

        GifFrame currentFrame = header.frames.get(framePointer);
        GifFrame previousFrame = null;
        int previousIndex = framePointer - 1;
        if (previousIndex >= 0) {
            previousFrame = header.frames.get(previousIndex);
        }

        final int savedBgColor = header.bgColor;

        // Set the appropriate color table.
        if (currentFrame.lct == null) {
            act = header.gct;
        } else {
            act = currentFrame.lct;
            if (header.bgIndex == currentFrame.transIndex) {
                header.bgColor = 0;
            }
        }

        int save = 0;
        if (currentFrame.transparency) {
            save = act[currentFrame.transIndex];
            // Set transparent color if specified.
            act[currentFrame.transIndex] = 0;
        }
        if (act == null) {
            if (Log.isLoggable(TAG, Log.DEBUG)) {
                Log.d(TAG, "No Valid Color Table");
            }
            // No color table defined.
            status = STATUS_FORMAT_ERROR;
            return null;
        }
        // Transfer pixel data to image.
        Bitmap result = null;
        try {
            result = setPixels(currentFrame, previousFrame);
        }catch (Exception e){
            L.e("Universal-Image-Loader" , "decodeBitmapData error : " + e.toString());
        }


        // Reset the transparent pixel in the color table
        if (currentFrame.transparency) {
            act[currentFrame.transIndex] = save;
        }
        if (header != null) {
            header.bgColor = savedBgColor;
        }
        return result;
    }
前面的代码比较容易理解,快速浏览一遍,我们发现关键的方法是
        // Transfer pixel data to image.
        Bitmap result = null;
        try {
            result = setPixels(currentFrame, previousFrame);
        }catch (Exception e){
            L.e("Universal-Image-Loader" , "decodeBitmapData error : " + e.toString());
        }
将前面一帧渲染成当前帧,返回Bitmap。所以我们再来看setPixels方法:
    /**
     * Creates new frame image from current data (and previous frames as specified by their
     * disposition codes).
     */
    private Bitmap setPixels(GifFrame currentFrame, GifFrame previousFrame) {
        // Final location of blended pixels.
        final int[] dest = mainScratch;

        // clear all pixels when meet first frame
        if (previousFrame == null) {
            Arrays.fill(dest, 0);
        }

        // fill in starting image contents based on last image's dispose code
        if (previousFrame != null && previousFrame.dispose > DISPOSAL_UNSPECIFIED) {
            // We don't need to do anything for DISPOSAL_NONE, if it has the correct pixels so will our
            // mainScratch and therefore so will our dest array.
            if (previousFrame.dispose == DISPOSAL_BACKGROUND) {
                // Start with a canvas filled with the background color
                int c = 0;
                if (!currentFrame.transparency) {
                    c = header.bgColor;
                } else if (framePointer == 0) {
                    // TODO: We should check and see if all individual pixels are replaced. If they are, the
                    // first frame isn't actually transparent. For now, it's simpler and safer to assume
                    // drawing a transparent background means the GIF contains transparency.
                    isFirstFrameTransparent = true;
                }
                Arrays.fill(dest, c);
            } else if (previousFrame.dispose == DISPOSAL_PREVIOUS && previousImage != null) {
                // Start with the previous frame
                previousImage.getPixels(dest, 0, downsampledWidth, 0, 0, downsampledWidth,
                        downsampledHeight);
            }
        }

        // Decode pixels for this frame into the global pixels[] scratch.

        decodeBitmapData(currentFrame);


        int downsampledIH = currentFrame.ih / sampleSize;
        int downsampledIY = currentFrame.iy / sampleSize;
        int downsampledIW = currentFrame.iw / sampleSize;
        int downsampledIX = currentFrame.ix / sampleSize;
        // Copy each source line to the appropriate place in the destination.
        int pass = 1;
        int inc = 8;
        int iline = 0;
        boolean isFirstFrame = framePointer == 0;
        for (int i = 0; i < downsampledIH; i++) {
            int line = i;
            if (currentFrame.interlace) {
                if (iline >= downsampledIH) {
                    pass++;
                    switch (pass) {
                        case 2:
                            iline = 4;
                            break;
                        case 3:
                            iline = 2;
                            inc = 4;
                            break;
                        case 4:
                            iline = 1;
                            inc = 2;
                            break;
                        default:
                            break;
                    }
                }
                line = iline;
                iline += inc;
            }
            line += downsampledIY;
            if (line < downsampledHeight) {
                int k = line * downsampledWidth;
                // Start of line in dest.
                int dx = k + downsampledIX;
                // End of dest line.
                int dlim = dx + downsampledIW;
                if (k + downsampledWidth < dlim) {
                    // Past dest edge.
                    dlim = k + downsampledWidth;
                }
                // Start of line in source.
                int sx = i * sampleSize * currentFrame.iw;
                int maxPositionInSource = sx + ((dlim - dx) * sampleSize);
                while (dx < dlim) {
                    // Map color and insert in destination.
                    int averageColor = averageColorsNear(sx, maxPositionInSource, currentFrame.iw);
                    if (averageColor != 0) {
                        dest[dx] = averageColor;
                    } else if (!isFirstFrameTransparent && isFirstFrame) {
                        isFirstFrameTransparent = true;
                    }
                    sx += sampleSize;
                    dx++;
                }
            }
        }

        // Copy pixels into previous image
        if (savePrevious && (currentFrame.dispose == DISPOSAL_UNSPECIFIED
                || currentFrame.dispose == DISPOSAL_NONE)) {
            if (previousImage == null) {
                previousImage = getNextBitmap();
            }
            previousImage.setPixels(dest, 0, downsampledWidth, 0, 0, downsampledWidth,
                    downsampledHeight);
        }

        // Set pixels for current image.
        Bitmap result = getNextBitmap();
        result.setPixels(dest, 0, downsampledWidth, 0, 0, downsampledWidth, downsampledHeight);
        return result;
    }
这一段代码比较长,我们可以分段来看:
        // Final location of blended pixels.
        final int[] dest = mainScratch;

        // clear all pixels when meet first frame
        if (previousFrame == null) {
            Arrays.fill(dest, 0);
        }

        // fill in starting image contents based on last image's dispose code
        if (previousFrame != null && previousFrame.dispose > DISPOSAL_UNSPECIFIED) {
            // We don't need to do anything for DISPOSAL_NONE, if it has the correct pixels so will our
            // mainScratch and therefore so will our dest array.
            if (previousFrame.dispose == DISPOSAL_BACKGROUND) {
                // Start with a canvas filled with the background color
                int c = 0;
                if (!currentFrame.transparency) {
                    c = header.bgColor;
                } else if (framePointer == 0) {
                    // TODO: We should check and see if all individual pixels are replaced. If they are, the
                    // first frame isn't actually transparent. For now, it's simpler and safer to assume
                    // drawing a transparent background means the GIF contains transparency.
                    isFirstFrameTransparent = true;
                }
                Arrays.fill(dest, c);
            } else if (previousFrame.dispose == DISPOSAL_PREVIOUS && previousImage != null) {
                // Start with the previous frame
                previousImage.getPixels(dest, 0, downsampledWidth, 0, 0, downsampledWidth,
                        downsampledHeight);
            }
        }
获取一个空的由BitmapProvider生成的int数组,如果是第一帧,将其清空置0。
接下来就是判断GIF的处置方法(Disposal Method)
- 如果前一帧存在且处置方法是回到背景色:将背景色填入dest数组,如果为透明则将第一帧透明置位;
- 如果前一帧存在且处置方法是回到先前状成:在上一帧图片不为空的情况下,get上一帧图片的像素数据存入dest数组中。
        // Decode pixels for this frame into the global pixels[] scratch.

        decodeBitmapData(currentFrame);
这里就是LZW算法从当前帧的数据中解压出当前帧图像的像素索引数组。具体的实现放在最后阅读。
        int downsampledIH = currentFrame.ih / sampleSize;
        int downsampledIY = currentFrame.iy / sampleSize;
        int downsampledIW = currentFrame.iw / sampleSize;
        int downsampledIX = currentFrame.ix / sampleSize;
        // Copy each source line to the appropriate place in the destination.
        int pass = 1;
        int inc = 8;
        int iline = 0;
        boolean isFirstFrame = framePointer == 0;
        for (int i = 0; i < downsampledIH; i++) {
            int line = i;
            if (currentFrame.interlace) {
                if (iline >= downsampledIH) {
                    pass++;
                    switch (pass) {
                        case 2:
                            iline = 4;
                            break;
                        case 3:
                            iline = 2;
                            inc = 4;
                            break;
                        case 4:
                            iline = 1;
                            inc = 2;
                            break;
                        default:
                            break;
                    }
                }
                line = iline;
                iline += inc;
            }
            line += downsampledIY;
            if (line < downsampledHeight) {
                int k = line * downsampledWidth;
                // Start of line in dest.
                int dx = k + downsampledIX;
                // End of dest line.
                int dlim = dx + downsampledIW;
                if (k + downsampledWidth < dlim) {
                    // Past dest edge.
                    dlim = k + downsampledWidth;
                }
                // Start of line in source.
                int sx = i * sampleSize * currentFrame.iw;
                int maxPositionInSource = sx + ((dlim - dx) * sampleSize);
                while (dx < dlim) {
                    // Map color and insert in destination.
                    @ColorInt int averageColor;
                    if (sampleSize == 1) {
                        int currentColorIndex = ((int) mainPixels[sx]) & 0x000000ff;
                        averageColor = act[currentColorIndex];
                    } else {
                        // TODO: This is substantially slower (up to 50ms per frame) than just grabbing the
                        // current color index above, even with a sample size of 1.
                        averageColor = averageColorsNear(sx, maxPositionInSource, currentFrame.iw);
                    }
                    if (averageColor != 0) {
                        dest[dx] = averageColor;
                    } else if (!isFirstFrameTransparent && isFirstFrame) {
                        isFirstFrameTransparent = true;
                    }
                    sx += sampleSize;
                    dx++;
                }
            }
        }
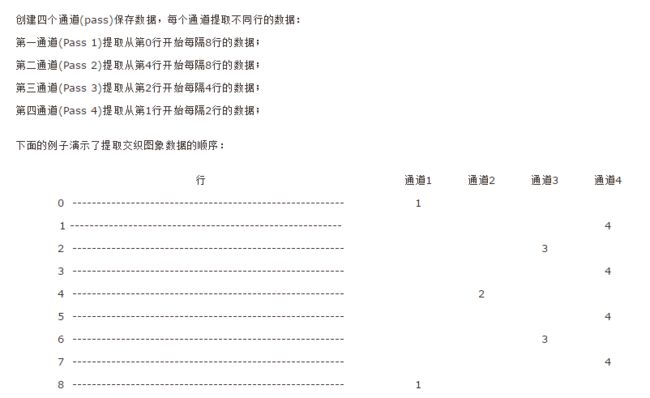
这一段解析了当前帧的宽高与横纵偏移。然后将每行的像素值复制到数组相应的位置。在这里需要判断交织模式。交织模式下,图像数据的排列方式如下图。然后通过调用averageColorsNear获取像素索引对应的RGB值放入dest数组中。
最后如果在处置方法中设置了保留。则需要将数据写入前一帧,然后再把数据写进当前帧。
        // Copy pixels into previous image
        if (savePrevious && (currentFrame.dispose == DISPOSAL_UNSPECIFIED
                || currentFrame.dispose == DISPOSAL_NONE)) {
            if (previousImage == null) {
                previousImage = getNextBitmap();
            }
            previousImage.setPixels(dest, 0, downsampledWidth, 0, 0, downsampledWidth,
                    downsampledHeight);
        }

        // Set pixels for current image.
        Bitmap result = getNextBitmap();
        result.setPixels(dest, 0, downsampledWidth, 0, 0, downsampledWidth, downsampledHeight);
最后,将这个result返回,就得到了下一帧的Bitmap。GIF的展示即可以通过管理定时的线程,定时去取下一帧的Bitmap。从而达到动画显示的效果。
最最后我们再看看averageColorsNear方法:
    private int averageColorsNear(int positionInMainPixels, int maxPositionInMainPixels,
                                  int currentFrameIw) {
        int alphaSum = 0;
        int redSum = 0;
        int greenSum = 0;
        int blueSum = 0;

        int totalAdded = 0;
        // Find the pixels in the current row.
        for (int i = positionInMainPixels;
             i < positionInMainPixels + sampleSize && i < mainPixels.length
                     && i < maxPositionInMainPixels; i++) {
            int currentColorIndex = ((int) mainPixels[i]) & 0xff;
            int currentColor = act[currentColorIndex];
            if (currentColor != 0) {
                alphaSum += currentColor >> 24 & 0x000000ff;
                redSum += currentColor >> 16 & 0x000000ff;
                greenSum += currentColor >> 8 & 0x000000ff;
                blueSum += currentColor & 0x000000ff;
                totalAdded++;
            }
        }
        // Find the pixels in the next row.
        for (int i = positionInMainPixels + currentFrameIw;
             i < positionInMainPixels + currentFrameIw + sampleSize && i < mainPixels.length
                     && i < maxPositionInMainPixels; i++) {
            int currentColorIndex = ((int) mainPixels[i]) & 0xff;
            int currentColor = act[currentColorIndex];
            if (currentColor != 0) {
                alphaSum += currentColor >> 24 & 0x000000ff;
                redSum += currentColor >> 16 & 0x000000ff;
                greenSum += currentColor >> 8 & 0x000000ff;
                blueSum += currentColor & 0x000000ff;
                totalAdded++;
            }
        }
        if (totalAdded == 0) {
            return 0;
        } else {
            return ((alphaSum / totalAdded) << 24)
                    | ((redSum / totalAdded) << 16)
                    | ((greenSum / totalAdded) << 8)
                    | (blueSum / totalAdded);
        }
    }
首先,我们调用的方式是:
                    // Map color and insert in destination.
                    @ColorInt int averageColor;
                    if (sampleSize == 1) {
                        int currentColorIndex = ((int) mainPixels[sx]) & 0x000000ff;
                        averageColor = act[currentColorIndex];
                    } else {
                        // TODO: This is substantially slower (up to 50ms per frame) than just grabbing the current color index above, even with a sample size of 1.
                        averageColor = averageColorsNear(sx, maxPositionInSource, currentFrame.iw);
                    }
所以调用averageColorsNear时sampleSize不会为1。averageColorsNear中通过两个循环,每个像素点采用了当前行+下一行,当前列及接下来的sampleSize-1列。
这一段不属于GIF格式中的内容,只是相当于Glide自己实现的一种,当源GIF尺寸大于需要显示的GIF时,作的压缩操作。
以上就是Glide解析GIF的核心代码。
