项目中的App使用React Native + React Navigation + Redux,要做ReactJS版本的web应用,所以自然想到了是否能公用一些逻辑代码和导航,网络框架等。如React Navigation,redux-form、和自己使用redux写的上下拉刷新组件、刷新组件、上传组件,以及一些纯的js端的UI组件改写成web平台也能使用。已有的项目中目录结构已确定并且庞大,很难一个个抽离出来,因此想着如果有**.web.js和Platform.OS==='web'这样的平台代码,就可以让这些想法成为可能。
在网上找到了twitter维护的react-native-web,它吸引我的是使用webpack的灵活配置,实现了**.web.js和Platform.OS==='web',下面我们来仿react-native-web配置一下。
第一步:创建新的react-native工程
react-native init ReactAndNativeDemo
第二步:接入react,react-dom
cd ReactAndNativeDemo
yarn add react-demo
yarn add --dev babel-loader webpack webpack-dev-server babel-preset-env babel-preset-react react-transform-hmr
第三步:创建web文件
1、在app目录下创建web文件夹,在web文件夹下创建webpack.config.js文件:
const webpack = require('webpack');

const appDirectory = path.resolve(__dirname, '../');

// This is needed for webpack to compile JavaScript.
// Many OSS React Native packages are not compiled to ES5 before being
// published. If you depend on uncompiled packages they may cause webpack build
// errors. To fix this webpack can be configured to compile to the necessary
// `node_module`.
const babelLoaderConfiguration = {
    test: /(\.jsx|\.js)$/,
    // Add every directory that needs to be compiled by Babel during the build.
    use: {
        loader: 'babel-loader',
    },
    exclude: /node_modules/
};

module.exports = {
    // your web-specific entry file
    entry: path.resolve(appDirectory, 'index.web.js'),

    // configures where the build ends up
    output: {
        filename: 'bundle.web.js',
        path: path.resolve(appDirectory, 'dist')
    },

    // devserver
    devServer: {
        contentBase: "./dist",//本地服务器所加载的页面所在的目录
        historyApiFallback: true,//不跳转
        inline: true,//实时刷新
        hot: true
    },

    module: {
        rules: [
            babelLoaderConfiguration,
        ]
    },

    plugins: [
        // `process.env.NODE_ENV === 'production'` must be `true` for production
        // builds to eliminate development checks and reduce build size. You may
        // wish to include additional optimizations.
        new webpack.DefinePlugin({
            'process.env.NODE_ENV': JSON.stringify(process.env.NODE_ENV || 'development'),
            __DEV__: process.env.NODE_ENV === 'production' || true
        }),
        new webpack.HotModuleReplacementPlugin(),//热加载插件
    ],

    resolve: {
        // If you're working on a multi-platform React Native app, web-specific
        // module implementations should be written in files using the extension
        // `.web.js`.
        extensions: [ '.web.js', '.js' ]
    }
}
2、在web目录下创建.babelrc文件:
{
  "presets": ["react", "env"],
  "env": {
    "development": {
      "plugins": [
        ["react-transform", {
          "transforms": [{
            "transform": "react-transform-hmr",
            "imports": ["react"],
            "locals": ["module"]
          }]
        }]
      ]
    }
  }
}
3、在app目录下创建index.web.js文件
import React from 'react';
import {render} from 'react-dom';
import App from './src/App';
render(在app下创建src目录,在src目录下创建App.web.js文件:
import React, {Component} from 'react'

class Greeter extends Component{
    render() {
        return (

                hello web in App.web.js with hot load

        );
    }
}

export default Greeter
4、在app目录下创建dist文件夹,在dist文件夹下创建index.html:
Webpack Sample Project
5、在package.json里面配置脚本:
...
"scripts": {
    ...
    "webStart": "webpack --config ./web/webpack.config.js",
    "webServer": "webpack-dev-server --open --config ./web/webpack.config.js --port 8082 --host 172.16.11.80",
    "webBuild": "NODE_ENV=production webpack --config ./webpack.production.config.js --progress"
  },
6、把app目录下的App.js移动到src中,与App.web.js同级,修改外部index.js文件中App.js的引用。
第四步:运行Web项目
执行npm run webStart
执行npm run webServer
总结:
通过以上的配置,代码结构如下:
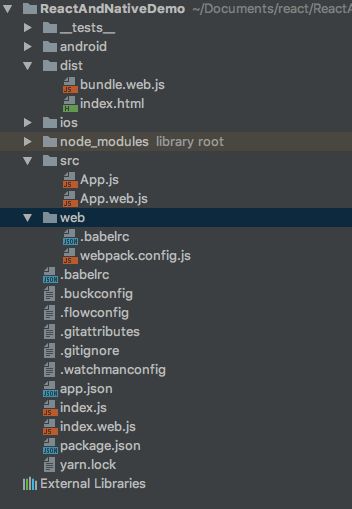
我们实现了web、android、ios使用了不同的入口在一个项目下共存,并且能通过App.web.js来写平台化差异化代码。可以Hotload代码。