前言:
在上两篇文章中对setContentView()是如何将我们的内容视图添加到系统提供的根视图中以及PhoneWindow的创建等做了粗略的分析,且这个时候内容视图还完全处于内存中 我们是还看不见的,本篇趁热打铁继续跟进 将要了解Activity是如何将DecorView添加到Window中 以及是如何将DecorView绘制到屏幕上的
分析要点:
老规矩 先来张Activity启动流程图:
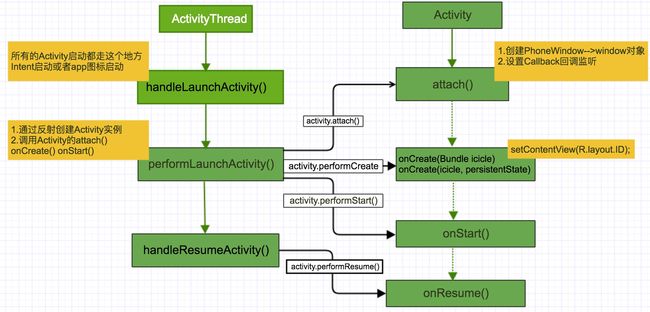
都知道系统源码中有一个全局的Handler 不管是Activity的启动还是Service的启动或绑定 亦或广播的注册 都会由它发送消息处理,而这个Handler对消息的处理就在ActivityThread类中 本文也将从ActivityThread中着手去分析Activity启动后生命周期是如何执行的。
源码阅读:
因对于startActivity()和通过Launch启动App的启动流程尚且不熟悉 所以这里直接跳到Activity已经开始启动的流程着手分析 首先来到ActivityThread#handleLaunchActivity() 所有Activity的启动都会调用这里 同时也会只捡要紧的函数看
 private void handleLaunchActivity(ActivityClientRecord r, Intent customIntent) {
        unscheduleGcIdler();
        mSomeActivitiesChanged = true;
        if (r.profilerInfo != null) {
            mProfiler.setProfiler(r.profilerInfo);
            mProfiler.startProfiling();
        }
        // Make sure we are running with the most recent config.
        handleConfigurationChanged(null, null);

        // WindowManagerGlobal初始化工作 这个WindowManagerGlobal是非常重要的一个类
        WindowManagerGlobal.initialize();

        //Activity就是在这里创建的
        Activity a = performLaunchActivity(r, customIntent);

        if (a != null) {
            r.createdConfig = new Configuration(mConfiguration);
            Bundle oldState = r.state;

            //Activity的onResume() 以及内容视图的绘制就是从这个函数开始的
            handleResumeActivity(r.token, false, r.isForward,!r.activity.mFinished && !r.startsNotResumed);
        }
}
先看Activity是如何创建的
private Activity performLaunchActivity(ActivityClientRecord r, Intent customIntent) {
        ActivityInfo aInfo = r.activityInfo;
        if (r.packageInfo == null) {
            r.packageInfo = getPackageInfo(aInfo.applicationInfo, r.compatInfo,
                    Context.CONTEXT_INCLUDE_CODE);
        }
        ComponentName component = r.intent.getComponent();
        if (component == null) {
            component = r.intent.resolveActivity(
                mInitialApplication.getPackageManager());
            r.intent.setComponent(component);
        }

        if (r.activityInfo.targetActivity != null) {
            component = new ComponentName(r.activityInfo.packageName,
                    r.activityInfo.targetActivity);
        }
        //这里通过反射的方式创建Activity
        Activity activity = null;
        try {
            java.lang.ClassLoader cl = r.packageInfo.getClassLoader();
            activity = mInstrumentation.newActivity(
                    cl, component.getClassName(), r.intent);
            StrictMode.incrementExpectedActivityCount(activity.getClass());
            r.intent.setExtrasClassLoader(cl);
            r.intent.prepareToEnterProcess();
            if (r.state != null) {
                r.state.setClassLoader(cl);
            }
        } catch (Exception e) {
        }

        try {
            Application app = r.packageInfo.makeApplication(false, mInstrumentation);
            if (activity != null) {
                Context appContext = createBaseContextForActivity(r, activity);
                CharSequence title = r.activityInfo.loadLabel(appContext.getPackageManager());
                Configuration config = new Configuration(mCompatConfiguration);

                //这里调用了activity#attach()进行PhoneWindow的创建以及一些Cllback监听的初始化和非常重要的WindowManagerImpl初始化等操作
                activity.attach(appContext, this, getInstrumentation(), r.token,
                        r.ident, app, r.intent, r.activityInfo, title, r.parent,
                        r.embeddedID, r.lastNonConfigurationInstances, config,
                        r.referrer, r.voiceInteractor);

                if (customIntent != null) {
                    activity.mIntent = customIntent;
                }
                r.lastNonConfigurationInstances = null;
                activity.mStartedActivity = false;
                int theme = r.activityInfo.getThemeResource();
                if (theme != 0) {
                    activity.setTheme(theme);
                }

                activity.mCalled = false;

                //Activity的onCreate()这里被调用 区别就是参数不同
                if (r.isPersistable()) {
                    mInstrumentation.callActivityOnCreate(activity, r.state, r.persistentState);
                } else {
                    mInstrumentation.callActivityOnCreate(activity, r.state);
                }
                r.activity = activity;
                r.stopped = true;

                //Activity的onStart()在这里被调用
                if (!r.activity.mFinished) {
                    activity.performStart();
                    r.stopped = false;
                }
                .................................
        return activity;
    }
mInstrumentation.callActivityOnCreate()Activtiy#onCreate()和Activity#onStart()
//这个Instrumentation类似于AppCompatActivity中的AppCompatDelegate一样是一个代理类
public class Instrumentation {

public void callActivityOnCreate(Activity activity, Bundle icicle) {
        prePerformCreate(activity);
        //onCreate()
        activity.performCreate(icicle);
        postPerformCreate(activity);
    }
    //Activity#onStart()
public void callActivityOnStart(Activity activity) {
        activity.onStart();
    }
}
 .................分割线................

// 跟进activity.performCreate(icicle)

class Activity{
    //一个参数
    final void performCreate(Bundle icicle) {
        restoreHasCurrentPermissionRequest(icicle);
        //执行OnonCreate()
        onCreate(icicle);
        mActivityTransitionState.readState(icicle);
        performCreateCommon();
    }
    //2个参数
    final void performCreate(Bundle icicle, PersistableBundle persistentState) {
        restoreHasCurrentPermissionRequest(icicle);
        //执行OnonCreate()
        onCreate(icicle, persistentState);
        mActivityTransitionState.readState(icicle);
        performCreateCommon();
    }

     final void performStart() {
        mActivityTransitionState.setEnterActivityOptions(this, getActivityOptions());
        mFragments.noteStateNotSaved();
        mCalled = false;
        mFragments.execPendingActions();

        //通过调用Instrumentation类的callActivityOnStart执行OnStart()
        mInstrumentation.callActivityOnStart(this);
        mFragments.dispatchStart();
        mFragments.reportLoaderStart();
        ........
    }
}
Activity创建好了 并且也执行到onStart() 再返回去看Activity的onResume()以及内容视图的绘制过程
final void handleResumeActivity(IBinder token,
            boolean clearHide, boolean isForward, boolean reallyResume) {
        unscheduleGcIdler();
        mSomeActivitiesChanged = true;

        // Activity#onResume()在这里执行 且此时内容还未绘制 也验证了onResume()后视图可见 是一个错误的观念 至少需要等一会
        ActivityClientRecord r = performResumeActivity(token, clearHide);

        /*****************重点将从这里开始**************************/

       if (r.window == null && !a.mFinished && willBeVisible) {
                //获取Activity中创建的Window对象
                r.window = r.activity.getWindow();

                //获取Window中的DecorView
                View decor = r.window.getDecorView();

                //INVISIBLE虽然不可见 但是却能占据window空间
                decor.setVisibility(View.INVISIBLE);

                //这里获取WindowManager的实现类WindowManagerImpl这是一个很重要的类
                ViewManager wm = a.getWindowManager();
                WindowManager.LayoutParams l = r.window.getAttributes();
                a.mDecor = decor;
                l.type = WindowManager.LayoutParams.TYPE_BASE_APPLICATION;
                l.softInputMode |= forwardBit;
                if (a.mVisibleFromClient) {
                    a.mWindowAdded = true;

                    //这一步执行将DecorView添加到Window窗口中和针对DecorView的测量 布局 绘制操作
                    wm.addView(decor, l);
                }
            }

            ....................
  }
先看Activity的onResume()是如何执行的
public final ActivityClientRecord performResumeActivity(IBinder token,
            boolean clearHide) {
        ............
                //onResume()在这里被执行
                r.activity.performResume();
        ............

        return r;
    }
DecorView是如何添加到Window中的? 且WindowManagerImpl是在Activity#attach()时初始化的 就要从WindowManagerImpl类开始分析 上面也是调用的 WindowManagerImpl的addView()
public final class WindowManagerImpl implements WindowManager {

//WindowManagerGlobal
 private final WindowManagerGlobal mGlobal = WindowManagerGlobal.getInstance();

 @Override
    public void addView(@NonNull View view, @NonNull ViewGroup.LayoutParams params) {
        applyDefaultToken(params);
        mGlobal.addView(view, params, mDisplay, mParentWindow);
    }
}

 /*******************WindowManagerGlobal************************/
public final class WindowManagerGlobal {
    //这里声明一些集合 来缓存我们加载过的view 在下次使用的时候 见会提高程序的执行速度

    private final ArrayList mViews = new ArrayList();
    private final ArrayList mRoots = new ArrayList();
    private final ArrayList mParams =
            new ArrayList();

  public void addView(View view, ViewGroup.LayoutParams params,
            Display display, Window parentWindow) {

        final WindowManager.LayoutParams wparams = (WindowManager.LayoutParams) params;

        if (parentWindow != null) {
    parentWindow.adjustLayoutParamsForSubWindow(wparams);
        }
        ViewRootImpl root;
        View panelParentView = null;

        synchronized (mLock) {
            // Start watching for system property changes.
            if (mSystemPropertyUpdater == null) {
                mSystemPropertyUpdater = new Runnable() {
                    @Override public void run() {
                        synchronized (mLock) {
                            for (int i = mRoots.size() - 1; i >= 0; --i) {
                                mRoots.get(i).loadSystemProperties();
                            }
                        }
                    }
                };
                SystemProperties.addChangeCallback(mSystemPropertyUpdater);
            }


            mRoots.get(index).doDie();

            root = new ViewRootImpl(view.getContext(), display);

            view.setLayoutParams(wparams);
            //这个view就是DecorView
            mViews.add(view);
            //ViewRootImpl 绘制好了View
            mRoots.add(root);
            //Window#Params
            mParams.add(wparams);
        }
        // do this last because it fires off messages to start doing things
        try {
           /*****************从这里开始 就开启正式的绘制流程*******/

            root.setView(view, wparams, panelParentView);
        } catch (RuntimeException e) {
            // BadTokenException or InvalidDisplayException, clean up.
            synchronized (mLock) {
                final int index = findViewLocked(view, false);
                if (index >= 0) {
                    removeViewLocked(index, true);
                }
            }
            throw e;
        }
}
继续深入 ViewRootImpl.setView()
public void setView(View view, WindowManager.LayoutParams attrs, View panelParentView) {
             ...........................................
                //执行绘制操作
                requestLayout();
                if ((mWindowAttributes.inputFeatures
                        & WindowManager.LayoutParams.INPUT_FEATURE_NO_INPUT_CHANNEL) == 0) {
                    mInputChannel = new InputChannel();
                }
                try {
                    mOrigWindowType = mWindowAttributes.type;
                    mAttachInfo.mRecomputeGlobalAttributes = true;
                    collectViewAttributes();

                    //这里使用IPC WMS将完成窗口的添加过程 这块我也不太下熟悉就跳过了
                    res = mWindowSession.addToDisplay(mWindow, mSeq, mWindowAttributes,
                            getHostVisibility(), mDisplay.getDisplayId(),
                            mAttachInfo.mContentInsets, mAttachInfo.mStableInsets,
                            mAttachInfo.mOutsets, mInputChannel);
                }
           //这句代码也很重要 将ViewRootImpl设置为DecorView的 ViewParent
           view.assignParent(this);

}
requestLayout()绘制流程
@Override
public void requestLayout() {
     if (!mHandlingLayoutInLayoutRequest) {
          checkThread();
          mLayoutRequested = true;
          scheduleTraversals();
     }
 }

void scheduleTraversals() {
        if (!mTraversalScheduled) {
            mTraversalScheduled = true;
            mTraversalBarrier = mHandler.getLooper().getQueue().postSyncBarrier();

            //Choreographer类中有一个Handler通过发送消息执行TraversalRunnable的run()方法
            mChoreographer.postCallback(
                    Choreographer.CALLBACK_TRAVERSAL, mTraversalRunnable, null);
}

final class TraversalRunnable implements Runnable {
        @Override
        public void run() {
            doTraversal();
        }
    }

 void doTraversal() {
            .........
            performTraversals();
            ..........
    }
//到这函数 针对DecorView的测量 布局 绘制 都将完成
private void performTraversals() {
    .............
    if (!mStopped || mReportNextDraw) {
      //确定测量模式和测量规格
       boolean focusChangedDueToTouchMode = ensureTouchModeLocally(
       (relayoutResult&WindowManagerGlobal.RELAYOUT_RES_IN_TOUCH_MODE) != 0);
       if (focusChangedDueToTouchMode || mWidth != host.getMeasuredWidth()
       || mHeight != host.getMeasuredHeight() || contentInsetsChanged) {
       int childWidthMeasureSpec = getRootMeasureSpec(mWidth, lp.width);
       int childHeightMeasureSpec = getRootMeasureSpec(mHeight, lp.height);


      //将调用DecorView的Measure()
      performMeasure(childWidthMeasureSpec, childHeightMeasureSpec);
    }
     //将调用DecorView的Layout()
     performLayout(lp, desiredWindowWidth, desiredWindowHeight);

     //将调用DecorView的Draw()
     performDraw();
}
测量 布局 绘制完成 再通过WMS完成窗口的添加过程 到此DecorView才真正显示到我们的屏幕上了

最后再多看一眼view.assignParent(this);将ViewRootImpl设置为DecorView的 ViewParent 这样的目的是什么
class View{

    void assignParent(ViewParent parent) {
        if (mParent == null) {
            mParent = parent;
        } else if (parent == null) {
            mParent = null;
    }
    //当我们调用View的 requestLayout()
    @CallSuper
    public void requestLayout() {
        if (mMeasureCache != null) mMeasureCache.clear();

        if (mAttachInfo != null && mAttachInfo.mViewRequestingLayout == null) {
            // Only trigger request-during-layout logic if this is the view requesting it,
            // not the views in its parent hierarchy
            ViewRootImpl viewRoot = getViewRootImpl();
            if (viewRoot != null && viewRoot.isInLayout()) {
                if (!viewRoot.requestLayoutDuringLayout(this)) {
                    return;
                }
            }
            mAttachInfo.mViewRequestingLayout = this;
        }

        mPrivateFlags |= PFLAG_FORCE_LAYOUT;
        mPrivateFlags |= PFLAG_INVALIDATED;

        if (mParent != null && !mParent.isLayoutRequested()) {
            //将会一直获取到父容器的 mParent.requestLayout();
            mParent.requestLayout();
        }
    }
}
到这里就很明白了平时我们在调用View的requestLayout()进行重新测量 布局 绘制时 会一直走到 ViewRootImpl的requestLayout()函数将DecorView重新测量 布局 绘制 由此看出在不是很必要的情况下不能直接调用该函数来刷新视图 因为这个过程是很耗CUP的。