Hook 技术通常被称为钩子技术,Hook技术是Windows系统用于替代中断机制的具体实现,钩子的含义就是在程序还没有调用系统函数之前,钩子捕获调用消息并获得控制权,在执行系统调用之前执行自身程序,简单来说就是函数劫持,本笔记将具体介绍应用层Hook的实现机制。
X86 手动完成 HOOK
首先我们来实现一个小功能,这里有一个小程序,当我们点击弹窗时会自动的弹出一个MessageBox提示,我们的目标是通过注入DLL的方式Hook来实现去除这个弹窗,先来看一下Hook的思路:
1.调用 GetModuleHandle 来获取到模块的基址(user32.dll)
2.调用 GetProcAddress 获取到MessageBoxA弹窗的基址
3.调用 VirtualProtect 来修改MsgBox前5个字节内存属性
4.计算 Dest - MsgBox - 5 重定位跳转地址,并Jmp跳转
5.计算 Dest + Offset + 5 = MsgBox +5 跳转回来的位置
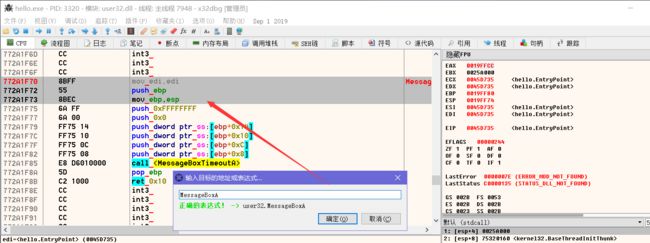
1.首先我们载入这个程序,输入MessageBoxA 找到我们需要Hook的地方,如下我们只需要在函数开头写入【jmp xxxx】该指令占用5字节,我们还需要记下被覆盖的这三条指令,在我们自己的中转函数中补齐它否则会导致堆栈不平衡。
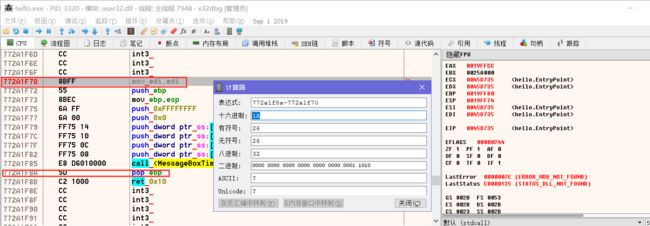
我们还需要计算出程序的返回地址,只需要用【772A1f8A - 772A1F70 = 1A】返回地址就是基址加上1A
直接附上代码:
#include
#include

DWORD jump = 0;

__declspec(naked) void Transfer(){
    __asm{
        mov edi, edi
        push ebp
        mov ebp, esp
        mov ebx, jump
        jmp ebx
    }
}

bool APIENTRY DllMain(HANDLE handle, DWORD dword, LPVOID lpvoid)
{
    HMODULE hwnd = GetModuleHandle(TEXT("user32.dll"));
    DWORD base = (DWORD)GetProcAddress(hwnd, "MessageBoxA");
    DWORD oldProtect = 0;

    if (VirtualProtect((LPVOID)base, 5, PAGE_EXECUTE_READWRITE, &oldProtect))
    {
        DWORD value = (DWORD)Transfer - base - 5;
        jump = base + 0x1a;
        __asm{
            mov eax, base
            mov byte ptr[eax], 0xe9
            inc eax
            mov ebx, value
            mov dword ptr[eax], ebx
        }
        VirtualProtect((LPVOID)base, 5, oldProtect, &oldProtect);
    }
    return true;
}
编译上方代码,然后使用注入工具注入到程序中,当我们点击弹窗时,已经Hook成功。
Hook改标题: 通常情况下,程序设置标题会调用 SetWindowTextA 这个API函数,我们可以拦截这个函数,并传进不同的窗口名称,从而实现修改指定窗口的标题,其实先代码只是在上面代码的基础上稍微改一下就能实现效果。
#include
#include

DWORD jump = 0;

__declspec(naked) bool _stdcall Transfer(HWND hwnd, LPCSTR lpString){
    __asm{
        mov edi, edi
        push ebp
        mov ebp, esp
        mov ebx, jump
        jmp ebx
    }
}
bool __stdcall MySetWindowTextA(HWND hwnd, LPCSTR lpString){
    char * lpText = "LyShark 破解版";
    return Transfer(hwnd, lpText);
}

bool APIENTRY DllMain(HANDLE handle, DWORD dword, LPVOID lpvoid)
{
    HMODULE hwnd = GetModuleHandle(TEXT("user32.dll"));
    DWORD base = (DWORD)GetProcAddress(hwnd, "SetWindowTextA");
    DWORD oldProtect = 0;

    if (VirtualProtect((LPVOID)base, 5, PAGE_EXECUTE_READWRITE, &oldProtect))
    {
        DWORD value = (DWORD)MySetWindowTextA - base - 5;
        jump = base + 5;
        __asm{
            mov eax, base
            mov byte ptr[eax], 0xe9
            inc eax
            mov ebx, value
            mov dword ptr[eax], ebx
        }
        VirtualProtect((LPVOID)base, 5, oldProtect, &oldProtect);
    }
    return true;
}
X64 手动完成 Hook
64位与32位系统之间无论从寻址方式,还是语法规则都与x86架构有着本质的不同,所以上面的使用技巧只适用于32位程序,注入32位进程使用,下面的内容则是64位下手动完成hook挂钩的一些骚操作,由于64位编译器无法直接内嵌汇编代码,导致我们只能调用C库函数来实现Hook的中转。
简单的HookAPI例子:
#include
#include

#define HOOK_LEN 0xC
void HookMessageBox();
BYTE Ori_Code[HOOK_LEN] = { 0x00 };
BYTE HookCode[HOOK_LEN] = { 0x48, 0xB8, 0x90, 0x90, 0x90, 0x90, 0x90, 0x90, 0x90, 0x90, 0xFF, 0xE0 };
/*
MOV RAX, 0x9090909090909090
JMP RAX
*/
static int (WINAPI *OldMessageBoxW)(HWND hWnd, LPCTSTR lpText, LPCTSTR lpCaption, UINT uType) = MessageBoxW;
int WINAPI MyMessageBoxW(HWND hWnd, LPCTSTR lpText, LPCTSTR lpCaption, UINT uType)
{
    memcpy(OldMessageBoxW, &Ori_Code, sizeof(HookCode));                       // 恢复hook原始代码
    int ret = OldMessageBoxW(hWnd, TEXT("hello lyshark"), lpCaption, uType);   // 调用原函数
    HookMessageBox();                                                          // 继续hook
    return ret;
}
VOID HookMessageBox()
{
    DWORD OldProtect;
    if (VirtualProtect(OldMessageBoxW, HOOK_LEN, PAGE_EXECUTE_READWRITE, &OldProtect))
    {
        memcpy(Ori_Code, OldMessageBoxW, HOOK_LEN);         // 拷贝原始机器码指令
        *(PINT64)(HookCode + 2) = (INT64)&MyMessageBoxW;    // 填充90为指定跳转地址
    }
    memcpy(OldMessageBoxW, &HookCode, sizeof(HookCode));    // 拷贝Hook机器指令
}
int main()
{
    HookMessageBox();
    MessageBoxW(NULL, TEXT("hello"), TEXT("标题"), MB_OK);
    return 0;
}
应用于DLL注入的Hook
#include
#include

BYTE OldCode[12] = { 0x00 };
BYTE HookCode[12] = { 0x48, 0xB8, 0x90, 0x90, 0x90, 0x90, 0x90, 0x90, 0x90, 0x90, 0xFF, 0xE0 };
DWORD_PTR base;

int WINAPI MyMessageBoxW(HWND hWnd, LPCTSTR lpText, LPCTSTR lpCaption, UINT uType)
{
    return 1;
}

bool APIENTRY DllMain(HANDLE handle, DWORD dword, LPVOID lpvoid)
{
    HMODULE hwnd = GetModuleHandle(TEXT("user32.dll"));
    DWORD_PTR base = (DWORD_PTR)GetProcAddress(hwnd, "MessageBoxW");
    DWORD OldProtect;

    if (VirtualProtect((LPVOID)base, 12, PAGE_EXECUTE_READWRITE, &OldProtect))
    {
        memcpy(OldCode, (LPVOID)base, 12);                  // 拷贝原始机器码指令
        *(PINT64)(HookCode + 2) = (INT64)&MyMessageBoxW;    // 填充90为指定跳转地址
    }
    memcpy((LPVOID)base, &HookCode, sizeof(HookCode));      // 拷贝Hook机器指令
    return true;
}
完善这个Hook代码: 经过本人的不断尝试,最终写出了完整的注入代码,不容易啊,苍天鸭!
// By: lyshark
// http://blib.cn
#include
#include

BYTE OldCode[12] = { 0x00 };
BYTE HookCode[12] = { 0x48, 0xB8, 0x90, 0x90, 0x90, 0x90, 0x90, 0x90, 0x90, 0x90, 0xFF, 0xE0 };

void HookFunction64(LPCWSTR lpModule, LPCSTR lpFuncName, LPVOID lpFunction)
{
    DWORD_PTR FuncAddress = (UINT64)GetProcAddress(GetModuleHandle(lpModule), lpFuncName);
    DWORD OldProtect = 0;

    if (VirtualProtect((LPVOID)FuncAddress, 12, PAGE_EXECUTE_READWRITE, &OldProtect))
    {
        memcpy(OldCode, (LPVOID)FuncAddress, 12);                   // 拷贝原始机器码指令
        *(PINT64)(HookCode + 2) = (UINT64)lpFunction;               // 填充90为指定跳转地址
    }
    memcpy((LPVOID)FuncAddress, &HookCode, sizeof(HookCode));       // 拷贝Hook机器指令
    VirtualProtect((LPVOID)FuncAddress, 12, OldProtect, &OldProtect);
}
void UnHookFunction64(LPCWSTR lpModule, LPCSTR lpFuncName)
{
    DWORD OldProtect = 0;
    UINT64 FuncAddress = (UINT64)GetProcAddress(GetModuleHandle(lpModule), lpFuncName);
    if (VirtualProtect((LPVOID)FuncAddress, 12, PAGE_EXECUTE_READWRITE, &OldProtect))
    {
        memcpy((LPVOID)FuncAddress, OldCode, sizeof(OldCode));
    }
    VirtualProtect((LPVOID)FuncAddress, 12, OldProtect, &OldProtect);
}

int WINAPI MyMessageBoxW(HWND hWnd, LPCTSTR lpText, LPCTSTR lpCaption, UINT uType)
{
    UnHookFunction64(L"user32.dll", "MessageBoxW");
    int ret = MessageBoxW(0, L"hello lyshark", lpCaption, uType);
    HookFunction64(L"user32.dll", "MessageBoxW", (PROC)MyMessageBoxW);
    return ret;
}
bool APIENTRY DllMain(HANDLE handle, DWORD dword, LPVOID lpvoid)
{
    switch (dword)
    {
    case DLL_PROCESS_ATTACH:
        HookFunction64(L"user32.dll", "MessageBoxW", (PROC)MyMessageBoxW);
        break;
    case DLL_PROCESS_DETACH:
    case DLL_THREAD_DETACH:
        break;
    }
    return true;
}
Detours 库的使用(32位)
前面的内容我们是自己实现的Hook代码,在生产环境中一般都会使用Hook库,常用的Hook库有免费开源的MinHook和商业的Detours Hook 这里我就默认使用Detours来测试32位下的Hook挂钩,Detours的64位是商业版,这里我们只用他的32位。
Detours 库在4.x开始就已经基于MIT许可开源了,GitHub地址: https://github.com/Microsoft/Detours
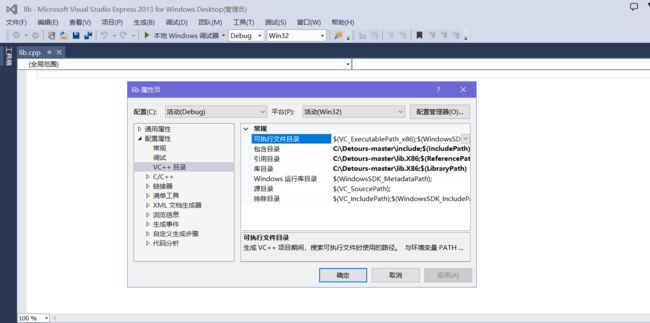
首先在Git上下载,下载好以后直接解压到指定磁盘,然后使用VS的命令行工具并进入Detours目录,直接数据命令 nmak 等待编译完成,然后配置VS项目,在【调试】->【属性】->【VC目录】将include和lib目录包含到项目中。
修改弹窗: 实现Hook MsgBox弹窗,该库的原理与我们上面手动实现的方式是相同的,不过它这个库更加的健壮。
#include
#include
#pragma comment(lib,"detours.lib")

static int(WINAPI *OldMessageBoxA)(HWND, LPCSTR, LPCSTR, UINT) = MessageBoxA;

int WINAPI MyMessageBoxA(HWND hWnd, LPCSTR lpText, LPCSTR lpCaption, UINT uType)
{
    return OldMessageBoxA(hWnd, TEXT("hello lyshark"), lpCaption, uType);
}

bool APIENTRY DllMain(HANDLE handle, DWORD dword, LPVOID lpvoid)
{
    int Error = DetourTransactionBegin();
    if (Error == NO_ERROR)
    {
        DetourUpdateThread(GetCurrentThread());                 // 执行线程准备
        DetourAttach(&(PVOID&)OldMessageBoxA, MyMessageBoxA);   // 挂钩
        DetourTransactionCommit();
    }
    return true;
}
简单实现修改标题: 修改窗体标题,也可以使用这个库,代码非常简洁,如下:
#include
#include
#include
#pragma comment(lib,"detours.lib")

static BOOL(WINAPI* Old_SetWindowTextA)(HWND hWnd, LPCSTR lpString) = SetWindowTextA;

BOOL WINAPI MySetWindowTextA(HWND hWnd, LPCSTR lpString){
    return Old_SetWindowTextA(hWnd, "已破解");
}

bool APIENTRY DllMain(HANDLE handle, DWORD dword, LPVOID lpvoid)
{
    int Error = DetourTransactionBegin();
    if (Error == NO_ERROR)
    {
        DetourUpdateThread(GetCurrentThread());
        DetourAttach(&(PVOID&)Old_SetWindowTextA, MySetWindowTextA);
        DetourTransactionCommit();
    }
    return true;
}
实现拦截文件创建: 文件的创建离不开CreateFileA函数,我们可以Hook这个函数,来拦截程序创建文件,此方法可用于对抗恶意代码,一些杀软也会通过Hook的方式监控文件的创建。
#include
#include
#include
#pragma comment(lib,"detours.lib")

static HANDLE(WINAPI* Old_CreateFileA)(LPCSTR lpFileName, DWORD dwDesiredAccess,
    DWORD dwShareMode, LPSECURITY_ATTRIBUTES lpSecurityAttributes,
    DWORD dwCreationDisposition, DWORD dwFlagsAndAttributes,
    HANDLE hTemplateFile) = CreateFileA;

HANDLE WINAPI MyCreateFileA(LPCSTR lpFileName, DWORD dwDesiredAccess,
    DWORD dwShareMode, LPSECURITY_ATTRIBUTES lpSecurityAttributes,
    DWORD dwCreationDisposition, DWORD dwFlagsAndAttributes,
    HANDLE hTemplateFile)
{
    char *temp = "c://test.txt";
    if (strcmp(lpFileName, temp)){
        MessageBoxA(0, TEXT("拦截到创建文件请求"), 0, 0);
        lpFileName = "";
        return Old_CreateFileA(lpFileName, dwDesiredAccess,dwShareMode, lpSecurityAttributes,
            dwCreationDisposition, dwFlagsAndAttributes,hTemplateFile);
    }
    return Old_CreateFileA(lpFileName, dwDesiredAccess,
        dwShareMode, lpSecurityAttributes,
        dwCreationDisposition, dwFlagsAndAttributes,hTemplateFile);
}
bool APIENTRY DllMain(HANDLE handle, DWORD dword, LPVOID lpvoid)
{
    int Error = DetourTransactionBegin();
    if (Error == NO_ERROR)
    {
        DetourUpdateThread(GetCurrentThread());
        DetourAttach(&(PVOID&)Old_CreateFileA, MyCreateFileA);
        DetourTransactionCommit();
    }
    return true;
}
实现Hook多个API:
#include
#include
#include
#pragma comment(lib,"detours.lib")

static BOOL(WINAPI* Old_SetWindowTextA)(HWND hWnd, LPCSTR lpString) = SetWindowTextA;
static int(WINAPI* Old_MessageBoxA)(HWND hWnd, LPCSTR lpText, LPCSTR lpCaption, UINT uType)=MessageBoxA;

BOOL WINAPI MySetWindowTextA(HWND hWnd, LPCSTR lpString){
    return Old_SetWindowTextA(hWnd, "已破解");
}
int WINAPI MyMessageBoxA(HWND hWnd, LPCSTR lpText, LPCSTR lpCaption, UINT uType)
{
    return Old_MessageBoxA(hWnd, TEXT("弹窗已被重定向"), lpCaption, uType);
}
bool APIENTRY DllMain(HANDLE handle, DWORD dword, LPVOID lpvoid)
{
    int Error = DetourTransactionBegin();
    if (Error == NO_ERROR)
    {
        DetourUpdateThread(GetCurrentThread());
        DetourAttach(&(PVOID&)Old_SetWindowTextA, MySetWindowTextA);
        DetourAttach(&(PVOID&)Old_MessageBoxA, MyMessageBoxA);
        DetourTransactionCommit();
    }
    return true;
}
获取程序OEP:
#include
#include
#pragma comment(lib,"detours.lib")

bool APIENTRY DllMain(HANDLE handle, DWORD dword, LPVOID lpvoid)
{
    DWORD ep = (DWORD)DetourGetEntryPoint(GetModuleHandle(0));
    char str[10];
    itoa(ep, str, 10);
    MessageBoxA(0, str, 0, 0);
    return true;
}
拦截DLL注入: 当本DLL被加载后,我们就无法向程序中注入DLL了,起到了简单保护进程的目的。
#include
#include
#include
#pragma comment(lib,"detours.lib")

static HMODULE(WINAPI* Old_LoadLibraryA)(LPCSTR lpFileName) = LoadLibraryA;
static FARPROC(WINAPI* Old_GetProcAddress)(HMODULE hModule, LPCSTR lpProcName) = GetProcAddress;

HMODULE WINAPI MyLoadLibraryA(LPCSTR lpFileName){
    return Old_LoadLibraryA("");
}
FARPROC WINAPI MyGetProcAddress(HMODULE hModule, LPCSTR lpProcName){
    return Old_GetProcAddress(0, "");
}
bool APIENTRY DllMain(HANDLE handle, DWORD dword, LPVOID lpvoid)
{
    int Error = DetourTransactionBegin();
    if (Error == NO_ERROR)
    {
        DetourUpdateThread(GetCurrentThread());
        DetourAttach(&(PVOID&)Old_LoadLibraryA, MyLoadLibraryA);
        DetourAttach(&(PVOID&)Old_GetProcAddress, MyGetProcAddress);
        DetourTransactionCommit();
    }
    return true;
}
自定义Hook函数: 有时候我们需要自定义Hook对象,这时候我们就可以使用本方法,直接在最后写上我们需要Hook的地址即可。
#include
#include
#pragma comment(lib,"detours.lib")

static int(WINAPI* Old_MessageBoxA)(HWND hWnd, LPCSTR lpText, LPCSTR lpCaption, UINT uType) = (int(WINAPI *)(HWND, LPCSTR, LPCSTR, UINT))0x755A1F70;

int WINAPI MyMessageBoxA(HWND hWnd, LPCSTR lpText, LPCSTR lpCaption, UINT uType)
{
    return Old_MessageBoxA(hWnd, lpText, lpCaption, uType);
}

bool APIENTRY DllMain(HANDLE handle, DWORD dword, LPVOID lpvoid)
{
    int Error = DetourTransactionBegin();
    if (Error == NO_ERROR)
    {
        DetourUpdateThread(GetCurrentThread());
        DetourAttach(&(LPVOID&)Old_MessageBoxA, MyMessageBoxA);
        DetourTransactionCommit();
    }
    return true;
}
MinHook 库的使用(64位)
由于Detours hook库的X64版本是商业版无法直接使用,想要X64挂钩这里推荐使用MinHook,该Hook库是完全开源免费的,使用起来也非常的简单。
MinHook的GitHub地址:https://github.com/m417z/minhook
首先在Git上下载,下载好以后直接解压到指定磁盘,然后使用VS的命令行工具并进入build目录,选择对应的版本自行编译即可,编译完成后找到指定目录下生成的lib文件,直接导入到include和lib目录包含到项目中即可。
MinHook入门: 同样是Hook MessageBox 用库就这么简单,自己写很麻烦!
#include
#include
#pragma comment(lib,"libMinHook.x64.lib")

typedef int (WINAPI *MESSAGEBOXW)(HWND, LPCWSTR, LPCWSTR, UINT);
MESSAGEBOXW fpMessageBoxW = NULL;

int WINAPI MyMessageBoxW(HWND hWnd, LPCWSTR lpText, LPCWSTR lpCaption, UINT uType)
{
    return fpMessageBoxW(hWnd, L"hello lyshark", lpCaption, uType);
}
bool APIENTRY DllMain(HANDLE handle, DWORD dword, LPVOID lpvoid)
{
    switch (dword)
    {
    case DLL_PROCESS_ATTACH:
        MH_Initialize();
        MH_CreateHook(&MessageBoxW, &MyMessageBoxW, reinterpret_cast(&fpMessageBoxW));
        MH_EnableHook(&MessageBoxW);
        break;
    case DLL_PROCESS_DETACH:
        MH_DisableHook(&MessageBoxW);
        MH_Uninitialize();
        break;
    }
    return true;
}
监控系统进程创建: 将下方DLL注入到explorer.exe进程中,即可监控系统的进程创建,在其中可以做查杀检测等,即可实现简单的主动防御。
#include
#include
#include
#pragma comment(lib,"libMinHook.x64.lib")

typedef int (WINAPI *CREATEPROCESSW)(LPCWSTR, LPWSTR, LPSECURITY_ATTRIBUTES,
    LPSECURITY_ATTRIBUTES, BOOL, DWORD, LPVOID, LPCWSTR, LPSTARTUPINFOW, LPPROCESS_INFORMATION);
CREATEPROCESSW pfnCreateProcessW = NULL;

int WINAPI MyCreateProcessW( LPCWSTR lpApplicationName,
     LPWSTR lpCommandLine,
     LPSECURITY_ATTRIBUTES lpProcessAttributes,
     LPSECURITY_ATTRIBUTES lpThreadAttributes,
     BOOL bInheritHandles,
     DWORD dwCreationFlags,
     LPVOID lpEnvironment,
     LPCWSTR lpCurrentDirectory,
     LPSTARTUPINFOW lpStartupInfo,
     LPPROCESS_INFORMATION lpProcessInformation)
{
        int nRetn = pfnCreateProcessW(lpApplicationName,
            lpCommandLine,
            lpProcessAttributes,
            lpThreadAttributes,
            bInheritHandles,
            dwCreationFlags,
            lpEnvironment,
            lpCurrentDirectory,
            lpStartupInfo,
            lpProcessInformation);
        MessageBoxW(0, lpApplicationName, 0, 0);
    return nRetn;
}

BOOL APIENTRY DllMain(HMODULE hModule,DWORD  ul_reason_for_call,LPVOID lpReserved)
{
    if (MH_Initialize() == MH_OK)
    {
        OutputDebugStringW(L"MH_Initialize success");
    }
    if (MH_CreateHook(&CreateProcessW, &MyCreateProcessW, reinterpret_cast(&pfnCreateProcessW)) == MH_OK)
    {
        OutputDebugStringW(L"MH_CreateHook success");
    }
    if (MH_EnableHook(&CreateProcessW) == MH_OK)
    {
        OutputDebugStringW(L"MH_Initialize success");
    }
    return TRUE;
}
实现禁止结束进程: 通过将DLL注入到系统的任务管理器中,实现禁止QQ进程被强制结束。
#include
#include
#include
#pragma comment(lib,"libMinHook.x64.lib")

typedef HANDLE(WINAPI *OPENPROCESS)(DWORD, BOOL, DWORD);
OPENPROCESS pfnOpenProcess = NULL;

HANDLE WINAPI MyOpenProcess(DWORD dwDesiredAccess, BOOL bInheritHandle, DWORD dwProcessId)
{
    HWND myhwnd = 0;

    myhwnd = FindWindowW(L"TXGuiFoundation", L"QQ");
    if (myhwnd != NULL)
    {
        HANDLE Retn = pfnOpenProcess(dwDesiredAccess, bInheritHandle, 0);
        return Retn;
    }
    HANDLE Retn = pfnOpenProcess(dwDesiredAccess, bInheritHandle, dwProcessId);
    return Retn;
}
BOOL APIENTRY DllMain(HMODULE hModule,DWORD  ul_reason_for_call,LPVOID lpReserved)
{
    MH_Initialize();
    MH_CreateHook(&OpenProcess, &MyOpenProcess, reinterpret_cast(&pfnOpenProcess));
    MH_EnableHook(&OpenProcess);
    return TRUE;
} 上方代码需要注意:任务管理器终止进程其实是调用了TerminateProcess函数来执行强杀进程的,正常情况下应该hook该函数,但此处我们Hook了OpenProcess这个打开进程的API,这是因为在我们结束进程时,系统会先打开进程来获取到进程句柄,然后才会调用TerminateProcess并传递句柄来强制杀掉进程,我们只需要让打开进程失效,此时TerminateProcess函数将得不到正确的句柄,从而无法完成结束进程。
原创,转载请注明出处


