一、Open×××是靠虚拟的TUN/TAP设备实现SSL ×××的,因此内核必须支持TUN/TAP设备模块,这个配置选项在2.6.x内核中,位于Device Drivers ->Network device support 菜单中,全称是Universal TUN/TAP device driver support ,通常在标准内核 中,会以模块方式提供,在Open ×××启动时,它会自动加载此模块,因此不需要手工加载此模块。
[root@dic172 2.6.18-238.12.1.el5-i686]# pwd
/usr/src/kernels/2.6.18-238.12.1.el5-i686
[root@dic172 2.6.18-238.12.1.el5-i686]# make menuconfig #打开内核菜单
Device Drivers --->
Network device support --->
二、在安装Open×××之前,还需要安装一些支持包,包括OpenSSL开发库和LZO压缩开发库
1、可使用yum安装OpenSSL开发库,但需要手工下载并安装LZO开发包。
[root@dic172 /]# yum install openssl
[root@dic172 /]# yum install openssl-devel
2、可到 http://www.oberhumer.com/opensource/lzo/ 下载LZO
[root@dic172 src]# tar zxvf lzo-2.03.tar.gz
[root@dic172 src]# cd lzo-2.03
[root@dic172 lzo-2.03]# ./configure
[root@dic172 lzo-2.03]# make
[root@dic172 lzo-2.03]# make install
三、配置SSL ×××服务
1、到 http://open***.net/release/ 下载open***-2.0.9.tar.gz并安装
[root@dic172 src]# tar zxvf open***-2.0.9.tar.gz
[root@dic172 src]# cd open***-2.0.9/
[root@dic172 open***-2.0.9]# ./configure
[root@dic172 open***-2.0.9]# make
[root@dic172 open***-2.0.9]# make install
[root@dic172 open***-2.0.9]# cp -p sample-scripts/open***.init /etc/init.d/open***
[root@dic172 open***-2.0.9]# chkconfig --add open***
[root@dic172 open***-2.0.9]# service open*** status #查看服务状态
open***: service not started
[root@dic172 open***-2.0.9]# chkconfig --level 235 open*** on
[root@dic172 open***-2.0.9]# chkconfig --list open***
open*** 0:off 1:off 2:on 3:on 4:on 5:on 6:off
2、开启IP转发功能
[root@dic172 open***-2.0.9]# vi /etc/sysctl.conf
net.ipv4.ip_forward = 1
[root@dic172 open***-2.0.9]# sysctl -p
3、定义Open×××的配置目录为/etc/open***,把服务器配置文件定义为/etc/open***/server.conf
Open×××是一个SSL ×××实现,因此,认证中最重要的是服务器和客户端的SSL证书管理,如果管理员之前没有SSL证书发布机制,那么可以使用Open×××附带的一组工具来完成所有的工作。
在/usr/src/open***-2.0.9/中,有一个easy-rsa目录,这下面就是一些一成和管理SSL证书的工具,以下为生成证书操作。
[root@dic172 open***-2.0.9]# mkdir -p /etc/open***
[root@dic172 open***-2.0.9]# cp -p sample-config-files/server.conf /etc/open***/ #将样本配置文件复制到/etc/open***/,后面再做修改
4、修改vars文件变量,设置国家代码、省份、地市、机构名单、单位名称邮件等
[root@dic172 open***-2.0.9]# cd easy-rsa/
[root@dic172 easy-rsa]# grep -v "#" vars
export D=`pwd`
export KEY_CONFIG=$D/openssl.cnf
export KEY_DIR=$D/keys
echo NOTE: when you run ./clean-all, I will be doing a rm -rf on $KEY_DIR
export KEY_SIZE=1024
export KEY_COUNTRY=CN
export KEY_PROVINCE=GD
export KEY_CITY=SZ
export KEY_ORG="DIC"
export KEY_EMAIL="[email protected]"
[root@dic172 easy-rsa]# source vars
NOTE: when you run ./clean-all, I will be doing a rm -rf on /usr/src/open***-2.0.9/easy-rsa/keys #提示可使用./clean-all清除所有包括CA在内的所有证书
5、使用clean-all脚本清除包括CA在内的所有证书,再创建CA证书。
[root@dic172 easy-rsa]# ./clean-all #先清除证书,再创建证书
[root@dic172 easy-rsa]# ./build-ca #创建CA证书
Generating a 1024 bit RSA private key
..........++++++
................++++++
writing new private key to 'ca.key'
-----
You are about to be asked to enter information that will be incorporated
into your certificate request.
What you are about to enter is what is called a Distinguished Name or a DN.
There are quite a few fields but you can leave some blank
For some fields there will be a default value,
If you enter '.', the field will be left blank.
-----
Country Name (2 letter code) [CN]:
State or Province Name (full name) [GD]:
Locality Name (eg, city) [SZ]:
Organization Name (eg, company) [DIC]:
Organizational Unit Name (eg, section) []:
Common Name (eg, your name or your server's hostname) []:dic172 #服务器主机名
Email Address [[email protected]]:
6、创建服务器密钥。
[root@dic172 easy-rsa]# ./build-key-server server #创建服务器端密钥
Generating a 1024 bit RSA private key
............................................++++++
....++++++
writing new private key to 'server.key'
-----
You are about to be asked to enter information that will be incorporated
into your certificate request.
What you are about to enter is what is called a Distinguished Name or a DN.
There are quite a few fields but you can leave some blank
For some fields there will be a default value,
If you enter '.', the field will be left blank.
-----
Country Name (2 letter code) [CN]:
State or Province Name (full name) [GD]:
Locality Name (eg, city) [SZ]:
Organization Name (eg, company) [DIC]:
Organizational Unit Name (eg, section) []:
Common Name (eg, your name or your server's hostname) []:dic172 #服务器主机名
Email Address [[email protected]]:
Please enter the following 'extra' attributes
to be sent with your certificate request
A challenge password []:dic172
An optional company name []:dic172
Using configuration from /usr/src/open***-2.0.9/easy-rsa/openssl.cnf
Check that the request matches the signature
Signature ok
The Subject's Distinguished Name is as follows
countryName :PRINTABLE:'CN'
stateOrProvinceName :PRINTABLE:'GD'
localityName :PRINTABLE:'SZ'
organizationName :PRINTABLE:'DIC'
commonName :PRINTABLE:'dic172'
emailAddress :IA5STRING:'[email protected]'
Certificate is to be certified until Jul 16 05:51:08 2021 GMT (3650 days)
Sign the certificate? [y/n]:y
1 out of 1 certificate requests certified, commit? [y/n]y
Write out database with 1 new entries
Data Base Updated
7、创建客户端密钥,客户端密钥名可随意命名。
[root@dic172 easy-rsa]# ./build-key client
Generating a 1024 bit RSA private key
.....++++++
.......................++++++
writing new private key to 'client.key'
-----
You are about to be asked to enter information that will be incorporated
into your certificate request.
What you are about to enter is what is called a Distinguished Name or a DN.
There are quite a few fields but you can leave some blank
For some fields there will be a default value,
If you enter '.', the field will be left blank.
-----
Country Name (2 letter code) [CN]:
State or Province Name (full name) [GD]:
Locality Name (eg, city) [SZ]:
Organization Name (eg, company) [DIC]:
Organizational Unit Name (eg, section) []:
Common Name (eg, your name or your server's hostname) []:tgh #不同客户端,命名绝不能一样
Email Address [[email protected]]:
Please enter the following 'extra' attributes
to be sent with your certificate request
A challenge password []:dic172
An optional company name []:dic172
Using configuration from /usr/src/open***-2.0.9/easy-rsa/openssl.cnf
Check that the request matches the signature
Signature ok
The Subject's Distinguished Name is as follows
countryName :PRINTABLE:'CN'
stateOrProvinceName :PRINTABLE:'GD'
localityName :PRINTABLE:'SZ'
organizationName :PRINTABLE:'DIC'
commonName :PRINTABLE:'tgh'
emailAddress :IA5STRING:'[email protected]'
Certificate is to be certified until Jul 16 05:52:27 2021 GMT (3650 days)
Sign the certificate? [y/n]:y
1 out of 1 certificate requests certified, commit? [y/n]y
Write out database with 1 new entries
Data Base Updated
8、创建dhDiffie-Hellman )密钥算法文件
[root@dic172 easy-rsa]# ./build-dh
Generating DH parameters, 1024 bit long safe prime, generator 2
This is going to take a long time
...+.......+.....+........................+......................+.....+...........................+..........+.......+.................................................+.....................+............+..............................................+..........................................................+..............................+...........................+..+.....+......++*++*++*
9、生成 tls-auth 密钥 ,tls-auth密钥可以为点对点的×××连接提供了进一步的安全验证,如果选择使用这一方式,服务器端和客户端都必须拥有该密钥文件。
[root@dic172 easy-rsa]# open*** --genkey --secret keys/ta.key
[root@dic172 easy-rsa]# cp -rp keys/ /etc/open***/ #将证书文件复制到/etc/open***/
10、修改server.conf配置文件
[root@dic172 open***]# grep -v "#" server.conf
local 192.168.161.172 #服务器所使用的IP
port 1194 #使用1194端口
proto udp #使用UDP协议
dev tun #使用tun设备
ca /etc/open***/keys/ca.crt #指定CA证书文件路径
cert /etc/open***/keys/server.crt
dh /etc/open***/keys/dh1024.pem
tls-auth /etc/open***/keys/ta.key 0
server 172.16.10.0 255.255.255.0 #×××客户端拨入后,所获得的IP地址池
ifconfig-pool-persist ipp.txt
push "dhcp-option DNS 202.96.134.133" #客户端所获得的DNS
client-to-client
keepalive 10 120
comp-lzo
persist-key
persist-tun
status open***-status.log
verb 3
mute 20
[root@dic172 open***-2.0.9]# service open*** start
Starting open***: [ OK ]
[root@dic172 open***-2.0.9]# netstat -anp |grep :1194
udp 0 0 192.168.161.172:1194 0.0.0.0:* 25162/open***
四、在XP客户端配置SSL ×××(客户端IP 192.168.163.96)
1、到http://open***.se/files/install_packages/下载open***-2.0.9-gui-1.0.3-install.exe
2、安装open***-2.0.9-gui-1.0.3-install.exe,一路next。由于只是做客户端使用,不必安装Open××× Service
安装完成后,在任务栏会新增加一个Open××× GUI和本地连接图标。
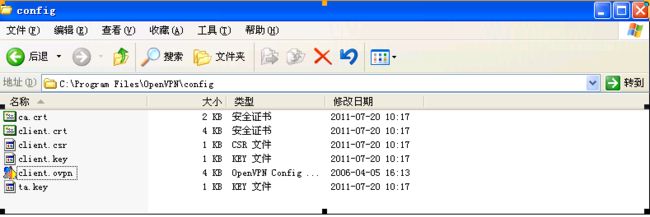
3、配置客户端,把服务器上/etc/open***/keys/ca.*,client.*,ta.* 复制客户端C:\Program Files\Open×××\config下;再从C:\Program Files\Open×××\sample-config复制一个客户端配置样本文件client.o***到C:\Program Files\Open×××\config下。
4、修改client.o***文件如下并保存。
client
dev tun
proto udp
remote 192.168.161.172 1194
resolv-retry infinite
nobind
ca ca.crt
cert client.crt
key client.key
tls-auth ta.key 1
comp-lzo
verb 3
mute 20
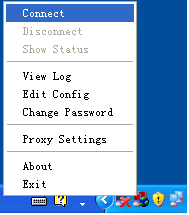
5、启动连接。右击右下角的Open××× GUI图标,连接
6、连接成功后,图标如下。到此,SSL ×××服务就配置好了。
![]()


