一、说明:
说到集群,大家应该都不陌生,为了提高性能需要配置集群,而在有的时候,我们需要在测试环境先测试然后灰度上线,所以这里介绍在一台服务器上配置rabbitmq集群
二、rabbitmq集群模式
1、普通模式:rabbitmq默认的集群模式
RabbitMQ集群中节点包括内存节点、磁盘节点。内存节点就是将所有数据放在内存,磁盘节点将数据放在磁盘上。如果在投递消息时,打开了消息的持久化,那么即使是内存节点,数据还是安全的放在磁盘。那么内存节点的性能只能体现在资源管理上,比如增加或删除队列(queue),虚拟主机(vrtual hosts),交换机(exchange)等,发送和接受message速度同磁盘节点一样。一个集群至少要有一个磁盘节点。一个rabbitmq集群中可以共享user,vhost,exchange等,所有的数据和状态都是必须在所有节点上复制的,对于queue根据集群模式不同,应该有不同的表现。在集群模式下只要有任何一个节点能够工作,RabbitMQ集群对外就能提供服务。
默认的集群模式,queue创建之后,如果没有其它policy,则queue就会按照普通模式集群。对于Queue来说,消息实体只存在于其中一个节点,A、B两个节点仅有相同的元数据,即队列结构,但队列的元数据仅保存有一份,即创建该队列的rabbitmq节点(A节点),当A节点宕机,你可以去其B节点查看,./rabbitmqctl list_queues发现该队列已经丢失,但声明的exchange还存在。
当消息进入A节点的Queue中后,consumer从B节点拉取时,RabbitMQ会临时在A、B间进行消息传输,把A中的消息实体取出并经过B发送给consumer,所以consumer应平均连接每一个节点,从中取消息。该模式存在一个问题就是当A节点故障后,B节点无法取到A节点中还未消费的消息实体。如果做了队列持久化或消息持久化,那么得等A节点恢复,然后才可被消费,并且在A节点恢复之前其它节点不能再创建A节点已经创建过的持久队列;如果没有持久化的话,消息就会失丢。这种模式更适合非持久化队列,只有该队列是非持久的,客户端才能重新连接到集群里的其他节点,并重新创建队列。假如该队列是持久化的,那么唯一办法是将故障节点恢复起来。
为什么RabbitMQ不将队列复制到集群里每个节点呢?这与它的集群的设计本意相冲突,集群的设计目的就是增加更多节点时,能线性的增加性能(CPU、内存)和容量(内存、磁盘)。当然RabbitMQ新版本集群也支持队列复制(有个选项可以配置)。比如在有五个节点的集群里,可以指定某个队列的内容在2个节点上进行存储,从而在性能与高可用性之间取得一个平衡(应该就是指镜像模式)。
2、镜像模式:把需要的队列做成镜像队列,存在于多个节点,属于RabbitMQ的HA方案
该模式解决了上述问题,其实质和普通模式不同之处在于,消息实体会主动在镜像节点间同步,而不是在consumer取数据时临时拉取。该模式带来的副作用也很明显,除了降低系统性能外,如果镜像队列数量过多,加之大量的消息进入,集群内部的网络带宽将会被这种同步通讯大大消耗掉。所以在对可靠性要求较高的场合中适用,一个队列想做成镜像队列,需要先设置policy,然后客户端创建队列的时候,rabbitmq集群根据“队列名称”自动设置是普通集群模式或镜像队列。具体如下:
队列通过策略来使能镜像。策略能在任何时刻改变,rabbitmq队列也近可能的将队列随着策略变化而变化;非镜像队列和镜像队列之间是有区别的,前者缺乏额外的镜像基础设施,没有任何slave,因此会运行得更快。
为了使队列称为镜像队列,你将会创建一个策略来匹配队列,设置策略有两个键“ha-mode和 ha-params(可选)”。ha-params根据ha-mode设置不同的值,下面表格说明这些key的选项,如下图:
三、普通集群模式安装配置
官方文档https://www.rabbitmq.com/clustering.html
1、环境
CentOS 6.7    IP 172.16.100.94   x86_64
2、软件包版本:
erlang-20.0.4-1.el6.x86_64.rpm
rabbitmq-server-3.6.12-1.el6.noarch.rpm
3、安装
#rpm -ivh  erlang-20.0.4-1.el6.x86_64.rpm
#yum install socat  -y   # rabbitmq-server依赖次软件包
#rpm -ivh rabbitmq-server-3.6.12-1.el6.noarch.rpm
4、启动3个进程(模拟3台不同的node)
#RABBITMQ_NODE_PORT=5672 RABBITMQ_NODENAME=rabbit1 /etc/init.d/rabbitmq-server start
#RABBITMQ_NODE_PORT=5673 RABBITMQ_NODENAME=rabbit2 /etc/init.d/rabbitmq-server start
#RABBITMQ_NODE_PORT=5674 RABBITMQ_NODENAME=rabbit3 /etc/init.d/rabbitmq-server start
查看启动情况
#netstat -tunlp
Active Internet connections (only servers)
Proto Recv-Q Send-Q Local Address               Foreign Address             State       PID/Program name
tcp        0      0 0.0.0.0:25672               0.0.0.0:*                   LISTEN      25527/beam.smp
tcp        0      0 0.0.0.0:25673               0.0.0.0:*                   LISTEN      26425/beam.smp
tcp        0      0 0.0.0.0:25674               0.0.0.0:*                   LISTEN      27310/beam.smp
tcp        0      0 0.0.0.0:4369                0.0.0.0:*                   LISTEN      25191/epmd
tcp        0      0 0.0.0.0:22                  0.0.0.0:*                   LISTEN      1778/sshd
tcp        0      0 :::5672                     :::*                        LISTEN      25527/beam.smp
tcp        0      0 :::5673                     :::*                        LISTEN      26425/beam.smp
tcp        0      0 :::5674                     :::*                        LISTEN      27310/beam.smp
tcp        0      0 :::4369                     :::*                        LISTEN      25191/epmd
tcp        0      0 :::22                       :::*                        LISTEN      1778/sshd
5、结束进程命令
#rabbitmqctl -n rabbit1 stop
#rabbitmqctl -n rabbit2 stop
#rabbitmqctl -n rabbit3 stop
6、查看状态:
#rabbitmqctl -n rabbit1 cluster_status
Cluster status of node rabbit1@localhost
[{nodes,[{disc,[rabbit1@localhost]}]},
 {running_nodes,[rabbit1@localhost]},
 {cluster_name,<<"rabbit1@localhost">>},
 {partitions,[]},
 {alarms,[{rabbit1@localhost,[]}]}]
#rabbitmqctl -n rabbit2 cluster_status
Cluster status of node rabbit2@localhost
[{nodes,[{disc,[rabbit2@localhost]}]},
 {running_nodes,[rabbit2@localhost]},
 {cluster_name,<<"rabbit2@localhost">>},
 {partitions,[]},
 {alarms,[{rabbit2@localhost,[]}]}]
#rabbitmqctl -n rabbit3 cluster_status
Cluster status of node rabbit3@localhost
[{nodes,[{disc,[rabbit3@localhost]}]},
 {running_nodes,[rabbit3@localhost]},
 {cluster_name,<<"rabbit3@localhost">>},
 {partitions,[]},
 {alarms,[{rabbit3@localhost,[]}]}]
7、开始配置
停掉rabbit2节点的应用
#rabbitmqctl -n rabbit2 stop_app
Stopping rabbit application on node rabbit2@localhost
将rabbit2节点加入到rabbit1@localhost
#rabbitmqctl -n rabbit2 join_cluster rabbit1@localhost
Clustering node rabbit2@localhost with rabbit1@localhost
启动rabbit2应用节点
#rabbitmqctl -n rabbit2 start_app
Starting node rabbit2@localhost
查看集群状态
#rabbitmqctl -n rabbit1 cluster_status
Cluster status of node rabbit1@localhost
[{nodes,[{disc,[rabbit1@localhost,rabbit2@localhost]}]},
 {running_nodes,[rabbit2@localhost,rabbit1@localhost]},
 {cluster_name,<<"rabbit1@localhost">>},
 {partitions,[]},
 {alarms,[{rabbit2@localhost,[]},{rabbit1@localhost,[]}]}]

#rabbitmqctl -n rabbit2 cluster_status
Cluster status of node rabbit2@localhost
[{nodes,[{disc,[rabbit1@localhost,rabbit2@localhost]}]},
 {running_nodes,[rabbit1@localhost,rabbit2@localhost]},
 {cluster_name,<<"rabbit1@localhost">>},
 {partitions,[]},
 {alarms,[{rabbit1@localhost,[]},{rabbit2@localhost,[]}]}]
可以看到不管是以哪一个节点的身份去查,集群中都有节点rabbit1和rabbit2
#############################################3
现在加入rabbit3
首先停掉rebbit3节点的应用
# rabbitmqctl -n rabbit3 stop_app
Stopping rabbit application on node rabbit3@localhost

# rabbitmqctl -n rabbit3 join_cluster rabbit2@localhost
Clustering node rabbit3@localhost with rabbit2@localhost
启动
# rabbitmqctl -n rabbit3 start_app
Starting node rabbit3@localhost
查看集群状态
#rabbitmqctl -n rabbit1 cluster_status
Cluster status of node rabbit1@localhost
[{nodes,[{disc,[rabbit1@localhost,rabbit2@localhost,rabbit3@localhost]}]},
 {running_nodes,[rabbit3@localhost,rabbit2@localhost,rabbit1@localhost]},
 {cluster_name,<<"rabbit1@localhost">>},
 {partitions,[]},
 {alarms,[{rabbit3@localhost,[]},
          {rabbit2@localhost,[]},
          {rabbit1@localhost,[]}]}]
注:已经加入群集的节点可以随时停止,并且宕机对集群来说也是没事的,在这两种情况下,集群的其
余部分继续运行不受影响,并且节点在重新启动时会自动“赶上”其他集群节点。
四、对集群进行测试:
我们假设关闭rabbit1和rabbit3,在每一个步骤检查集群状态
1、关闭rabbit1节点
#rabbitmqctl -n rabbit1 stop
Stopping and halting node rabbit1@localhost
2、查看集群状态
# rabbitmqctl -n rabbit2 cluster_status
Cluster status of node rabbit2@localhost
[{nodes,[{disc,[rabbit1@localhost,rabbit2@localhost,rabbit3@localhost]}]},
 {running_nodes,[rabbit3@localhost,rabbit2@localhost]},
 {cluster_name,<<"rabbit1@localhost">>},
 {partitions,[]},
 {alarms,[{rabbit3@localhost,[]},{rabbit2@localhost,[]}]}]
可以看到rabbit1节点已经不再running_noeds中了,但是依然在disc列表!
#rabbitmqctl -n rabbit3 cluster_status
Cluster status of node rabbit3@localhost
[{nodes,[{disc,[rabbit1@localhost,rabbit2@localhost,rabbit3@localhost]}]},
 {running_nodes,[rabbit2@localhost,rabbit3@localhost]},
 {cluster_name,<<"rabbit1@localhost">>},
 {partitions,[]},
 {alarms,[{rabbit2@localhost,[]},{rabbit3@localhost,[]}]}]
############################################################
#rabbitmqctl -n rabbit3 stop    #关闭rabbit3 节点
Stopping and halting node rabbit3@localhost
3、查看集群状态
#rabbitmqctl -n rabbit2 cluster_status
Cluster status of node rabbit2@localhost
[{nodes,[{disc,[rabbit1@localhost,rabbit2@localhost,rabbit3@localhost]}]},
 {running_nodes,[rabbit2@localhost]},
 {cluster_name,<<"rabbit1@localhost">>},
 {partitions,[]},
 {alarms,[{rabbit2@localhost,[]}]}]
4、现在开启关闭的节点rabbit1 和rabbit3
#RABBITMQ_NODE_PORT=5672 RABBITMQ_NODENAME=rabbit1 /etc/init.d/rabbitmq-server start
#RABBITMQ_NODE_PORT=5674 RABBITMQ_NODENAME=rabbit3 /etc/init.d/rabbitmq-server start

5、再查看集群状态
#rabbitmqctl -n rabbit1 cluster_status
Cluster status of node rabbit1@localhost
[{nodes,[{disc,[rabbit1@localhost,rabbit2@localhost,rabbit3@localhost]}]},
 {running_nodes,[rabbit3@localhost,rabbit2@localhost,rabbit1@localhost]},
 {cluster_name,<<"rabbit1@localhost">>},
 {partitions,[]},
 {alarms,[{rabbit3@localhost,[]},
          {rabbit2@localhost,[]},
          {rabbit1@localhost,[]}]}]
可以看到3个节点都已经是running状态了。

6、为rabbit1节点添加用户名
#rabbitmqctl -n rabbit1 add_user admin admin123
#rabbitmqctl -n rabbit1 set_user_tags admin administrator
#rabbitmqctl -n rabbit1 set_permissions -p / admin  ".*" ".*" ".*"
7、开启web管理界面
#rabbitmq-plugins -n rabbit1 enable rabbitmq_management   #会开启15672端口
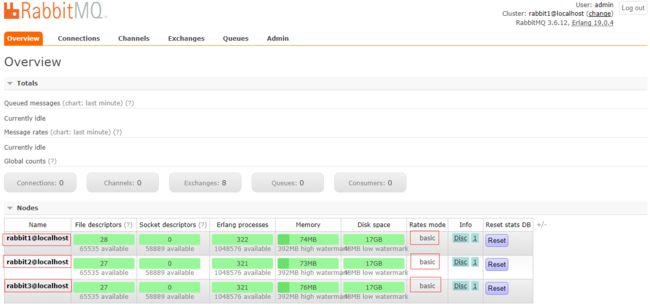
在浏览器访问  输入第6步设置的用户名和密码,界面如下:
注:rabbit2和rabbit3之所以是×××状态,红色小箭头也解释了。因为我们是在一台服务器模拟的3个节点,rabbitmq_management界面启动之后,端口是15672,只启动了一个,再启动rabbit2的时候,提示端口被占用,目前不知道如何为管理界面指定不同的端口,后面会继续研究……
五、退出集群和重启集群
1、退出集群
当节点不再成为集群中的一部分时,需要从集群中明确删除节点,我们以rabbit3节点为例子:
#rabbitmqctl -n rabbit3 stop_app
#rabbitmqctl -n rabbit3 reset
#rabbitmqctl -n rabbit3 start_app
查询状态
#rabbitmqctl -n rabbit1 cluster_status
Cluster status of node rabbit1@localhost
[{nodes,[{disc,[rabbit1@localhost,rabbit2@localhost]}]},
 {running_nodes,[rabbit2@localhost,rabbit1@localhost]},
 {cluster_name,<<"rabbit1@localhost">>},
 {partitions,[]},
 {alarms,[{rabbit2@localhost,[]},{rabbit1@localhost,[]}]}]
####################################################
#rabbitmqctl -n rabbit2 cluster_status
Cluster status of node rabbit2@localhost
[{nodes,[{disc,[rabbit1@localhost,rabbit2@localhost]}]},
 {running_nodes,[rabbit1@localhost,rabbit2@localhost]},
 {cluster_name,<<"rabbit1@localhost">>},
 {partitions,[]},
 {alarms,[{rabbit1@localhost,[]},{rabbit2@localhost,[]}]}]
#####################################################
#rabbitmqctl -n rabbit3 cluster_status
Cluster status of node rabbit3@localhost
[{nodes,[{disc,[rabbit3@localhost]}]},
 {running_nodes,[rabbit3@localhost]},
 {cluster_name,<<"rabbit3@localhost">>},
 {partitions,[]},
 {alarms,[{rabbit3@localhost,[]}]}]
可以看到节点3已经被移除了集群!
#####################################################
我们也可以远程删除节点,例如当必须处理一个无响应的节点的时候,可以从rabbit2@localhost中删除rabbit1@localhost
#rabbitmqctl -n rabbit1 stop_app          #首先停掉rabbit1节点

#rabbitmqctl -n rabbit2 forget_cluster_node rabbit1@localhost #从集群中移除rabbit1
Removing node rabbit1@localhost from cluster

注意,rabbit1仍然认为它与rabbit2是属于一个集群,当尝试启动它的时候将导致错误,我们将需要
重置它,以便能够再次启动它,如下:
#rabbitmqctl -n rabbit1 start_app
Starting node rabbit1@localhost
BOOT FAILED
===========
Error description:
   {error,{inconsistent_cluster,"Node rabbit1@localhost thinks it's clustered with node rabbit2@localhost, but rabbit2@localhost disagrees"}}
Log files (may contain more information):
   /var/log/rabbitmq/rabbit1.log
   /var/log/rabbitmq/rabbit1-sasl.log

Stack trace:
   [{rabbit_mnesia,check_cluster_consistency,0,
                   [{file,"src/rabbit_mnesia.erl"},{line,598}]},
    {rabbit,'-start/0-fun-0-',0,[{file,"src/rabbit.erl"},{line,273}]},
    {rabbit,start_it,1,[{file,"src/rabbit.erl"},{line,417}]},
    {rpc,'-handle_call_call/6-fun-0-',5,[{file,"rpc.erl"},{line,197}]}]

Error: {error,{inconsistent_cluster,"Node rabbit1@localhost thinks it's clustered with node rabbit2@localhost, but rabbit2@localhost disagrees"}}

#rabbitmqctl -n rabbit1 reset     #重置rabbit1节点
Resetting node rabbit1@localhost
#rabbitmqctl -n rabbit1 start_app #再开启就不会报错了
Starting node rabbit1@localhost
然后查看移除集群之后的状态
#rabbitmqctl -n rabbit1 cluster_status
Cluster status of node rabbit1@localhost
[{nodes,[{disc,[rabbit1@localhost]}]},
 {running_nodes,[rabbit1@localhost]},
 {cluster_name,<<"rabbit1@localhost">>},
 {partitions,[]},
 {alarms,[{rabbit1@localhost,[]}]}]
#rabbitmqctl -n rabbit2 cluster_status
Cluster status of node rabbit2@localhost
[{nodes,[{disc,[rabbit2@localhost]}]},
 {running_nodes,[rabbit2@localhost]},
 {cluster_name,<<"rabbit1@localhost">>},
 {partitions,[]},
 {alarms,[{rabbit2@localhost,[]}]}]
#rabbitmqctl -n rabbit3 cluster_status
Cluster status of node rabbit3@localhost
[{nodes,[{disc,[rabbit3@localhost]}]},
 {running_nodes,[rabbit3@localhost]},
 {cluster_name,<<"rabbit3@localhost">>},
 {partitions,[]},
 {alarms,[{rabbit3@localhost,[]}]}]
注:cluster_status命令现在显示作为独立RabbitMQ brokers运行的所有三个节点.但是有一点需要注意
rabbit2节点保留了集群的残留状态,而rabbit1和rabbit3是新近初始化的brokers。如果我们想要重新
初始化rabbit2节点,操作如下:
#rabbitmqctl -n rabbit2 stop_app
#rabbitmqctl -n rabbit2 reset
#rabbitmqctl -n rabbit2 start_app
之后再查看,rabbit2就是一个新初始化的节点了,如下:
#rabbitmqctl -n rabbit2 cluster_status
Cluster status of node rabbit2@localhost
[{nodes,[{disc,[rabbit2@localhost]}]},
 {running_nodes,[rabbit2@localhost]},
 {cluster_name,<<"rabbit2@localhost">>},
 {partitions,[]},
 {alarms,[{rabbit2@localhost,[]}]}]

2、集群重启
当集群重启时,最后一个挂掉的节点应该第一个重启,如果没有这样做,节点将等待30秒钟,以便最后
一个disc节点重新联机,并随后失败。
如果最后一个脱机的节点无法恢复,则可以使用forget_cluster_node命令将其从集群中删除。如果集群
因特殊原因(比如断电),而不知道哪个节点最后一个挂掉。可用以下方法重启,使其再次可引导,先
在一个节点上执行,如下:
#rabbitmqctl force_boot
#service rabbitmq-server start
在其他节点上执行
#service rabbitmq-server start

查看cluster状态是否正常(要在所有节点上查询)。
#rabbitmqctl cluster_status
如果有节点没加入集群,可以先退出集群,然后再重新加入集群。

注意:上述方法不适合内存节点重启,内存节点重启的时候是会去磁盘节点同步数据,如果磁盘节点没
起来,内存节点一直失败。
六、解决单机集群管理界面出现×××的问题(第四步骤最后)
在官网上看到了如何在一台服务器配置三个节点,并且将其配置成集群,如下步骤:
1、启动三个节点
RABBITMQ_NODE_PORT=5672 RABBITMQ_SERVER_START_ARGS="-rabbitmq_management listener [{port,15672}]" RABBITMQ_NODENAME=rabbit1 /etc/init.d/rabbitmq-server start
RABBITMQ_NODE_PORT=5673 RABBITMQ_SERVER_START_ARGS="-rabbitmq_management listener [{port,15673}]" RABBITMQ_NODENAME=rabbit2 /etc/init.d/rabbitmq-server start
RABBITMQ_NODE_PORT=5674 RABBITMQ_SERVER_START_ARGS="-rabbitmq_management listener [{port,15674}]" RABBITMQ_NODENAME=rabbit3 /etc/init.d/rabbitmq-server start
Starting rabbitmq-server: SUCCESS
rabbitmq-server.
2、查看端口
# netstat -tunlp
Active Internet connections (only servers)
Proto Recv-Q Send-Q Local Address               Foreign Address             State       PID/Program name
tcp        0      0 0.0.0.0:25672               0.0.0.0:*                   LISTEN      17282/beam.smp
tcp        0      0 127.0.0.1:9000              0.0.0.0:*                   LISTEN      125867/php-fpm
tcp        0      0 0.0.0.0:25673               0.0.0.0:*                   LISTEN      17911/beam.smp
tcp        0      0 0.0.0.0:25674               0.0.0.0:*                   LISTEN      20203/beam.smp
tcp        0      0 0.0.0.0:80                  0.0.0.0:*                   LISTEN      125204/nginx
tcp        0      0 0.0.0.0:4369                0.0.0.0:*                   LISTEN      17041/epmd
tcp        0      0 0.0.0.0:22                  0.0.0.0:*                   LISTEN      3172/sshd
tcp        0      0 127.0.0.1:25                0.0.0.0:*                   LISTEN      1324/master
tcp        0      0 :::5672                     :::*                        LISTEN      17282/beam.smp
tcp        0      0 :::5673                     :::*                        LISTEN      17911/beam.smp
tcp        0      0 :::5674                     :::*                        LISTEN      20203/beam.smp
tcp        0      0 :::4369                     :::*                        LISTEN      17041/epmd
tcp        0      0 :::22                       :::*                        LISTEN      3172/sshd
tcp        0      0 ::1:25                      :::*                        LISTEN      1324/master
3、配置集群
#rabbitmqctl -n rabbit2 stop_app

#rabbitmqctl -n rabbit2 join_cluster rabbit1@localhost   #将rabbit2节点加入到rabbit1

#rabbitmqctl -n rabbit2 start_app

4、查看
#rabbitmqctl  -n rabbit1 cluster_status
Cluster status of node rabbit1@localhost
[{nodes,[{disc,[rabbit1@localhost,rabbit2@localhost]}]},
 {running_nodes,[rabbit2@localhost,rabbit1@localhost]},
 {cluster_name,<<"rabbit1@localhost">>},
 {partitions,[]},
 {alarms,[{rabbit2@localhost,[]},{rabbit1@localhost,[]}]}]

5、继续添加集群节点
#rabbitmqctl -n rabbit3 stop_app

#rabbitmqctl -n rabbit3 join_cluster rabbit2@localhost   #将rabbit3节点加入rabbit2

#rabbitmqctl -n rabbit3 start_app

6、查看集群状态
#rabbitmqctl  -n rabbit1 cluster_status
Cluster status of node rabbit1@localhost
[{nodes,[{disc,[rabbit1@localhost,rabbit2@localhost,rabbit3@localhost]}]},
 {running_nodes,[rabbit3@localhost,rabbit2@localhost,rabbit1@localhost]},
 {cluster_name,<<"rabbit1@localhost">>},
 {partitions,[]},
 {alarms,[{rabbit3@localhost,[]},
          {rabbit2@localhost,[]},
          {rabbit1@localhost,[]}]}]

#rabbitmqctl  -n rabbit2 cluster_status
Cluster status of node rabbit2@localhost
[{nodes,[{disc,[rabbit1@localhost,rabbit2@localhost,rabbit3@localhost]}]},
 {running_nodes,[rabbit3@localhost,rabbit1@localhost,rabbit2@localhost]},
 {cluster_name,<<"rabbit1@localhost">>},
 {partitions,[]},
 {alarms,[{rabbit3@localhost,[]},
          {rabbit1@localhost,[]},
          {rabbit2@localhost,[]}]}]

#rabbitmqctl  -n rabbit3 cluster_status
Cluster status of node rabbit3@localhost
[{nodes,[{disc,[rabbit1@localhost,rabbit2@localhost,rabbit3@localhost]}]},
 {running_nodes,[rabbit1@localhost,rabbit2@localhost,rabbit3@localhost]},
 {cluster_name,<<"rabbit1@localhost">>},
 {partitions,[]},
 {alarms,[{rabbit1@localhost,[]},
          {rabbit2@localhost,[]},
          {rabbit3@localhost,[]}]}]
7、启动三个节点的rabbitmq-management界面
#rabbitmq-plugins -n rabbit1 enable rabbitmq_management
The following plugins have been enabled:
  amqp_client
  cowlib
  cowboy
  rabbitmq_web_dispatch
  rabbitmq_management_agent
  rabbitmq_management
Applying plugin configuration to rabbit1@localhost... started 6 plugins.

#rabbitmq-plugins -n rabbit2 enable rabbitmq_management
Plugin configuration unchanged.
Applying plugin configuration to rabbit2@localhost... started 6 plugins.

#rabbitmq-plugins -n rabbit3 enable rabbitmq_management
Plugin configuration unchanged.
Applying plugin configuration to rabbit3@localhost... started 6 plugins.

然后可以看到15672、15673、15674端口都起来了。

8、在rabbit1节点上创建用户
rabbitmqctl -n rabbit1 add_user admin admin123
rabbitmqctl -n rabbit1 set_user_tags admin administrator
rabbitmqctl -n rabbit1 set_permissions -p / admin  ".*" ".*" ".*"
注意:节点1设置完以上这些之后,在集群内的机器都会同步此配置,但是/etc/rabbitmq/rabbitmq.config文件不会同步。
查看vhost(/)允许哪些用户访问
#rabbitmqctl -n rabbit1 list_permissions -p /    #节点rabbit2和rabbit3查询出的信息是一样的
Listing permissions in vhost "/"
guest   .*      .*      .*
admin   .*      .*      .*
配置允许远程访问的用户,rabbitmq的guest用户默认不允许远程主机访问
#cat rabbitmq.config
[
{rabbit, [{tcp_listeners, [5672]}, {loopback_users, ["admin"]}]}
].
查看集群创建了那些用户:
#rabbitmqctl -n rabbit1 list_users
Listing users
admin   [administrator]
guest   [administrator]
删除guest用户:
#rabbitmqctl -n rabbit1 delete_user guest
Deleting user "guest"
然后在浏览器访问,如下图:
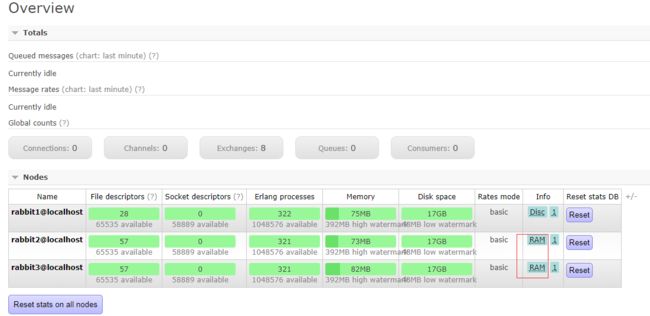
注意:集群中的节点disc表示为磁盘模式,ram表示为内存模式。默认是disc磁盘模式,而一个集群中最少要有一个磁盘节点。
下面我们将rabbit2和rabbit3节点改为ram模式,操作如下
#rabbitmqctl -n rabbit2 stop_app

修改rabbit2节点disc模式为ram模式
#rabbitmqctl -n rabbit2 change_cluster_node_type ram
Turning rabbit2@localhost into a ram node

启动rabbit2节点
#rabbitmqctl -n rabbit2 start_app
Starting node rabbit2@localhost

节点rabbit3操作和rabbit2一样!
########################################
注意:也可以在加入集群的时候设置节点模式
#rabbitmqctl -n rabbit1 stop_app
#rabbitmqctl -n rabbit2 join_cluster rabbit1@localhost --ram
#rabbitmqctl -n rabbit1 start_app
刷新管理页面,会看到模式改变了,rabbit1是disc模式,rabbit2和rabbit3是ram模式,如下图:
注意事项:
1、cookie在所有节点上必须完全一样,同步时一定要注意。
2、erlang是通过主机名来连接服务,必须保证各个主机名之间可以ping通。可以通过编辑/etc/hosts来手工添加主机名和IP对应关系。如果主机名ping不通,rabbitmq服务启动会失败。
3、如果queue是非持久化queue,则如果创建queue的那个节点失败,发送方和接收方可以创建同样的queue继续运作。但如果是持久化queue,则只能等创建queue的那个节点恢复后才能继续服务。
4、在集群元数据有变动的时候需要有disk node在线,但是在节点加入或退出的时候所有的disk node必须全部在线。如果没有正确退出disk node,集群会认为这个节点当掉了,在这个节点恢复之前不要加入其它节点。
参考地址:http://www.ywnds.com/?p=4741
七、rabbitmq遇到的问题
1、rabbitmq管理界面无法启动
#rabbitmq-plugins disable rabbitmq_management
Error: The following plugins could not be found:
  rabbitmq_management
执行#rabbitmq-plugins set rabbitmq_management  然后再执行disable或者enable就ok了
2、rabbitmq集群配置好之后,主机的hostname不能轻易修改,如果修改了,就会报错提示节点找不到,因为rabbitmq集群是以hostname为节点创建的。
不足之处,请多多指出。


