Python爬虫入门(一)-爬取CSDN热门博文
标签(空格分隔): python
因毕业设计需要,所以开始学起了python,大部分都是边写边学,遇到问题就google,所以可能有很多写的不好的地方,有好的意见请指出.不过主要分享的是遇到了自己不熟悉的东西,如何快速解决该问题的流程.
1.目的
写的目的是抓取csdn博客首页的一些文章的标题,连接,作者,摘要信息,如下图,然后存放到自己的数据库中,为了版权问题,所以不抓取内容了,毕业设计使用的时候直接超链接过去.
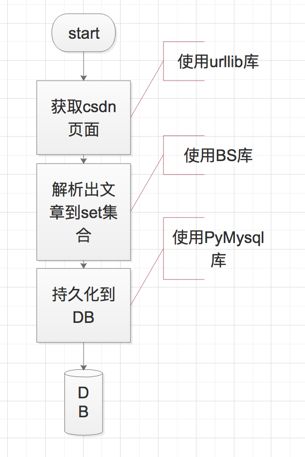
接下来分析csdn博客的首页http://blog.csdn.net/,打开F12后,可以查看到文章内容是直接在html中返回,并没有单独的数据接口,因此想要获取数据的第一步就是获取该页面内容.那么大概流程就如下清晰了:
2.获取页面内容
csdn博客的首页是根据模板生成的,没有数据对应的接口,所以直接获取页面即可.代码就很简单了
首先建立一个common模块,用于保存一些公共信息,也方便后期加入抓取其他网站文章.
Common.py
# coding=utf-8
# 伪装浏览器请求,不加header的话请求会报403,因为未被识别成浏览器
headers = {
    'User-Agent': 'Mozilla/5.0 (Windows; U; Windows NT 6.1; en-US; rv:1.9.1.6) Gecko/20091201 Firefox/3.5.6'
}

csdn_url = 'http://blog.csdn.net/?page='
接下来发送请求,获取需要解析的页面
    url = Common.csdn_url + str(x+1)
    print('请求的地址为: ' + url)
    req = request.Request(url, headers= Common.headers)
    result = request.urlopen(req).read().decode('utf-8')
    # result即请求到的csdn页面.
3.解析页面
解析就用到了beautifulSoup4库,官网地址:点击进入,针对使用的话属于跟着文档走一遍就够用的库,具体就不在这里阐述,毕竟本文只是想表达一个应对问题的流程.
3.1 模型
首先因为最终要保存到数据库,所以对数据库表要有一个映射,也就是Model层.
class Article:
    '数据库文章类'

    def __init__(self, raw):
        self.id = raw.get('id')
        self.title = raw.get('title')
        self.user_id = raw.get('userId')
        self.summary = raw.get('summary')
        self.html_content = raw.get('htmlContent')
        self.content = raw.get('content')
        self.keyword = raw.get('keyword')
        self.viewcount = 0
        self.likecount = 0
        self.catelog_id = 0 #需要审核时手动指定
        self.is_top = raw.get('isTop')
        self.is_show = raw.get('isShow')
        self.createdate = raw.get('createdate')
        self.modifydate = raw.get('modifydate')
        self.source = raw.get('source')
        self.source_link = raw.get('sourceLink')
        self.source_author = raw.get('sourceAuthor')

    def __hash__(self):
        return hash(self.id)

    def __eq__(self, other):
        return self.id == other.id
分析:
self指的是该类实例对象本身,个人理解为java类中的this,可以直接访问类中的属性.
def __init__(self, raw)相当于Java中的构造函数,执行Article(raw)的话会自动调用该init方法.
def __hash__(self)和def __eq__(self, other),按照流程图该类会用一个set集合存储,目的是自动根据文章id去重,那么就要了解到python中set集合是如何去重的.这一点和Java差不多,hash值决定了桶的位置,eq决定是否重复..
3.2 解析页面内容
解析一般根据页面内容,分析,然后操作dom树拿到自己想要的东西.这里解析后放到一个字典中,字典的基本结构就是键值对.最后再放到set集合中.
def dealwith(result):
    soup = BeautifulSoup(result,'html.parser')
    blogs = soup.find_all('dl',class_='blog_list clearfix')
    # 获取当前页文章
    for blog in blogs:
        article = dict() #创建字典
        article['userId'] = -1 #代表是机器人
        article['isShow'] = 0 #暂时不展示,后台审核
        article['isTop'] = 0 #不置顶
        dt=datetime.datetime.now().strftime("%Y-%m-%d %H:%M:%S")
        article['createdate'] = dt #创建时间
        article['modifydate'] = dt #更新时间
        article['source'] = 2 #表示来自csdn

        # 解析作者信息
        nickname = blog.dt.contents[2].string
        article['sourceAuthor'] = nickname

        # 解析文章内容
        content = blog.dd
        for child in content.children:
            if re.search("tracking-ad",str(child)):
                sourceLink = child.a['href']
                articleId = sourceLink[sourceLink.rfind('/')+1 : len(sourceLink)]
                article['id'] = '2'+articleId #csdn文章id
                article['sourceLink'] = sourceLink #原文链接
                article['title'] = child.a.string #原文标题
                continue
            if re.search("blog_list_c",str(child)):
                article['summary'] = child.string #原文摘要
                continue
        # 添加到集合中
        articleList.add(ArticleModel.Article(article))
4.持久化到数据库
保存到数据库中使用到了pymysql库,该库的使用可以参考菜鸟教程:点击进入.
如下使用contextlib建立一个上下文管理器mysqlTemplate().具体执行一会再分析
ArticleService.py
import pymysql
import contextlib

host='127.0.0.1'
port=3306
user='root'
passwd='123456'
db='aust'
charset='utf8'

@contextlib.contextmanager
def mysqlTemplate():
    conn = pymysql.connect(host=host, port=port, user=user, passwd=passwd, db=db, charset=charset)
    cursor = conn.cursor(cursor=pymysql.cursors.DictCursor)
    try:
        yield cursor
    finally:
        conn.commit()
        cursor.close()
        conn.close()
然后写一个执行方法:
# 保存到数据库,已经有的数据则直接跳过
def saveToDB():
    sql = "REPLACE INTO `article` VALUES (%s,%s, %s, %s, %s,%s, %s, %s, %s, %s, %s, %s, %s, %s, %s, %s, %s)"
    with ArticleService.mysqlTemplate() as cursor:
        #读取出set集合
        for x in articleList:
            #执行更新操作
            row_count = cursor.execute(sql,
                        (x.id,x.title,x.user_id,x.summary,x.html_content,x.content,x.keyword,x.viewcount,x.likecount,
                         x.catelog_id,x.is_top,x.is_show,x.createdate,x.modifydate,x.source,x.source_link,x.source_author))
            print(row_count)
分析:
首先使用了@contextlib.contextmanager定义了一个上下文管理器mysqlTemplate(),该函数中是获取数据库连接,然后yield cursor,最后再关闭连接,那么该yield cursor就是主要逻辑代码,也就对应着下面的saveToDB()函数.
首先yield会把该函数转变为生成器,那么yield之前的算是一次next()调用,之后的也算是next()调用,那么中间的就是with产生的调用.
整个流程就是先获取到数据库连接,然后执行到了yield,该函数终端,转而执行with里面的函数,with的as获取到了yield的返回值也就是cursor对象,with执行完毕后之前终端的函数继续执行,关闭数据库资源等.
这里的mysql语句使用了replace into **这样的话,已经收集过得文章就不会重复收集到数据库中了.
那么到此我的需求也就实现了,剩下的就是实际中遇到的一些异常,相信google都能解决掉的.

