一、环境
安装过程参考的是http://charlie928.blog.51cto.com/3741218/1613257
一些故障处理参考文章http://4gamers.cn/blog/2014/07/15/setup-gitlab-on-aliyun-ubuntu/
gitlab的安装说明https://github.com/lubia/gitlab-recipes/tree/master/install/centos
系统:CentOS6.4最小化安装
IP:192.168.3.45
二、增加yum源
增加epel源
[root@gitlab ~]#  rpm -ivh http://dl.fedoraproject.org/pub/epel/6/x86_64/epel-release-6-8.noarch.rpm
Retrieving http://dl.fedoraproject.org/pub/epel/6/x86_64/epel-release-6-8.noarch.rpm
warning: /var/tmp/rpm-tmp.YSifux: Header V3 RSA/SHA256 Signature, key ID 0608b895: NOKEY
Preparing...                ########################################### [100%]
   1:epel-release           ########################################### [100%]
[root@gitlab ~]# sed -i 's@#b@b@g' /etc/yum.repos.d/epel.repo
[root@gitlab ~]# sed  -i 's@mirrorlist@#mirrorlist@g' /etc/yum.repos.d/epel.repo
安装淘宝源
[root@gitlab ~]# wget -O CentOS-Base.repo http://mirrors.aliyun.com/repo/Centos-6.repo
需要配置本地hosts解析,后面会用到
192.168.3.45 www.gitlab.com
三、安装更新包
[root@gitlab ~]# yum -y update
[root@gitlab ~]# yum -y groupinstall 'Development Tools'
[root@gitlab ~]# yum -y install readline readline-devel ncurses-devel gdbm-devel glibc-devel tcl-devel openssl-devel curl-devel expat-devel db4-devel byacc sqlite-devel libyaml libyaml-devel libffi libffi-devel libxml2 libxml2-devel libxslt libxslt-devel libicu libicu-devel system-config-firewall-tui redis sudo wget crontabs logwatch logrotate perl-Time-HiRes  cmake libcom_err-devel.i686 libcom_err-devel.x86_64  perl-ExtUtils-CBuilder perl-ExtUtils-MakeMaker nodejs
四、安装git
删除系统默认的git,使用源码安装git
[root@gitlab ~]# git --version
git version 1.7.1
[root@gitlab ~]# yum remove git -y

#下载源码安装包
[root@gitlab ~]# wget https://www.kernel.org/pub/software/scm/git/git-2.1.3.tar.gz
[root@gitlab ~]# tar xf git-2.1.3.tar.gz
[root@gitlab ~]# cd git-2.1.3
[root@gitlab git-2.1.3]# ./configure
[root@gitlab git-2.1.3]# make && make prefix=/usr/local install
[root@gitlab git-2.1.3]# ln -s /usr/local/bin/git /usr/bin/
[root@gitlab git-2.1.3]# git --version
git version 2.1.3
五、安装ruby环境
删除系统自带的ruby环境,确保ruby是2.0以上的版本
[root@gitlab ~]# yum remove ruby -y
#下载ruby安装包,最少2.0以上
[root@gitlab ~]# wget ftp://ftp.ruby-lang.org/pub/ruby/ruby-2.1.2.tar.gz
[root@gitlab ~]# tar xf ruby-2.1.2.tar.gz
[root@gitlab ~]# cd ruby-2.1.2
[root@gitlab ruby-2.1.2]#./configure --prefix=/usr/local/
[root@gitlab ruby-2.1.2]# make && make install
安装bundler
[root@gitlab ruby-2.1.2]# gem install bundler --no-doc
ERROR:  Could not find a valid gem 'bundler' (>= 0), here is why:
          Unable to download data from https://rubygems.org/ - Errno::ECONNRESET: Connection reset by peer - SSL_connect (

#解决如下
[root@gitlab ruby-2.1.2]# gem sources --remove https://rubygems.org/
https://rubygems.org/ removed from sources
[root@gitlab ruby-2.1.2]# gem sources -a https://ruby.taobao.org/
https://ruby.taobao.org/ added to sources
[root@gitlab ruby-2.1.2]# gem sources -l
*** CURRENT SOURCES ***

https://ruby.taobao.org/
#重新安装bundler
[root@gitlab ruby-2.1.2]# gem install bundler --no-doc
Fetching: bundler-1.9.9.gem (100%)
Successfully installed bundler-1.9.9
1 gem installed
六、创建git用户
[root@gitlab ~]# adduser --system --shell /bin/bash --comment 'GitLab' --create-home --home-dir /home/git/ git
七、安装mysql,这里选择源码安装mysql-5.5-37,使用安装脚本进行安装
脚本内容如下
#!/bin/bash

DATADIR='/data/mysql/data'
VERSION='mysql-5.5.37'
export LANG=zh_CN.UTF-8

#Source function library.
. /etc/init.d/functions

#camke install mysql5.5.X
install_mysql(){
        read -p "please input a password for root: " PASSWD
        if [ ! -d $DATADIR ];then
                mkdir -p $DATADIR
        fi
        yum install cmake make gcc-c++ bison-devel ncurses-devel -y
        id mysql &>/dev/null
        if [ $? -ne 0 ];then
                useradd mysql -s /sbin/nologin -M
        fi
        #useradd mysql -s /sbin/nologin -M
        #change datadir owner to mysql
        chown -R mysql.mysql $DATADIR
        cd
        #wget http://mirrors.sohu.com/mysql/MySQL-5.5/mysql-5.5.38.tar.gz
        tar xf $VERSION.tar.gz
        cd $VERSION
        cmake . -DCMAKE_INSTALL_PREFIX=/usr/local/$VERSION \
        -DMYSQL_DATADIR=$DATADIR \
        -DMYSQL_UNIX_ADDR=$DATADIR/mysql.sock \
        -DDEFAULT_CHARSET=utf8 \
        -DDEFAULT_COLLATION=utf8_general_ci \
        -DENABLED_LOCAL_INFILE=ON \
        -DWITH_INNOBASE_STORAGE_ENGINE=1 \
        -DWITH_FEDERATED_STORAGE_ENGINE=1 \
        -DWITH_BLACKHOLE_STORAGE_ENGINE=1 \
        -DWITHOUT_EXAMPLE_STORAGE_ENGINE=1 \
        -DWITHOUT_PARTITION_STORAGE_ENGINE=1
        make && make install
        if [ $? -ne 0 ];then
                action "install mysql is failed"  /bin/false
                exit $?
        fi
        sleep 2
        #link
        ln -s /usr/local/$VERSION/ /usr/local/mysql
        ln -s /usr/local/mysql/bin/* /usr/bin/
        #copy config and start file
        /bin/cp /usr/local/mysql/support-files/my-small.cnf /etc/my.cnf
        cp /usr/local/mysql/support-files/mysql.server /etc/init.d/mysqld
        chmod 700 /etc/init.d/mysqld
        #init mysql
        /usr/local/mysql/scripts/mysql_install_db  --basedir=/usr/local/mysql --datadir=$DATADIR --user=mysql
        if [ $? -ne 0 ];then
                action "install mysql is failed"  /bin/false
                exit $?
        fi
        #check mysql
        /etc/init.d/mysqld start
        if [ $? -ne 0 ];then
                action "mysql start is failed"  /bin/false
                exit $?
        fi
        chkconfig --add mysqld
        chkconfig mysqld on
        /usr/local/mysql/bin/mysql -e "update mysql.user set password=password('$PASSWD') where host='localhost' and user='root';"
        /usr/local/mysql/bin/mysql -e "update mysql.user set password=password('$PASSWD') where host='127.0.0.1' and user='root';"
        /usr/local/mysql/bin/mysql -e "delete from mysql.user where password='';"
        /usr/local/mysql/bin/mysql -e "flush privileges;"
        #/usr/local/mysql/bin/mysql -e "select version();" >/dev/null 2>&1
        if [ $? -eq 0 ];then
                echo "+---------------------------+"
                echo "+------mysql安装完成--------+"
                echo "+---------------------------+"
        fi
        #/etc/init.d/mysqld stop
}

install_mysql
查看mysql安装结果
[root@gitlab ~]# mysql --version
mysql  Ver 14.14 Distrib 5.5.37, for Linux (x86_64) using  EditLine wrapper
创建数据库并授权
[root@gitlab ~]# mysql -u root -p -h 127.0.0.1
Enter password:         #这里的密码是我的安装脚本中提供的密码
Welcome to the MySQL monitor.  Commands end with ; or \g.
Your MySQL connection id is 6
Server version: 5.5.37 Source distribution

Copyright (c) 2000, 2014, Oracle and/or its affiliates. All rights reserved.

Oracle is a registered trademark of Oracle Corporation and/or its
affiliates. Other names may be trademarks of their respective
owners.

Type 'help;' or '\h' for help. Type '\c' to clear the current input statement.

mysql> CREATE DATABASE IF NOT EXISTS `gitlabhq_production` DEFAULT CHARACTER SET `utf8` COLLATE `utf8_unicode_ci`;
Query OK, 1 row affected (0.00 sec)

mysql> GRANT SELECT, LOCK TABLES, INSERT, UPDATE, DELETE, CREATE, DROP, INDEX, ALTER ON `gitlabhq_production`.* TO 'git'@'localhost' IDENTIFIED BY 'gitpasswd';
Query OK, 0 rows affected (0.00 sec)

mysql> flush privileges;
Query OK, 0 rows affected (0.01 sec)

mysql> select user,host,password from mysql.user;
+------+-----------+-------------------------------------------+
| user | host      | password                                  |
+------+-----------+-------------------------------------------+
| root | localhost | *B181A5BCA7C882221F5B8F6F9657AE71FF67EDDB |
| root | 127.0.0.1 | *B181A5BCA7C882221F5B8F6F9657AE71FF67EDDB |
| git  | localhost | *6EA0EDE421A05E610ADBFC5D47B93B6E06C6216F |
+------+-----------+-------------------------------------------+
3 rows in set (0.00 sec)
测试新建的用户能否登陆mysql
[root@gitlab ~]# mysql -u git -p -h localhost
Enter password:         #这里的密码是上文中给定的gitpasswd
Welcome to the MySQL monitor.  Commands end with ; or \g.
Your MySQL connection id is 8
Server version: 5.5.37 Source distribution

Copyright (c) 2000, 2014, Oracle and/or its affiliates. All rights reserved.

Oracle is a registered trademark of Oracle Corporation and/or its
affiliates. Other names may be trademarks of their respective
owners.

Type 'help;' or '\h' for help. Type '\c' to clear the current input statement.

mysql> show databases;
+---------------------+
| Database            |
+---------------------+
| information_schema  |
| gitlabhq_production |
| test                |
+---------------------+
3 rows in set (0.00 sec)
八、配置redis
[root@gitlab ~]# chkconfig redis on
[root@gitlab ~]# /etc/init.d/redis start
Starting redis-server:                                     [  OK  ]
[root@gitlab ~]# netstat -anpt |grep redis
tcp        0      0 127.0.0.1:6379              0.0.0.0:*                   LISTEN      8755/redis-server
九、安装gitlab
[root@gitlab ~]# cd /home/git/
[root@gitlab git]# sudo -u git -H git clone https://gitlab.com/gitlab-org/gitlab-ce.git -b 7-4-stable gitlab
Cloning into 'gitlab'...
remote: Counting objects: 127971, done.
remote: Compressing objects: 100% (32073/32073), done.
remote: Total 127971 (delta 97845), reused 123442 (delta 94050)
Receiving objects: 100% (127971/127971), 81.35 MiB | 1.63 MiB/s, done.
Resolving deltas: 100% (97845/97845), done.
Checking connectivity... done.

#修改配置文件
[root@gitlab git]# cd gitlab/
[root@gitlab gitlab]# sudo -u git -H cp config/gitlab.yml.example config/gitlab.yml

#下面这条命令可以不用操作,保持默认即可
[root@gitlab gitlab]# sudo -u git -H vim config/gitlab.yml
gitlab:
    ## Web server settings (note: host is the FQDN, do not include http://)
    host:  www.gitlab.com  #这里设置的域名是为后面的postfix使用的,在后文中的gitlab.conf站点配置文件中也是使用的这个域名,普通用户访问gitlab使用这个域名
    port: 80
    https: false
#修改相应的目录权限
[root@gitlab gitlab]# chown -R git log/
[root@gitlab gitlab]# chown -R git tmp/
[root@gitlab gitlab]# chmod -R u+rwX log/
[root@gitlab gitlab]# chmod -R u+rwX tmp/
[root@gitlab gitlab]# chmod -R u+rwX tmp/pids/
[root@gitlab gitlab]# chmod -R u+rwX tmp/sockets/
[root@gitlab gitlab]# chmod -R u+rwX  public/uploads

#创建目录
[root@gitlab gitlab]# sudo -u git -H mkdir /home/git/gitlab-satellites
[root@gitlab gitlab]# chmod u+rwx,g=rx,o-rwx /home/git/gitlab-satellites

编辑配置文件unicorn.rb
[root@gitlab gitlab]# sudo -u git -H cp config/unicorn.rb.example config/unicorn.rb
[root@gitlab gitlab]# nproc
1
[root@gitlab gitlab]# sudo -u git -H vim config/unicorn.rb
worker_processes 1

#复制配置文件rack_attack.rb
[root@gitlab gitlab]# sudo -u git -H cp config/initializers/rack_attack.rb.example config/initializers/rack_attack.rb

#定义全局的用户和邮箱
[root@gitlab gitlab]# sudo -u git -H git config --global user.name "GitLab"
[root@gitlab gitlab]# sudo -u git -H git config --global user.email "[email protected]"
[root@gitlab gitlab]# sudo -u git -H git config --global core.autocrlf input

#编辑连接redis的配置
[root@gitlab gitlab]# sudo -u git -H cp config/resque.yml.example config/resque.yml
[root@gitlab gitlab]# sudo -u git -H vim config/resque.yml
development: redis://localhost:6379
test: redis://localhost:6379
production: unix:/var/run/redis/redis.sock
十、编辑gitlab数据库文件
[root@gitlab gitlab]# sudo -u git cp config/database.yml.mysql config/database.yml
[root@gitlab gitlab]# sudo -u git -H vim config/database.yml
production:
  adapter: mysql2
  encoding: utf8
  collation: utf8_general_ci
  reconnect: false
  database: gitlabhq_production
  pool: 10
  username: git
  password: "gitpasswd"

#修改数据库文件权限
[root@gitlab gitlab]# sudo -u git -H chmod o-rwx config/database.yml
十一、安装gem
#添加淘宝的ruby源
[root@gitlab gitlab]# sudo -u git vim Gemfile
source "http://ruby.taobao.org"  #将第一行修改成taobao的源

[root@gitlab gitlab]# cd /home/git/gitlab
[root@gitlab gitlab]# ln -s /usr/local/bin/bundle /usr/bin/
[root@gitlab gitlab]# sudo -u git -H bundle install --deployment --without development test postgres aws
十二、安装gitlab-shell
[root@gitlab gitlab]# ln -s /usr/local/bin/ruby /usr/bin/ruby
[root@gitlab gitlab]# sudo -u git -H bundle exec rake gitlab:shell:install[v2.0.1] REDIS_URL=unix:/var/run/redis/redis.sock RAILS_ENV=production
git clone 'https://gitlab.com/gitlab-org/gitlab-shell.git' '/home/git/gitlab-shell/'
Cloning into '/home/git/gitlab-shell'...
remote: Counting objects: 2118, done.
remote: Compressing objects: 100% (1639/1639), done.
remote: Total 2118 (delta 1301), reused 710 (delta 400)
Receiving objects: 100% (2118/2118), 306.39 KiB | 177.00 KiB/s, done.
Resolving deltas: 100% (1301/1301), done.
Checking connectivity... done.
git reset --hard $(git describe v2.0.1 || git describe origin/v2.0.1) || git fetch origin && git reset --hard $(git describe v2.0.1 || git describe origin/v2.0.1)
HEAD is now at a3b5445 Fix bug when changes to post-receive worker was not dumped properly
HEAD is now at a3b5445 Fix bug when changes to post-receive worker was not dumped properly
bin/install
mkdir -p /home/git/repositories/: OK
mkdir -p /home/git/.ssh: OK
chmod 700 /home/git/.ssh: OK
touch /home/git/.ssh/authorized_keys: OK
chmod 600 /home/git/.ssh/authorized_keys: OK
chmod -R ug+rwX,o-rwx /home/git/repositories/: OK
find /home/git/repositories/ -type d -exec chmod g+s {} ;: OK

#gitlab-shell配置文件内容
[root@gitlab gitlab]# sudo -u git -H vim /home/git/gitlab-shell/config.yml
---
user: git
gitlab_url:  https://localhost/   #使用https
http_settings:
  self_signed_cert: true            #修改成true
repos_path: "/home/git/repositories/"
auth_file: "/home/git/.ssh/authorized_keys"
redis:
  bin: "/usr/bin/redis-cli"
  namespace: resque:gitlab
  socket: "/var/run/redis/redis.sock"
log_level: INFO
audit_usernames: false
十三、初始化数据库
[root@gitlab gitlab]# sudo -u git -H bundle exec rake gitlab:setup RAILS_ENV=production
This will create the necessary database tables and seed the database.
You will lose any previous data stored in the database.
Do you want to continue (yes/no)? yes            #输入yes
十四、下载服务脚本
[root@gitlab gitlab]# wget -O /etc/init.d/gitlab  https://gitlab.com/gitlab-org/gitlab-recipes/raw/master/init/sysvinit/centos/gitlab-unicorn

#配置gitlab的启动级别
[root@gitlab gitlab]# chmod +x /etc/init.d/gitlab
[root@gitlab gitlab]# chkconfig --add gitlab
[root@gitlab gitlab]# chkconfig gitlab on

#配置logrotate
[root@gitlab gitlab]# cp lib/support/logrotate/gitlab /etc/logrotate.d/gitlab

#检测gitlab的应用支持状态,并配置
[root@gitlab gitlab]# sudo -u git -H bundle exec rake gitlab:env:info RAILS_ENV=production

System information
System:
Current User:	git
Using RVM:	no
Ruby Version:	2.1.2p95
Gem Version:	2.2.2
Bundler Version:1.9.7
Rake Version:	10.3.2
Sidekiq Version:2.17.0

GitLab information
Version:	7.4.5
Revision:	19d572e
Directory:	/home/git/gitlab
DB Adapter:	mysql2
URL:		http://localhost
HTTP Clone URL:	http://localhost/some-project.git
SSH Clone URL:	git@localhost:some-project.git
Using LDAP:	no
Using Omniauth:	no

GitLab Shell
Version:	2.0.1
Repositories:	/home/git/repositories/
Hooks:		/home/git/gitlab-shell/hooks/
Git:		/usr/bin/git

[root@gitlab gitlab]# sudo -u git -H bundle exec rake assets:precompile RAILS_ENV=production

#启动gitlab服务
[root@gitlab gitlab]# service gitlab start
Starting unicorn:                                          [  OK  ]
Starting sidekiq:                                          [  OK  ]
十五、安装nginx服务,并下载gitlab的站点配置文件
这里的nginx使用yum进行安装
[root@gitlab gitlab]# yum install -y nginx
[root@gitlab gitlab]# chkconfig nginx on
[root@gitlab gitlab]# wget -O /etc/nginx/conf.d/gitlab.conf https://gitlab.com/gitlab-org/gitlab-ce/raw/master/lib/support/nginx/gitlab-ssl
将nginx用户添加到git组
[root@gitlab gitlab]# usermod -a -G git nginx
[root@gitlab gitlab]# chmod g+rx /home/git/
[root@gitlab gitlab]# vim /etc/nginx/conf.d/gitlab.conf
#编辑文件/etc/nginx/conf.d/gitlab.conf,修改其中的serve_rname
server_name gitlab.weyee.com
配置SSL证书
[root@gitlab gitlab]# mkdir -p /etc/nginx/ssl
[root@gitlab gitlab]# cd /etc/nginx/ssl/
[root@gitlab gitlab]# openssl req -new -x509 -nodes -days 3560 -out gitlab.crt -keyout gitlab.key
启动nginx服务
[root@gitlab gitlab]# service nginx start
十六、Gitlab配置SMTP邮件
cd /home/git/gitlab
[root@git gitlab]#sudo -u git -H cp config/initializers/smtp_settings.rb.sample config/initializers/smtp_setting.rb

#修改如下
[root@git gitlab]#sudo -u git -H vim config/initializers/smtp_settings.rb

if Rails.env.production?
  Rails.application.config.action_mailer.delivery_method = :smtp

  ActionMailer::Base.delivery_method = :smtp        #使用smtp方法
  ActionMailer::Base.smtp_settings = {
    address: "smtp.163.com",
    port: 25,
    user_name: "xxx",            #用户名
    password: "xxxx",            #密码
    domain: "163.com",
    authentication: :login,
    enable_starttls_auto: true,
    #openssl_verify_mode: 'peer' # See ActionMailer documentation for other possible options
  }
end


#编辑文件
[root@git gitlab]#sudo -u git -H vim config/environments/production.rb
config.action_mailer.delivery_method = :smtp            #将方法修改成smtp方式
在第一次访问是报错,500类型的错误,通过查看日志文件/home/git/gitlab/log/production.log知道是redis.sock的问题,解决如下
[root@gitlab gitlab]# cp /etc/redis.conf /etc/redis.conf.orig
[root@gitlab gitlab]# sed 's/^port .*/port 0/' /etc/redis.conf.orig |tee /etc/redis.conf

#添加redis.sock文件信息
[root@gitlab gitlab]# echo 'unixsocket /var/run/redis/redis.sock' |tee -a /etc/redis.conf
[root@gitlab gitlab]# echo -e 'unixsocketperm 0770' |tee -a /etc/redis.conf

#创建文件并赋予权限
[root@gitlab gitlab]# mkdir  -p /var/run/redis
[root@gitlab gitlab]# chown redis:redis /var/run/redis
[root@gitlab gitlab]# chmod 755 /var/run/redis
[root@gitlab gitlab]# service redis restart

#将redis用户添加到git组
[root@gitlab gitlab]# usermod -aG redis git
到此,重启redis后,还是报错提示
Errno::EACCES (Permission denied - connect(2) for /var/run/redis/redis.sock):
我这里是直接使用如下命令解决的
[root@gitlab gitlab]# chmod -R 777 /var/run/redis
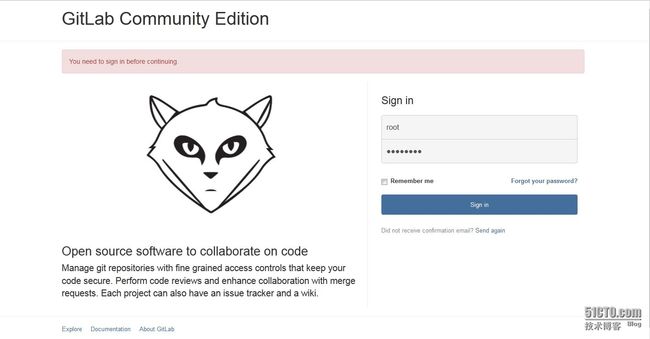
验证结果,访问地址如下:https://192.168.3.45
用户名和密码如下
login.........root
password......5iveL!fe
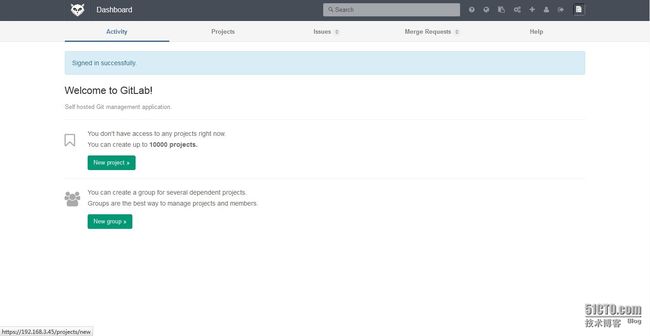
login以后的界面如下
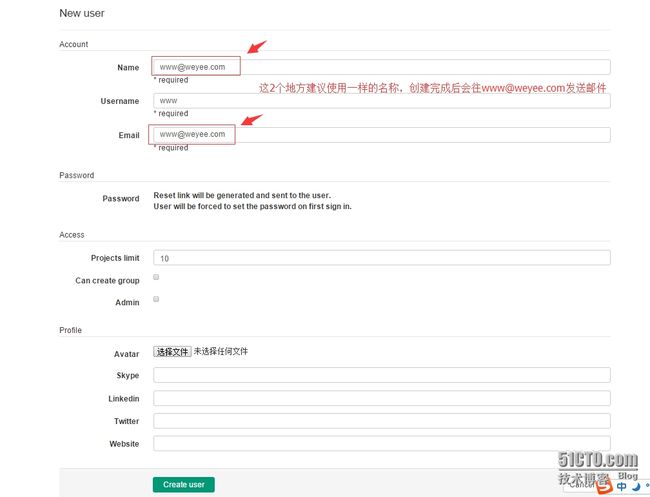
添加用户www,按图操作即可
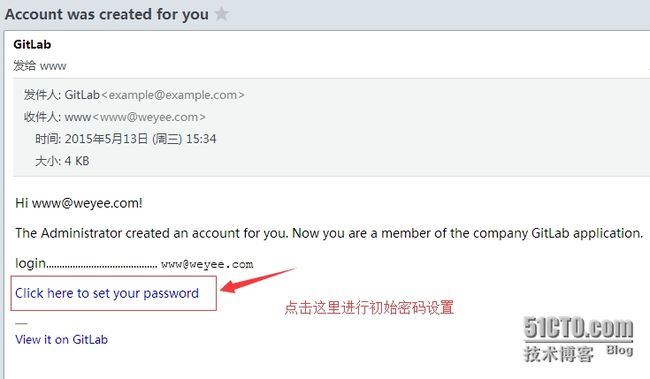
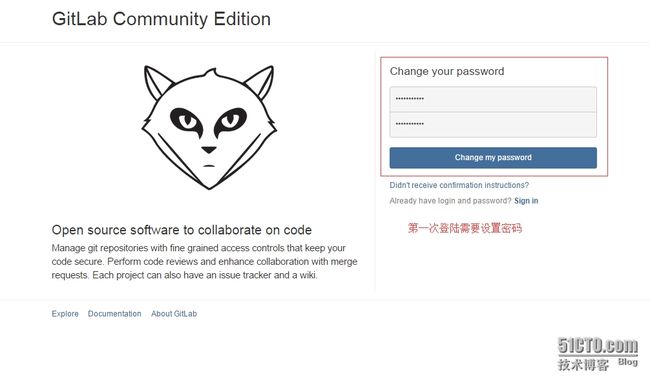
在用户邮箱[email protected]查收邮件,点击Click here to set your password进行密码设置
安装完成后gitlab运行异常使用如下命令检测,并解决
sudo -u git -H bundle exec rake gitlab:check RAILS_ENV=production
密码设置完成后使用https://www.gitlab.com/登录即可
gitlab的使用可参考http://dl528888.blog.51cto.com/2382721/1305656
http://dl528888.blog.51cto.com/2382721/1292316
