FTP File Transfer Protocol 传输控制协议,可以使文件通过网络从一台主机传送到同一网络的另一台主机上,而不受计算机类型和操作系统类型的限制。
常用ftp软件:Windows: Serv-U ,IIS Filezilla
Linux:Filezilla ,Vsftpd(very secure),wu-ftpd proftpd pureftp
ftp工作原理:
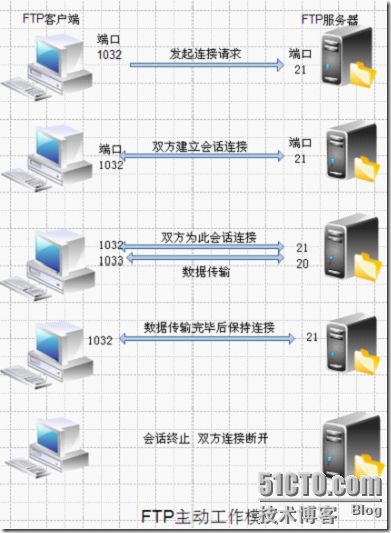
主动模式:连接由服务器端发起
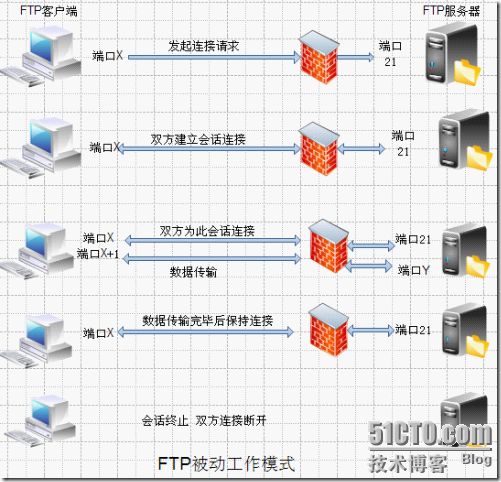
被动模式:客户端需要下载数据的时候,服务器端不是主动连接客户端,而是告诉客户端自己已经打开了某个端口,等待客户端进行数据下载。即服务端等待,客户端发起请求。
在服务器端,FTP服务器有两个预分配的端口号,分别为21和20,其中,端口号21用于发送和接收FTP的控制信息,FTP服务器通过侦听这个端口来判断是否有FTP客户端的连接请求,一个FTP会话建立后,端口21在会话期间将始终保持打开状态,端口20用于发送和接收FTP数据(ASCII码或者二进制文件),该端口只在传输数据时打开,在传输结束时关闭。
在客户端,当FTP客户端发起请求后,课动态分配端口号,选择范围为1024~65535.当一个FTP会话开始后,客户端程序打开一个控制端口,该端口连接到服务器上的21端口,需要传输数据时,客户端再打开到服务器端口20 的第二个端口。每当开始传输文件时,客户端程序就会打开一个新的数据端口,在文件传输完毕后,再将该端口自动关闭。
如果客户端和服务器端存在防火墙,主动模式就会产生问题:防火墙无法预知客户端用于建立数据连接的端口。需采用被动模式,被动模式的控制连接和数据连接都是由FTP客户端发起的。首先客户端随机开启一个大于1024的端口X向服务器的21端口发起连接,同时开启X+1端口,然后向服务器发送PASV命令,通知服务器自己处于被动模式,服务器收到命令后,会开放一个大于1024的端口Y进行监听,然后用PORT Y告诉客户端,自己的数据端口是Y,客户端收到命令后,会通过X+1号端口连接服务器的端口Y,然后在两个端口之间进行数据传输。
软件包:vsftpd
进程:vsftpd (/usr/sbin/vsftpd)
启动脚本:/etc/init.d/vsftpd
三个主配置文件
/etc/vsftpd/vsftpd.conf 600 root root
/etc/vsftpd/ftpusers 600 root root //**默认不允许登录本机ftp的用户
/etc/pam.d/vsftpd 644 root root //**访问控制文件,验证用户账号及密码
PS:vsftpd接受tcpwrapper的控制。但需要加载两个额外模块:ip_conntrack_ftp,
ip_nat_ftp。
下面就来安装使用vsftpd:
[root@station39 ~]# yum install vsftpd -y
[root@station39 ~]# service vsftpd start
查看下主配置文件:
[root@station39 ftp]# cd /etc/vsftpd/
[root@station39 vsftpd]# vim vsftpd.conf
# Allow anonymous FTP? (Beware - allowed by default if you comment this out).
anonymous_enable=YES //**是否允许匿名用户登录。
PS:所谓匿名用户实际上被映射为系统上的ftp用户
[root@station39 vsftpd]# finger ftp
Login: ftp Name: FTP User
Directory: /var/ftp Shell: /sbin/nologin
Never logged in.
No mail.
No Plan.
所以我们实际访问的是ftp的家目录。
# Uncomment this to allow local users to log in.
local_enable=YES //**是否允许系统上的账号登录
PS:任何一个用户登录FTP时访问的是自己的家目录。
# Uncomment this to enable any form of FTP write command.
write_enable=YES //**是否允许本地用户上传
# Default umask for local users is 077. You may wish to change this to 022,
# if your users expect that (022 is used by most other ftpd's)
local_umask=022 //** 当本地用户上传文件时建立新文件时所使用的权限掩码
# Uncomment this to allow the anonymous FTP user to upload files. This only
# has an effect if the above global write enable is activated. Also, you will
# obviously need to create a directory writable by the FTP user.
#anon_upload_enable=YES //** 允许匿名用户上传文件
# Uncomment this if you want the anonymous FTP user to be able to create
# new directories.
#anon_mkdir_write_enable=YES //** 允许匿名用户上传目录
anon_other_write_enable=YES //** 匿名用户的其他权限
# Activate directory messages - messages given to remote users when they
# go into a certain directory.
dirmessage_enable=YES //** 是否打开目录中的欢迎信息
message_file =. message //**在任何一个ftp的目录下建立. message的文件写上欢迎信
息,切换到那个目录时就会显示欢迎信息
# The target log file can be vsftpd_log_file or xferlog_file.
# This depends on setting xferlog_std_format parameter
xferlog_enable=YES //** 是否启用传输日志,一般和下面两项结合使用
# The name of log file when xferlog_enable=YES and xferlog_std_format=YES
# WARNING - changing this filename affects /etc/logrotate.d/vsftpd.log
#xferlog_file=/var/log/xferlog
# Switches between logging into vsftpd_log_file and xferlog_file files.
# NO writes to vsftpd_log_file, YES to xferlog_file
xferlog_std_format=YES //** 传输日志是否使用标准格式
log_ftp_protocol=YES //**详细日志,包括用户使用什么命令,此选项使用非标准格
式,意味着上面一项必须为NO
chroot_local_user=YES //** 禁锢所有用户只能访问自己的家目录
# You may specify an explicit list of local users to chroot() to their home
# directory. If chroot_local_user is YES, then this list becomes a list of
# users to NOT chroot().
#chroot_list_enable=YES
# (default follows)
#chroot_list_file=/etc/vsftpd/chroot_list //**禁锢某些用户只能访问自己的家目录,将用户
名写在/etc/vsftpd/chroot_list即可。
# If you want, you can arrange for uploaded anonymous files to be owned by
# a different user. Note! Using "root" for uploaded files is not
# recommended!
#chown_uploads=YES
#chown_username=whoever //** 匿名用户上传文件时,将文件的权限改为另一个用户的
# You may fully customise the login banner string:
#ftpd_banner=Welcome to blah FTP service. //** 欢迎信息
# You may activate the "-R" option to the builtin ls. This is disabled by
# default to avoid remote users being able to cause excessive I/O on large
# sites. However, some broken FTP clients such as "ncftp" and "mirror" assume
# the presence of the "-R" option, so there is a strong case for enabling it.
#ls_recurse_enable=YES //**是否允许递归使用ls命令
# You may change the default value for timing out an idle session.
#idle_session_timeout=600 //** 空闲会话超时时间
#
# You may change the default value for timing out a data connection.
#data_connection_timeout=120 //** 数据连接超时时间
max_clients //** 允许并发连接的所有客户端的数目
max_per_ip //** 单个IP所允许打开的并发连接数
anon_max_rate=10240 //** 匿名用户上传下载的最大速率
local_max_rate=10240 //** 本地用户上传下载的最大速率
userlist_enable=YES //** 是否接受/etc/vsftpd/user_list的管理,与下面一项结合使用
userlist_deny=YES|NO //** YES 黑名单 NO 白名单(仅允许文件中的用户登录)
PS:vsftp支持虚拟用户。
在开启SElinux的情况下允许匿名用户上传
[root@station39 vsftpd]# setsebool -P allow_ftpd_anon_write 1
[root@station39 vsftpd]# setsebool -P ftp_home_dir 1
[root@station39 vsftpd]# getsebool -a | grep ftp
allow_ftpd_anon_write --> on
allow_ftpd_full_access --> off
allow_ftpd_use_cifs --> off
allow_ftpd_use_nfs --> off
allow_tftp_anon_write --> off
ftp_home_dir --> on
ftpd_connect_db --> off
ftpd_disable_trans --> off
ftpd_is_daemon --> on
httpd_enable_ftp_server --> off
tftpd_disable_trans --> off
使用SSL
做一个自签名的证书:
[root@station39 vsftpd]# mkdir ssl
[root@station39 vsftpd]# cd ssl/
[root@station39 ssl]# openssl genrsa 1024 > vsftpd_key.pem
[root@station39 ssl]# openssl req -new -x509 -key vsftpd_key.pem -out vsftpd_cert.pem -days 3655
[root@station39 ssl]# chmod 600 ./*
[root@station39 ssl]# ll
total 16
-rw------- 1 root root 1184 Mar 24 13:20 vsftpd_cert.pem
-rw------- 1 root root 887 Mar 24 13:15 vsftpd_key.pem
编辑/etc/vsftpd/vsftpd.conf文件
#ssl
ssl_enable=YES
ssl_tlsv1=YES
ssl_sslv2=YES
ssl_sslv3=YES
allow_anon_ssl=NO
force_local_data_ssl=YES
force_local_logins_ssl=YES
rsa_cert_file=/etc/vsftpd/ssl/vsftpd_cert.pem
rsa_private_key_file=/etc/vsftpd/ssl/vsftpd_key.pem
保存退出,重启服务!
PS:vsftpd 的配置文件对语法要求比较严格,一定要注意选项后面不要有空格,否则就会有如下错误:
配置选项参数解释:
ssl_enable=yes/no //**是否启用 SSL,默认为no
allow_anon_ssl=yes/no //**是否允许匿名用户使用SSL,默认为no
rsa_cert_file=/path/to/file //**rsa证书的位置
dsa_cert_file=/path/to/file //**dsa证书的位置
force_local_logins_ssl=yes/no //**非匿名用户登陆时是否加密,默认为yes
force_local_data_ssl=yes/no //**非匿名用户传输数据时是否加密,默认为yes
force_anon_logins_ssl=yes/no //**匿名用户登录时是否加密,默认为no
force_anon_data_ssl=yes/no //**匿名用户数据传输时是否加密,默认为no
ssl_sslv2=yes/no //**是否激活sslv2加密,默认no
ssl_sslv3=yes/no //**是否激活sslv3加密,默认no
ssl_tlsv1=yes/no //**是否激活tls v1加密,默认yes
ssl_ciphers=加密方法 //**默认是DES-CBC3-SHA


