日期及版本:2014.5.4v1.0
架构图
实验目的:
1.Haproxy+Keepalived双主双机高可用模型,keepalived为Haproxy主从提供高可用保证haproxy-master若挂掉haproxy-backup能无缝接管,haproxy为后端Web提供负载均衡,缓解并发压力,实现WEB站点负载均衡+高可用性;
2. Haproxy反代web做动静分离;
3. Haproxy反代mysql 算法leastconn和roundrobin的不同效果;
系统环境:
OS:centos6.4 X64
apache: httpd-2.2.15-26.el6.centos.x86_64
haproxy: haproxy-1.4.22-3.el6.x86_64
keepalived:keepalived-1.2.7
基础配置:
Role |
Out-IP |
In-IP |
Host |
| haproxy VIP: | 192.168.1.10 | ||
| haproxy-master(haproxy1): | 192.168.1.11 | 172.16.100.254 | ha1.example.com |
| haproxy-backup(haproxy2): | 192.168.1.12 | 172.16.100.253 | ha2.example.com |
| apache1: | 172.16.100.13 | web1.example.com | |
| apache2: | 172.16.100.14 | web2.example.com |
实验步骤:因为都是双机配置,重复内容合并
1.1、配置后端web1,web2按IP修改
[root@web1 ~]# hostname web1
[root@web1 ~]# ifconfig eth0 172.16.100.13/24 up
[root@web1 ~]# route add default gw 172.16.100.254
[root@web1 ~]# route -n
[root@web1 ~]# yum -y install httpd
[root@web1 ~]# echo '
web1.example.com
' > /var/www/html/index.html[root@web1 ~]# service httpd start
[root@web1 ~]# curl http://172.16.100.13
1.2、安装php
[root@web1 ~]# yum -y install php
[root@ web1 ~]# cd /var/www/html/
[root@ web1 html]# cp index.html index.php
[root@web1 html]# cat >> index.php < [root@web1 html]# service httpd restart 2、配置Haproxy反向代理 [root@station11 ~]# hostname ha1 [root@ha1 ~]# ifconfig eth0 192.168.1.11/24 up [root@ha1 ~]# ifconfig eth1 172.16.100.254/24 up [root@ha1 ~]# route add default gw 192.168.1.1 [root@ha1 ~]# sed -i '/net.ipv4.ip_forward/ s/\(.*= \).*/\11/' /etc/sysctl.conf#打开转发功能 net.ipv4.ip_forward = 1 [root@ha1 ~]# yum -y install haproxy [root@ha1 ~]# cd /etc/haproxy/ [root@ha1 haproxy]# cp haproxy.cfg haproxy.cfg.bak 用rsyslog的理由: 1.防止系统崩溃无法获取系统日志分享崩溃原因,用rsyslog可以把日志传输到远程的日志服务器上 2.使用rsyslog日志可以减轻系统压力,因为使用rsyslog可以有效减轻系统的磁盘IO 3.rsyslog使用tcp传输非常可靠,可以对日志进行过滤,提取出有效的日志,rsyslog是轻量级的日志软件,在大量日志写的情况下,系统负载基本上在0.1以下 [root@ha1 haproxy]# yum -y install rsyslog [root@ ha1 haproxy ~]# vim /etc/rsyslog.conf
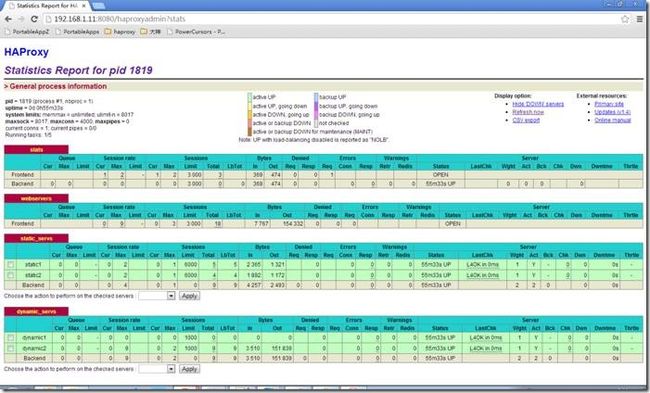
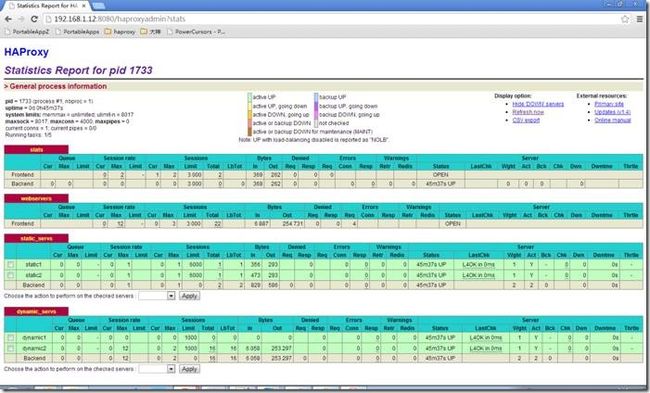
重启服务 [root@ha1 haproxy]# service rsyslog restart 3、双机公共设置ha1与ha2相同设置 [root@ha1 haproxy]# vim haproxy.cfg 在web1,web2服务器配置中日志格式添加"X-Forwarded-For"特殊首部,以便后端服务器记录真实发起请求的客户端IP地址 [root@web1 ~]# vim /etc/httpd/conf/httpd.conf 搜LogFormat 第一个字节段插入%{X-Forwarded-For}i LogFormat "%{X-Forwarded-For}i %h %l %u %t \"%r\" %>s %b \"%{Referer}i\" \"%{User-Agent}i\"" combined [root@web1 ~]# sed -i '/^LogFormat.*combined/ s#"#"\%{X-Forwarded-For}\i#' /etc/httpd/conf/httpd.conf [root@web1 html]# service httpd restart [root@web2 html]# service httpd restart 3、验证静态页面的负载均衡,动态页面长连接保持于同一后端服务器,动静分离。 Haproxy反代日志会详细显示前端客户端IP,Haproxy反代IP,根据动静分离ACL选择不同后端服务器,GET到不同页面。后端upstream服务器别名 [root@ha1 haproxy]# tail /var/log/haproxy.log [root@ha2 haproxy]# tail /var/log/haproxy.log 各个后端服务器日志记录前端客户端IP,Haproxy反代内网卡(内网关)IP,Get到不同页面,动态页面还有haproxy反代外网卡IP [root@web1 ~]# tail /var/log/httpd/access_log [root@web2 ~]# tail /var/log/httpd/access_log 不同http://192.168.1.1x:8080/haproxyadmin?stats访问同一侦听stats主机的指定url,端口经过身份验证,显示管理页面。 配置keepalived主从服务器,主从相同实例高低相反 [root@ha1 ~]# yum -y install keepalived [root@ha1 ~]# cp /etc/keepalived/keepalived.conf /etc/keepalived/keepalived.conf.bak [root@ha1 keepalived]# service keepalived start [root@ha2 keepalived]# vim keepalived.conf [root@ha1 ~]# ip addr | grep eth0 [root@ha2 ~]# ip addr | grep eth0 [root@ha1 ~]# tail /var/log/messages 停止ha1服务器haproxy服务,keepalived进行重新选举,ha2提升VI_1从备到主,VIP切换到备用服务器 [root@ha1 ~]# service haproxy stop [root@ha2 ~]# tail /var/log/messages [root@ha1 ~]# ip addr | grep eth0 VIP偏移到Keepalived backup机上 [root@ha2 ~]# ip addr | grep eth0 启动ha1服务器haproxy服务,VIP重新切换回主服务器 [root@ha1 ~]# service haproxy start [root@ha1 ~]# ip addr | grep eth0 [root@ha2 ~]# ip addr | grep eth0 [root@ha1 ~]# tail /var/log/messages [root@ha2 ~]# tail /var/log/messages 3、反代mysql 算法leastconn和roundrobin的不同效果? [root@web1 ~]# yum -y install mysql mysql-server mysql-devel [root@web1 ~]# service mysqld start [root@web1 ~]# mysqladmin -u root password redhat [root@web1 ~]# mysql -uroot -predhat station14相同 [root@ha1 haproxy]# vim haproxy.cfg [root@ha1 haproxy]# service haproxy reload [root@ha2 ~]# mysql -umysqlchecker -h192.168.1.11 mysql> select @@hostname; | station14.example.com | [root@ha2 ~]# mysql -umysqlchecker -h192.168.1.11 mysql> select @@hostname; | station13.example.com | [root@ha1 haproxy]# vim haproxy.cfg balance leastconn 修改算法为最少连接数,只考虑活动连接数,哪个后端服务器的连接最少就调度到哪台。 [root@ha1 haproxy]# service haproxy reload 用tcpdump捕捉来自不同源ip的tcp请求 [root@web1 ~]# tcpdump -i eth0 -s 0 -l -w out.log dst port 3306 | strings [root@web2 ~]# tcpdump -i eth0 -s 0 -l -w out.log dst port 3306 | strings 使用不同客户端访问, [root@station21 ~]# mysql -umysqlchecker -h192.168.1.11 -e "select @@hostname;" | station13.example.com | 在每个客户端执行命令后立刻在对应mysql端运行如下命令 [root@web1 ~]# strings out.log | grep -i 'select @@hostmame'| wc -l 1 [root@station22 ~]# mysql -umysqlchecker -h192.168.1.11 -e "select @@hostname;" | station14.example.com | [root@web2 ~]# strings out.log | grep -i 'select @@hostmame'| wc -l 1 [root@station23 ~]# mysql -umysqlchecker -h192.168.1.11 -e "select @@hostname;" | station13.example.com | [root@web1 ~]# strings out.log | grep -i 'select @@hostmame'| wc -l 2 [root@station24 ~]# mysql -umysqlchecker -h192.168.1.11 -e "select @@hostname;" | station13.example.com | [root@web1 ~]# strings out.log | grep -i 'select @@hostmame'| wc -l 3 [root@station25 ~]# mysql -umysqlchecker -h192.168.1.11 -e "select @@hostname;" | station14.example.com | [root@web2 ~]# strings out.log | grep -i 'select @@hostmame'| wc -l 2 [root@station26 ~]# mysql -umysqlchecker -h192.168.1.11 -e "select @@hostname;" | station14.example.com | [root@web2 ~]# strings out.log | grep -i 'select @@hostmame'| wc -l 3 会得到执行语句当时的递增次数,最少连接算法会把连接请求调度到当时活动连接最少的那台服务器。
EOF
启用接受远程日志功能
去注释
# Provides UDP syslog reception
$ModLoad imudp
$UDPServerRun 514   基于UDP接收日志请求
rsyslog默认会把如下信息发往
*.info;mail.none;authpriv.none;cron.none;      /var/log/messages
修改上行为下行,添加local2.none不记录到
*.info;mail.none;authpriv.none;cron.none;local2.none;      /var/log/messages
添加一行,日志记录到
local2.*                                    /var/log/haproxy.log
global
log         127.0.0.1 local2           #以日志服务器形式发往本机地址,设施名local2
chroot      /var/lib/haproxy           #haproxy工作目录切换到假根目录,这里默认
pidfile     /var/run/haproxy.pid
maxconn     4000                       #每个haproxy单进程所接受的最大并发连接数
user        haproxy
group       haproxy
daemon                                 #haproxy以守护进程的方式工作于后台
stats socket /var/lib/haproxy/stats    #统计数据保存位置
defaults
mode                    http                 #指定frontend和backend工作模式{tcp|http|health},代理后端web站点用http模式
log                     global               #日志使用全局中定义的日志参数
option                  httplog              #启用http的log,启用对http请求会话计时捕获到cookie的日志,默认原格式简陋,后面还可跟参数[clf] clf格式
option                  dontlognull          #不记录空信息,保证HAProxy不记录上级负载均衡发送过来的用于检测状态没有数据的心跳包。
option http-server-close                     #启用http连接在服务器端关闭功能,支持客户端一侧长连接
option forwardfor       except 127.0.0.0/8   # forwardfor将用户请求转发后端服时,在HTTP请求报文中添加"X-Forwarded-For"特殊首部,以便后端服记录真实发起请求的客户端IP地址,而不是代理服务器内网卡地址。
option                  redispatch           #当原分配用户请求的后端服故障时,允许把用户请求重新分发给其他后端服
option                  abortonclose         #当Haproxy服务器负载很高的时候,自动结束掉当前队列处理比较久的连接
retries                 3                    #对后端服连接失败后的重连次数
timeout http-request    10s                  #http请求超时时间10秒
timeout queue           1m                   #后端有多个服务器,当每个后端服务器都达到最大连接上限,haproxy等待发送到对应后端服务器的队列已满或请求已入列但未处理的超时时间1分种
timeout connect         10s                  #haproxy向后端服务器请求建立连接的超时时间
timeout client          1m                   #发起连接请求的前端客户端连接处于非活动态的最大超时时间,过时断开,相当于Apache的timeout keepalive
timeout server          1m                   #服务器端连接处于非活动态的最大超时时间
timeout http-keep-alive 10s                  #长连接超时时间
timeout check           10s                  #做健康状态检测的超时时间
maxconn                 3000                 #最大连接数
listen stats
mode          http
bind          *:8080                        #绑定在特殊端口8080
stats         enable                        #启动status管理界面
stats         hide-version                  #status隐藏haproxy版本信息
stats uri     /haproxyadmin?stats           #status访问路径
stats realm   Haproxy\ Statistics           #status登陆验证信息
stats auth    admin:admin                   #status页面登陆用户名或密码
stats admin if TRUE                         #通过验证才能管理后端,必须加判断条件,否则语法错误
frontend webservers
bind         *:80
mode         http
log          global
option       httpclose                      #每次请求完毕后主动关闭http通道
option       logasap                        #传输大文件时可以提前记录日志
option       dontlognull                    #不记录空信息,保证HAProxy不记录上级负载均衡发送过来的用于检测状态没有数据的心跳包
#################HAProxy的日志记录内容设置###################
capture request  header Host len 20         #只记录Host这首部值的前20字节
capture request  header X-Forwarded-For len 15  #记录发起请求客户端的IP地址,IP地址一般就15个字节。
capture request  header Referer len 60      #Referrer记录点击链接时所在页面的引用位置
################url_static配合if使用实现动静分离#########################
acl url_static       path_beg       -i /static /p_w_picpaths /javascript /stylesheets   #path_begin路径以XX开头,-i忽略大小写
acl url_static       path_end       -i .html .jpg .jpeg .gif .png .css .js        #path_end路径以XX结尾,同名acl逻辑或关系
use_backend static_servs          if url_static     #满足ACL url_static 使用backend static_servs
default_backend dynamic_servs
#调度算法动静区别在于调整配置文件haproxy.cfg,动态调整reload生效,静态调整restart生效
#轮调平均分配访问到后端服,访问动态页面需要保持会话因此source consistent源地址一致性hash算法把来自于同一客户端请求始终转发于同一台后端服
backend static_servs
balance roundrobin                                 #动态轮调
server static1 172.16.100.13:80 check maxconn 6000  #此处server名static1是后端服别名,关键是IP地址
server static2 172.16.100.14:80 check maxconn 6000
backend dynamic_servs
balance source                                     #对源IP地址进行哈希,hash-type决定动态静态
hash-type consistent                               #hash类型 map-based图位静态 consistent-hash一致性hash动态
server dynamic1 172.16.100.13:80 check maxconn 1000 #根据服务器内容自定义最大连接数
server dynamic2 172.16.100.14:80 check maxconn 1000
May 4 01:15:25 localhost haproxy[1819]: 192.168.1.108:50854 [04/May/2014:01:15:25.571] webservers dynamic_servs/dynamic2 24/0/1/2/+27 200 +177 - - ---- 2/2/2/2/0 0/0 {192.168.1.11||http://192.168.1.11/} "GET /index.php?=PHPE9568F34-D428-11d2-A769-00AA001ACF42 HTTP/1.1"
May 4 01:15:25 localhost haproxy[1819]: 192.168.1.108:50855 [04/May/2014:01:15:25.572] webservers dynamic_servs/dynamic2 25/0/0/2/+27 200 +177 - - ---- 1/1/1/1/0 0/0 {192.168.1.11||http://192.168.1.11/} "GET /index.php?=PHPE9568F35-D428-11d2-A769-00AA001ACF42 HTTP/1.1"
May 4 01:15:28 localhost haproxy[1819]: 192.168.1.108:50856 [04/May/2014:01:15:28.552] webservers static_servs/static1 5/0/1/1/+7 304 +147 - - ---- 3/3/1/1/0 0/0 {192.168.1.11||} "GET /index.html HTTP/1.1"
May 4 01:15:29 localhost haproxy[1819]: 192.168.1.108:50857 [04/May/2014:01:15:28.556] webservers static_servs/static2 799/0/1/1/+801 200 +265 - - ---- 2/2/1/1/0 0/0 {192.168.1.11||} "GET /index.html HTTP/1.1"
May 4 01:38:30 localhost haproxy[1733]: 192.168.1.108:51208 [04/May/2014:01:38:30.436] webservers dynamic_servs/dynamic2 24/0/0/4/+28 200 +177 - - ---- 2/2/2/2/0 0/0 {192.168.1.12||http://192.168.1.12/} "GET /index.php?=PHPE9568F34-D428-11d2-A769-00AA001ACF42 HTTP/1.1"
May 4 01:38:30 localhost haproxy[1733]: 192.168.1.108:51209 [04/May/2014:01:38:30.436] webservers dynamic_servs/dynamic2 24/0/0/4/+28 200 +177 - - ---- 2/2/2/1/0 0/0 {192.168.1.12||http://192.168.1.12/} "GET /index.php?=PHPE9568F35-D428-11d2-A769-00AA001ACF42 HTTP/1.1"
May 4 01:39:04 localhost haproxy[1733]: 192.168.1.108:51219 [04/May/2014:01:39:04.178] webservers static_servs/static1 88/0/1/1/+90 200 +265 - - ---- 3/3/1/1/0 0/0 {192.168.1.12||} "GET /index.html HTTP/1.1"
May 4 01:39:38 localhost haproxy[1733]: 192.168.1.108:51229 [04/May/2014:01:39:38.161] webservers static_servs/static2 8/0/2/0/+10 200 +265 - - ---- 3/3/1/1/0 0/0 {192.168.1.12||} "GET /index.html HTTP/1.1"
192.168.1.108172.16.100.254 - - [04/May/2014:01:14:01 +0800] "GET /index.html HTTP/1.1" 304 - "-"
192.168.1.108172.16.100.253 - - [04/May/2014:01:38:29 +0800] "GET /index.php?=PHPE9568F34-D428-11d2-A769-00AA001ACF42 HTTP/1.1" 200 2524 "http://192.168.1.12/"
192.168.1.108172.16.100.253 - - [04/May/2014:01:38:29 +0800] "GET /index.php?=PHPE9568F35-D428-11d2-A769-00AA001ACF42 HTTP/1.1" 200 2146 "http://192.168.1.12/"
global_defs {
notification_email {                         #keepalived切换时发送到对象,一行一个
root@localhost
}
notification_email_from keepadmin@localhost #发件人
smtp_connect_timeout 3                      #指定smtp超时时间
smtp_server 127.0.0.1                       #指定smtp服务器地址
router_id LVS_DEVEL                         #VRRP组名,同属一组的两节点必须设置一样
}
vrrp_script chk_haproxy {
script "killall -0 haproxy"
interval 2                                 #脚本执行间隔时间
weight 2                              #脚本结果导致的优先级变更:2表示优先级+2;-2则表示优先级-2
}
vrrp_instance VI_1 {
interface eth0                             #绑定VIP的网卡
state MASTER                               #设置主节点MASTER
priority 100                               #主节点优先级(1-254),主一定要比备优先级高
virtual_router_id 173                      #设置VRID,两节点必须一致
garp_master_delay 1                        #主从切换时间秒
authentication {
auth_type PASS                         #验证类型
auth_pass 1111                         #验证密码
}
track_interface {                          #设置额外的监控,里面那个网卡出现问题都会切换
eth0
}
virtual_ipaddress {
192.168.1.88/24 dev eth0               #设置VIP,两节点必须一致
}
track_script {
chk_haproxy                            #脚本跟踪监测
}
}
vrrp_instance VI_2 {
interface eth0                             #绑定VIP的网卡
state BACKUP                               #设置备节点BACKUP
priority 99                                #备节点优先级(1-254),主一定要比备优先级高
virtual_router_id 174                      #设置VRID,两节点必须一致
garp_master_delay 1                        #主从切换时间秒
authentication {
auth_type PASS                         #验证类型
auth_pass 11111                        #验证密码
}
track_interface {                          #设置额外的监控,里面那个网卡出现问题都会切换
eth0
}
virtual_ipaddress {
192.168.1.188/24 dev eth0             #设置VIP,两节点必须一致
}
}
global_defs {
notification_email {
root@localhost
}
notification_email_from keepadmin@localhost
smtp_connect_timeout 3
smtp_server 127.0.0.1
router_id LVS_DEVEL
}
vrrp_script chk_haproxy {
script "killall -0 haproxy"
interval 2
weight 2                                 #脚本结果导致的优先级变更:2表示优先级+2;-2则表示优先级-2
}
vrrp_instance VI_1 {
interface eth0                           #绑定VIP的网卡
state BACKUP                             #设置备节点
priority 99                              #备节点优先级(1-254),主一定要比备优先级高
virtual_router_id 173                    #设置VRID,两节点必须一致
garp_master_delay 1                      #主从切换时间秒
authentication {
auth_type PASS
auth_pass 1111
}
track_interface {
eth0
}
virtual_ipaddress {
192.168.1.88/24 dev eth0
}
track_script {
chk_haproxy
}
}
vrrp_instance VI_2 {
interface eth0
state MASTER
priority 100
virtual_router_id 174
garp_master_delay 1
authentication {
auth_type PASS
auth_pass 11111
}
track_interface {
eth0
}
virtual_ipaddress {
192.168.1.188/24 dev eth0
}
}
2: eth0:
2: eth0:
May 4 04:49:26 station11 Keepalived_vrrp[3973]: VRRP_Instance(VI_1) Transition to MASTER STATE
May 4 04:49:27 station11 Keepalived_vrrp[3973]: VRRP_Instance(VI_1) Entering MASTER STATE
May 4 04:49:35 station11 Keepalived_vrrp[3973]: VRRP_Instance(VI_2) Entering BACKUP STATE
[root@ha2 ~]# tail /var/log/messages
May 4 04:49:35 station12 Keepalived_vrrp[3594]: VRRP_Instance(VI_1) Entering BACKUP STATE
May 4 04:49:35 station12 Keepalived_vrrp[3594]: VRRP_Instance(VI_2) Transition to MASTER STATE
May 4 04:49:36 station12 Keepalived_vrrp[3594]: VRRP_Instance(VI_2) Entering MASTER STATE
May 4 04:56:00 station12 Keepalived_vrrp[3594]: VRRP_Instance(VI_1) forcing a new MASTER election
May 4 04:56:01 station12 Keepalived_vrrp[3594]: VRRP_Instance(VI_1) Transition to MASTER STATE
May 4 04:56:02 station12 Keepalived_vrrp[3594]: VRRP_Instance(VI_1) Entering MASTER STATE
2: eth0:
2: eth0:
2: eth0:
2: eth0:
May 4 05:07:41 ha1 Keepalived_vrrp[3973]: VRRP_Instance(VI_1) forcing a new MASTER election
May 4 05:07:42 ha1 Keepalived_vrrp[3973]: VRRP_Instance(VI_1) Transition to MASTER STATE
May 4 05:07:43 ha1 Keepalived_vrrp[3973]: VRRP_Instance(VI_1) Entering MASTER STATE
May 4 05:07:41 station12 Keepalived_vrrp[3594]: VRRP_Instance(VI_1) Entering BACKUP STATE
mysql> USE mysql;
mysql> INSERT INTO user (Host,User) values ('172.16.100.254','mysqlchecker');
##INSERT INTO user (Host,User) values ('
注销
defaults
#option                  httplog
#option                  http-server-close
#option forwardfor       except 127.0.0.0/8
添加
listen mysqlservers
mode tcp       #模式 TCP
bind *:3306   #代理端口
balance roundrobin   轮调算法
option mysql-check user mysqlchecker  #mysql健康检查  mysqlchecker为mysql登录用户名
server myserv1 172.16.100.13:3306 check inter 1500 rise 3 fall 3 weight 1
server myserv2 172.16.100.14:3306 check inter 1500 rise 3 fall 3 weight 1
#服务器定义:check inter 1500是检测心跳频率,rise 3是3次正确认为服务器可用,fall 3是3次失败认为服务器不可用,weight代表权重


