一、环境:
系统最小化安装,系统初使化脚本:
http://linuxops.blog.51cto.com/2238445/841849
cd /usr/local/src/
tar zxf httpd-2.2.22.tar.gz
cd httpd-2.2.22
./configure --prefix=/usr/local/apache2 --enable-modules=so --enable-so --enable-cache --enable-mem-cache --enable-rewrite --enable-ssl --with-mpm=prefork
make;make install
cd ..
1.安装tomcat
tar zxf apache-tomcat-7.0.26.tar.gz
mv apache-tomcat-7.0.26 /usr/local/tomcat
2.安装jdk
tar zxf jdk-7u4-linux-x64.gz
mv jdk1.7.0_04 /usr/local/jdk
3.设置java、tomcat运行环境变量
vi /etc/profile
在文件最后加入如下内容:
#Set java & tomcat Environment
JAVA_HOME=/usr/local/jdk
export JAVA_HOME
JRE_HOME=/usr/local/jdk/jre
export JRE_HOME
CLASSPATH=/usr=/usr/local/tomcat/common/lib/:/usr/local/jdk/lib:/usr/local/jdk/jre/lib
export CLASSPATH
PATH=$PATH:/usr/local/tomcat/bin/:/usr/local/apache/bin:/usr/local/jdk/bin:/usr/local/jdk/jre/bin
export PATH
TOMCAT_HOME=/usr/local/tomcat
export TOMCAT_HOME
让环境变量立即生效:
source /etc/profile
1.安装jk
tar zxf tomcat-connectors-1.2.37-src.tar.gz
cd tomcat-connectors-1.2.37-src/native
./configure --with-apxs=/usr/local/apache2/bin/apxs --with-java-home=/usr/local/jdk
make;make install
检测模块有没有生成
通过上面几步,会在/usr/local/apache2/modules/目录下产生mod_jk.so 这个模块文件
2.整合apache和tomcat
1.)修改apache配置文件/usr/local/apache2/conf/httpd.conf ,加入:Include conf/mod_jk.conf
echo "Include conf/mod_jk.conf" >> /usr/local/apache2/conf/httpd.conf
2.)创建mod_jk.conf配置文件
vi /usr/local/apache2/conf/mod_jk.conf
加入如下内容:
# Load mod_jk module
LoadModule jk_module modules/mod_jk.so
# Where to find workers.properties
JkWorkersFile conf/workers.properties
# Where to put jk logs
JkLogFile logs/mod_jk.log
JkShmFile logs/mod_jk.shm
# Set the jk log level [debug/error/info]
JkLogLevel info
# Select the log format
JkLogStampFormat "[%a %b %d %H:%M:%S %Y] "
# JkOptions indicate to send SSL KEY SIZE,
JkOptions +ForwardKeySize +ForwardURICompat -ForwardDirectories
# JkRequestLogFormat set the request format
JkRequestLogFormat "%w %V %T"
# Send JSPs for context /examples to worker named ajp13
JkMount /* controller
3.配置JK调度器
创建JK配置文件
cat /usr/local/apache2/conf/workers.properties
#
# workers.properties conf
#
# list the workers by name
worker.list=controller #定义负载均衡名称
worker.controller.type=lb #定义负载均衡类型,这里为lb
worker.controller.error_escalation_time=0 #切换错误状态时间
worker.controller.max_reply_timeouts=10
# -------- server 1 ---------
worker.jvm1.reference=worker.template #jvm1引用worker.template模板
worker.jvm1.port=8009 #jvm1的ajp端口
worker.jvm1.host=192.168.8.222 #jvm1的的IP
worker.jvm1.lbfactor = 5
# -------- server 2 ---------
worker.jvm2.reference=worker.template
worker.jvm2.port=8009
worker.jvm2.host=192.168.8.223
worker.jvm2.lbfactor = 1
worker.jvm2.activation=A
worker.template.type=ajp13
worker.template.socket_connect_timeout=5000 #套接字连接超时为5000毫秒,默认为0
worker.template.socket_keepalive=true #开启保持为真,默认为false
worker.template.ping_mode=A #使用cping/cpong模式,有C,P,I,A四个模式,A表示选择所以模式
worker.template.ping_timeout=10000 #探测cping/cpong超时间默认10000毫秒
worker.template.connection_pool_minsize=0 #连接池关闭最小时间
worker.template.connection_pool_timeout=600 #连接池600秒
worker.template.reply_timeout=300000 #答复超时300000毫秒
worker.template.recovery_options=3 #重试次数
worker.controller.balance_workers=jvm1,jvm2 #负载均衡的客户名称
worker.controller.sticky_session=0
worker.controller.sticky_session_force=0
#worker.balancer.sticky_session=1
1.server1上配置
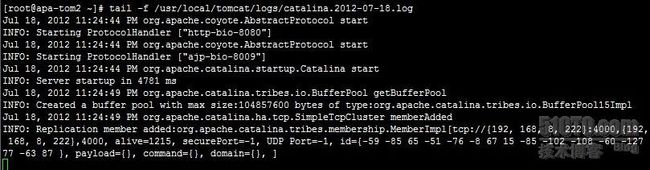
1.)在/usr/local/tomcat/conf/server.xml 中修改Enginx节点信息,大概在103行:
把
"Catalina" defaultHost="localhost"> 修改成:
"Catalina" defaultHost="localhost" jvmRoute="jvm1"> 2.)加入Cluster节点信息,大概在110行左右处加入如下内容:
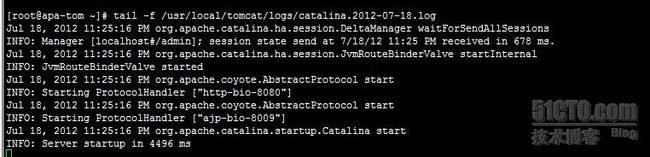
"org.apache.catalina.ha.tcp.SimpleTcpCluster" channelSendOptions="8"> "org.apache.catalina.ha.session.DeltaManager" expireSessionsOnShutdown="false"
notifyListenersOnReplication="true"/>
"org.apache.catalina.tribes.group.GroupChannel"> "org.apache.catalina.tribes.membership.McastService" address="228.0.0.4"
port="45564"
frequency="500"
dropTime="3000"/>
"org.apache.catalina.tribes.transport.nio.NioReceiver" address="192.168.8.222"
port="4000"
autoBind="100"
selectorTimeout="5000"
maxThreads="6"/>
"org.apache.catalina.tribes.transport.ReplicationTransmitter"> "org.apache.catalina.tribes.transport.nio.PooledParallelSender"/> "org.apache.catalina.tribes.group.interceptors.TcpFailureDetector"/> "org.apache.catalina.tribes.group.interceptors.MessageDispatch15Interceptor"/> "org.apache.catalina.ha.tcp.ReplicationValve" filter=""/>
"org.apache.catalina.ha.session.JvmRouteBinderValve"/> "org.apache.catalina.ha.deploy.FarmWarDeployer" tempDir="/tmp/war-temp/"
deployDir="/tmp/war-deploy/"
watchDir="/tmp/war-listen/"
watchEnabled="false"/>
"org.apache.catalina.ha.session.JvmRouteSessionIDBinderListener"/> "org.apache.catalina.ha.session.ClusterSessionListener"/>
1.)在/usr/local/tomcat/conf/server.xml 中修改Enginx节点信息,大概在103行:
把
"Catalina" defaultHost="localhost"> 修改成:
"Catalina" defaultHost="localhost" jvmRoute="jvm2"> 2.)加入Cluster节点信息,大概在110行左右处加入如下内容:
"org.apache.catalina.ha.tcp.SimpleTcpCluster" channelSendOptions="8"> "org.apache.catalina.ha.session.DeltaManager" expireSessionsOnShutdown="false"
notifyListenersOnReplication="true"/>
"org.apache.catalina.tribes.group.GroupChannel"> "org.apache.catalina.tribes.membership.McastService" address="228.0.0.4"
port="45564"
frequency="500"
dropTime="3000"/>
"org.apache.catalina.tribes.transport.nio.NioReceiver" address="192.168.8.223"
port="4000"
autoBind="100"
selectorTimeout="5000"
maxThreads="6"/>
"org.apache.catalina.tribes.transport.ReplicationTransmitter"> "org.apache.catalina.tribes.transport.nio.PooledParallelSender"/> "org.apache.catalina.tribes.group.interceptors.TcpFailureDetector"/> "org.apache.catalina.tribes.group.interceptors.MessageDispatch15Interceptor"/> "org.apache.catalina.ha.tcp.ReplicationValve" filter=""/>
"org.apache.catalina.ha.session.JvmRouteBinderValve"/> "org.apache.catalina.ha.deploy.FarmWarDeployer" tempDir="/tmp/war-temp/"
deployDir="/tmp/war-deploy/"
watchDir="/tmp/war-listen/"
watchEnabled="false"/>
"org.apache.catalina.ha.session.JvmRouteSessionIDBinderListener"/> "org.apache.catalina.ha.session.ClusterSessionListener"/> 3.修改web站点文件存放主目录路径
1.)apache配置文件要修改的地方
把下面两处修改成:
DocumentRoot "/data/www/" #大概在104行
"/data/www"> #大概在131行 2.)tomcat配置文件修改成:
"localhost" appBase="/data/www" unpackWARs="true" autoDeploy="true">
"/" docBase="" debug="0" reloadable="true" />
mkdir -p /data/www/
cat /data/www/test.jsp
<%
System.out.println("Welcome tomcat_cluster session repication");
%>
在/data/www目录下创建admin目录,再在admin目录下创建WEB-INF目录
mkdir -p /data/www/admin/WEB-INF
cd /data/www/admin/WEB-INF
vi web.xml
加入如下内容:
"http://java.sun.com/xml/ns/j2ee" xmlns:xsi="http://www.w3.org/2001/XMLSchema-instance"
xsi:schemaLocation="http://java.sun.com/xml/ns/j2ee http://java.sun.co
m/xml/ns/j2ee/web-app_2_4.xsd" version="2.4">
TomcatDemo
cat /data/www/admin/index.jsp
<%@ page contentType="text/html; charset=GBK" %>
<%@ page import="java.util.*" %>
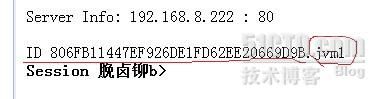
Cluster App Test Server Info:
<%
out.println(request.getLocalAddr() + " : " + request.getLocalPort()+"
");%><%
out.println("
ID " + session.getId()+"
");// 如果有新的 Session 属性设置
String dataName = request.getParameter("dataName");
if (dataName != null && dataName.length() > 0) {
String dataValue = request.getParameter("dataValue");
session.setAttribute(dataName, dataValue);
}
out.print("Session 列表");
Enumeration e = session.getAttributeNames();
while (e.hasMoreElements()) {
String name = (String)e.nextElement();
String value = session.getAttribute(name).toString();
out.println( name + " = " + value+"
");System.out.println( name + " = " + value);
}
%>
名称:"dataName">
值:"dataValue">