本帖内容摘抄自:https://testerhome.com/topics/7060,在此基础上增加练习笔记(在看本帖之前可以先看原文档)。
注:本文中接口均是moco的接口,请参考《Moco接口框架应用实战》了解moco基本知识。
REST Assured是一个可以简化HTTP Builder顶层 基于REST服务的测试过程的Java DSL(针对某一领域,具有受限表达性的一种计算机程序设计语言)。它支持发起POST,GET,PUT,DELETE,OPTIONS,PATCH和HEAD请求,并且可以用来验证和校对这些请求的响应信息。
静态导入方法:
pom.xml中要加入以下依赖:
            io.rest-assured
            rest-assured


            io.rest-assured
            json-schema-validator
            3.0.2


            io.rest-assured
            spring-mock-mvc
            3.0.6


            org.hamcrest
            hamcrest-library
推荐大家从以下的类中静态导入方法,以提高使用rest-assured的效率。
import io.restassured.RestAssured.*;
import io.restassured.matcher.RestAssuredMatchers.*;
import org.hamcrest.Matchers.*;
如果您想使用Json Schema validation 还应该静态导入这些方法:
import io.restassured.module.jsv.JsonSchemaValidator.*;
更多使用方法参阅 Json Schema Validation 。
如果您正在使用SpringMVC,你可以使用spring-mock-mvc 模型的Rest Assured DSL来对Spring的controller层进行单元测试。为此需要从RestAssuredMockMvc静态导入这些方法:
import io.restassured.module.mockmvc.RestAssuredMockMvc.*;
示例
例一 - JSON
假设某个get请求 (to http://localhost:8889/lotto) 返回JSON如下:
  {
    "description":"返回json接口",
    "request":{
      "uri":"/lotto",
      "method":"get"
    },
    "response":{
      "json":{
        "lotto":{
          "lottoId":5,
          "winning-numbers":[2,45,34,23,7,5,3],
          "winners":[{
            "winnerId":23,
            "numbers":[2,45,34,23,3,5]
          },{
            "winnerId":54,
            "numbers":[52,3,12,11,18,22]
          }]
        }
      }
    }
  }
REST assured可以帮您轻松地进行get请求并对响应信息进行处理。举个例子,如果想要判断lottoId的值是否等于5,你可以这样做:
在类中写一个方法,写下如下代码:
    @Test
    public void testone(){
        given()
                .when()
                .get("http://localhost:8889/lotto")
                .then()
                .body("lotto.lottoId",equalTo(5));

    }
注:lottoId必须是int类型,才能用equalTo(5),如果是string类型,用equalTo("5")
又或许您想要检查winnerId的取值包括23和54:
    @Test
    public void testtwo(){
        given()
                .when()
                .get("http://localhost:8889/lotto")
                .then()
                .body("lotto.winners.winnerId",hasItems(23,54));

    }
注意: equalTo 和 hasItems 是 Hamcrest matchers的方法,所以需要静态导入 import static org.hamcrest.Matchers.*;
注意这里的"json path"语法使用的是Groovy的GPath标注法,不要和Jayway的JsonPath语法混淆。(暂时可以不用关注)
以BigDecimal返回float和double类型
(译者注:Java在java.math包中提供的API类BigDecimal,用来对超过16位有效位的数进行精确的运算)
您可以对rest-assured和JsonPath进行配置,使之以BigDecimal返回json里的数值类型数据,而不是float或者double。可以参考下面json文本:
  {
    "description":"以BigDecimal返回float和double类型",
    "request":{
      "uri":"/price",
      "method":"get"
    },
    "response":{
      "json":{
        "price":12.12
      }
    }
  }
默认情况下您验证price字段是否等于float类型的12.12像这样:
    @Test
    public void testthree(){
        given()
                .when()
                .get("http://localhost:8889/price")
                .then()
                .body("price",is(12.12f));

    }
但是如果想用rest-assured的JsonConfig来配置返回的所有的json数值都为BigDecimal类型:
    @Test
    public void testfour(){
        given()
                .config(RestAssured.config().jsonConfig(jsonConfig().numberReturnType(BIG_DECIMAL)))
                .when()
                .get("http://localhost:8889/price")
                .then()
                .body("price",is(new BigDecimal(12.12)));

    }
因为上面moco的接口没有定义price是BigDecimal类型,所以test的接口代码会报错,实际测试中遇到返回值类型是BigDecimal的可以用这个代码。
JSON Schema validation
自从 2.1.0 版本rest-assured开始支持Json Schema validation. 举个例子,在classpath中放置以下的schema文件(译者注:idea的话可以放在resources目录下),products-schema.json:
{
  "definitions": {},
  "$schema": "http://json-schema.org/draft-07/schema#",
  "$id": "http://example.com/root.json",
  "type": "object",
  "title": "The Root Schema",
  "required": [
    "lotto"
  ],
  "properties": {
    "lotto": {
      "$id": "#/properties/lotto",
      "type": "object",
      "title": "The Lotto Schema",
      "required": [
        "lottoId",
        "winning-numbers",
        "winners"
      ],
      "properties": {
        "lottoId": {
          "$id": "#/properties/lotto/properties/lottoId",
          "type": "integer",
          "title": "The Lottoid Schema",
          "default": 0,
          "examples": [
            5
          ]
        },
        "winning-numbers": {
          "$id": "#/properties/lotto/properties/winning-numbers",
          "type": "array",
          "title": "The Winning-numbers Schema",
          "items": {
            "$id": "#/properties/lotto/properties/winning-numbers/items",
            "type": "integer",
            "title": "The Items Schema",
            "default": 0,
            "examples": [
              2,
              45,
              34,
              23,
              7,
              5,
              3
            ]
          }
        },
        "winners": {
          "$id": "#/properties/lotto/properties/winners",
          "type": "array",
          "title": "The Winners Schema",
          "items": {
            "$id": "#/properties/lotto/properties/winners/items",
            "type": "object",
            "title": "The Items Schema",
            "required": [
              "winnerId",
              "numbers"
            ],
            "properties": {
              "winnerId": {
                "$id": "#/properties/lotto/properties/winners/items/properties/winnerId",
                "type": "integer",
                "title": "The Winnerid Schema",
                "default": 0,
                "examples": [
                  23
                ]
              },
              "numbers": {
                "$id": "#/properties/lotto/properties/winners/items/properties/numbers",
                "type": "array",
                "title": "The Numbers Schema",
                "items": {
                  "$id": "#/properties/lotto/properties/winners/items/properties/numbers/items",
                  "type": "integer",
                  "title": "The Items Schema",
                  "default": 0,
                  "examples": [
                    2,
                    45,
                    34,
                    23,
                    3,
                    5
                  ]
                }
              }
            }
          }
        }
      }
    }
  }
}
您可以使用这个schema验证(/products)这个请求是否符合规范:
    @Test
    public void testfive(){
        given()
                .when()
                .get("http://localhost:8889/lotto")
                .then()
                .assertThat()
                .body(matchesJsonSchemaInClasspath("products-schema.json"));

    }
注:jsonschema 可以在https://www.jsonschema.net/网页中生成,
在resource包下创建products-schema.json,放入从网页中生成的jsonschema。
matchesJsonSchemaInClasspath 静态导入自 io.restassured.module.jsv.JsonSchemaValidator 并且我们推荐从这个类中静态导入所有的方法。
import static io.restassured.module.jsv.JsonSchemaValidator.matchesJsonSchemaInClasspath;
maven依赖,上面已经讲过要加入该依赖:
            io.rest-assured
            json-schema-validator
            3.0.2
JSON Schema Validation 设置项
rest-assured的json-schema-validator module使用Francis Galiegue的json-schema-validator (fge) 库来进行验证。 如果您想配置使用基础fge库,你可以像下面例子中:
    @Test
    public void testsix(){
        // Given
        JsonSchemaFactory jsonSchemaFactory = JsonSchemaFactory.newBuilder().setValidationConfiguration(ValidationConfiguration.newBuilder().setDefaultVersion(DRAFTV4).freeze()).freeze();
        // When
        get("http://localhost:8889/lotto").then().assertThat().body(matchesJsonSchemaInClasspath("products-schema.json").using(jsonSchemaFactory));

    }
using方法允许您进入jsonSchemaFactory的实例,rest-assured在验证期间也会进行此操作。这种方式允许我们对验证进行细粒度的配置。
fge库也允许验证状态是 checked或者unchecked(译者注:表示不懂)。默认情况,rest-assured使用checked验证,但是如果你想要改变这种方式,您可以提供一个matcher的JsonSchemaValidatorSettings实例。举个例子:
get("/products").then().assertThat().body(matchesJsonSchemaInClasspath("products-schema.json").using(settings().with().checkedValidation(false)));
这些settings方法静态导入自 JsonSchemaValidatorSettings类。
注:想要验证jsonschema,用testfive方法中写的验证就可以了。
Json Schema Validation的静态配置
现在想象下您总是使用unchecked验证,并且设置默认的json schema版本为3。与其每次都在代码里进行设置,不如静态地进行定义设置。举个例子:
    @Test
    public void testeight(){
        JsonSchemaValidator.settings = settings().with().jsonSchemaFactory(
                JsonSchemaFactory.newBuilder().setValidationConfiguration(ValidationConfiguration.newBuilder().setDefaultVersion(DRAFTV3).freeze()).freeze()).
                and().with().checkedValidation(false);

        get("http://localhost:8889/lotto").then().assertThat().body(matchesJsonSchemaInClasspath("products-schema.json"));
    }
注:DRAFTV3 会报错,DRAFTV4是可以成功的。
现在任意一个由JsonSchemaValidator导入的matcher都会使用DRAFTV3作为默认版本并且unchecked validation。
想要重置JsonSchemaValidator到默认设置仅仅需要调用reset方法:
JsonSchemaValidator.reset();
不使用rest-assured的Json Schema Validation
您也可以在不依赖rest-assured的情况下使用json-schema-validator module。如想要把json文本表示为String类型的字符串,可以这样做:
    @Test
    public void testnine(){

        String json = "{\n" +
                "        \"lotto\":{\n" +
                "          \"lottoId\":5,\n" +
                "          \"winning-numbers\":[2,45,34,23,7,5,3],\n" +
                "          \"winners\":[{\n" +
                "            \"winnerId\":23,\n" +
                "            \"numbers\":[2,45,34,23,3,5]\n" +
                "          },{\n" +
                "            \"winnerId\":54,\n" +
                "            \"numbers\":[52,3,12,11,18,22]\n" +
                "          }]\n" +
                "        }\n" +
                "      }";
        assertThat(json,matchesJsonSchemaInClasspath("products-schema.json"));
    }
匿名式的JSON根节点验证
一个JSON文本并不总是有一个命名好的根属性。这里有个验证这种JSON的例子:
[1, 2, 3]
注:这种json的返回不太好设计,moco不出这样的接口。
一个匿名的JSON根属性可以通过使用$或者空字符串作为路径来识别。举个例子,通过访问http://localhost:8889/json这个地址可以获得一个JSON文本,我们可以使用rest-assured验证:
    @Test
    public void testten(){
        given()
                .when()
                .get("http://localhost:8889/json")
                .then()
                .body("$",hasItems(1,2,3));

    }
例2 - XML
XML可以一种通过简单的方式解析。假设一个POST请求http://localhost:8080/greetXML返回:
{
"description":"返回内容是xml",
"request":{
"uri":"/getxml",
"method":"post",
"forms":{
"firstName":"John",
"lastName":"Doe"
}
},
"response":{
"text":" \nJohn \nDoe \n ",
"headers":{
"Content-Type":"text/xml"
}
}
}
换言之,它在请求中返还了一个基于firstname和lastname请求参数的greeting节点。您可以通过rest-assured轻易地展现和解析这个例子
        //post入参为form 表单参数,返回类型为xml
        given()
                .proxy(8888)//连接代理
                .formParam("firstName", "John")
                .formParam("lastName","Doe")
                .when()
                .post("http://localhost:8889/getxml")
                .then()
                .using()
                .defaultParser(Parser.XML)//返回类型是xml格式
                .body("greeting.firstName",equalTo("John"));//校验结果
如果您想同时解析firstname和lastname可以这样做:
        //post入参为form 表单参数,返回类型为xml
        given()
                .proxy(8888)//连接代理
                .formParam("firstName", "John")
                .formParam("lastName","Doe")
                .when()
                .post("http://localhost:8889/getxml")
                .then()
                .using()
                .defaultParser(Parser.XML)//返回类型是xml格式
                .body("greeting.firstName",equalTo("John"))
                .body("greeting.lastName",equalTo("Doe"));//校验结果
或者稍微简短些:
with().formParams("firstName", "John", "lastName", "Doe").when().post("http://localhost:8889/getxml").then().body("greeting.firstName", equalTo("John"), "greeting.lastName", equalTo("Doe"));
XML 命名空间
考虑到您需要使用io.restassured.config.XmlConfig声明一个命名空间。举个例子,有一个位于http://localhost:8080的资源namespace-example,返回如下的XML:
{
"description":"返回内容是xml",
"request":{
"uri":"/getxmlwithnamespace",
"method":"get"
},
"response":{
"text":" \nsudo \nmake me a sandwich! \n ",
"headers":{
"Content-Type":"text/xml"
}
}
}
可以然后声明http://localhost/这个URI并且验证其响应:
    @Test
    public void testtwelve(){
        given().
                config(RestAssured.config().xmlConfig(xmlConfig().declareNamespace("test", "http://localhost/"))).
                when().
                get("http://localhost:8889/getxmlwithnamespace").
                then().
                body("foo.bar.text()", equalTo("sudo make me a sandwich!")).
                body(":foo.:bar.text()", equalTo("sudo ")).
                body("foo.test:bar.text()", equalTo("make me a sandwich!"));
    }
这个路径语法遵循Groovy的XmlSlurper语法。注意直到2.6.0的路径语法都不遵循Groovy的XmlSlurper语法。请看release notes可以获知2.6.0之前的版本语法是怎样的。
注:参考《XML的命名空间》了解本代码
XPath:
您也可以使用x-path来解析XML响应。举个例子:
moco接口:
{
"description":"返回内容是xml,入参类型是json",
"request":{
"uri":"/getxmlwithjson",
"method":"post",
"json":{
"firstName":"John",
"lastName":"Doe"
}
},
"response":{
"text":" \nJohn \nDoe \n ",
"headers":{
"Content-Type":"text/xml"
}
}
}
验证方法:
        Map map = new HashMap();
        map.put("firstName","John");
        map.put("lastName","Doe");


        given()
                .proxy(8888)
                .body(map)
                .when()
                .post("http://localhost:8889/getxmlwithjson")
                .then()
                .body(hasXPath("/greeting/firstName[text()='John']"));
或者:
        given()
                .proxy(8888)
                .body(map)
                .when()
                .post("http://localhost:8889/getxmlwithjson")
                .then()
                .body(hasXPath("/greeting/firstName",containsString("Jo")));
在XPath表达式中使用命名空间,你需要在配置中启用这些选项:
xml:
   Apples
   Bananas
代码如下:此代码运行不成功,namespaceContext的实例写的不对。
    @Test
    public void testfourteen(){

        NamespaceContext namespaceContext = new NamespaceContext() {
            @Override
            public String getNamespaceURI(String prefix) {
                return null;
            }

            @Override
            public String getPrefix(String namespaceURI) {
                return null;
            }

            @Override
            public Iterator getPrefixes(String namespaceURI) {
                return null;
            }
        };


        given()
                .config(RestAssured.config().xmlConfig(xmlConfig().with().namespaceAware(true)))
                .proxy(8888)
                .when()
                .get("http://localhost:8889/getxmlwithnamespacetwo")
                .then()
                .body(hasXPath("/h:table",namespaceContext,equalTo("111")));


    }
Schema和DTD
XML响应体也可以验证为一个XML Schema (XSD)或DTD.
校验XSD是指:接口中返回xml响应体,针对xml生成xml schema,就是xsd后缀的文件,校验xsd文件和返回的xml响应体是否一致。
校验DTD是指:接口中返回的xml响应体中定义了DTD的文档规范,DTD文档是以dtd后缀的文件,校验dtd文件和返回的xml响应体的文档规范是否一致。
DTD文档是指在xml头中定义的DOCTYPE规范,比如下面的D:\Springboot\AutoTest\Chapter15\src\main\resources\XSD\mybatis-3-config.dtd路径下的mybatis-3-config.dtd文件就规范了该xml的文档规范。
XSD 例子
get("/carRecords").then().assertThat().body(matchesXsd(xsd));
xsd是xml schema definition,xml文档的结构定义。
moco的接口返回xml文档,对xml文档生成对应的xsd文档
  {
    "description":"模拟返回内容是文件",
    "request" :
    {
      "uri":"/getresponsewithfile",
      "method":"get"
    },
    "response" :
    {
      "file" : "D:/Springboot/AutoTest/Chapter15/src/main/resources/XSD/assertxml.xml"
    }
  }
xml文档内容如下:

生成的xsd文档内容如下:
对应的测试代码中这些写:
 File file = new File("D:\\Springboot\\AutoTest\\Chapter15\\src\\main\\resources\\XSD\\assertxsd.xsd");

        given()
                .proxy(8888)
                .when()
                .get("http://localhost:8889/getresponsewithfile")
                .then()
                .assertThat()
                .body(matchesXsd(file));//接口返回内容是xml,需要把xml转换成xml schema,然后生成一个文件,把文件传过来作为参数
DTD 例子
get("/videos").then().assertThat().body(matchesDtd(dtd));
moco的接口:
  {
    "description":"模拟返回内容是文件",
    "request" :
    {
      "uri":"/getresponsewithDTDfile",
      "method":"get"
    },
    "response" :
    {
      "file" : "D:/Springboot/AutoTest/Chapter15/src/main/resources/databaseConfig.xml"
    }
  }
接口返回的文件头中内容是:
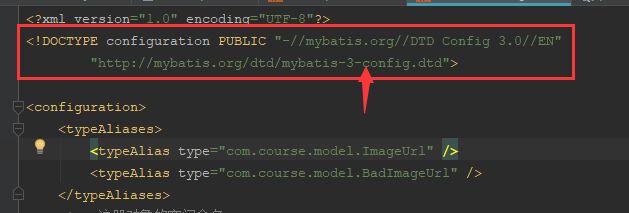
我们需要把http://mybatis.org/dtd/mybatis-3-config.dtd 文件下到本地,在浏览器中输入该地址就能下载到文件
测试代码:
        File file1 = new File("D:\\Springboot\\AutoTest\\Chapter15\\src\\main\\resources\\XSD\\mybatis-3-config.dtd");
        given()
                .proxy(8888)
                .when()
                .get("http://localhost:8889/getresponsewithDTDfile")
                .then()
                .assertThat()
                .body(matchesDtd(file1));//需要传DTD的文件的地址
matchesXsd和matchesDtd方法在Hamcrest matchers里,你可以从io.restassured.matcher.RestAssuredMatchers
导入。