DBA中级学习大纲
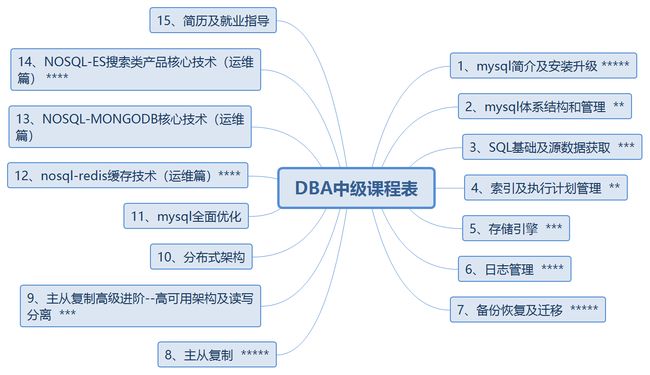
DBA中级课程表.png
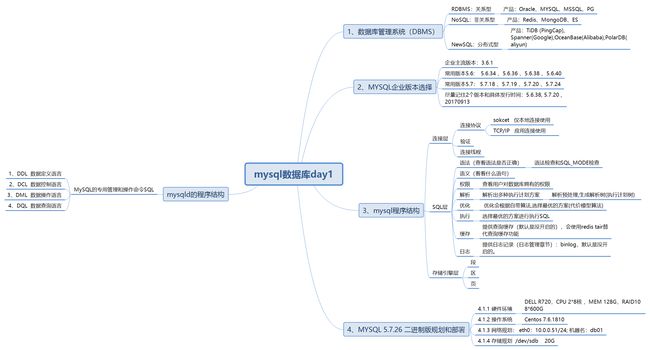
一、数据库版本介绍:
mysql数据库day1.png
二、安装MYSQL 5.7.26二进制版本的步骤:
1、准备硬件环境:
1.1.1 硬件环境
DELL R720 , CPU28,MEM128G, RAID108*600G SAS
1.1.2 操作系统
Centos 7.6.1810
1.1.3 网络规划
eth0 : 10.0.0.51/24
Hostname: db01
1.1.4 存储规划
/dev/sdb 20G
2、实施部署:
2.1 创建相关目录:
[root@db01 ~]# mkdir /application           ----> 软件的存放目录
[root@db01 /]# mkdir /data/3306/data -p     ----> 数据的存放位置
2.2 创建用户:
[root@db01 /]# useradd -s /sbin/nologin -M mysql
2.3 上传软件并解压处理:
[root@db01 application]# ll
total 1079692
-rw-r--r--  1 mysql mysql 644869837 Aug  5 09:31 mysql-5.7.26-linux-glibc2.12-x86_64.tar.gz
[root@db01 /application]# tar xf mysql-5.7.26-linux-glibc2.12-x86_64
[root@db01 /application]# mv mysql-5.7.26-linux-glibc2.12-x86_64 mysql
[root@db01 application]# ll
total 1079692
drwxr-xr-x  9 mysql mysql       129 Aug  5 12:22 mysql
-rw-r--r--  1 mysql mysql 644869837 Aug  5 09:31 mysql-5.7.26-linux-glibc2.12-x86_64.tar.gz
注:软件包可以去mysql.com官网下载
2.4 数据初始化(创建系统数据):
[root@db01 ~]# rpm -qa|grep maria
mariadb-libs-5.5.60-1.el7_5.x86_64
[root@db01 ~]# yum  remove mariadb-libs-5.5.60-1.el7_5.x86_64 -y
"注:由于centos7系统自带mariadb数据库,所以必须要将其删除。"
[root@db01 ~]# vim /etc/profile
export PATH=/application/mysql/bin:$PATH
[root@db01 ~]# mysql -V   //次命令用于检查mysql版本信息
mysql  Ver 14.14 Distrib 5.7.26, for linux-glibc2.12 (x86_64) using  EditLine wrapper
[root@db01 data]# mysqld --initialize-insecure --user=mysql --basedir=/application/mysql --datadir=/data/3306/data  //数据库初始化命令
2019-08-05T08:41:34.391208Z 0 [Warning] TIMESTAMP with implicit DEFAULT value is deprecated. Please use --explicit_defaults_for_timestamp server option (see documentation for more details).
2019-08-05T08:41:36.705525Z 0 [Warning] InnoDB: New log files created, LSN=45790
2019-08-05T08:41:36.910614Z 0 [Warning] InnoDB: Creating foreign key constraint system tables.
2019-08-05T08:41:37.021365Z 0 [Warning] No existing UUID has been found, so we assume that this is the first time that this server has been started. Generating a new UUID: d63578ab-b75c-11e9-a331-000c29a71104.
2019-08-05T08:41:37.022771Z 0 [Warning] Gtid table is not ready to be used. Table 'mysql.gtid_executed' cannot be opened.
2019-08-05T08:41:37.023736Z 1 [Warning] root@localhost is created with an empty password ! Please consider switching off the --initialize-insecure option.
2.5 书写配置文件:
cat >/etc/my.cnf <   //wuxin变量可以自己定义
EOF
2.6 准备启动脚本:
[root@db01 ~]#chown -R mysql.mysql /data/* /application/mysql/*
[root@db01 ~]#cp /application/mysql/support-files/mysql.server /etc/init.d/mysqld
[root@db01 ~]# /etc/init.d/mysqld start   //启动mysql方法
Starting MySQL.Logging to '/data/3306/data/db01.err'.
SUCCESS!
2.7 使用systemd管理mysql:
[root@db01 ~]# /etc/init.d/mysqld start   //因为要用systemctl去管理,所以先按上一步的方法关闭mysql
[root@db01 ~]# cat > /etc/systemd/system/mysqld.service <
2.8 用systemctl管理启动数据库:
[root@db01 ~]#systemctl start mysqld
3、安装过程中细节说明:
3.1 初始化命令:
[root@db01 ~]# mysqld --initialize-insecure --user=mysql --basedir=/application/mysql --datadir=/data/3306/data

作用: 生成系统数据到/data/3306/data中
-rw-r----- 1 mysql mysql       56 Aug  5 12:33 auto.cnf
-rw-r----- 1 mysql mysql     3159 Aug  5 12:38 db01.err
-rw-r----- 1 mysql mysql        6 Aug  5 12:38 db01.pid
-rw-r----- 1 mysql mysql      419 Aug  5 12:33 ib_buffer_pool
-rw-r----- 1 mysql mysql 12582912 Aug  5 12:38 ibdata1
-rw-r----- 1 mysql mysql 50331648 Aug  5 12:38 ib_logfile0
-rw-r----- 1 mysql mysql 50331648 Aug  5 12:33 ib_logfile1
-rw-r----- 1 mysql mysql 12582912 Aug  5 12:38 ibtmp1
drwxr-x--- 2 mysql mysql     4096 Aug  5 12:33 mysql
drwxr-x--- 2 mysql mysql     8192 Aug  5 12:33 performance_schema
drwxr-x--- 2 mysql mysql     8192 Aug  5 12:33 sys

参数说明:
--initialize-insecure   # 启用非安全模式,进行数据初始化
--initialize            # 启用安全模式,进行数据初始化
mysql 5.7版本以后,加强了用户密码安全管理的功能
(1) 密码长度
(2) 密码复杂度
(3) 初始化时自动生成密码
扩展:
mysql 5.6版本的初始化命令如下:
/application/mysql/scripts/mysql_install_db --user=mysql --basedir=/application/mysql --datadir=/data/3306/data
3.2 启动方式说明:
systemd (centos7)

cat > /etc/systemd/system/mysqld.service <
三、同主机版本升级(把5.7.26版本升级成8.0.16版本):
1、生产环境中应备份好数据库,然后再进行以下升级操作。
2、升级步骤:
2.1 安装8.0软件到新位置
[root@db01 application]# ll
total 1079692
-rw-r--r--  1 root  root  460733332 Aug  5 09:31 mysql-8.0.16-linux-glibc2.12-x86_64.tar.xz
[root@db01 /application]# tar xf mysql-8.0.16-linux-glibc2.12-x86_64.tar.xz
[root@db01 /application]# [root@db01 /application]# mv mysql-8.0.16-linux-glibc2.12-x86_64 mysql8
[root@db01 application]# ll
total 1079692
drwxr-xr-x 11 root  root        194 Aug  5 15:51 mysql8
-rw-r--r--  1 root  root  460733332 Aug  5 09:31 mysql-8.0.16-linux-glibc2.12-x86_64.tar.xz
注:软件包可以去mysql.com官网下载
2.2 把数据库服务关闭:
[root@db01 ~]# systemctl stop mysqld
2.3 修改已有配置:
2.3.1 修改环境变量:
[root@db01 ~]# vim /etc/profile
export PATH=/application/mysql8/bin:$PATH
[root@db01 ~]#source /etc/profile   //环境变量修改完后重启生效
[root@db01 ~]# mysql -V   //检查数据库是否升级为8.0版本
2.3.2 修改配置文件:
[root@db01 ~]# vim /etc/my.cnf
[mysqld]
user=mysql
basedir=/application/mysql8
datadir=/data/3306/data
socket=/tmp/mysql.sock
[mysql]
socket=/tmp/mysql.sock
prompt=oldguo[\\d]>
2.3.3 修改启动脚本文件:
[root@db01 ~]# vim /etc/systemd/system/mysqld.service

[Unit]
Description=MySQL Server
Documentation=man:mysqld(8)
Documentation=http://dev.mysql.com/doc/refman/en/using-systemd.html
After=network.target
After=syslog.target
[Install]
WantedBy=multi-user.target
[Service]
User=mysql
Group=mysql
ExecStart=/application/mysql8/bin/mysqld --defaults-file=/etc/my.cnf
LimitNOFILE = 5000
2.3.4 启动数据库:
[root@db01 ~]# systemctl start mysqld
2.3.5 查看是否升级成功:
[root@db01 ~]# cd /data/3306/data/     //在data数据目录下,8.0版本的数据比5.7.26的多一倍,所以检查是否增加了文件数据
[root@db01 /data/3306/data]# cat mysql_upgrade_info   //可查看版本信息
8.0.16
2.4 mysql8.0以前版本,需要进行数据升级(此步骤在8.0版本可省略):
[root@db01 ~]# mysql_upgrade
四、如何恢复到原有5.7.26版本:
4.1 提前备份数据库:
4.2 systemctl stop mysqld 停掉数据库
4.3 把/data/3306/data 下面的数据全部清空
4.4 修改/etc/profile环境变量
4.5 数据初始化(创建系统数据):
[root@db01 ~]# mysql -V   //次命令用于检查mysql版本信息
mysql  Ver 14.14 Distrib 5.7.26, for linux-glibc2.12 (x86_64) using  EditLine wrapper
[root@db01 data]# mysqld --initialize-insecure --user=mysql --basedir=/application/mysql --datadir=/data/3306/data  //数据库初始化命令
2019-08-05T08:41:34.391208Z 0 [Warning] TIMESTAMP with implicit DEFAULT value is deprecated. Please use --explicit_defaults_for_timestamp server option (see documentation for more details).
2019-08-05T08:41:36.705525Z 0 [Warning] InnoDB: New log files created, LSN=45790
2019-08-05T08:41:36.910614Z 0 [Warning] InnoDB: Creating foreign key constraint system tables.
2019-08-05T08:41:37.021365Z 0 [Warning] No existing UUID has been found, so we assume that this is the first time that this server has been started. Generating a new UUID: d63578ab-b75c-11e9-a331-000c29a71104.
2019-08-05T08:41:37.022771Z 0 [Warning] Gtid table is not ready to be used. Table 'mysql.gtid_executed' cannot be opened.
2019-08-05T08:41:37.023736Z 1 [Warning] root@localhost is created with an empty password ! Please consider switching off the --initialize-insecure option.