整理自 https://doc.qt.io/archives/qtjambi-4.5.2_01/com/trolltech/qt/qtjambi-tutorial.html
introdation
This tutorial gives an introduction to GUI programming using the Qt Jambi toolkit. It doesn't cover everything; the emphasis is on teaching the programming philosophy of GUI programming, and Qt Jambi's features are introduced as needed. Some commonly used features are never used in this tutorial.
Chapter one starts with a minimal "Hello world" program and the following chapters introduce new concepts.
The tutorial's source code is located in Qt Jambis's com/trolltech/examples/tutorial
directory.
Tutorial chapters:
Hello World!
Calling it Quits
Family Values
Let There Be Widgets
Building Blocks
Building Blocks Galore!
One Thing Leads to Another
Hello World!
This first program is a simple "Hello world" example. It contains only the bare minimum you need to get a Qt Jambi application up and running. The picture below is a screenshot of this program.
Here's the complete source code for the application:
package com.trolltech.examples.tutorial;
import com.trolltech.qt.gui.*;
Line by Line Walkthrough
package com.trolltech.examples.tutorial;
import com.trolltech.qt.gui.*;
To use Qt Jambi classes, you need to import at least the gui
package, which includes the QApplication class. QApplication manages various application-wide resources and is needed to run a Qt Jambi application. The gui
package contain GUI related classes, such as widgets, which is a user interface object that can process user input and draw
graphics.public static void main(String args[]) {
The main()
method is the entry point to the program. Almost always when using Qt Jambi, main()
only needs to perform some kind of initialization before passing the control to the Qt Jambi library, which then tells the program about the user's actions.The args
parameter is the command-line arguments. This is a standard Java feature.
QApplication.initialize(args);
Each Qt Jambi application contains a unique QApplication instance, which is a private QApplication class member. To create the instance, you call the static initialize() method with args
; note that args
might be changed as Qt Jambi removes command-line arguments it recognizes. See QApplication.argv() documentation for details.The QApplication object must be created before any GUI-related features of Qt Jambi are used.
QPushButton hello = new QPushButton("Hello World!");
Here, after the QApplication, comes the first GUI-related code: A push button is created.QPushButton is a GUI push button that the user can press and release. The programmer can change both the overall look and feel and many minor properties of it (such as color), as well as the widget's content. A QPushButton can show either a text or a QIcon.
The button is set up to display the text "Hello world!". Because we don't specify a parent window (as second argument to the QPushButton constructor), the button will be a window of its own, with its own window frame and title bar.
hello.resize(120, 40);
The button is set up to be 120 pixels wide and 40 pixels high (excluding the window frame, which is provided by the windowing system). We could call QWidget.move() to assign a specific screen position to the widget, but instead we let the windowing system choose a position.
hello.setWindowTitle("Hello World");
The title of the window in which the button is shown is set with QWidget.setWindowTitle().
hello.show();
A widget is never visible when you create it. You must call QWidget.show() to make it visible.
QApplication.exec(); }
This is where main()
passes control to Qt Jambi. QCoreApplication.exec() will return when the application exits. (QCoreApplication is QApplication's base class. It implements QApplication's core, non-GUI functionality and can be used when developing non-GUI applications.)In QCoreApplication.exec(), Qt Jambi receives and processes user and system events and passes these on to the appropriate widgets.
You should now try to compile and run this program.
The tutorial examples are located in Qt Jambi's examples/tutorial
directory. They are automatically built when you build Qt Jambi.
If you have typed in the source code manually, you compile and run it as a regular Java program (provided that you have set up Qt Jambi correctly, see the install instructions).
javac com/trolltech/examples/tutorial/HelloWorld.java
java com.trolltech.examples.tutorial.HelloWorld
Running the Application
When you run the application, you will see a small window filled with a single button, and on it you can read the famous words: "Hello world!"Exercises
Try to resize the window. Click the button. If you're running X11, try running the program with the -geometry
option (for example, -geometry 100x200+10+20
).
HelloWorld.java
package com.trolltech.examples.tutorial;

import com.trolltech.qt.gui.*;

public class HelloWorld
{
    public static void main(String args[])
    {
        QApplication.initialize(args);

        QPushButton hello = new QPushButton("Hello World!");
        hello.resize(120, 40);
        hello.setWindowTitle("Hello World");
        hello.show();

        QApplication.exec();
    }
}
2.Calling it Quits
Having created a window in Chapter 1, we will now go on to make the application quit properly when the user tells it to.We will also use a font that is more exciting than the default one. We give the entire source code of the application:
Quit.java
public class Quit
{
    public static void main(String args[])
    {
        QApplication.initialize(args);


        QPushButton quit = new QPushButton("Quit");

        quit.resize(80, 40);

        quit.setFont(new QFont("Times", 18, QFont.Weight.Bold.value()));


        quit.clicked.connect(QApplication.instance(), "quit()");


        quit.setWindowTitle("Calling It Quits");
        quit.show();
        QApplication.exec();
    }
}
Line by Line Walkthrough
QPushButton quit = new QPushButton("Quit");
This time, the button says Quit and that's exactly what the program will do when the user clicks the button.
quit.resize(80, 40);
We've chosen another size for the button since the text is a bit shorter than "Hello world!". We could also have used QFontMetrics to set right size, or let QPushButton choose a reasonable default.
quit.setFont(new QFont("Times", 18, QFont.Weight.Bold.value()));
Here we choose a new font for the button, an 18-point bold font from the Times family. It is also possible to change the default font for the entire application, using QApplication::setFont(). We fetch the value from the Weight enum as the weight of the font is given as an int in the constructor.
quit.clicked.connect(QApplication.instance(), "quit()");
We connect the clicked signal to the quit()
slot in QApplication (QApplication.instance() returns the application's unique QApplication instance). clicked
is an instance of the Signal0 class and quit()
is a regular method in QApplication that quits the application. When connect()
is invoked a one-way connection between the two QtJambiObjects is established. After the slot is connected to the signal the quit() method is invoked when a method on the signal is invoked; this is called emitting the signal. In this case, the application will exit when the user clicks on the button with the mouse.Every Qt Jambi object can have both signals
(to send messages) and slots
(to receive messages). All widgets are Qt Jambi objects, since they inherit QWidget, which indirectly inherits QtJambiObject.
This signal and slot mechanism is perhaps the most central feature of Qt Jambi. The Signals and Slots documentation describes this topic in detail.
Running the Application
When you run this program, you will see an even smaller window than in Chapter 1, filled with an even smaller button.See Chapter 1 for how to compile and run the application.
Exercises
Try to resize the window. Press the button to close the application.Are there any other signals in QPushButton you can connect to quit? [Hint: The QPushButton inherits most of its functionality from QAbstractButton.]
Quit.java
package com.trolltech.examples.tutorial;

import com.trolltech.qt.gui.*;

public class Quit
{
    public static void main(String args[])
    {
        QApplication.initialize(args);

        QPushButton quit = new QPushButton("Quit");
        quit.resize(80, 40);
        quit.setFont(new QFont("Times", 18, QFont.Weight.Bold.value()));

        quit.clicked.connect(QApplication.instance(), "quit()");

        quit.setWindowTitle("Calling It Quits");
        quit.show();
        QApplication.exec();
    }
}
3.Family Values
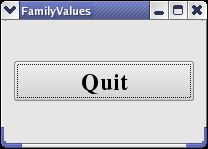
This example shows how to create parent and child widgets.
We'll keep it simple and use just a single parent and a lone child.
public class FamilyValues
{
    public static void main(String args[])
    {
        QApplication.initialize(args);


        QWidget window = new QWidget();

        window.resize(200, 120);


        QPushButton quit = new QPushButton("Quit", window);

        quit.setFont(new QFont("Times", 18, QFont.Weight.Bold.value()));

        quit.setGeometry(10, 40, 180, 40);


        quit.clicked.connect(QApplication.instance(), "quit()");

        window.setWindowTitle("FamilyValues");

        window.show();

        QApplication.exec();
    }
}
Line by Line Walkthrough
QWidget window = new QWidget();
Here we simply create a plain widget object. The QWidget class is the base class of all user interface objects. The widget is the atom of the user interface: It receives mouse, keyboard and other events from the window system, and paints a representation of itself on the screen. A widget is clipped by its parent and by the widgets in front of it.A widget that isn't embedded in a parent widget, like this particular widget, is called a window. Usually, windows have their own window frame and taskbar entry, provided by the window system. A widget without a parent widget is always an independent window. Its initial position on the screen is controlled by the window system.
window.resize(200, 120);
We set the window's width to 200 pixels and its height to 120 pixels.
QPushButton quit = new QPushButton("Quit", window);
A child is born. This QPushButton is created with a parent widget (window)
. A child widget is always displayed within its parent's area. When displayed, it is clipped by its parent's bounds. By default, it is rooted at the top-left corner of its parent, at position (0, 0).
quit.setGeometry(10, 40, 180, 40);
The QWidget.setGeometry() method takes four arguments: The first two arguments are the x and y coordinates of the button's top-left corner. The coordinates are relative to the parent widget. The last two arguments are the button's width and height. The result is a button that extends from position (10, 40) to position (190, 80).
window.show();
When a parent widget is shown, it will call show for all its children (except those that were explicitly hidden using QWidget.hide()).
Running the Application
The button no longer fills the entire window. Instead, it stays at position (10, 40) within the window and with a size of (180, 40), because of the QWidget.setGeometry() call.
Exercises
Try resizing the window. How does the button change? What happens to the button's height if you run the program with a bigger font? What happens if you try to make the window really small?
FamilyValues.java
package com.trolltech.examples.tutorial;

import com.trolltech.qt.gui.*;

public class FamilyValues
{
    public static void main(String args[])
    {
        QApplication.initialize(args);

        QWidget window = new QWidget();
        window.resize(200, 120);

        QPushButton quit = new QPushButton("Quit", window);
        quit.setFont(new QFont("Times", 18, QFont.Weight.Bold.value()));
        quit.setGeometry(10, 40, 180, 40);

        quit.clicked.connect(QApplication.instance(), "quit()");

        window.setWindowTitle("FamilyValues");
        window.show();
        QApplication.exec();
    }
}
4.Let There Be Widgets
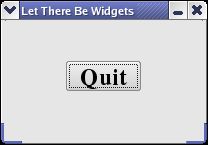
This example shows how to create your own widget, and describes how to control the minimum and maximum sizes of a widget.
public class Widgets extends QWidget
{

    public Widgets()
    {

        setFixedSize(200, 120);


        QPushButton quit = new QPushButton(tr("Quit"), this);
        quit.setGeometry(62, 40, 75, 30);
        quit.setFont(new QFont("Times", 18, QFont.Weight.Bold.value()));


        quit.clicked.connect(QApplication.instance(), "quit()");

        setWindowTitle(tr("Let There Be Widgets"));
    }


    public static void main(String args[])
    {
        QApplication.initialize(args);

        Widgets widget = new Widgets();
        widget.show();

        QApplication.exec();
    }

}
Line by Line Walkthrough
public class Widgets extends QWidget{
Here we create a new class. Because this class inherits from QWidget, the new class is a widget and may be a top-level window or a child widget (like the QPushButton in the previous chapter).
public Widgets() {
This class has only one member, a constructor (in addition to the members it inherits from QWidget). This widget is created without a parent. Parentless widgets are top-level windows in Qt Jambi, i.e., they are shown in separate windows on the screen. You can set a parent in the constructor of QWidget or with the QWidget.setParent() method. A widget's parent is also set to the widget to which it is added.
setFixedSize(200, 120);
Because this widget doesn't know how to handle resizing, we fix its size. In the next chapter, we will show how a widget can respond to resize event from the user.
QPushButton quit = new QPushButton(tr("Quit"), this); quit.setGeometry(62, 40, 75, 30);
quit.setFont(new QFont("Times", 18, QFont.Weight.Bold.value()));
Here we create and set up a child widget of this widget (the new widget's parent is this
, i.e. the Widgets
instance).The tr() method call around the string literal "Quit" marks the string for translation, making it possible to change it at run-time based on the contents of a translation file. It is a good habit to use tr() around all user-visible strings, in case you decide later to translate your application to other languages.
The QWidget.setGeometry() call sets both the widget's screen position and the size. It is equivalent to calling QWidget.move() followed by QWidget.resize(). If we didn't set the widgets geometry, the parent widget will position it using the buttons sizeHint() method - all widgets are able to calculate their preferred size.
public static void main(String args[]) {
QApplication.initialize(args);
Widgets widget = new Widgets();
widget.show();
QApplication.exec(); }
Here we instantiate a Widgets, show it, and execute the application.
Running the Application
This program is very similar in behavior to the previous one. The difference lies in the way we have implemented it. It does behave slightly differently, however. Just try to resize it to see.
Exercises
Try to create another Widgets
object in main()
. What happens?Try to add more buttons or put in other widgets than QPushButton.
5.Building Blocks
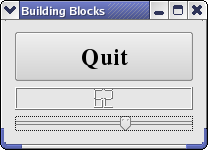
This example shows how to create and connect together several widgets by using signals and slots, and how to handle resizes.
public class Blocks extends QWidget
{

    public Blocks()
    {
        QPushButton quit = new QPushButton(tr("Quit"));
        quit.setFont(new QFont("Times", 18, QFont.Weight.Bold.value()));

        QLCDNumber lcd = new QLCDNumber(2);
        lcd.setSegmentStyle(QLCDNumber.SegmentStyle.Filled);


        QSlider slider = new QSlider(Qt.Orientation.Horizontal);

        slider.setRange(0, 99);

        slider.setValue(0);


        quit.clicked.connect(QApplication.instance(), "quit()");

        slider.valueChanged.connect(lcd, "display(int)");


        QVBoxLayout layout = new QVBoxLayout();

        layout.addWidget(quit);
        layout.addWidget(lcd);
        layout.addWidget(slider);
        setLayout(layout);

        setWindowTitle(tr("Building Blocks"));
    }

    public static void main(String args[])
    {
        QApplication.initialize(args);

        Blocks widget = new Blocks();
        widget.show();

        QApplication.exec();
    }
}
Line by Line Walkthrough
public Blocks() {
QPushButton quit = new QPushButton(tr("Quit"));
quit.setFont(new QFont("Times", 18, QFont.Weight.Bold.value())); QLCDNumber lcd = new QLCDNumber(2); lcd.setSegmentStyle(QLCDNumber.SegmentStyle.Filled);
lcd
is a QLCDNumber, a widget that displays numbers in an LCD-like fashion. This instance is set up to display two digits. We set the QLCDNumber.segmentStyle property to QLCDNumber.SegmentStyle.Filled to make the LCDs more readable.
QSlider slider = new QSlider(Qt.Orientation.Horizontal); slider.setRange(0, 99);
slider.setValue(0);
The user can use the QSlider widget to adjust an integer value in a range. Here we create a horizontal one, set its minimum value to 0, its maximum value to 99, and its initial value to 0.
slider.valueChanged.connect(lcd, "display(int)");
Here we use the signals and slots mechanism to connect the slider's valueChanged signal to the LCD number's display() slot.Whenever the slider's value changes it broadcasts the new value by emitting the valueChanged signal. Because that signal is connected to the LCD number's display() slot, the slot is called when the signal is broadcast. Neither of the objects knows about the other. This is essential in component programming.
Slots are otherwise normal Java member methods and follow the normal Java access rules.
QVBoxLayout layout = new QVBoxLayout();
layout.addWidget(quit);
layout.addWidget(lcd);
layout.addWidget(slider);
setLayout(layout);
Blocks
uses a QVBoxLayout to manage the geometry of its child widgets. For that reason, we don't need to specify the screen coordinates for each widget like we did in Chapter 4. In addition, using a layout ensures that the child widgets are resized when the window is resized. Then we add the quit
, lcd
and slider
widgets to the layout using QBoxLayout.addWidget().The QWidget.setLayout() method installs the layout on Blocks
. The call to setLayout() automatically sets the parent of the widgets in the layout so that they are children of Blocks
. Because of this, we didn't need to specify this
as the parent for the quit
, lcd and slider widgets.
In Qt Jambi, widgets are either children of other widgets (e.g. this
), or they have no parent. A widget can be added to a layout, in which case the layout becomes responsible for managing the geometry of that widget, but the layout can never act as a parent itself. Indeed, QWidget's constructor takes a QWidget pointer for the parent, and QLayout doesn't inherit from QWidget.
Running the Application
The LCD number reflects everything you do to the slider, and the widget handles resizing well. Notice that the LCD number widget changes in size when the window is resized (because it can), but the others stay about the same (because otherwise they would look strange).
Exercises
Try changing the LCD number to add more digits or to change mode (QLCDNumber.setMode()). You can even add four push buttons to set the number base.You can also change the slider's range.
Perhaps it would have been better to use a QSpinBox than a slider?
Try to make the application quit when the LCD number overflows.
Blocks.java
6 Building Blocks Galore!
This example shows how to encapsulate two widgets into a new component and how easy it is to use many widgets. For the first time, we use a custom widget as a child widget.
public class BlocksGalore extends QWidget
{
    public BlocksGalore()
    {
        QPushButton quit = new QPushButton(tr("Quit"));
        quit.setFont(new QFont("Times", 18, QFont.Weight.Bold.value()));

        quit.clicked.connect(QApplication.instance(), "quit()");


        QGridLayout grid = new QGridLayout();
        QVBoxLayout layout = new QVBoxLayout();
        layout.addWidget(quit);
        layout.addLayout(grid);
        setLayout(layout);
        setWindowTitle(tr("Building Blocks Galore"));


        for (int row = 0; row < 3; ++row) {

            for (int column = 0; column < 3; ++column) {
                LCDRange lcdRange = new LCDRange();
                grid.addWidget(lcdRange, row, column);
            }
        }
    }


    class LCDRange extends QWidget
    {

        public LCDRange()
        {
            QLCDNumber lcd = new QLCDNumber(2);
            lcd.setSegmentStyle(QLCDNumber.SegmentStyle.Filled);

            QSlider slider = new QSlider(Qt.Orientation.Horizontal);
            slider.setRange(0, 99);
            slider.setValue(0);

            slider.valueChanged.connect(lcd, "display(int)");

            QVBoxLayout layout = new QVBoxLayout();
            layout.addWidget(lcd);
            layout.addWidget(slider);
            setLayout(layout);
        }

    }

    public static void main(String args[])
    {
        QApplication.initialize(args);

        BlocksGalore widget = new BlocksGalore();
        widget.show();

        QApplication.exec();
    }
}
Line by Line Walkthrough
class LCDRange extends QWidget {
The LCDRange
widget is a widget without any API. It just has a constructor. This sort of widget is not very useful, so we'll add some API later.
public LCDRange() {
QLCDNumber lcd = new QLCDNumber(2); lcd.setSegmentStyle(QLCDNumber.SegmentStyle.Filled);
QSlider slider = new QSlider(Qt.Orientation.Horizontal); slider.setRange(0, 99);
slider.setValue(0); slider.valueChanged.connect(lcd, "display(int)");
QVBoxLayout layout = new QVBoxLayout();
layout.addWidget(lcd); layout.addWidget(slider); setLayout(layout);
}
The code in the constructor is lifted straight from the Blocks
constructor in Chapter 5. The only differences are that the Quit button is left out and the class is renamed.The BlocksGalore
class, too, contains no API except a constructor:
public class BlocksGalore extends QWidget{
public BlocksGalore() {
QPushButton quit = new QPushButton(tr("Quit"));
quit.setFont(new QFont("Times", 18, QFont.Weight.Bold.value())); quit.clicked.connect(QApplication.instance(), "quit()");
The push button that used to be in what is now LCDRange
has been separated so that we can have one Quit button and many LCDRange
 objects.QGridLayout grid = new QGridLayout();
QVBoxLayout layout = new QVBoxLayout();
 layout.addWidget(quit); layout.addLayout(grid);
setLayout(layout);
setWindowTitle(tr("Building Blocks Galore"));
We create a QWidget with a QGridLayout that will contain three columns. The QGridLayout automatically arranges its widgets in rows and columns; you can specify the row and column numbers when adding widgets to the layout, and QGridLayout will fit them into the grid.We use a QVBoxLayout to lay out the Quit button and the grid layout. The QWidget.addLayout() method is similar to the QWidget.addWidget() method, making the given layout a child of the main layout.
We then proceed to create the LCDRange widgets:
for (int row = 0; row < 3; ++row) {
 for (int column = 0; column < 3; ++column) {
   LCDRange lcdRange = new LCDRange(); grid.addWidget(lcdRange, row, column); }
}
 }
We create nine LCDRange
widgets, and we arrange them in three rows and three columns. We set the parent of the widgets to the BlocksGalore instance in the constructor. If we didn't, the parent of the widgets would be set when the layout is installed on the widget with setLayout(). For this reason, it might be a good idea to always set a parent to a widget in its constructor.That's all, folks!
Running the Application
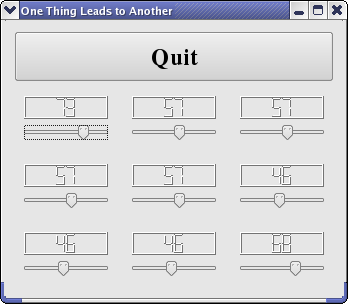
This program shows how easy it is to use many widgets at a time. Each one behaves like the slider and LCD number in the previous chapter. Again, the difference lies in the implementation.
Exercises
Initialize each slider with a different/random value on startup.
BlocksGalore.java
One Thing Leads to Another
This example shows how to create custom widgets with signals and slots, and how to connect them together in more complex ways.
Line by Line Walkthrough
This file is mainly lifted from BlocksGalore
in Chapter 6; only the non-trivial changes are noted here.The LCDRange class now includes three members besides the constructor. They make up an interface between this widget and other components in a program. Until now, LCDRange
didn't really have an API at all. We will examine them as we stumble upon them in the code.
This class is for the most part equal to LCDRange from chapter 6, and only the changes are noted here.
quit.setFont(new QFont("Times", 18, QFont.Weight.Bold.value()));
We have added a private variable that will hold the number in the display.
public final Signal1
valueChanged = new Signal1 ();
Here we declare our first custom signal: valueChanged
. We will emit it whenever the value of the LCD changes. A signal is an instance of one of the signal classes, which are Signal1, Signal2 ... Signal9). The suffix number is equal to the number of arguments of the signal; the types of the arguments must be given as class generics. We want one argument (the value of the LCD display), so we use the Signal1 class with Integers. You already know how to connect to the signal. The signal can be connected to any method that takes an Integer.We move on to the constructor:
public LCDRange() {
  ... slider.valueChanged.connect(lcd, "display(int)"); slider.valueChanged.connect(valueChanged);
... }
We connect the sliders valueChanged
signal to our display()
slot, and to our own valueChanged
signal. The signal you connect will be triggered by the signal to which it is connected.Let's take a closer look at what happens when the user operates the slider. The slider sees that its value has changed and emits the QSlider.valueChanged signal. That signal is connected both to the QLCDNumber.display() slot and to the valueChanged
signal of the LCDRange
.
Thus, when the signal is emitted, LCDRange
emits its own valueChanged
signal. In addition, QLCDNumber.display() is called and shows the new number.
Note that you're not guaranteed any particular order of execution; LCDRange.valueChanged
may be emitted before or after QLCDNumber.display() is called.
public int value() { return value; }
The implementation of value()
is straightforward. It simply returns the slider's value.public void >setValue(int value) { slider.setValue(value); }
The implementation of setValue()
is equally straightforward. Note that because the slider and LCD number are connected, setting the slider's value automatically updates the LCD number as well. In addition, the slider will automatically adjust the value if it is outside its legal range.The ConnectedSlider
class is copied from BlocksGalore in the previous chapter except for the constructor. We examine the changes here:
LCDRange previousRange = null;
for (int row = 0; row < 3; ++row) {
for (int column = 0; column < 3; ++column) {
LCDRange lcdRange = new LCDRange();
grid.addWidget(lcdRange, row, column);
 if (previousRange != null) lcdRange.valueChanged. connect(previousRange, "setValue(int)");
previousRange = lcdRange; } }
When we create the nine LCDRange
objects, we connect them using the signals and slots mechanism. Each has its valueChanged
signal connected to the previous one's setValue()
slot. Because LCDRange emits the valueChanged
signal when its value changes, we are here creating a chain of signals and slots.
Running the Application
On startup, the program's appearance is identical to the previous one. Try operating the slider to the bottom-right.
Exercises
Use the bottom-right slider to set all LCDs to 50. Then set the top six to 30 by clicking on the slider on the row above. Now, use the one to the left of the last one operated to set the first five LCDs back to 50.Click to the left of the handle on the bottom-right slider. What happens? Why is this the correct behavior?
ConnectedSliders.java
更多文档 https://doc.qt.io/archives/qtjambi-4.5.2_01/com/trolltech/qt/qtjambi-examples.html


