声明:本文转载自https://enginx.cn
0x01 前言
我一直都自行签发数字证书并部署在测试和生产环境中,因为商业的CA非常昂贵,同时我也没有相应的资质申请。管理自签发的数字证书也是一个发问题,在这里,我使用EJBCA。
在过去很长的一段时间里我都是随心所欲地签发私有证书,因为服务于服务之间都需要用到数字证书,这导致我需要维护的证书越来越多,而且存在很大的风险。
为了方便管理,我找到一款开源免费的CA管理系统:EJBCA。它可以管理CA与各级证书,签发和吊销证书,同时还支持CRL与OCSP。
0x02 准备
我将在centos7上部署配置这个系统,过程不算难,但因为网络的关系可能需要较长的时间。
EJBCA基于java,最新版的EJBCA需要用到JBoss EAP 7作为基础部署环境,同时你还需要一个mariadb存储数据。当然你还可以选择其他的数据库,具体请参考以下的安装指引:
- EJBCA Installation guide
在配置mariadb的时候请注意编码要为utf-8,以下是我数据库的信息:
- mariadb for EJBCA
- host:10.1.1.14
- dbname:ejbca
- username:ejbca
- passwd:ejbca
但在实际安装中,我发现最新版的JBoss EAP 7会导致EJBCA部署失败,所以我选择使用JBoss EAP 6.4.0这个版本,JBoss EAP可通过以下地址下载:
- Download JBoss EAP for Development Use
下载的时候请下载 Installer:
JBoss EAP的下载需要一个账户,在非商业使用环境中是免费的。
最后还需要用到ant命令,请使用以下命令安装:
[root@ejbca ~]# yum install ant -y
准备好之后,应该会有这两个文件:
1. [root@ejbca  ~]# ll -h /root/ejbca/
2. total  211M
3. -rw-r--r--  1  root root  33M  Jul  22  22:43  ejbca_ce_6_5.0.5.zip
4. -rw-r--r--  1  root root  179M  Jul  22  22:43  jboss-eap-6.4.0-installer.jar
0x03 JBoss EAP
安装ant的时候会默认装上JDK 1.8,所以我用java命令安装JBoos EAP:
[root@ejbca ~]# java -jar ejbca/jboss-eap-6.4.0-installer.jar
在安装过程中会有交互:
#选择安装语言,默认为英语
Select language  :
0:  eng
1:  chn
2:  deu
3:  fra
4:  jpn
5:  por
6:  spa
Please choose  [0]  :

#确认协议之后是安装路径,默认即可
Select the installation path:  [/root/EAP-6.4.0]

#随后是部件选项,默认即可
Select the packs you want to  install:

1    [x]  [Required]      [Red Hat JBoss Enterprise Application Platform]  (542.89  KB)
2    [x] [AppClient]  (34.24  KB)
3    [x]  [Required]      [Bin]  (10.99  MB)
4    [x]  [Required]      [Bundles]  (1.01  MB)
5    [x] [Docs]  (4.75  MB)
6    [x]  [Required]      [Domain]  (125.56  KB)
7    [x]  [Required]      [Domain Shell Scripts]  (17.35  KB)
8    [x]  [Required]      [Modules]  (147.01  MB)
9    [x]  [Required]      [Standalone]  (152.77  KB)
10 [x]  [Required]      [Standalone Shell Scripts]  (14.16  KB)
11 [x]  [Required]      [Welcome Content]  (2.11  MB)
12 [x] [Red Hat JBoss Enterprise Application Platform Natives]  (8  KB)
13 [x] [Native RHEL7 x86_64]  (76  KB)
14 [x] [Native Utils RHEL7 x86_64]  (53.04  KB)
15 [x] [Native Webserver RHEL7 x86_64]  (254.97  KB)
Total Size Required:  167.11  MB
Press  0  to  confirm your selections
Please select which packs you want to  install

#随后是jboss用户名和密码
Admin username:  [admin]
Admin password:  []
*************
Confirm admin password:  [*************]
*************
press  1  to  continue,  2  to  quit,  3  to  redisplay.

#然后是演示文件的安装,我选择no
Quickstarts
Red Hat JBoss Enterprise Application Platform comes with  a  series of quickstart examples designed to  help users begin writing applications using the Java EE  6  technologies.  Would you like to  install quickstarts?
0  [x]  No
1  [  ]  Yes

#最后是监听端口,默认是8080,
Socket Bindings
Configure the socket bindings for  Red Hat JBoss Enterprise Application Platform.
Select Port Configuration:
0  [x]  Use  the default  port bindings for  standalone and  domain modes.
1  [  ]  Configure an offset for  all default  port bindings.
2  [  ]  Configure custom port bindings.

#紧接着是是否启用IPv6
If  this  computer is  using  a  pure IPv6 configuration,  please check the box below.
  [  ]  Enable pure IPv6 configuration

#然后会询问是否启动服务器,先不启动
Server Launch
Choose server startup mode:
0  [x]  Don't  start the server
1  [  ]  Standalone Mode
2  [  ]  Domain Mode

#选择日志等级
Configure the logging levels for  Red Hat JBoss Enterprise Application Platform?
0  [x]  No
1  [  ]  Yes
#选择配置文件
Configure runtime environment
There are several additional options for  configuring Red Hat JBoss Enterprise Application Platform now that the server has been installed.  Each  option can be individually chosen,  and  will be configured in  the order displayed upon pressing next.  Would you like to  do  this  now?
0  [x]  Perform default  configuration
1  [  ]  Perform advanced configuration
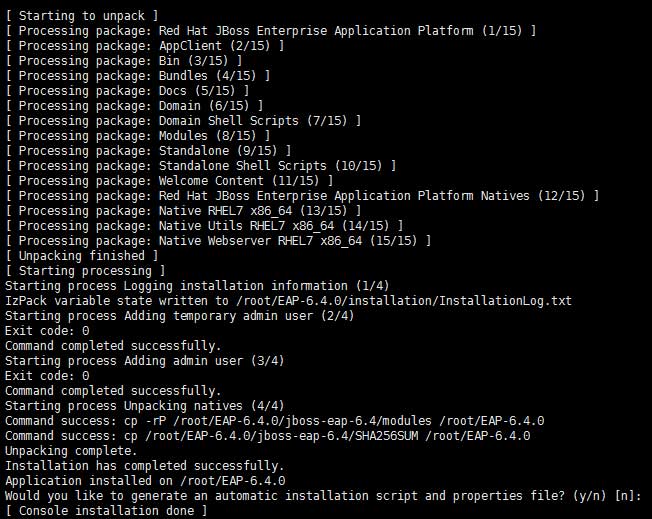
经过一系列交互之后就会解包安装:
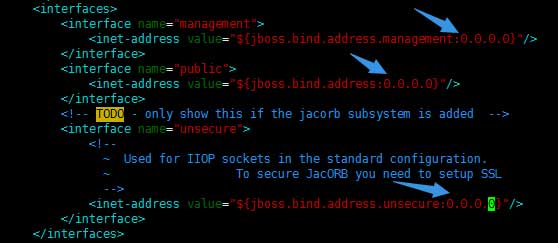
到这里已经完成JBoss EAP的安装,其实他有个基于web的控制面饭,但是服务器只监听127.0.0.1这个IP,如果需要监听其他IP或0.0.0.0,请修改以下文件:
#打开文件进行修改
[root@ejbca  ~]# vim /root/EAP-6.4.0/standalone/configuration/standalone.xml
#定位到interface的节点并修改监听地址为0.0.0.0
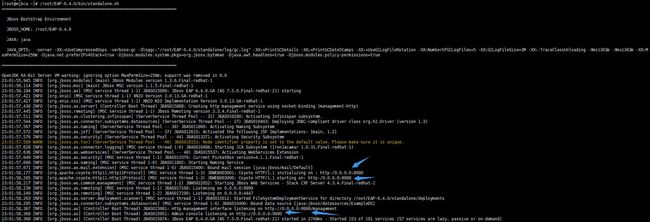
随后使用以下命令启动服务,在这里先不用脚本,因为后面需要重启服务。启动服务后再打开一个SSH窗口进行下面的步骤:
[root@ejbca ~]# /root/EAP-6.4.0/bin/standalone.sh
确认JBoss EAP服务启动后即可通过浏览器打开管理界面:
0x04 mariadb connector
为了让JBoss EAP连接上mariadb,需要使用MariaDB Connector,可以通过以下地址下载:
- MariaDB Connector
我写这篇文章的时候,最新版是2.0.3,可以通过以下地址直接下载:
- mariadb-java-client-2.0.3.jar
然后创建数据库驱动文件夹并将下载好的MariaDB Connector放置到该目录中:
#进入JBoss根目录
[root@ejbca  ~]# cd /root/EAP-6.4.0/
#新建文件夹
[root@ejbca ejbca_ce_6_5.0.5]# mkdir -p modules/org/mariadb/main/
#检查文件
[root@ejbca ejbca_ce_6_5.0.5]# ll -h modules/org/mariadb/main/
total  460K
-rw-r--r--  1  root root  457K  Jul  22  23:43  mariadb-java-client-2.0.3.jar
最后还需要在该目录中新建一个配置文件:
[root@ejbca ejbca_ce_6_5.0.5]# cat modules/org/mariadb/main/module.xml
请注意修改resources字段中的文件名。
然后是启用MariaDB Connector,使用jboss-cli.sh进入JBoss cli:
[root@ejbca ejbca_ce_6_5.0.5]# /root/EAP-6.4.0/bin/jboss-cli.sh
You are disconnected at  the moment.  Type  'connect'  to  connect to  the server or  'help'  for  the list of supported commands.
[disconnected  /]
如果提示disconnected,则需要输入connect并回车,如果一切正常则显示:
[standalone@localhost:9999 /]
然后输入以下命令在JBoss中注册mariadb驱动:
#注册驱动
/subsystem=datasources/jdbc-driver=org.mariadb.jdbc.Driver:add(driver-name=org.mariadb.jdbc.Driver,driver-module-name=org.mariadb,driver-xa-datasource-class-name=org.mariadb.jdbc.MySQLDataSource)

#重新加载
:reload
完成后输入exit回车即可退出。
0x05 EJBCA
在新SSH窗口中解压并进入EJBCA源码目录:
#进入临时文件夹
[root@ejbca  ~]# cd /root/ejbca/
#解压文件
[root@ejbca  ~]# unzip ejbca_ce_6_5.0.5.zip
#进入EJBCA目录
[root@ejbca  ~]# cd /root/ejbca/ejbca_ce_6_5.0.5/
0x05.1 配置文件
先进入配置文件目录:
[root@ejbca ejbca_ce_6_5.0.5]# cd conf/
配置文件目录包含以下文件:
[root@ejbca conf]# ll -h
total  176K
-rw-------  1  root root  587  Apr  6  10:29  batchtool.properties.sample
-rw-------  1  root root  8.1K  Apr  6  10:29  cache.properties.sample
-rw-------  1  root root  1.4K  Apr  6  10:29  catoken.properties.sample
-rw-------  1  root root  396  Apr  6  10:29  certstore.properties.sample
-rw-------  1  root root  14K  Apr  6  10:29  cesecore.properties.sample
-rw-------  1  root root  1.4K  Apr  6  10:29  cmptcp.properties.sample
-rw-------  1  root root  362  Apr  6  10:29  crlstore.properties.sample
-rw-------  1  root root  100  Apr  6  10:29  custom.properties.sample
-rw-------  1  root root  3.1K  Apr  6  10:29  database.properties.sample
-rw-------  1  root root  9.5K  Apr  6  10:29  ejbca.properties.sample
-rw-------  1  root root  3.1K  Apr  6  10:29  externalra-gui.properties.sample
-rw-------  1  root root  1.9K  Apr  6  10:29  externalra.properties.sample
-rw-------  1  root root  3.2K  Apr  6  10:29  install.properties.sample
-rw-------  1  root root  2.7K  Apr  6  10:29  jaxws.properties.sample
-rw-------  1  root root 50  Apr  6  10:29  jndi.properties.glassfish
-rw-------  1  root root  146  Apr  6  10:29  jndi.properties.jboss7
-rw-------  1  root root  146  Apr  6  10:29  jndi.properties.jbosseap6
-rw-------  1  root root  4.2K  Apr  6  10:29  log4j-glassfish.xml.sample
-rw-------  1  root root  4.8K  Apr  6  10:29  log4j-jboss6.xml.sample
-rw-------  1  root root  4.0K  Apr  6  10:29  log4j-jbosseap6.xml.sample
drwx------  2  root root 36  Apr  6  10:29  logdevices
-rw-------  1  root root  1.3K  Apr  6  10:29  mail.properties.sample
-rw-------  1  root root  18K  Apr  6  10:29  ocsp.properties.sample
drwx------  2  root root 37  Apr  6  10:29  plugins
-rw-------  1  root root  6.4K  Apr  6  10:29  scepra.properties.sample
-rw-------  1  root root  1.2K  Apr  6  10:29  systemtests.properties.sample
-rw-------  1  root root  2.4K  Apr  6  10:29  va.properties.sample
-rw-------  1  root root  1.9K  Apr  6  10:29  va-publisher.properties.sample
-rw-------  1  root root  13K  Apr  6  10:29  web.properties.sample
EJBCA只加载后缀名为properties的文件,否则则加载默认配置。在这里我们需要修改以下文件:
- database.properties:数据库配置文件
- ejbca.properties:EJBCA配置文件
- install.properties:安装配置文件
- web.properties:web服务配置文件
首先是数据库配置文件,先将文件复制一份然后进行修改:
#复制
[root@ejbca conf]# cp database.properties.sample database.properties
#修改
[root@ejbca conf]# vim database.properties
#修改以下内容
database.name=mysql
database.url=jdbc:mysql://10.1.1.14:3306/ejbca?characterEncoding=UTF-8
database.driver=org.mariadb.jdbc.Driver
database.username=ejbca
database.password=ejbca
然后复制并修改EJBCA配置文件:
#复制文件
[root@ejbca conf]# cp ejbca.properties.sample ejbca.properties
#修改文件
[root@ejbca conf]# vim ejbca.properties
#修改以下内容
appserver.home=/root/EAP-6.4.0
appserver.type=jboss
approval.defaultrequestvalidity=28800
approval.defaultapprovalvalidity=28800
ejbca.passwordlogrounds=8
然后修改安装配置文件:
#复制文件
[root@ejbca conf]# cp install.properties.sample install.properties
#修改文件
[root@ejbca conf]# vim install.properties
#修改以下内容
ca.name=EnginxManagementCA
ca.dn=CN=EnginxManagementCA,O=EnginxNet,C=CN
ca.tokentype=soft
ca.tokenpassword=null
ca.keyspec=4096
ca.keytype=RSA
ca.signaturealgorithm=SHA256WithRSA
ca.validity=3650
ca.policy=null
ca.certificateprofile=ROOTCA
最后是web服务配置文件:
#复制文件
[root@ejbca conf]# cp web.properties.sample web.properties
#修改文件
[root@ejbca conf]# vim web.properties
#修改以下内容
java.trustpassword=changeit  #默认即可
superadmin.cn=SuperAdmin  #默认即可
superadmin.dn=CN=${superadmin.cn},O=EnginxNet,C=CN
superadmin.password=ejbca  #默认即可
superadmin.batch=true
httpsserver.password=serverpwd  #默认即可
httpsserver.hostname=ca.ejbca.t.com
httpsserver.dn=CN=${httpsserver.hostname},O=EnginxNet,C=CN
httpserver.pubhttp=8080
httpserver.pubhttps=8442
httpserver.privhttps=8443
0x05.2 部署 / 安装
修改完成配置文件后回到EJBCA源码根目录并运行以下命令记性部署:
#回到根目录
[root@ejbca conf]# cd /root/ejbca/ejbca_ce_6_5.0.5/
#部署
[root@ejbca ejbca_ce_6_5.0.5]# ant deploy
部署需要较长的时间,请耐心等待。如果成功则显示:
BUILD SUCCESSFUL
Total time:  1  minute  39  seconds
然后还需要安装,安装过程中可以看到配置信息:
[root@ejbca ejbca_ce_6_5.0.5]# ant install
成功后会显示如下内容:
BUILD SUCCESSFUL
Total time:  3  minutes  11  seconds
数据库则会生成以下表:
MariaDB  [ejbca]>  show tables;
+-----------------------------+
|  Tables_in_ejbca |
+-----------------------------+
|  AccessRulesData |
|  AdminEntityData |
|  AdminGroupData              |
|  AdminPreferencesData        |
|  ApprovalData                |
|  AuditRecordData |
|  AuthorizationTreeUpdateData  |
|  Base64CertData              |
|  CAData                      |
|  CRLData |
|  CertReqHistoryData          |
|  CertificateData |
|  CertificateProfileData      |
|  CryptoTokenData |
|  EndEntityProfileData        |
|  GlobalConfigurationData |
|  HardTokenCertificateMap |
|  HardTokenData |
|  HardTokenIssuerData |
|  HardTokenProfileData        |
|  HardTokenPropertyData |
|  InternalKeyBindingData      |
|  KeyRecoveryData |
|  PeerData                    |
|  PublisherData |
|  PublisherQueueData          |
|  ServiceData |
|  UserData                    |
|  UserDataSourceData          |
+-----------------------------+
29  rows in  set  (0.00  sec)
0x05.3 登入
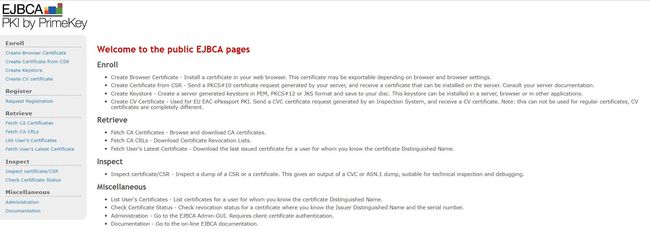
这时候可以通过以下地址访问公开页面:
http://10.1.1.100:8080/ejbca/
如果需要登入管理界面,则需要先重启JBoss。回到JBoss的SSH窗口按下组合键CTRL+C终止运行,然后再重新启动JBoss。从控制台中可以查看监听的地址与端口:
01:14:30,664  INFO  [org.apache.coyote.http11.Http11Protocol]  (MSC service thread  1-1)  JBWEB003001:  Coyote HTTP/1.1  initializing on  :  http-/0.0.0.0:8443
01:14:30,675  INFO  [org.apache.coyote.http11.Http11Protocol]  (MSC service thread  1-3)  JBWEB003001:  Coyote HTTP/1.1  initializing on  :  http-/0.0.0.0:8442
01:14:30,678  INFO  [org.apache.coyote.http11.Http11Protocol]  (MSC service thread  1-2)  JBWEB003001:  Coyote HTTP/1.1  initializing on  :  http-/0.0.0.0:8080
01:14:30,705  INFO  [org.apache.coyote.http11.Http11Protocol]  (MSC service thread  1-1)  JBWEB003000:  Coyote HTTP/1.1  starting on:  http-/0.0.0.0:8443
01:14:30,710  INFO  [org.apache.coyote.http11.Http11Protocol]  (MSC service thread  1-2)  JBWEB003000:  Coyote HTTP/1.1  starting on:  http-/0.0.0.0:8080
01:14:30,722  INFO  [org.apache.coyote.http11.Http11Protocol]  (MSC service thread  1-3)  JBWEB003000:  Coyote HTTP/1.1  starting on:  http-/0.0.0.0:8442
在登入之前需要在以下目录将p12证书文件保存到本地并安装:
[root@ejbca  ~]# ll /root/ejbca/ejbca_ce_6_5.0.5/p12/
total  20
-rw-r--r--  1  root root  4334  Jul  23  01:06  superadmin.p12
-rw-r--r--  1  root root  5332  Jul  23  01:05  tomcat.jks
-rw-r--r--  1  root root  1456  Jul  23  01:06  truststore.jks
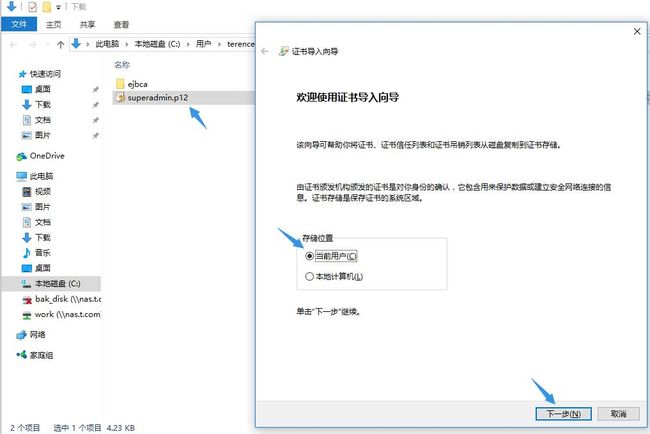
在windows系统中双击下载的p12文件并选择“本地用户”:
证书密码为“ejbca”:
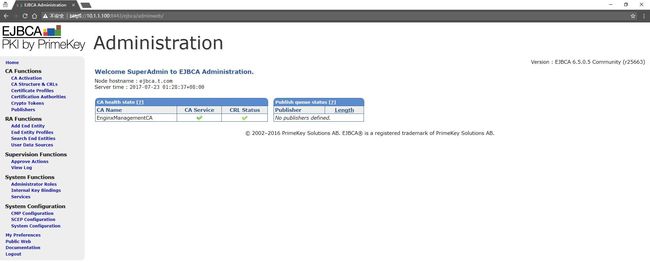
证书导入完毕后即可通过浏览器登入管理面板:
https://10.1.1.100:8443/ejbca/adminweb/
这里要选择正确的数字证书,否则无法登入,登入后的界面如下:
0x06 结语
EJBCA是一套很强大的CA管理软件,完全可以在企业内部部署使用。
JBoss的启动可以使用以下脚本:
[root@ejbca  ~]# cat /usr/local/shell/jboss_startup.sh
#!/bin/sh
nohup  /root/EAP-6.4.0/bin/standalone.sh  >  /dev/null  2>&1  &
0x07 相关视频
- Bilibili:EP18 – centos7安装全功能CA管理系统EJBCA


