要自定义一个相机,涉及的类有很多, 这也是AVFounation的重要学习内容之一, 音视频的捕获方面的知识更是重中之重,大概涉及的类有AVCaptureSession、AVCaptureConnection、AVCaptureDevice、AVCaptureDeviceInput、AVCapturePhotoOutput、AVCaptureMovieFileOutput等, 下面来一一介绍
AVCaptureSession
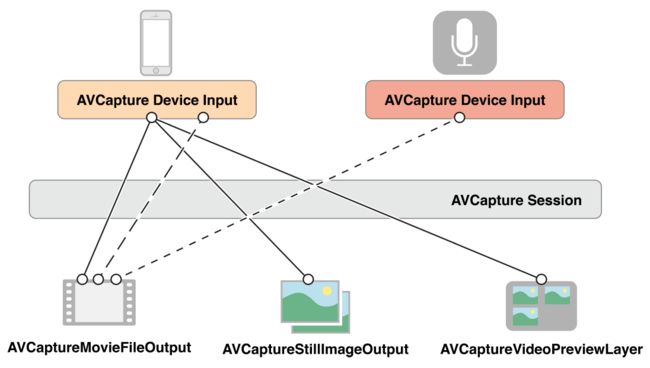
这个就是充当会话者的角色, 我们可以理解为平时生活中的插线板, 有输入, 有输出。其中AVCaptureDeviceInput为输入, AVCapturePhotoOutput、AVCaptureMovieFileOutput等为输出它们之间的关系我们可以看一下下面这幅图
这里的
AVCaptureStillImageOutPut和
AVCapturePhotoOutput是类似的, iOS10之前用
AVCaptureStillImageOutPut, iOS10之后用
AVCapturePhotoOutput
其中输入源有:AVCaptureDeviceInput(video)、 AVCaptureDeviceInput(audio)
输出源有:AVCaptureVideoDataOutput, AVCaptureAudioDataOutput, AVCaptureMovieFileOutput, AVCaptureStillImageOutput(AVCapturePhotoOutput), AVCaptureMetadataOutput,
简单的创建一个会话者
AVCaptureSession *session = [[AVCaptureSession alloc] init];

// 添加输入与输出

[session startRunning];
AVCaptureSession可以拥有一个或多个输入源, 当你想获取一张图片的时候你只需要AVCaptureDeviceInput(video)也就是图像的输入源就可以了, 当你想获取一段有声的视频时,则需要两个输入源AVCaptureDeviceInput(video)和AVCaptureDeviceInput(audio),你还可以只获取声音数据的时候, 只要AVCaptureDeviceInput(audio)就可以了。
在创建AVCaptureSession时我们一般会设定一个预设来获取不同规格的数据:
NSString *const AVCaptureSessionPresetPhoto; //一般在获取静态图片的时候用
NSString *const AVCaptureSessionPresetHigh;
NSString *const AVCaptureSessionPresetMedium;
NSString *const AVCaptureSessionPresetLow;
NSString *const AVCaptureSessionPreset352x288;
NSString *const AVCaptureSessionPreset640x480;  //  VGA.
NSString *const AVCaptureSessionPreset1280x720;  // 720p HD.
NSString *const AVCaptureSessionPreset1920x1080;
NSString *const AVCaptureSessionPresetiFrame960x540;
NSString *const AVCaptureSessionPresetiFrame1280x720;
NSString *const AVCaptureSessionPresetInputPriority; //通过已连接的捕获设备的 activeFormat 来反过来控制 capture session 的输出质量等级
在配置AVCaptureSession, 需要注意的是:
1、在输入输出或配置它的时候, 线程是阻塞的, 所以最后是创建一条串行队列异步执行。
2、在改变或配置输入, 输出, 预设(sessionPreset)的时候, 在AVCaptureSession所在线程在修改或配置之前调用- (void)beginConfiguration; 修改完之后, 或修改失败之后调用- (void)commitConfiguration;, 这样可以提高流畅性等不必要的BUG。
AVCaptureConnection
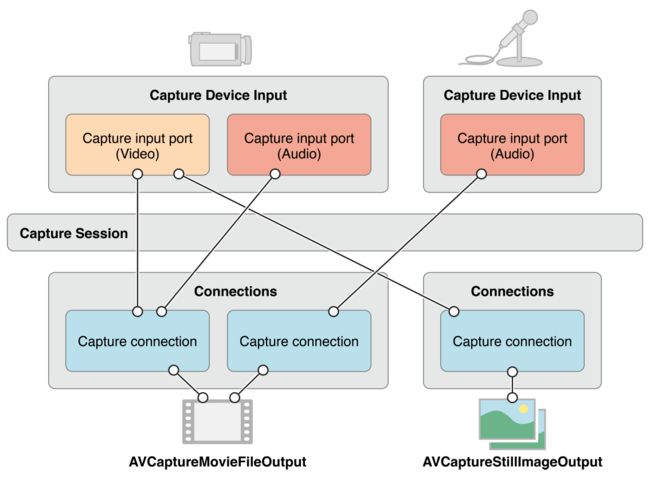
在AVCaptureSession中, 可能存在着很多的AVCaptureConnection, AVCaptureConnection代表着一条连接通道, 例如: 获取一张图片, 输入是AVCaptureDeviceInput(video) 输出是 AVCaptureStillImageOutput(AVCapturePhotoOutput), 在输入到输出这个过程中, 就有一个AVCaptureConnection对象去管理者这个流程。AVCaptureConnection可以有多个输入和输出,例如:获取视视频的时候, 就有视频和音频的输入, 输出也可以分视频数据和音频数据, 还可以获取图片数据。一般这个对象在你AVCaptureSession中加入输入输出的时候就会自动的帮你创建了。
所以我们一般是去获取使用:
AVCaptureConnection *connection = [movieFileOutput connectionWithMediaType:AVMediaTypeAudio];
我们一般用它来管理视频或图片输出的方向格式等问题, 还有音频输出的音量、声道等, 控制输入或输出
//图片输出朝向问题
       AVCaptureConnection *photoOutputConnection = [self.photoOutput connectionWithMediaType:AVMediaTypeVideo];
        photoOutputConnection.videoOrientation = videoPreviewLayerVideoOrientation;
其中朝向问题, 这里整理出来然大家有个很好的对比
[UIApplication sharedApplication].statusBarOrientation; 状态栏的方向跟视频的方向是一致的, 还有对比设备的朝向
typedef NS_ENUM(NSInteger, UIInterfaceOrientation) {
    UIInterfaceOrientationUnknown                                                           = UIDeviceOrientationUnknown,
    UIInterfaceOrientationPortrait            =  AVCaptureVideoOrientationPortrait          = UIDeviceOrientationPortrait,              //home button on the bottom.
    UIInterfaceOrientationPortraitUpsideDown  = AVCaptureVideoOrientationPortraitUpsideDown = UIDeviceOrientationPortraitUpsideDown,    //home button on the top.
    UIInterfaceOrientationLandscapeLeft       = AVCaptureVideoOrientationLandscapeRight     = UIDeviceOrientationLandscapeRight,        //home button on the right.
    UIInterfaceOrientationLandscapeRight      = AVCaptureVideoOrientationLandscapeLeft      = UIDeviceOrientationLandscapeLeft          //home button on the left.
} __TVOS_PROHIBITED;
AVCaptureDeviceInput
这个类代表着AVCaptureSession中的输入, 其中会根据AVCaptureDevice中的是视频设备(摄像头)还是音频设备(麦克风),的不同而不同,创建出来之后充当输入的角色添加到AVCaptureSession中
    //配置session输入输出, 或输入输出属性, sessionPreset时,需要用到-beginConfiguration, -commitConfiguration
    [self.session beginConfiguration];
    self.session.sessionPreset = AVCaptureSessionPresetPhoto;
    //添加视频输入
    AVCaptureDevice *videoDevice = [AVCaptureDevice defaultDeviceWithDeviceType:AVCaptureDeviceTypeBuiltInWideAngleCamera mediaType:AVMediaTypeVideo position:AVCaptureDevicePositionUnspecified];
    AVCaptureDeviceInput *videoDeviceInput = [AVCaptureDeviceInput deviceInputWithDevice:videoDevice error:&error];
    if (!videoDeviceInput) {
        NSLog(@"视频设备输出创建错误--%@", error);
        self.setupResult = AVCamManualSetupResultSessionConfigurationFailed;
        [self.session commitConfiguration];
        return;
    }
    if ([self.session canAddInput:videoDeviceInput]) {
        [self.session addInput:videoDeviceInput];
        self.videoDeviceInput = videoDeviceInput;
        self.videoDevice = videoDevice;
        dispatch_async(dispatch_get_main_queue(), ^{//调整视频输入方向
            UIInterfaceOrientation statusBarOriebtation = [UIApplication sharedApplication].statusBarOrientation;
            AVCaptureVideoOrientation initialVideoOrientation = AVCaptureVideoOrientationPortrait;
            if (statusBarOriebtation != UIInterfaceOrientationUnknown) {
                initialVideoOrientation = (AVCaptureVideoOrientation)statusBarOriebtation;
            }

            AVCaptureVideoPreviewLayer *previewLayer = (AVCaptureVideoPreviewLayer *)self.previewView.layer;
            previewLayer.connection.videoOrientation = initialVideoOrientation;
        });
    }else {
        NSLog(@"不能添加视频输入到session");
        self.setupResult = AVCamManualSetupResultSessionConfigurationFailed;
        [self.session commitConfiguration];
        return;

    }

    //添加音频输入
    AVCaptureDevice *audioDevice = [AVCaptureDevice defaultDeviceWithMediaType:AVMediaTypeAudio];
    AVCaptureDeviceInput *audioDeviceInput = [AVCaptureDeviceInput deviceInputWithDevice:audioDevice error:&error];
    if (!audioDeviceInput) {
        NSLog(@"音频设备输出创建错误--%@", error);

    }

    if ([self.session canAddInput:audioDeviceInput]) {
        [self.session addInput:audioDeviceInput];
    }else {

        NSLog(@"不能添加音频输入到session");
    }
需要注意的是:
1、摄像头的聚焦(AVCaptureFocusMode)、曝光(AVCaptureExposureMode)、白平衡(AVCaptureWhiteBalanceMode)和感光度(ISO)等等一些参数设置都是在AVCaptureDevice(video)里面配置完成的。
2、AVCaptureDevice配置参数或修改参数的时候都要注意先调用 - (BOOL)lockForConfiguration:(NSError **)outError; 配置完成后调用 - (void)unlockForConfiguration;
下面是一下参数的配置:
//改变聚焦模式
- (IBAction)changeFocusMode:(id)sender
{
    UISegmentedControl *control = sender;
    AVCaptureFocusMode mode = (AVCaptureFocusMode)[self.focusModes[control.selectedSegmentIndex] intValue];
    NSError *error = nil;
    if ([self.videoDevice lockForConfiguration:&error]) {
        if ([self.videoDevice isFocusModeSupported:mode]) {
            self.videoDevice.focusMode = mode;
        }
        else {
           NSLog( @"Focus mode %@ is not supported. Focus mode is %@.", [self stringFromFocusMode:mode], [self stringFromFocusMode:self.videoDevice.focusMode] );
            self.focusModeControl.selectedSegmentIndex = [self.focusModes indexOfObject:@(self.videoDevice.focusMode)];
            [self.videoDevice unlockForConfiguration];
        }

    }
    else {
         NSLog( @"Could not lock device for configuration: %@", error );
    }

}

//手动模式下, 改变镜头聚焦位置
- (IBAction)changeLensPosition:(id)sender
{
    UISlider *control = sender;
    NSError *error = nil;
    if ([self.videoDevice lockForConfiguration:&error]) {
        [self.videoDevice setFocusModeLockedWithLensPosition:control.value completionHandler:nil];//手动聚焦
        [self.videoDevice unlockForConfiguration];
    }
    else {
        NSLog( @"Could not lock device for configuration: %@", error );
    }
}

//设置输入设备的聚焦和曝光的模式和点
- (void)focusWithMode:(AVCaptureFocusMode)focusMode exposeWithMode:(AVCaptureExposureMode)exposureMode atDevicePoint:(CGPoint)point monitorSubjectAreaChange:(BOOL)monitorSubjectAreaChange
{
    dispatch_async(self.sessionQueue, ^{
        AVCaptureDevice *device = self.videoDevice;
        NSError *error = nil;
        if ([device lockForConfiguration:&error]) {
            if (focusMode != AVCaptureFocusModeLocked && device.isFocusPointOfInterestSupported && [device isFocusModeSupported:focusMode]) {
                device.focusPointOfInterest = point;
                device.focusMode = focusMode;
            }

            if (exposureMode != AVCaptureExposureModeCustom && device.isExposurePointOfInterestSupported && [device isExposureModeSupported:exposureMode]) {
                device.exposurePointOfInterest = point;
                device.exposureMode = exposureMode;
            }

            device.subjectAreaChangeMonitoringEnabled = monitorSubjectAreaChange;
            [device unlockForConfiguration];
        }else {
          NSLog( @"Could not lock device for configuration: %@", error );
        }
    });
}

//根据点击的位置, 进行聚焦和曝光
- (IBAction)focusAndExposeTap:(UIGestureRecognizer *)gestureRecognizer
{
    CGPoint devicePoint = [(AVCaptureVideoPreviewLayer *)self.previewView.layer captureDevicePointOfInterestForPoint:[gestureRecognizer locationInView:[gestureRecognizer view]]];
    [self focusWithMode:self.videoDevice.focusMode exposeWithMode:self.videoDevice.exposureMode atDevicePoint:devicePoint monitorSubjectAreaChange:YES];

}

//改变曝光模式
- (IBAction)changeExposureMode:(id)sender
{
    UISegmentedControl *control = sender;
    AVCaptureExposureMode mode = (AVCaptureExposureMode)[self.exposureModes[control.selectedSegmentIndex] intValue];
    NSError *error = nil;
    if ([self.videoDevice lockForConfiguration:&error]) {
        if ([self.videoDevice isExposureModeSupported:mode]) {
            self.videoDevice.exposureMode = mode;
        }
        else {
          NSLog( @"Exposure mode %@ is not supported. Exposure mode is %@.", [self stringFromExposureMode:mode], [self stringFromExposureMode:self.videoDevice.exposureMode] );
            self.exposureModeControl.selectedSegmentIndex = [self.exposureModes indexOfObject:@(self.videoDevice.exposureMode)];
        }
        [self.videoDevice unlockForConfiguration];
    }
    else {
       NSLog( @"Could not lock device for configuration: %@", error );
    }
}

//手动模式下的设置曝光时间
- (IBAction)changeExposureDuration:(id)sender
{
    UISlider *control = sender;
    NSError *error = nil;

    double p = pow( control.value, kExposureDurationPower ); // Apply power function to expand slider's low-end range
    double minDurationSeconds = MAX( CMTimeGetSeconds( self.videoDevice.activeFormat.minExposureDuration ), kExposureMinimumDuration );
    double maxDurationSeconds = CMTimeGetSeconds( self.videoDevice.activeFormat.maxExposureDuration );
    double newDurationSeconds = p * ( maxDurationSeconds - minDurationSeconds ) + minDurationSeconds; // Scale from 0-1 slider range to actual duration
    if ([self.videoDevice lockForConfiguration:&error]) {
        [self.videoDevice setExposureModeCustomWithDuration:CMTimeMakeWithSeconds(newDurationSeconds, 1000*1000*1000) ISO:AVCaptureISOCurrent completionHandler:nil];
        [self.videoDevice unlockForConfiguration];
    }
    else {

      NSLog( @"Could not lock device for configuration: %@", error );
    }
}
AVCaptureOutput
一般是用他们的子类AVCaptureVideoDataOutput, AVCaptureAudioDataOutput, AVCaptureMovieFileOutput, AVCaptureStillImageOutput(AVCapturePhotoOutput), AVCaptureMetadataOutput, 他们都用相对应的代理, 其中数据输出都是通过代理来实现的,
下面的是视频的数据输出和存储
- (IBAction)toggleMovieRecording:(id)sender
{
    self.recordButton.enabled = NO;
    self.cameraButton.enabled = NO;
    self.captureModeControl.enabled = NO;

    AVCaptureVideoPreviewLayer *previewLayer = (AVCaptureVideoPreviewLayer *)self.previewView.layer;
    AVCaptureVideoOrientation previewLayerVideoOrientation = previewLayer.connection.videoOrientation;
    dispatch_async(self.sessionQueue, ^{
        if (!self.movieFileOutput.isRecording) {

            if ([UIDevice currentDevice].isMultitaskingSupported) {
                self.backgroundRecordingID = [[UIApplication sharedApplication] beginBackgroundTaskWithExpirationHandler:nil];
            }
            AVCaptureConnection *moviceConnection = [self.movieFileOutput connectionWithMediaType:AVMediaTypeVideo];
            moviceConnection.videoOrientation = previewLayerVideoOrientation;
            //保存到相册
            NSString *outputFileName = [NSProcessInfo processInfo].globallyUniqueString;
            NSString *outputFilePath = [NSTemporaryDirectory() stringByAppendingPathComponent:[outputFileName stringByAppendingPathExtension:@"mov"]];
            [self.movieFileOutput startRecordingToOutputFileURL:[NSURL fileURLWithPath:outputFilePath] recordingDelegate:self];
        }
        else {
            [self.movieFileOutput stopRecording];

        }

    });
}

- (void)captureOutput:(AVCaptureFileOutput *)captureOutput didStartRecordingToOutputFileAtURL:(NSURL *)fileURL fromConnections:(NSArray *)connections
{
    dispatch_async( dispatch_get_main_queue(), ^{
        self.recordButton.enabled = YES;
        [self.recordButton setTitle:NSLocalizedString( @"Stop", @"Recording button stop title" ) forState:UIControlStateNormal];
    });
}

- (void)captureOutput:(AVCaptureFileOutput *)captureOutput didFinishRecordingToOutputFileAtURL:(NSURL *)outputFileURL fromConnections:(NSArray *)connections error:(NSError *)error
{
    UIBackgroundTaskIdentifier  currentBackgroundRecordingID = self.backgroundRecordingID;
    self.backgroundRecordingID = UIBackgroundTaskInvalid;
    dispatch_block_t cleanup = ^{
        if ([[NSFileManager defaultManager] fileExistsAtPath:outputFileURL.path]) {
            [[NSFileManager defaultManager] removeItemAtPath:outputFileURL.path error:nil];
        }
        if (currentBackgroundRecordingID != UIBackgroundTaskInvalid) {
            [[UIApplication sharedApplication] endBackgroundTask:currentBackgroundRecordingID];
        }

    };
    BOOL success = YES;
    if (error) {
        NSLog( @"Error occurred while capturing movie: %@", error );
        success = [error.userInfo[AVErrorRecordingSuccessfullyFinishedKey] boolValue];
    }
    if (success) {
        [PHPhotoLibrary requestAuthorization:^(PHAuthorizationStatus status) {
            if (status == PHAuthorizationStatusAuthorized) {
                [[PHPhotoLibrary sharedPhotoLibrary] performChanges:^{
                    PHAssetResourceCreationOptions *options = [[PHAssetResourceCreationOptions alloc] init];
                    options.shouldMoveFile = YES;
                    PHAssetCreationRequest *changeRequest = [PHAssetCreationRequest creationRequestForAsset];
                    [changeRequest addResourceWithType:PHAssetResourceTypeVideo fileURL:outputFileURL options:options];
                } completionHandler:^(BOOL success, NSError * _Nullable error) {
                    if (!success) {
                        NSLog( @"Could not save movie to photo library: %@", error);
                    }
                    cleanup();
                }];
            }else {
                cleanup();
            }
        }];
    }
    else {
        cleanup();
    }
    dispatch_async(dispatch_get_main_queue(), ^{
        self.cameraButton.enabled = (self.videoDeviceDiscoverySession.devices.count > 1);
        self.recordButton.enabled = self.captureModeControl.selectedSegmentIndex == AVCamManualCaptureModeMovie;
        [self.recordButton setTitle:NSLocalizedString( @"Record", @"Recording button record title" ) forState:UIControlStateNormal];
        self.captureModeControl.enabled = YES;
    });
}
参考
文章代码都是官方代码DEMO
大家还可以参考另外一篇比较好的文章iOS-AVFoundation自定义相机详解

