说到OS的用户和权限,大家都知道非常重要,因为几乎每个用户在实际工作中都或多或少地遇到过权限的问题。如我们在为一些用户配置运行一些特殊应用程序或服务时;为某些用户分配特定的网管管理任务时。大家都想有尽可能高的权限以方便工作,但在实际网络应用中,不可能每个用户都能拥有至高无上的权限,就像在现实生活中一样,都是根据不同员工在实际工作中应用需求来设置的。
“用户权限”这个概念非常广,不仅包括常见的文件访问权限、共享权限,还包括重要的网络操作、管理权限等,非常多样。
很多人都知道,在Microsoft的windows系统中把不同的权限分别定义成:安全权限、共享权限和用户权利。用户的各种权限是用户进行各种具体应用的前提,同时也是网络系统安全需求。许多网络安全事故或隐患就是直接或间接来自于不恰当的网络用户权限配置。
那么在Linux系统中用户权限是怎样的呢?我们知道,Linux的哲学思想之一就是一切皆文件,因此在Linux系统中,用户权限最重要的体现就是文件权限。下面我们先说说Linux文件权限基础哈!
一、Linux文件权限基础:
1、Linux的文件类型:
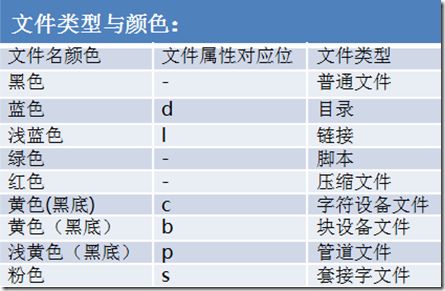
与windows不同,linux中不同类型文件颜色不尽相同,可以通过文件名颜色或者文件属性来查看文件类型:
可以使用file命令查看文件类型:
例如:
[root@rhel5 jjx]# ll
总计 312
drwxrwxr-x  2 jjx  jjx    4096 12-22 12:43 b_d
drwxr-xr-x  2 root root  49152 12-21 16:17 bin
-r-sr-S--x  1 jjx  jjx      51 12-22 13:19 file01.txt
-rw-rw-r--  1 jjx  jjx      84 12-24 19:11 file02.txt
drwxr-xr-x 18 root root   4096 12-21 16:17 include
drwxr-xr-x  6 root root   4096 12-21 16:17 kerberos
-rwxr-xr-x  1 root root   3154 12-25 22:11 lang.sh
[root@rhel5 jjx]# file lang.sh
lang.sh: ASCII text
[root@rhel5 jjx]# file tmp
tmp: directory
2、Linux的文件及目录的权限:
对于每一个文件,Linux都提供了一套文件权限系统。
对于每一类用户,权限系统又分别提供他们三种权限:
- 读(r) :用户是否有权力读文件的内容;
- 写(w) :用户是否有权利改变文件的内容;
- 执行(x) :用户是否有权利执行文件;
| 权限类别 |
文件权限 |
目录权限 |
| 读取(r) |
可以读取文件的内容,如:可以用cat命令查看文件内容 |
可以对目录执行ls命令,但不允许使用-l选项,而且不能cd到目录中 |
| 修改(w) |
可以修改文件的内容,如:可以使用文本编辑工具修改文本的内容 |
可以在目录中创建文件 |
|
执行(x) |
可以运行某个程序(即文件可发起为进程),如:运行QQ等应用程序 |
可以对目录执行ls -l,并且能够cd进去 |
范例:
[user1@rhel5 home]$ ll
总计 96
drwx------  2 archlinux archlinux 4096 12-23 16:13 archlinux
drwx------  2 centos    centos    4096 01-07 21:10 centos
drwx------  2 gentoo    gentoo    4096 12-23 16:06 gentoo
drwx------  2 hadoop    hadoop    4096 01-07 20:18 hadoop
drwx------  2 hive      magedu    4096 01-07 20:19 hive
drwxrwx--- 25 jjx       jjx       4096 01-22 14:43 jjx
drwx------  2 mandriva  distro    4096 12-29 16:35 mandriva
drwx------  2 redhat    redhat    4096 01-17 19:02 redhat
drwx---r--  5 jjx       jjx       4096 01-22 15:17 tmp         #其他用户对tmp目录只有“读取”权限
drwx------  2 ubuntu    ubuntu    4096 12-23 15:54 ubuntu
drwx------  2 user1     user01    4096 01-17 16:08 user1
drwx------  2 xin       xin       4096 12-21 19:42 xin
[user1@rhel5 home]$ ls tmp      #可以用ls命令查看目录内容哈
data  PermissionTest  tmp/file01.txt  tmp/hellogrp01  users
[user1@rhel5 home]$ ll tmp         #不能用"ls -l”,即不能使用长列表的方式查看目录tmp的内容哈
总计 0
?--------- ? ? ? ?          ? tmp/data
?--------- ? ? ? ?          ? tmp/file01.txt
?--------- ? ? ? ?          ? tmp/hellogrp01
?--------- ? ? ? ?          ? tmp/PermissionTest
?--------- ? ? ? ?          ? tmp/users
[user1@rhel5 home]$ cd tmp    #只有读权限所以不能cd到该目录哈
-bash: cd: tmp: 权限不够
[root@rhel5 home]# chmod o+x tmp/   #修改tmp目录的权限,使得其他用户有“执行”权限
[root@rhel5 home]# su – user1       #切换到user1用户
[user1@rhel5 ~]$ ll -d /home/tmp/
drwx-----x 5 jjx jjx 4096 01-22 15:17 /home/tmp/     #tmp目录有“执行”了权限哈
[user1@rhel5 ~]$ cd /home/tmp/    #可以cd到tmp目录中去了哈
[user1@rhel5 tmp]$ pwd
/home/tmp
[user1@rhel5 tmp]$ ll     #因为没“读取”权限,所以不能查看tmp目录的内容哈
ls: .: 权限不够
[user1@rhel5 tmp]$ touch file.txt   #没有“写”权限,无法在tmp目录中创建文件哈
touch: cannot touch `file.txt': Permission denied
3、Linux文件系统安全模型:
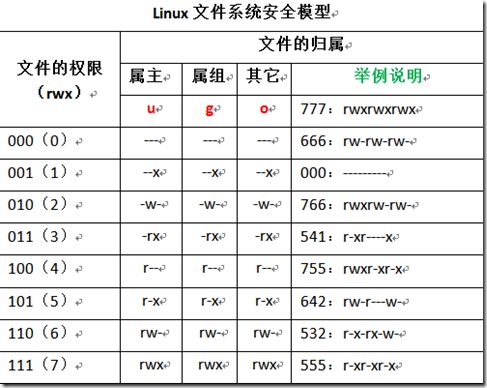
文件权限系统,将操作文件的用户都分成三类,如图所示:
- 文件的拥有者,即属主(u)
- 文件所属组的成员,即属组(g)
- 其他用户(o)
举例说明:
[root@rhel5 tmp]# ll
总计 24
drwxr-xr-x 2 root root   4096 01-07 20:51 data   #u=rwx(7) g=r-x(5) o=r-x(5)
-rw-rw-r-- 1 jjx  jjx       0 01-20 11:29 hellgrp
-rw-r--r-- 1 jjx  centos    0 01-20 11:34 hellogrp01
drwxr-xr-x 3 root root   4096 12-23 16:27 users
[root@rhel5 tmp]# ll
total 32
drwxrw---- 2 jjx  jjx  4096 Jan 22 15:46 PermissionTest
drwxr-xr-x 2 root root 4096 Jan  7 20:51 data
-rw-rw-r-- 1 jjx  jjx     0 Jan 22 15:17 file01.txt     #file01.txt文件的权限是664哈
-rwxr--r-- 1 jjx  jjx     0 Jan 20 11:34 hellogrp01
drwxr-xr-x 3 root root 4096 Dec 23 16:27 users
[root@rhel5 tmp]# chmod 777 file01.txt    #修改file01.txt的权限为777,即:rwxrwxrwx
[root@rhel5 tmp]# ll
total 32
drwxrw---- 2 jjx  jjx  4096 Jan 22 15:46 PermissionTest
drwxr-xr-x 2 root root 4096 Jan  7 20:51 data
-rwxrwxrwx 1 jjx  jjx     0 Jan 22 15:17 file01.txt     #可以看到file01.txt的权限被修改为777了哈
-rwxr--r-- 1 jjx  jjx     0 Jan 20 11:34 hellogrp01
drwxr-xr-x 3 root root 4096 Dec 23 16:27 users
4、/etc/login.defs配置文件:
大家都知道,我们创建一个用户的时候,会自动创建用户家目录,会分配UID,还有密码策略,知道是怎么规定的吗?
就是在login.defs这个文件里面定义的;
  1: [root@rhel5 jjx]# cat /etc/login.defs
  2: # *REQUIRED*
  3: #   Directory where mailboxes reside, _or_ name of file, relative to the
  4: #   home directory.  If you _do_ define both, MAIL_DIR takes precedence.
  5: #   QMAIL_DIR is for Qmail
  6: #
  7: #QMAIL_DIR      Maildir
  8: MAIL_DIR        /var/spool/mail     #创建用户时,同时也在规定的这个目录建立邮件目录
  9: #MAIL_FILE      .mail
 10:
 11: # Password aging controls:
 12: #
 13: #       PASS_MAX_DAYS   Maximum number of days a password may be used.
 14: #       PASS_MIN_DAYS   Minimum number of days allowed between password changes.
 15: #       PASS_MIN_LEN    Minimum acceptable password length.
 16: #       PASS_WARN_AGE   Number of days warning given before a password expires.
 17: #
 18: #建立新用户时所定义的用户影子口令属性
 19: PASS_MAX_DAYS   99999    #密码有效期
 20: PASS_MIN_DAYS   0    #密码最小更改时间,单位是天。为0,就是没有限制,随时可以更改
 21: PASS_MIN_LEN    5    #安全密码的最小位数
 22: PASS_WARN_AGE   7    #密码过期前几天提醒用户,默认是7天。
 23:
 24: #
 25: # Min/max values for automatic uid selection in useradd
 26: #
 27: UID_MIN                   500   #新建用户的最小UID是500
 28: UID_MAX                 60000   #新建用户的最大UID是60000
 29:
 30: #
 31: # Min/max values for automatic gid selection in groupadd
 32: #
 33: GID_MIN                   500   #新建组的最小GID是500
 34: GID_MAX                 60000   #新建组的最大GID是60000
 35:
 36: #
 37: # If defined, this command is run when removing a user.
 38: # It should remove any at/cron/print jobs etc. owned by
 39: # the user to be removed (passed as the first argument).
 40: #
 41: #USERDEL_CMD    /usr/sbin/userdel_local
 42:
 43: #
 44: # If useradd should create home directories for users by default
 45: # On RH systems, we do. This option is overridden with the -m flag on
 46: # useradd command line.
 47: #
 48: CREATE_HOME     yes    #是否给新建立的用户建立家目录
 49:
 50: # The permission mask is initialized to this value. If not specified,
 51: # the permission mask will be initialized to 022.
 52: UMASK           077    #给用户建立的家目录的权限掩码
 53:
 54: # This enables userdel to remove user groups if no members exist.
 55: #
 56: USERGROUPS_ENAB yes   #是否在建立一个用户的时候也建立相应的基本组
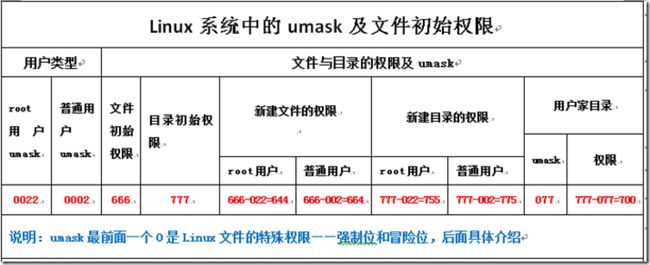
我们重点看下第52行哈!
5、文件的权限掩码umask
举例说明:
[root@rhel5 jjx]# whoami
root
[root@rhel5 jjx]# umask
0022
[root@rhel5 jjx]# su - jjx
[jjx@rhel5 ~]$ whoami
jjx
[jjx@rhel5 ~]$ umask
0002
[root@rhel5 tmp]# tail -5 /etc/passwd
mandriva:x:2002:3003::/home/mandriva:/bin/bash
hadoop:x:2004:2004::/home/hadoop:/bin/bash
hive:x:2005:2005::/home/hive:/bin/bash
centos:x:2006:2006::/home/centos:/bin/bash
user1:x:2003:5002::/home/user1:/bin/bash
[root@rhel5 tmp]# useradd user2      #创建新用户user2,以查看其家目录的默认权限
[root@rhel5 tmp]# tail -1 /etc/passwd
user2:x:2007:2007::/home/user2:/bin/bash
[root@rhel5 tmp]# ll -d /home/user2    #可以看到新建用户的家目录的权限是700哈,也就是说umak=777-700=077
drwx------ 2 user2 user2 4096 Jan 22 18:31 /home/user2
[root@rhel5 tmp]# ll
total 0
[root@rhel5 tmp]# touch file01.root.txt
[root@rhel5 tmp]# ll
total 4
-rw-r--r-- 1 root root 0 Jan 22 18:43 file01.root.txt   #可以看到,root用户新创建的文件的默认权限为666-022=644哈
[root@rhel5 tmp]# mkdir dir01.root.dir
[root@rhel5 tmp]# ll
total 12
drwxr-xr-x 2 root root 4096 Jan 22 18:43 dir01.root.dir  #可以看到,root用户新创建的目录的默认权限为777-022=755哈
-rw-r--r-- 1 root root    0 Jan 22 18:43 file01.root.txt
[root@rhel5 tmp]# su – user1      #切换到普通用户user1
[user1@rhel5 ~]$ touch file01.txt   #新建一个文件file01.txt
[user1@rhel5 ~]$ mkdir dir01    #新建一个目录dir01
[user1@rhel5 ~]$ ll
总计 60
drwxrwxr-x 2 user1 user1  4096 01-22 18:50 dir01        #可以看到,普通用户新创建的目录的权限为777-002=775哈
-rw-rw-r-- 1 user1 user1     0 01-22 18:50 file01.txt   #可以看到,普通用户新创建的文件的权限为666-002=664哈
-rwxr-xr-x 1 root  root   2255 01-17 16:08 rc
-rwxr-xr-x 1 root  root    220 01-17 16:08 rc.local
-rwxr-xr-x 1 root  root  26376 01-17 16:08 rc.sysinit
6、/etc/skel目录
在创建一个新用户后,会在新用户的主目录下看到类似.bash_profile, .bashrc, .bash_logout等文件,这些文件是怎么来的呢,如果我想让新建立的用户在家目录下默认拥有自己指定的配置文件,该如何设置呢?
/etc/skel目录就是解决这个问题的,/etc/skel目录定义了新建用户在家目录下默认的配置文件,更改/etc/skel目录下的内容就可以改变新建用户默认家目录的配置文件信息。
[root@rhel5 skel]# ll -a
总计 56
drwxr-xr-x  2 root root  4096 2012-03-30 .
drwxr-xr-x 94 root root 12288 01-20 11:30 ..
-rw-r--r--  1 root root    24 2006-07-12 .bash_logout
-rw-r--r--  1 root root   176 2006-07-12 .bash_profile
-rw-r--r--  1 root root   124 2006-07-12 .bashrc
-rw-r--r--  1 root root   658 2006-09-12 .zshrc
可以看到都是隐藏文件哈!新建立的用户家目录里相应的内容就是由这几个文件定义的!~~
二、Linux文件权限管理:
1、修改文件权限:
命令名称:chomod
命令所在路径:/bin/chmod
执行权限:所有用户
功能描述:修改文件权限
语法:chmod [options] …MODE[,MODE]… FILENAME…
MODE: `[ugoa]*([-+=]([rwxXst]*|[ugo]))+'
说明:u=属主 g=属组 o=其他用户 a=所有用户
-:删除权限 +:添加权限 =:修改某一类或某些类用户的权限
r:读权限 w:写权限 x:执行权限 X:代表的是UID强制位 s:代表的是GID强制位 t:代表的是冒险位
范例:
(1)只操作某类用户的某位或某些位权限:u,g,o,a(如:+/- ,u+w,+x, -x ,g-rw)
[jjx@rhel5 tmp]$ ll
总计 20
drwxr-xr-x 2 root root 4096 01-07 20:51 data
-rw-r--r-- 1 jjx  jjx     0 01-20 11:34 hellogrp01  #修改此文件的权限,使其属主jjx用户具有执行权限
drwxr-xr-x 3 root root 4096 12-23 16:27 users
[jjx@rhel5 tmp]$ chmod u+x hellogrp01
[jjx@rhel5 tmp]$ ll
总计 20
drwxr-xr-x 2 root root 4096 01-07 20:51 data
-rwxr--r-- 1 jjx  jjx     0 01-20 11:34 hellogrp01  #此文件具有执行权限了哈,可以看到文件名变成了绿色
drwxr-xr-x 3 root root 4096 12-23 16:27 users
[jjx@rhel5 ~]$ ll -d test
drwxrwxr-x 3 jjx jjx 4096 01-09 10:26 test
[jjx@rhel5 ~]$ chmod u=rwx,g=r--,o=---  test    #修改某些类用户的权限
[jjx@rhel5 ~]$ ll -d test
drwxr----- 3 jjx jjx 4096 01-09 10:26 test
(3)以8进制的方式同时修改三类用户的权限:
[jjx@rhel5 ~]$ ll -d test
drwxr----- 3 jjx jjx 4096 01-09 10:26 test
[jjx@rhel5 ~]$ chmod 764 test      #以8进制方式同时修改三类用户的权限
[jjx@rhel5 ~]$ ll -d test
drwxrw-r-- 3 jjx jjx 4096 01-09 10:26 test
常用选项:
-R:递归改变文件或目录的权限
范例:
[jjx@rhel5 PermissionTest]$ ll
总计 8
-rw-rw-r-- 1 jjx jjx 0 01-22 14:59 file01.txt
-rw-rw-r-- 1 jjx jjx 0 01-22 14:59 file02.txt
[jjx@rhel5 PermissionTest]$ cd ..
[jjx@rhel5 tmp]$ chmod -R 700 PermissionTest/   #递归修改目录及目录下文件的权限(对于目录,默认情况仅改变的是目录自身的权限,对于目录下文件的权限不会改变哈)
[jjx@rhel5 tmp]$ ll
总计 28
drwxr-xr-x 2 root root 4096 01-07 20:51 data
-rwxr--r-- 1 jjx  jjx     0 01-20 11:34 hellogrp01
drwx------ 2 jjx  jjx  4096 01-22 14:59 PermissionTest  #目录的权限被修改了哈
drwxr-xr-x 3 root root 4096 12-23 16:27 users
[jjx@rhel5 tmp]$ ll PermissionTest/
总计 8
-rwx------ 1 jjx jjx 0 01-22 14:59 file01.txt   #可以看到递归修改目录的权限后,目录下的文件的权限也一并改变了哈
-rwx------ 1 jjx jjx 0 01-22 14:59 file02.txt
2、改变文件的属主:
命令名称:chown
命令所在路径:/bin/chown
执行权限:root
功能描述:修改文件属主
语法:chown [OPTION] 用户 文件
常用选项:-R: 递归修改权限
范例:
[jjx@rhel5 test]$ touch file01.txt    #新建file01.txt文件
[jjx@rhel5 test]$ ll
总计 28
drwxr-xr-x 3 root root 4096 01-09 13:18 BashTest
-rw-rw-r-- 1 jjx  jjx     0 01-22 19:40 file01.txt
-rwxr-xr-x 1 root root  121 12-30 15:33 ifuser.sh
-rwxr-xr-x 1 root root  243 12-30 22:07 Uid.sh
[jjx@rhel5 test]$ chown centos file01.txt      #普通用户不允许更改文件的属主哈
chown: 正在更改 “file01.txt” 的所有者: 不允许的操作
[root@rhel5 test]# whoami
root
[root@rhel5 test]# ll
total 28
drwxr-xr-x 3 root root 4096 Jan  9 13:18 BashTest
-rwxr-xr-x 1 root root  243 Dec 30 22:07 Uid.sh
-rw-rw-r-- 1 jjx  jjx     0 Jan 22 19:40 file01.txt
-rwxr-xr-x 1 root root  121 Dec 30 15:33 ifuser.sh
[root@rhel5 test]# chown user1 file01.txt    #用root用户把file01.txt的属主改为用户user1
[root@rhel5 test]# ll
total 28
drwxr-xr-x 3 root  root 4096 Jan  9 13:18 BashTest
-rwxr-xr-x 1 root  root  243 Dec 30 22:07 Uid.sh
-rw-rw-r-- 1 user1 jjx     0 Jan 22 19:40 file01.txt   #可以看到file01.txt的属主变成user1了哈
-rwxr-xr-x 1 root  root  121 Dec 30 15:33 ifuser.sh
3、改变文件的属组:
命令名称:chgrp
命令所在路径:/bin/chgrp
执行权限:root和文件属主用户
功能描述:修改文件的属组
语法:chgrp [OPTION] GROUP FILE
常用选项:-R: 递归修改权限
范例:
[root@rhel5 tmp]# ll -R  #递归查看当前目录下文件的详细属性
.:
total 12
drwxrwxr-x 2 jjx jjx 4096 Jan 22 19:56 dir01
-rw-rw-r-- 1 jjx jjx    0 Jan 22 19:49 file01.txt

./dir01:
total 4
-rw-r--r-- 1 jjx jjx 0 Jan 22 19:56 file02.txt
[root@rhel5 tmp]# chgrp -R user1 .    #递归修改当前目录及文件的属组
[root@rhel5 tmp]# ll -R
.:
total 12
drwxrwxr-x 2 jjx user1 4096 Jan 22 19:56 dir01
-rw-rw-r-- 1 jjx user1    0 Jan 22 19:49 file01.txt

./dir01:
total 4
-rw-r--r-- 1 jjx user1 0 Jan 22 19:56 file02.txt
三、Linux文件权限进阶之特殊权限:强制位与冒险位
为什么需要强制位和冒险位?
我们知道,某个用户登录到系统之后执行命令的过程为:命令以用户的身份运行,发起为进程,该进程的属主和属组即为该用户。
例如:
ls –l /etc/passwd 这个命令的执行过程为:
jjx用户发起的ls命令的进程是以用户jjx的身份运行的,那么该进程的属组和属组为jjx用户,如此一来,ls命令就以jjx用户的身份访问/etc/passwd文件,而/etc/passwd文件对其他用户有读取权限,所以命令能执行成功 ,如下所示:
[jjx@Centos ~]$ whoami
jjx
[jjx@Centos ~]$ ls -l /etc/passwd     #ls命令以用户jjx的身份执行,而passwd文件对其他用户有读取权限,所以命令能执行成功
-rw-r--r--. 1 root root 1324 Jan 29 15:56 /etc/passwd
但在下面的例子里出现了特殊的情况:
[jjx@Centos ~]$ ll /etc/shadow
----------. 1 root root 924 Jan 29 19:21 /etc/shadow      #除管理员外所有用户没有任何权限访问此文件
[jjx@Centos ~]$ cat /etc/shadow
cat: /etc/shadow: Permission denied      #cat命令以jjx的身份访问shadow文件是没有读取权限的哈
[jjx@Centos ~]$ passwd                   #密码都是保存在shadow文件中的,那为什么可以修改密码?
Changing password for user jjx.
Changing password for jjx.
(current) UNIX password:
New password:
Retype new password:
passwd: all authentication tokens updated successfully.
[jjx@Centos ~]$ ll `which passwd`
-rwsr-xr-x. 1 root root 30768 Feb 22  2012 /usr/bin/passwd   #看到该文件的UID了吗?“s”就是玄机所在:它表示强制位"set UID”
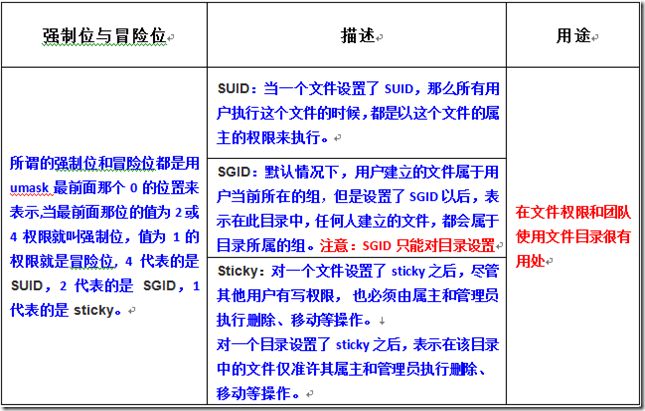
下面的表格具体解释了什么是强制位和冒险位:
举例说明强制位和冒险位:
(1)SUID范例:
[centos@Centos test]$ whoami
centos
[centos@Centos test]$ ll
total 52
-rw-r-xr-x. 1 root root 48568 Jan 29 20:33 cat
-rw-r-----. 1 root root    10 Jan 29 20:25 tmp.txt
[centos@Centos test]$ ./cat tmp.txt          #当前目录下的cat命令以centos身份访问tmp.txt文件
./cat: tmp.txt: Permission denied               #没有访问权限哈
[root@Centos test]# chmod u+s ./cat       #用管理员身份对当前目录下的cat设置SUID
[root@Centos test]# ll
total 52
-rwSr-xr-x. 1 root root 48568 Jan 29 20:33 cat    #可以看到多了个”S“权限哈;原来x位没有设置权限为S,否则为s
-rw-r-----. 1 root root    10 Jan 29 20:25 tmp.txt
[centos@Centos test]$ ./cat tmp.txt       #以centos用户的身份运行./cat命令读取tmp.txt的内容
SUID test            #此时实际上不是以centos用户自己的身份来发起cat进程,而是./cat文件的属主身份来发起cat进程,所以能够成功
[centos@Centos test]$ cat tmp.txt         #/bin/cat命令是以centos身份发起进程访问tmp.txt文件
cat: tmp.txt: Permission denied           #所以没有权限访问哈
(2)SGID范例:
[centos@Centos test]$ id centos
uid=501(centos) gid=501(centos) groups=501(centos),502(redhat)     #centos是额外组redhat的成员
[centos@Centos test]$ whoami
centos                      #当前登录的用户是centos
[centos@Centos test]$ ll -d /tmp/test/
drwxrwxr-x. 2 root redhat 4096 Jan 30 14:13 /tmp/test/       #/tmp/test目录的属组为redhat
#centos用户是redhat组的成员,所以在下面的例子中centos用户是可以创建文件的
[centos@Centos test]$ touch a.centos    #centos用户可以在test目录中创建文件
[centos@Centos test]$ ll /tmp/test
total 0
-rw-rw-r--. 1 centos centos 0 Jan 30 14:11 a.centos     #可以看到a.centos的属主和属组与目录test没关系
#suse用户是redhat组的成员,所以在下面的例子中suse用户是可以创建文件的
[suse@Centos test]$ id suse   #suse也是额外组redhat的成员
uid=502(suse) gid=503(suse) groups=503(suse),502(redhat)
[suse@Centos test]$ whoami
suse                              #当前登录的用户是suse
[suse@Centos test]$ ll -d /tmp/test
drwxrwxr-x. 2 root redhat 4096 Jan 30 14:13 /tmp/test         #/tmp/test目录的属组为redhat
[suse@Centos test]$ touch /tmp/test/a.suse      #suse用户可以在test目录中创建文件
[suse@Centos test]$ ll /tmp/test/a.suse
-rw-rw-r--. 1 suse suse 0 Jan 30 14:20 /tmp/test/a.suse   #可以看到a.suse的属主和属组与目录test没关系
#用管理员身份修改目录/tmp/test/的GID,使其变为SGID
root@Centos tmp]# ll -d /tmp/test/
drwxrwxr-x. 2 root redhat 4096 Jan 30 14:13 /tmp/test/
[root@Centos tmp]# chmod g+s /tmp/test/           #修改/tmp/test/目录的GID
[root@Centos tmp]# ll -d /tmp/test/
drwxrwsr-x. 2 root redhat 4096 Jan 30 14:13 /tmp/test/   #test目录的GID变为SGID了
#分别用centos用户和suse用户登录,在/tmp/test/目录下创建一个新文件,注意查看其属主和属组
[centos@Centos test]$ whoami
centos             #当前登录用户是centos
[centos@Centos test]$ touch /tmp/test/b.centos  #在test目录下创建新文件b.centos
[centos@Centos test]$ ll /tmp/test/b.centos
-rw-rw-r--. 1 centos redhat 0 Jan 30 14:31 /tmp/test/b.centos    #注意看b.centos的属组,变为redhat了,而不再是centos用户的基本组centos了哈
[suse@Centos test]$ whoami
suse                        #当前登录用户为suse
[suse@Centos test]$ touch /tmp/test/b.suse
[suse@Centos test]$ ll /tmp/test/b.suse
-rw-rw-r--. 1 suse redhat 0 Jan 30 14:41 /tmp/test/b.suse    #同样,新文件的属组为redhat
#有了SGID,同一个组中的成员就可以互相访问修改他们各自创建的文件了
[centos@Centos test]$ echo "hello" >>/tmp/test/b.suse   #centos用户可以修改suse创建的文件哈
[centos@Centos test]$ cat /tmp/test/b.suse
hello
[suse@Centos test]$ echo "hello,centos" >>/tmp/test/b.centos  #同样,suse可以修改centos创建的文件
[suse@Centos test]$ cat /tmp/test/b.centos
hello,centos
总结:设置SGID的作用——在文件权限和团队使用文件目录很有用处
(3)冒险位sticky范例:
这个功能就更强了 ,当你们公司有一个交换目录的时候,大家都要对这个目录有写入权限,这样,别人就可以删除你的文件了,有什么办法不让别人删除你的文件呢?当然sticky可以满足,你们还有其他方法吗?
[suse@Centos test]$ grep redhat /etc/group
redhat:x:502:jjx,centos,suse    #centos和suse用户都是redhat组的成员
[suse@Centos test]$ ll /tmp/test/b.*       #centos和suse在test目录下都创建了各自的文件
-rw-rw-r--. 1 centos redhat 13 Jan 30 14:47 /tmp/test/b.centos
-rw-rw-r--. 1 suse   redhat  6 Jan 30 14:43 /tmp/test/b.suse
[centos@Centos test]$ echo "hello,suse" >>/tmp/test/b.suse   #centos用户可以修改suse创建的文件
[centos@Centos test]$ cat /tmp/test/b.suse
hello,suse
[suse@Centos test]$ echo "hello,centos" >>/tmp/test/b.centos  #同样,suse可以修改centos创建的文件
[suse@Centos test]$ cat /tmp/test/b.centos
hello,centos
#既然可以互相修改各自创建的文件,那可以互相删除各自的文件吗?
[centos@Centos test]$ rm /tmp/test/b.suse      #centos可以删除suse创建的b.suse文件
[centos@Centos test]$ ll /tmp/test/b.suse
ls: cannot access /tmp/test/b.suse: No such file or directory
[suse@Centos test]$ rm /tmp/test/b.centos      #suse可以删除centos创建的b.centos
[suse@Centos test]$ ll /tmp/test/b.centos
ls: cannot access /tmp/test/b.centos: No such file or directory
#下面演示了在一个公共场所,centos与suse用户可以相互修改各自创建的文件,但不可以相互删除,这就是sticky的作用
[root@Centos tmp]# chmod o+t /tmp/test/   #修改/tmp/test/目录的权限,使其拥有sticky权限
[root@Centos tmp]# ll -d /tmp/test/
drwxrwsr-t. 2 root redhat 4096 Jan 30 15:19 /tmp/test/       #/tmp/test/目录具有了sticky位
[centos@Centos test]$ touch /tmp/test/c.centos         #centos创建了一个新文件
[centos@Centos test]$ ll /tmp/test/c.centos
-rw-rw-r--. 1 centos redhat 0 Jan 30 15:14 /tmp/test/c.centos
[suse@Centos test]$ touch /tmp/test/c.suse     #suse创建了一个新文件
[suse@Centos test]$ ll /tmp/test/c.suse
-rw-rw-r--. 1 suse redhat 0 Jan 30 15:13 /tmp/test/c.suse
[centos@Centos test]$ echo "hello,suse" >> /tmp/test/c.suse   #centos可以修改suse创建的c.suse文件
[centos@Centos test]$ cat /tmp/test/c.suse
hello,suse
[centos@Centos test]$ rm /tmp/test/c.suse
rm: cannot remove `/tmp/test/c.suse': Operation not permitted   #centos不能删除c.suse文件哈
[suse@Centos test]$ echo "hello,centos" >> /tmp/test/c.centos #suse可以修改centos创建的c.centos文件
[suse@Centos test]$ cat /tmp/test/c.centos
hello,centos
[suse@Centos test]$ rm -f /tmp/test/c.centos     #suse不能删除c.centos文件哈
rm: cannot remove `/tmp/test/c.centos': Operation not permitted
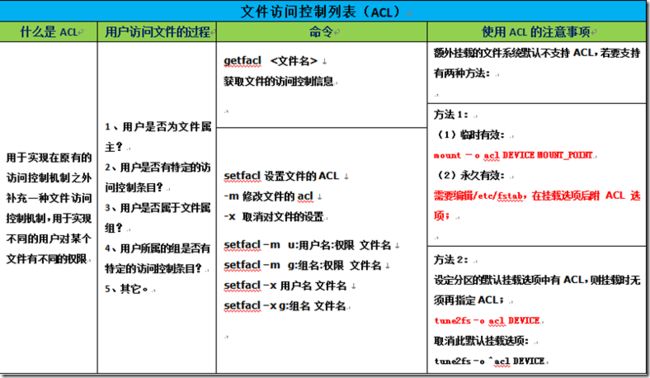
四、文件访问控制列表(ACL)
范例:
1、设置ACL:
复制文件/var/log/messages至/data目录, 其属主为root用户,且有读写权限,属组为root组,且有读写权限;
可以被任何人读取,可以被suse用户和ubuntu组读写,但centos用户没有任何访问权限;
[root@Centos /]# mkdir -pv /data    #创建/data目录
mkdir: created directory `/data'
[root@Centos /]# cp /var/log/messages /data  #复制/var/log/messages文件到/data目录
[root@Centos /]# ll /data/messages
-rw-------. 1 root root 311851 Jan 30 17:03 /data/messages      #默认属组和othser没有任何权限
[root@Centos /]# chmod 664 /data/messages      #修改/data/messages的权限,使属组有读写权限,other有读取权限
[root@Centos /]# ll /data/messages      #验证权限修改结果
-rw-rw-r--. 1 root root 311851 Jan 30 17:03 /data/messages
[root@Centos /]# useradd suse     #创建suse用户
useradd: user 'suse' already exists
[root@Centos /]# useradd ubuntu      #创建ubuntu用户,且创建ubuntu组
[root@Centos /]# tail -3 /etc/passwd     #验证结果
centos:x:501:501::/home/centos:/bin/bash
suse:x:502:503::/home/suse:/bin/bash
ubuntu:x:503:504::/home/ubuntu:/bin/bash
#下面创建ACL,使得/data/message文件可以被suse用户和ubuntu组读写,但centos用户没有任何访问权限
[root@Centos /]# getfacl /data/messages   #查看/data/message文件的默认ACL
getfacl: Removing leading '/' from absolute path names
# file: data/messages
# owner: root
# group: root
user::rw-
group::rw-
other::r--
[root@Centos /]# setfacl -m u:suse:rw-,g:ubuntu:rw-,u:centos:--- /data/messages   #设置ACL
[root@Centos /]# getfacl /data/messages       #验证结果
getfacl: Removing leading '/' from absolute path names
# file: data/messages
# owner: root
# group: root
user::rw-
user:centos:---             #centos用户没有任何访问权限
user:suse:rw-               #suse用户有读写权限
group::rw-
group:ubuntu:rw-            #ubuntu组有读写权限
mask::rw-
other::r--
[root@Centos ~]# su - centos    #切换到centos用户验证ACL结果
[centos@Centos ~]$ cat /data/messages
cat: /data/messages: Permission denied      #没有读权限
[centos@Centos ~]$ echo "hello,messages" >> /data/messages
-bash: /data/messages: Permission denied   #没有写权限
[root@Centos ~]# su - suse     #切换到suse用户验证ACL结果
[suse@Centos ~]$ echo "hello"  >> /data/messages    #suse用户有写权限
[suse@Centos ~]$ grep "hello" /data/messages    #suse用户有读权限
hello
[root@Centos ~]# su - ubuntu   #切换到ubuntu用户,其隶属于ubuntu组
 #ubuntu用户原来没有写权限,但设置了ubuntu组有读写权限,所以ubuntu用户有读写权限
[ubuntu@Centos ~]$ echo "new log file" > /data/messages   #有写权限
[ubuntu@Centos ~]$ cat /data/messages     #有读权限
new log file
2、取消ACL
[root@Centos ~]# ll /data/messages
-rw-rw-r--+ 1 root root 13 Jan 30 17:40 /data/messages    #详细查看设置了ACL的文件时,可以看到权限位最后一位出现了一个“+”
[root@Centos ~]# getfacl /data/messages       #查看默认的ACL
getfacl: Removing leading '/' from absolute path names
# file: data/messages
# owner: root
# group: root
user::rw-
user:centos:---
user:suse:rw-
group::rw-
group:ubuntu:rw-
mask::rw-
other::r--
[root@Centos ~]# setfacl -x u:centos,suse,g:ubuntu /data/messages   #删除ACL
[root@Centos ~]# getfacl /data/messages      #验证结果
getfacl: Removing leading '/' from absolute path names
# file: data/messages
# owner: root
# group: root
user::rw-
group::rw-
mask::rw-
other::r--
本次博文的主要内容就这些,欢迎各位大大拍砖哈!~~
