使用Webpack 搭建React项目的方法和步骤
参考文章:《How to Create a React app from scratch using Webpack 4 》 write by Linh Nguyen My
创建项目以及使用webpack编译项目
- 使用npm init新建功能,如果想要跳过各种询问,可以使用 -y命令:
npm init -y
- 接下来要使用webpack作为开发的依赖项,以及webpack-cli, 它可以让我们在命令行中使用webpack, 使用以下命令来安装:
npm i webpack webpack-cli -D
命令解释
- i:install
- -D: --dave-dev
以上命令等同于
npm install webpack webpack-cli --save-dev
- 创建一个src文件夹并在文件夹下创建index.js, 将以下示例代码写入index.js:
console.log("hello");
- 现在,修改package.json, 添加scripts中2条命令start 和 build,代码如下:
{
"name": "translation-tool-webpack-react",
"version": "1.0.0",
"description": "",
"main": "index.js",
"scripts": {
"start": "webpack --mode development",
"build": "webpack --mode production"
},
"keywords": [],
"author": "",
"license": "ISC",
"devDependencies": {
"webpack": "^4.41.2",
"webpack-cli": "^3.3.10"
}
}
Webpack4 现在有2中模式,development和production, 当运行
npm run start
或者 npm start
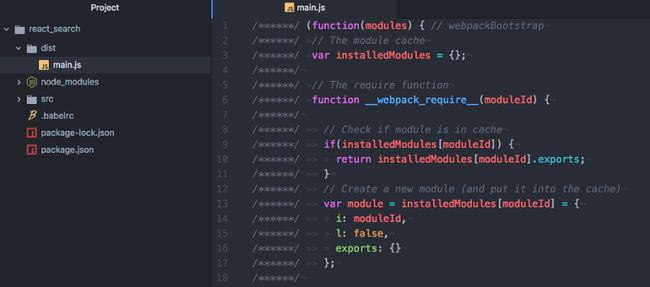
的时候,会在dist文件夹下创建一个main.js, 会包含我们写在src中的代码,效果如图:
设置React 和 Babel
如果想要使用React来进行编码,需要使用Babel, 它会将ES6转换成ES5,因为目前并不是所有的浏览器都支持ES6,例如IE
- 安装react 和 react-dom作为依赖
npm i react react-dom -S
命令解释:
- -S: --save
- 安装babel-core, babel-loader, babel-preset-env, babel-preset-react作为开发依赖项 注意此处的版本问题,babel-core6 和babel-loader8不兼容,需要使用babel-core6和babel-loader7,原文中没有提到这个问题
npm i babel-core babel-loader@7 babel-preset-env, babel-preset-react -D
命令解释
- babel-core 将ES6代码转换成ES5
- babel-loader: 在使用webpack配置Babel时,babel-loader帮助转换JavaScript的依赖项,例如当你导入自己开发的components到其他components中时
- babel-preset-env: 根据需要支持的浏览器,决定哪些转换(transformations)和插件(plugins)以及垫片(polyfills)被使用
- babel-preset-react: 所有React插件的预调装置(preset),例如将JSX转换为函数(functions)
- 创建webpack.config.js为babel-loader设置规则
module.exports = {
module: {
rules: [
{
test: /\.js$/,
exclude: /node_modules/,
use: {
loader: "babel-loader"
}
}
]
}
}
- 然后需要创建一个独立的文件 .babelrc 提供babel-loader的一些选项。 这些可以在webpack.config.js文件中写,但是更多经验表名,独立出来会更好,一是可读性会更好,二是非webpack类的配置工具也可以复用。 配置内容如下:
{
"preset": ["env", "react"]
}
- 接下来,修改index.js的内容来加载一个component:
import React from 'react';
import ReactDOM from 'react-dom';
const Index = () => {
return Hello React!
};
ReactDOM.render( , document.getElementById("index));
- 同时也需要在src文件夹下创建一个index.html文件作为加载React组件的模板
React and Webpack4
安装html-webpack-plugin并在webpack.confg.js中配置它。 这个插件会生成一个html网页,插入一个
,将文件生成在dist/index.html并轻量化。
- 安装html-webpack-plugin作为开发以来
npm i html-webpack-plugin -D
- 更新webpack 配置文件:
const HtmlWebPackPlugin = require("html-webpack-plugin"); const htmlPlugin = new HtmlWebPackPlugin({ template: "./src/index.html", filename: "./index.html" }); module.exports = { module: { rules: [ { test: /\.js$/, exclude: /node_modules/, use: { loader: "babel-loader" } } ] }, plugins: [htmlPlugin] };
plugin的配置也可以写在module里面:
plugins: [ new HtmlWebPackPlugin({ template: "./src/index.html", filename: "./index.html" }); ]
但是更推荐第一种,这样可读性比较好。template
的值是生成html文件时的模板html文件。 此时运行命令npm run start
或者npm start
, 可以看到index.html生成:
此时打开dist下的index.html文件,会看到浏览器中显示"Hello React"。
设置webpack-dev-server
每次修改后需要重新编译再看效果是很麻烦的事情,因此,我们可以使用webpack-dev-server模块来让webpack监听代码的改动,并及时更新组件
安装webpack-dev-server作为开发依赖
npm i webpack-dev-server -D
然后修改package.json的start命令,如下面所示:
{
"name": "translation-tool-webpack-react",
"version": "1.0.0",
"description": "",
"main": "index.js",
"scripts": {
"start": "webpack-dev-server --mode development --open --hot",
"build": "webpack --mode production"
},
"keywords": [],
"author": "",
"license": "ISC",
"devDependencies": {
"babel-core": "^6.26.3",
"babel-loader": "^7.1.5",
"babel-preset-env": "^1.7.0",
"babel-preset-react": "^6.24.1",
"css-loader": "^3.2.0",
"html-webpack-plugin": "^3.2.0",
"style-loader": "^1.0.0",
"webpack": "^4.41.2",
"webpack-cli": "^3.3.10",
"webpack-dev-server": "^3.9.0"
},
"dependencies": {
"react": "^16.11.0",
"react-dom": "^16.11.0"
}
}
现在运行npm run start
或者npm start
命令,会自动打开浏览器并打开页面localhonst:8080 (--open 命令的效果),现在页面会根据代码的变动热加载。 如果不想每次变更整个页面,只变更有变化的组件,可以使用--hot命令(详情参考Hot Module Replacement)
设置CSS
当我们在React组件中导入css文件时,会需要css-loader来加载它们。当css加载完毕,还需要style-loader来将它们插入到我们的DOM中:添加一个标签到HTML页面
中
- 安装这两个模块
npm i css-loader style-loader -D
2.更新webpack.config.js:
const HtmlWebPackPlugin = require("html-webpack-plugin");
const htmlWebpackPlugin = new HtmlWebPackPlugin({
template: "./src/index.html",
filename: "./index.html"
});
module.exports = {
module: {
rules: [
{
test: /\.js$/,
exclude: /node_modules/,
use: {
loader: "babel-loader"
}
},
{
test: /\.css$/,
use: ["style-loader", "css-loader"]
}
]
},
plugins: [htmlWebpackPlugin]
};
注意这里的loader的添加顺序。 我们需要先解析CSS文件,然后在用style-loader加载到DOM。 默认情况下,webpack是从右到左(从数组的最后一位向第一位)加载
CSS 模块化
使用webpack可以将css模块化,即加载的class name会被限制在使用的组件中,从而限制其作用范围。
- 给css-loader添加一些配置:
const HtmlWebPackPlugin = require("html-webpack-plugin");
const htmlWebpackPlugin = new HtmlWebPackPlugin({
template: "./src/index.html",
filename: "./index.html"
});
module.exports = {
module: {
rules: [
{
test: /\.js$/,
exclude: /node_modules/,
use: {
loader: "babel-loader"
}
},
{
test: /\.css$/,
use: [
{
loader: "style-loader"
},
{
loader: "css-loader",
options: {
modules: true,
importLoaders: 1,
localIdentName: "[name]_[local]_[hash:base64]",
sourceMap: true,
minimize: true
}
}
]
}
]
},
plugins: [htmlWebpackPlugin]
};
我们在设置配置的时候,每个loader都变成了一个对象,option配置的解释:
- module: true 开启CSS模块化
- importLoaders 设置css-loader前还有多少loader被加载,例如,sass-loader应该在css-loader前加载
- localIdentName 可以配置生成的class name:
- [name] 会取所在的component的名字
- [local] class 或者id的取值
- [hash:base64] 每个component的css随机生成的唯一哈希值
有了模块化,我们就不用担心同一个class name在整个项目中冲突的问题,只需要考虑同一个component中如何定义class name即可。
解决import时后缀名的问题
配置webpack的resolve,可以定义加载文件的规则,例如,不想每次导入的时候都精确到文件以及后缀名,可以修改webpack.config.js如下:
const HtmlWebPackPlugin = require("html-webpack-plugin");
const htmlPlugin = new HtmlWebPackPlugin({
template: "./src/index.html",
filename: "./index.html"
})
module.exports = {
module: {
rules: [{
test: /\.js$/,
exclude: /node_modules/,
use: {
loader: 'babel-loader'
}
},
{
test: /\.jsx$/,
exclude: /node_modules/,
use: {
loader: 'babel-loader'
}
},
{
test: /\css$/,
use: [{
loader: "style-loader",
},
{
loader: "css-loader",
options: {
modules: true,
importLoaders: 1,
localIdentName: "[name]_[local]_[hash:base64]",
sourceMap: true,
minimize: true
}
}
]
}
]
},
plugins: [htmlPlugin],
resolve: {
extensions: ['.js', '.jsx', '.json']
}