Xcode
收录1
- 用户截屏时触发
UIApplicationUserDidTakeScreenshotNotification通知当用户截屏时会触发
[[NSNotificationCenter defaultCenter] addObserver:self selector:@selector(screenCapture) name:UIApplicationUserDidTakeScreenshotNotification object:nil];
- (void)screenCapture{
    // doSomething
}
- About Exceptions Breakpoint
苹果官方文档只介绍了这个断点的使用方法,没对这个断点的功能做具体的介绍。
当应用发生诸如数组越界、null值、对象重复释放等问题导致的崩溃时,Xcode通常只会跳到main()函数。而Exceptions Breakpoint会在异常发生的时候在异常的地方放一个断点,调试器不会再跳到main()函数,而是停留在了异常发生的地方,而且大多数情况下Exceptions Breakpoint都会打印异常消息。碉堡了!
如果将Exceptions设置为All,会导致应用在main()函数里面崩溃,避免这个问题的方法是将Exception更改为Objective-C
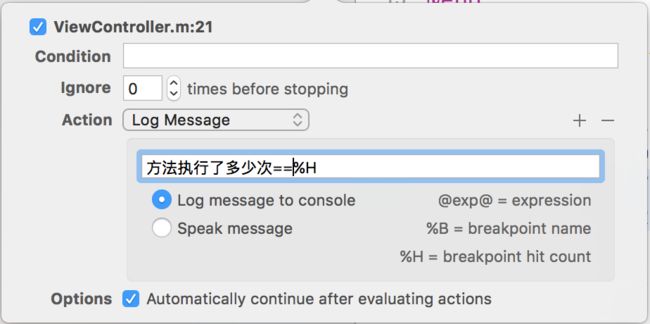
-
代码继续执行,判断方法执行次数
//底部automatically continue 一定要勾选
- 神器计算图片位置的函数
AVMakeRectWithAspectRatioInsideRect()
通过这个函数,我们可以计算一个图片放在另一个 view 按照一定的比例居中显示,可能说的我比较抽象,还是用图来显示,可以说它可以直接一个 image 以任何的比例显示显示在 imageview 中居中所处的位置,拿 UIViewContontAspectFit来演示
UIImageView *imageView = [[UIImageView alloc] initWithFrame:CGRectMake(100, 100, 300, 300)];
imageView.center = self.view.center;
imageView.backgroundColor = [UIColor redColor];
imageView.contentMode = UIViewContentModeScaleAspectFit;
UIImage *image = [UIImage imageNamed:@"mm.jpg"];
imageView.image = image;

 CGRect iamgeAspectRect = AVMakeRectWithAspectRatioInsideRect(image.size, imageView.bounds);
NSLog(@"iamgeAspectRect = %@, imageView =%@",NSStringFromCGRect(iamgeAspectRect),NSStringFromCGRect(imageView.frame));
[self.view addSubview:imageView];

******这个函数是在 AV框架*********
-
在使用view的缩放的时候,layer.border.width随着view的放大,会出现锯齿化的问题,解决这个问题需要设置这个属性。
self.layer.allowsEdgeAntialiasing = YES; -
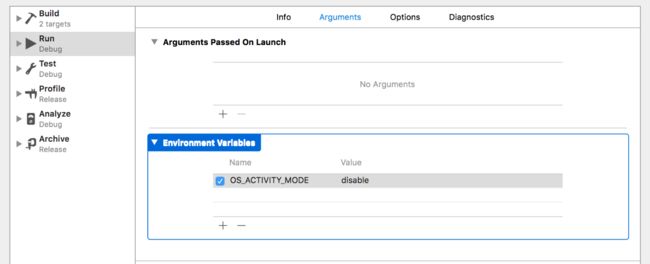
Xcode 8.0 后运行程序会有一堆无聊的打印(真机调试时取消对勾)
UIViewController
通过代码为xib 或sb中view增加约束时尽量避免在viewDidLoad中执行
-(void)updateViewConstraints {
     [_tableView mas_makeConstraints:^(MASConstraintMaker *make) {
        make.top.equalTo(self.view.mas_top).offset(64);
        make.left.equalTo(self.view.mas_left).offset(0);
        make.right.equalTo(self.view.mas_right).offset(0);
        make.bottom.equalTo(self.view.mas_bottom).offset(0);
    }];

   //一定要先调记得super方法
    [super updateViewConstraints];
}
UINavigationController
- navigationBar
设置navigationBar透明度alpha为0,相当于将navigationBar隐藏,则子视图全部隐藏,相应的标题及左右按钮全部失效。如果让navigationBar透明,其它子视图有效,则需下面方法。
[self.navigationController.navigationBar setBackgroundImage:[UIImage new] forBarMetrics:UIBarMetricsDefault];//消除横线
[self.navigationController.navigationBar.shadowImage = [UIImage new];
当然如果是要在上下划动时改变透明度,则要如下方法
[[self.navigationController.navigationBar subviews] objectAtIndex:0].alpha = 0;//可以根据需要改变alpha
- navigationBar 的transluent 默认为YES,
viewController 的EdgesForExtendedLayout 默认为UIRectEdgeAll
viewController 的automaticallyAdjustsScrollViewInsets 默认YES,
设为NO时,会从screen顶部开始。
默认情况下navigationBar是毛玻璃效果,并且视图上的tableView
从navigationBar下开始,不会出现遮挡,但cell数量较多时,显示不全,所以要改变UIRectEdgeAll
[self setEdgesForExtendedLayout:UIRectEdgeTop];
- 改变navigationBar的颜色
//这样显然是错误的
 self.navigationController.navigationBar.backgroundColor = [UIColor redColor];
//正确如下
1.
   [self.navigationController.navigationBar setBackgroundImage:
   [self imageWithColor:[UIColor greenColor]] forBarMetrics:UIBarMetricsDefault];
    self.navigationController.navigationBar.translucent = YES;
2.
    NSDictionary *textAttributes = @{
                   NSFontAttributeName: [UIFont   systemFontOfSize:18],
                   NSForegroundColorAttributeName: [UIColor whiteColor],
                               };
        UINavigationBar *navigationBarAppearance = [UINavigationBar appearance];

        [navigationBarAppearance setBarTintColor:[UIColor greenColor]];//背景色
        [navigationBarAppearance setTitleTextAttributes:textAttributes];//标题字体颜色
        [navigationBarAppearance setTintColor:[UIColor redColor]];//item颜色
        [navigationBarAppearance setTranslucent:NO];//是否毛玻璃

        //ios 9以前将状态栏改成白色
       [UIApplication sharedApplication].statusBarStyle  = UIStatusBarStyleLightContent;
        //ios 9以后已经变成了viewController 的对象方法,首先重写
        -(UIStatusBarStyle)preferredStatusBarStyle{  return UIStatusBarStyleLightContent; }
        其次info中添加View controller-based status bar appearance 并设置为NO即可。(好像也可以不重写,直接)
- pop页面后暂不销毁VC
//这样做后简单几秒钟后页面可以不刷新,保持原样
  if (saveTaskVC ==nil) {

    TaskShowViewController * worksVC =[[TaskShowViewController alloc]init];

    saveTaskVC = worksVC;

    NSTimer * tiemr =[NSTimer scheduledTimerWithTimeInterval:10 repeats:NO block:^(NSTimer * _Nonnull timer) {
        saveTaskVC = nil;
        timer = nil;
        [timer invalidate];
    }];
}
[self.navigationController pushViewController:saveTaskVC animated:YES];
UITableView
- 两个方法:didDeselect 方法是指选中后再点其它cell 时执行
- (void)tableView:(UITableView *)tableView didSelectRowAtIndexPath:(NSIndexPath *)indexPath
{
    UITableViewCell *cell = [tableView cellForRowAtIndexPath:indexPath];
    cell.accessoryType = UITableViewCellAccessoryCheckmark;
    _selectionIndexPath = indexPath; // 记录被选中cell的indexPath,防止复用出现问题

    UIButton *checkMark = cell.subviews[2];
    [checkMark setImage:[UIImage imageNamed:@"danxuan_selected"] forState:UIControlStateNormal];
    NSLog(@"中时:%ld",indexPath.row);
}

- (void)tableView:(UITableView *)tableView didDeselectRowAtIndexPath:(NSIndexPath *)indexPath
{
    UITableViewCell *cell = [tableView cellForRowAtIndexPath:indexPath];
    cell.accessoryType = UITableViewCellAccessoryNone;
    NSLog(@"未选中时:%ld",indexPath.row);
}
- UItableview 默认是UITableViewStylePlain 样式,区头区尾会有停滞效果。取消停滞如下
-(void)scrollViewDidScroll:(UIScrollView *)scrollView
{
    CGFloat sectionHeaderHeight = sectionHead.height;
   if (scrollView.contentOffset.y<=sectionHeaderHeight&&scrollView;.contentOffset.y>=0)
    {
        scrollView.contentInset = UIEdgeInsetsMake(-scrollView.contentOffset.y, 0, 0, 0);
    } else if(scrollView.contentOffset.y>=sectionHeaderHeight)
    {
        scrollView.contentInset = UIEdgeInsetsMake(-sectionHeaderHeight, 0, 0, 0);
    }
}
当然也可直接改样式为 UITableViewStyleGrouped,需要设置tableHeaderView的高度,否则头部会有空白,所以必须写
tableView.tableHeaderView =[ [UIView alloc]initWithFrame:CGRectMake(0,0,width,0.1)]
处理TableView中cell点击延迟
- (void)tableView:(UITableView *)tableView didSelectRowAtIndexPath:(NSIndexPath *)indexPath {
    [tableView deselectRowAtIndexPath:indexPath animated:NO];(不能为YES!!)
}
- 分割线顶着边线,这样写更合适
-(void)tableView:(UITableView *)tableView willDisplayCell:(nonnull UITableViewCell *)cell forRowAtIndexPath:(nonnull NSIndexPath *)indexPath
{
    if ([cell respondsToSelector:@selector(setSeparatorInset:)]) {
        [cell setSeparatorInset:UIEdgeInsetsMake(0, 0, 0, 0)];
    }
    if ([cell respondsToSelector:@selector(setLayoutMargins:)]) {
        [cell setLayoutMargins:UIEdgeInsetsMake(0, 0, 0, 0)];
    }
}
UIGestureRecognizer
- UISwipeGestureRecognizer/UIPanGestureRecognizer区分
在同一个View上添加swipe 和 Pan 两个手势,只走Pan手势,完全不走 swipe.所以要实现以下两个方法:
//1.优先识别后者
[panGesture requireGestureRecognizerToFail:swipeGesture];
//2.实现手势的代理方法
-(BOOL)gestureRecognizer:(UIGestureRecognizer *)gestureRecognizer
shouldRecognizeSimultaneouslyWithGestureRecognizer:
(UIGestureRecognizer *)otherGestureRecognizer {
      return YES;
}
- 禁止侧滑返回
网上其它方法好像效果都不理想,这个简单直接
  id traget = self.navigationController.interactivePopGestureRecognizer.delegate;
    UIPanGestureRecognizer * pan = [[UIPanGestureRecognizer alloc]initWithTarget:traget action:nil];
    [self.view addGestureRecognizer:pan];
Button
- 自定义Button
UIButton *button = [UIButton buttonWithType:UIButtonTypeCustom];
 button.frame = CGRectMake(0, 0, 30, 30);
 button.center = self.view.center;
 [button setTitle:@"+" forState:UIControlStateNormal];
 button.titleLabel.font = [UIFont systemFontOfSize:30];
 [button setTitleEdgeInsets:UIEdgeInsetsMake(0, 3, 2, 2)];
 button.layer.cornerRadius = 15;
 button.layer.masksToBounds = YES;
 button.backgroundColor = [UIColor redColor];
 [self.view addSubview:button];
 [button addTarget:self action:@selector(goAction:) forControlEvents:UIControlEventTouchUpInside];
- 屏蔽点击
button.enabled = NO; 会改变按钮的状态,颜色变灰
button.userInteractionEnabled = NO ; 按钮的状态不改变,颜色不改变
- UIEdgeInsets
 //可以设置图片文字适当偏移
 UIEdgeInsets inset = UIEdgeInsetsMake(100, 50, 0, 0);
 btn.titleEdgeInsets = inset;
 btn.imageEdgeInsets = inset;
- 取消点击效果
self.Button.adjustsImageWhenHighlighted = NO;
UITextField
- PlaceHolder
//设置占位字体大小及颜色
[textField setValue: [UIColor colorWithWhite:0.800 alpha:1.000] forKeyPath:@"_placeholderLabel.textColor"];
[textField setValue: [UIFont boldSystemFontOfSize:14] forKeyPath:@"_placeholderLabel.font"];
//一般占位字符会偏上
// 实测需要先设置字体然后居中才有效
 textField.font = [UIFont systemFontOfSize:12];
 textField.contentVerticalAlignment =
        UIControlContentVerticalAlignmentCenter;
UIView
- 获取view所在控制器
-(UIViewController *)viewController {
   UIViewController *viewController = nil;
   UIResponder *next = self.nextResponder;
   while (next)  {
     if ([next isKindOfClass:[UIViewController class]]) {
          viewController = (UIViewController *)next;
           break;
      }
    next = next.nextResponder;
    }
    return viewController;
}
- 当View的值为透明或半透明时,其子视图也会改变透明度。为了让子视图不透明,可以有以下方法
bgView.backgroundColor = [UIColor colorWithWhite:0.f alpha:0.5];
bgView.backgroundColor = [UIColor colorWithRed:0.2 green:0.3 blue:0.4 alpha:0.5];
bgView.backgroundColor = [color colorWithAlphaComponent:0.5]; //实例方法
- UIView设置图片
//可能会耗内存
UIView *myView = [[UIView alloc]initWithFrame:CGRectMake(0, 0, 300, 300)];
 UIColor *myColor  = [UIColor colorWithPatternImage:[UIImage imageNamed:@"0.png"]];
myView.backgroundColor = myColor;
或
UIView *myView = [[UIView alloc]initWithFrame:CGRectMake(0, 0, 300, 300)];
UIImage *image = [UIImage imageNamed:@"0"];
myView.layer.contents = (__bridge id)image.CGImage;
//取值范围0-1,对应x,y,width,height.
myView.layer.contentsCenter = CGRectMake(0, 0, 1, 1);
- 阴影设置
self.bgView.layer.cornerRadius = 5;
//当设置阴影时下面这句一定要注释
// self.bgView.layer.masksToBounds = YES;
self.bgView.layer.shadowColor = [UIColor grayColor].CGColor;
self.bgView.layer.shadowOffset = CGSizeMake(0, 1);
self.bgView.layer.shadowOpacity = 0.3;
self.bgView.layer.shadowRadius = 2;
模态跳转
  FFViewController *VC = [[FFViewController alloc]init];
// UIModalTransitionStylePartialCurl;  //翻页
// UIModalTransitionStyleCrossDissolve;//渐显
  VC.modalTransitionStyle = UIModalTransitionStyleFlipHorizontal; //旋转
 [self presentViewController:VC animated:YES completion:nil];
Layer
- 指定边切圆角
UIBezierPath *maskPath = [UIBezierPath bezierPathWithRoundedRect:myImage.bounds //bounds不是frame
                                                  byRoundingCorners:UIRectCornerTopLeft | UIRectCornerBottomLeft
                                                        cornerRadii:CGSizeMake(2, 2)];
    CAShapeLayer *maskLayer = [[CAShapeLayer alloc] init];
    maskLayer.frame = myImage.bounds;
    maskLayer.path = maskPath.CGPath;
    myImage.layer.mask = maskLayer;
- 设置颜色渐变
  CAGradientLayer*layer = [CAGradientLayer layer];  // 设置渐变效果
  CAGradientLayer *layer  = [[CAGradientLayer alloc]init];
  layer.frame = self.testView.bounds;
  layer.colors = [NSArray arrayWithObjects:(id)[UIColor redColor].CGColor,[UIColor clearColor].CGColor, nil];
  //默认从上到下排列颜色
 layer.startPoint = CGPointMake(0, 0);
 layer.endPoint = CGPointMake(1, 1);
[self.testView.layer addSublayer:layer];
UIImage
- 缩放
//可以实现对图片拉伸,并减少形变
UIEdgeInsets inset = UIEdgeInsetsMake(50,50,50,50);
image = [image resizableImageWithCapInsets:inset resizingMode:UIImageResizingModeStretch];
- 模糊层
//毛玻璃效果
UIBlurEffect *blurEffect = [UIBlurEffect effectWithStyle:UIBlurEffectStyleExtraLight];
//毛玻璃效果视图
  UIVisualEffectView *blurEffectView = [[UIVisualEffectView alloc]initWithEffect:blurEffect];

 blurEffectView.frame = self.mageView.frame;
 [self.imageView insertSubview:blurEffectView atIndex:0];
- contentModel

自定义弹窗
- 简单弹窗
AlertViewController *alertVC = [[AlertViewController alloc]init];
UIWindow *window = [UIApplication sharedApplication].keyWindow;[window.rootViewController addChildViewController: alertVC];
[window.rootViewController.view addSubview: alertVC.view];
//然后在相应的VC中设置背景,处理手势
-(void)viewDidLoad{
     UITapGestureRecognizer *tap = [[UITapGestureRecognizer alloc] initWithTarget:self action:@selector(closeBtn:)];
     tap.delegate = self;
     [self.view addGestureRecognizer:tap];
}
-(BOOL)gestureRecognizer:(UIGestureRecognizer *)gestureRecognizer shouldReceiveTouch:(UITouch *)touch {
    if(touch.view == self.view){
        return YES;
    }else
        return NO;
}
- 系统弹窗
//弹出选项框可以画也可以用系统的
-(void)go:(UIButton *)sender{
    TestViewController *testVC = [[TestViewController alloc] init];
    // 设置大小
    testVC.preferredContentSize = CGSizeMake(150, 300);
    // 设置 Sytle
    testVC.modalPresentationStyle = UIModalPresentationPopover;
    // 需要通过 sourceView 来判断位置的
    testVC.popoverPresentationController.sourceView =sender;
    // 指定箭头所指区域的矩形框范围(位置和尺寸),以sourceView的左上角为坐标原点
    // 这个可以 通过 Point 或  Size 调试位置
    testVC.popoverPresentationController.sourceRect = sender.bounds;
    // 箭头方向
    testVC.popoverPresentationController.permittedArrowDirections = UIPopoverArrowDirectionUp;
    // 设置代理
    testVC.popoverPresentationController.delegate = self;
    [self presentViewController:testVC animated:YES completion:nil];
}
-(UIModalPresentationStyle)adaptivePresentationStyleForPresentationController:(UIPresentationController *)controller{
    return UIModalPresentationNone; //不适配
}
-(BOOL)popoverPresentationControllerShouldDismissPopover:(UIPopoverPresentationController *)popoverPresentationController{
    return YES;   //点击蒙版popover消失, 默认YES
}
UIAppearance
- 简单应用
//修改导航栏背景图
UINavigationBar * appearance = [UINavigationBar appearance];
UIImage *navBackgroundImg =[UIImage imageNamed:@"navBg.png"];
[appearance setBackgroundImage:navBackgroundImg forBarMetrics:UIBarMetricsDefault];
//个性导航栏返回按钮
[self.navigationController.navigationBar setTitleTextAttributes:@{NSForegroundColorAttributeName: [UIColor redColor],NSFontAttributeName:[UIFont systemFontOfSize:19.0]}];
self.title=[NSString stringWithFormat:@"第%lu页",(unsigned long)self.navigationController.viewControllers.count];
//自定义返回按钮
UIImage *backButtonImage = [[UIImage imageNamed:@"fanhui.png"] resizableImageWithCapInsets:UIEdgeInsetsMake(0, 30, 0, 0)];
[[UIBarButtonItem appearance] setBackButtonBackgroundImage:backButtonImage forState:UIControlStateNormal barMetrics:UIBarMetricsDefault];
//将返回按钮的文字position设置不在屏幕上显示
[[UIBarButtonItem appearance] setBackButtonTitlePositionAdjustment:UIOffsetMake(NSIntegerMin, NSIntegerMin) forBarMetrics:UIBarMetricsDefault];
//修改导航条上的UIBarButtonItem
UIBarButtonItem *appearance = [UIBarButtonItem appearanceWhenContainedIn:[UINavigationBar class], nil];
//设置导航栏的字体包括backBarButton和leftBarButton,rightBarButton的字体
NSDictionary *textAttributes = @{UITextAttributeFont: [UIFont systemFontOfSize:18],
                                 UITextAttributeTextColor: [UIColorblueColor],
                                 UITextAttributeTextShadowColor: [UIColor whiteColor],
                                 UITextAttributeTextShadowOffset: [NSValue valueWithCGSize:CGSizeMake(1, 1)]};
[appearance setTitleTextAttributes:textAttributes forState:1];//forState为0时为下正常状态,为1时为点击状态。
//修改leftBarButton,rightBarButton背景效果
[appearance setBackgroundImage:[UIImage imageNamed:@"navBarButton.png"]
                      forState:UIControlStateNormal
                         style:UIBarButtonItemStyleBordered
                    barMetrics:UIBarMetricsDefault];
[appearance setBackgroundImage:[UIImage imageNamed:@"navBarButton_a.png"]
                      forState:UIControlStateHighlighted
                         style:UIBarButtonItemStyleBordered
                    barMetrics:UIBarMetricsDefault];
//修改底部栏
UITabBar *appearance = [UITabBar appearance];
//设置背景图片
[appearance setBackgroundImage:[UIImage imageNamed:@"tabbar_bg.png"]];
//设置选择item的背景图片
UIImage * selectionIndicatorImage =[[UIImage imageNamed:@"tabbar_slider"]resizableImageWithCapInsets:UIEdgeInsetsMake(4, 0, 0, 0)] ;
[appearance setSelectionIndicatorImage:selectionIndicatorImage];
- 注意事项
-(IBAction)SegmentChange:(UISegmentedControl *)sender {

    NSLog(@"%ld",(long)sender.selectedSegmentIndex);
    switch (sender.selectedSegmentIndex) {
        case 0:
            [UISwitch appearance].onTintColor = [UIColor redColor];
            break;
        case 1:
            [UISwitch appearance].onTintColor = [UIColor blueColor];
            break;
        case 2:
            [UISwitch appearance].onTintColor = [UIColor blackColor];
            break;
        default:
            break;
    }
    //因为在添加那一刻已经添加了属性,随意移除后从新添加
    [self.view removeFromSuperview];

    //添加
    [[UIApplication sharedApplication].keyWindow addSubview:self.view];
}
NSString
- 字符串拼接图片
 -(NSAttributedString *)attatchImage: (UIImage *)image atLastOfString: (NSString *)string{
    //1.现将内容string转化为NSMutableAttributedString
    NSMutableAttributedString *attributedMString = [[NSMutableAttributedString alloc] initWithString:string];
    //2.获取图片的NSTextAttachment
    NSTextAttachment *attach = [[NSTextAttachment alloc] init];
    attach.image = image;
    //在这里如果不设置attatchment的bounds,就有可能造成添加的图片的位置高于文字或者大小与文字的大小不统一的情况。不过还是具体问题具体分析,在这里只是告诉各位图片的rect是可以更改的
    attach.bounds = CGRectMake(2, -2, 15, 15);
    //3.将图片的NSTextAttachment转化为imageString
    NSAttributedString *imageString = [NSAttributedString attributedStringWithAttachment:attach];

    //4.合并NSMutableAttributedString和imageString
    [attributedMString appendAttributedString:imageString];

    //5. 将NSMutableAttributedString转化为NSAttributedString并返回
    return [[NSAttributedString alloc] initWithAttributedString:attributedMString]
}
- 按多个字符分割
NSString *str = @"2,3.4";
 NSCharacterSet *set = [NSCharacterSet characterSetWithCharactersInString:@",."];
 NSLog(@"%@",[str componentsSeparatedByCharactersInSet:set]);
NSArray
- 数级快速求和平均值最大最小
NSArray *array = [NSArray arrayWithObjects:@"2.0", @"2.3", @"3.0", @"4.0", @"10", nil];
CGFloat sum = [[array valueForKeyPath:@"@sum.floatValue"] floatValue];
CGFloat avg = [[array valueForKeyPath:@"@avg.floatValue"] floatValue];
CGFloat max =[[array valueForKeyPath:@"@max.floatValue"] floatValue];
CGFloat min =[[array valueForKeyPath:@"@min.floatValue"] floatValue];
NSLog(@"%f\n%f\n%f\n%f",sum,avg,max,min);
UIDatePicker
- 当设置最大最小时间时必须设置时区
  [_picker  setTimeZone:[NSTimeZone localTimeZone]];//必须设置时区最大小最小值才有用
  _picker.minimumDate = [NSDate dateWithString:@"1949-01-20" format:@"yyyy-MM-dd"];
_picker.maximumDate = [NSDate date];
其它
- 使用SDWebImage时就做好在系统内存警告时释放内容的准备
-(void)applicationDidReceiveMemoryWarning:(UIApplication *)application
{
    [[SDImageCache sharedImageCache] clearMemory];
    [[SDWebImageManager sharedManager] cancelAll];
}

//清理缓存时类似
- (IBAction)clickClearButton:(UIButton:)sender {
    [[SDImageCache sharedImageCache] clearMemory];
    [[SDImageCache sharedImageCache] clearDiskOnCompletion:nil];
}
- 禁止锁屏
[UIApplication sharedApplication].idleTimerDisabled = YES;
-
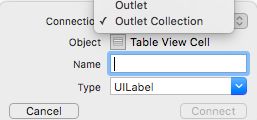
使用 xib 时如有多个相同类型控件,如多个button,label 可拉出一个包含这种类型控件的数组
随机数
 arc4random()范围太大,下面这更合适
//生成0 - 255 的随机数
 CGFloat r = arc4random_uniform(256) / 255.0;
 CGFloat g = arc4random_uniform(256) / 255.0;
 CGFloat b = arc4random_uniform(256) / 255.0;
- load & initialize
在程序启动时,Runtime会去加载所有的类。
在这一时期,如果类或者类的分类实现了+load方法,
则会去调用这个方法。
+initialize方法是在类或子类第一次接收消息之前会被调用,
这包括类的实例对象或者类对象。
如果类一直没有被用到,则这个方法不会被调用。
因此,我们可以将类使用时所需要的一些前置条件在这两个方法中处理。
但应该尽量放在+initialize中。
因为+load方法是在程序启动时调用,势必会影响到程序的启动时间。
而+initialize方法可以说是懒加载调用,只有用到才会去执行。
- nil/NSNull
nil:指向一个对象的空指针
当一个对象置为nil时,这个对象的内存地址就会被系统收回。

NULL:指向其他类型(如:基本类型、C类型)的空指针
从C语言继承来的,就是一个简单的空

NSNull:通常表示集合中的空值
[NSNull null]和nil的区别在于,
nil是一个空对象,已经完全从内存中消失了
NSNull对象拥有一个有效的内存地址

对NSNull对象发送消息会crash
对nil 发消息则不会crash

数组中可能有 [NSNull null],但不能为nil