AsyncTask是什么?
AsyncTask这个类允许在后台执行操作并在UI线程上更新结果而不用必须操纵主线程或使用handlers;
AsyncTask作为 Thread Handler辅助类存在,并不构成通用的线程框架。
理想情况下,AsyncTasks应该是用于短操作(最多几秒钟。)如果你需要保持线程长时间运行,强烈建议使用各种API
concurrent包提供的API例如:ThreadPoolExecutor和FutureTask。
AsyncTask怎么使用?
-
AsyncTask 使用的时候必须子类化,即继承这个类才能使用;
-
需要触发时调用execute()方法。
-
继承时需要设定三个泛型 Params,Progress 和 Result 的类型,如AsyncTask
其中:
Params : 指调用 execute() 方法时传入的参数类型和 doInBackgound() 的参数类型。
Progress : 在后台请求数据期间发布的进度单元的类型。
Result : 异步线程请求返回的结果。 -
继承之后的子类必须重写doInBackground,一般还会重写 onPostExecut 、onPreExecute 方法和 onProgressUpdate 方法。
其中:
onPreExecute : UI线程,运行在doInBackground之前。
doInBackground : 运行于后台(子线程),耗时的操作可以在这里做,此方法可以调用 publishProgress 来发布更新在UI线程上。
onProgressUpdate : 运行在UI线程中,当调用完 publishProgress 之后,如果当前线程没有被取消,将在这个方法中更新进度。
下面是代码实例:
 private class DownloadFilesTask extends AsyncTask; {
       protected Long doInBackground(URL... urls) {
           int count = urls.length;
           long totalSize = 0;
           for (int i = 0; i < count; i++) {
               totalSize += Downloader.downloadFile(urls[i]);
               publishProgress((int) ((i / (float) count)   100));
               // Escape early if cancel() is called
               if (isCancelled()) break;
           }
           return totalSize;
       }

       protected void onProgressUpdate(Integer... progress) {
           setProgressPercent(progress[0]);
       }

       protected void onPostExecute(Long result) {
           showDialog("Downloaded " + result + " bytes");
       }
   }
执行的代码:
new DownloadFilesTask().execute(url1, url2, url3)
AsyncTask源码分析(API 27)
▶ 首先看一下 AsyncTask的构造方法
 public AsyncTask(@Nullable Looper callbackLooper) {
        mHandler = callbackLooper == null || callbackLooper == Looper.getMainLooper()
            ? getMainHandler()
            : new Handler(callbackLooper);//初始化mhandler

        //初始化mWorker
        mWorker = new WorkerRunnable() {
            public Result call() throws Exception {
                //开始执行call方法时将mTaskInvoked置为true
                mTaskInvoked.set(true);
                Result result = null;
                try {
                    //设置调用线程的优先级为后台线程
                    Process.setThreadPriority(Process.THREAD_PRIORITY_BACKGROUND);
                    //执行doInBackground方法(在后台进程),并将结果返回
                    result = doInBackground(mParams);
                    /**
                     *将当前线程中待处理的任何Binder命令刷新到内核/驱动程序。
                     * 在执行可能长时间阻塞的操作之前调用,以确保已释放任何挂起的对象引用
                     *为了防止进程持有超过它需要的对象
                     */
                    Binder.flushPendingCommands();
                } catch (Throwable tr) {
                    //AtomicBoolean设置新值为true,false表示只允许一个线程访问。
                    // 此处当前线程已经异常,故重新赋值为true,允许其他线程重新开始操作
                    mCancelled.set(true);
                    throw tr;
                } finally {
                    //传递结果给postResult
                    postResult(result);
                }
                return result;
            }
        };

        //初始化mFuture,传入参数mWorker
        mFuture = new FutureTask(mWorker) {
            @Override
            protected void done() {
                try {
                    //传递结果
                    postResultIfNotInvoked(get());
                } catch (InterruptedException e) {
                    android.util.Log.w(LOG_TAG, e);
                } catch (ExecutionException e) {
                    throw new RuntimeException("An error occurred while executing doInBackground()",
                            e.getCause());
                } catch (CancellationException e) {
                    postResultIfNotInvoked(null);//抛异常时,传递结果为null
                }
            }
        };
    }
实例化了AsyncTask对象之后,我们就可以调用AsyncTask的execute方法执行任务
▶ execute() 方法
    public final AsyncTask execute(Params... params) {
        return executeOnExecutor(sDefaultExecutor, params);//调用executeOnExecutor方法,其中用到有个参数sDefaultExecutor值得关注
    }
▶ sDefaultExecutor
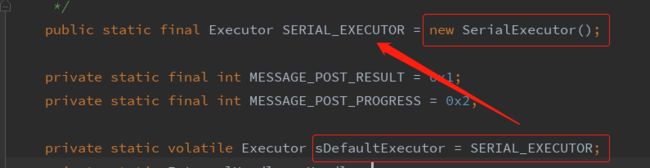
其中的 sDefaultExecutor 是被 volatile 关键字修饰的一个SerialExecutor 对象,这意味着 sDefaultExecutor 具有以下两个特点:
- 保证了不同线程对这个变量进行操作时的可见性,即一个线程修改了某个变量的值,这新值对其他线程来说是立即可见的。
- 禁止进行指令重排序。
那么这个SerialExecutor 的作用是什么?
▶ SerialExecutor
 private static class SerialExecutor implements Executor {
        final ArrayDeque mTasks = new ArrayDeque();
        Runnable mActive;

        public synchronized void execute(final Runnable r) {
         //将任务添加到其内部的队列 mTasks 中,按顺序依次执行
            mTasks.offer(new Runnable() {
                public void run() {
                    try {
                        r.run();
                    } finally {
                    //当任务执行完毕的时候,通过调用scheduleNext方法执行下一个Runnable任务
                        scheduleNext();
                    }
                }
            });
            if (mActive == null) {
                scheduleNext();
            }
        }

       //并且即使在多个线程同时操作的情况下,由于THREAD_POOL_EXECUTOR具有可见性,
      //不会造成数据更新不及时的问题
        protected synchronized void scheduleNext() {
            if ((mActive = mTasks.poll()) != null) {
                THREAD_POOL_EXECUTOR.execute(mActive);
            }
        }
    }
SerialExecutor中有一个execute 方法和 scheduleNext 方法。
execute 方法将任务添加到其内部的队列 mTasks 中,按顺序依次执行;调用 THREAD_POOL_EXECUTOR 处理任务,执行完毕后再从 mTasks 中取下一个任务,并且即使在多个线程同时操作的情况下,由于THREAD_POOL_EXECUTOR具有可见性,不会造成数据更新不及时的问题;到这里可以回到一开始的executeOnExecutor方法。
▶ executeOnExecutor
 public final AsyncTask executeOnExecutor(Executor exec,
            Params... params) {
        //exec是之前的sDefaultExecutor 参数
        if (mStatus != Status.PENDING) {//Status有三个状态值,PENDING表示task还没有被执行
            switch (mStatus) {
                case RUNNING://表示已经在执行中
                    throw new IllegalStateException("Cannot execute task:"
                            + " the task is already running.");
                case FINISHED://表示已经结束
                    throw new IllegalStateException("Cannot execute task:"
                            + " the task has already been executed "
                            + "(a task can be executed only once)");
            }
        }

        //执行到这里说明当前task需要被执行,故将状态置为RUNNING
        mStatus = Status.RUNNING;

        //调用onPreExecute方法
        onPreExecute();

        mWorker.mParams = params;//将参数赋值给mWorker中的变量
        exec.execute(mFuture);//实际调用的就是SerialExecutor中的execute方法

        return this;
    }
其中的mWorker是一个实现了Callable的静态内部抽象类,包含一个Params数组;
 private static abstract class WorkerRunnable implements Callable {
        Params[] mParams;
    }
其中的mFuture是一个FutureTask
到这里execute() 方法基本结束。
最后返回结果的方法:
▶ postResult
 private Result postResult(Result result) {
        @SuppressWarnings("unchecked")
        Message message = getHandler().obtainMessage(MESSAGE_POST_RESULT,
                new AsyncTaskResult(this, result));
        //将结果发送给handler
        message.sendToTarget();
        return result;
    }
不同版本之间的差异
上面的源码分析基于API27,在Android 3.0之前是并没有SerialExecutor这个类的,而是直接在AsyncTask中构建了一个sExecutor常量,并对线程池总大小,同一时刻能够运行的线程数做了规定,而3.0之后的使用了SerialExecutor这个类,限制同一时间只能一个线程访问,只能执行一个任务,执行完成之后,接着执行下一个任务。
▶ API 3.0之前
添加的任务进入多线程池,支持并发。
核心线程数为5个
最大运行线程数为128个
▶ API 3.0之后
默认只支持一个线程数;
但可以创建单独的线程池;
或者使用AsyncTask.THREAD_POOL_EXECUTOR(默认同时运行线程数5个)
▶ AsyncTask缺点
- 开启线程后,未结束,此时用户又一次,甚至多次开启线程,导致多次请求。
解决方式:将线程写为静态static。 - 当用户开启线程后,退出界面,多次进入。由于线程持有Activity的变量的实例,导致Activity无法被回收,从而导致内存泄漏
解决方式:采用弱引用的方式,将线程与Activity进行解耦。
参考文章 1:https://blog.csdn.net/womengmengyan/article/details/52315564?utm_source=copy
2: https://www.cnblogs.com/dolphin0520/p/3920373.html