微信开源了自己的热修复Tinker库,一直没用过,所以想搞一个小Demo来体验一下
什么是Tinker?
Tinker是微信官方的Android热补丁解决方案,它支持动态下发代码、So库以及资源,让应用能够在不需要重新安装的情况下实现更新。
Tinker 传送门:github主页 wiki介绍 Tinker的接入指南
开始接入
Tinker 的sample 的地址为 sample
1、gradle配置
参照 Tinker sample的做法 在 gradle.properties文件末尾添加
TINKER_VERSION=1.7.11
在项目的 build.gradle 中指定classpath
buildscript {
    repositories {
        jcenter()
    }
    dependencies {
        classpath 'com.android.tools.build:gradle:2.2.2'

        // NOTE: Do not place your application dependencies here; they belong
        // in the individual module build.gradle files
        classpath "com.tencent.tinker:tinker-patch-gradle-plugin:${TINKER_VERSION}"
    }
}
参考 sample 的build.gradle 进行配置
1、在android {}标签中添加 签名配置
signingConfigs {
        release {
            try {
                storeFile file("./keystore/release.keystore")
                storePassword "testres"
                keyAlias "testres"
                keyPassword "testres"
            } catch (ex) {
                throw new InvalidUserDataException(ex.toString())
            }
        }

        debug {
            storeFile file("./keystore/debug.keystore")
        }
    }
2、在dependencies{}标签添加核心库
 compile("com.tencent.tinker:tinker-android-lib:${TINKER_VERSION}") { changing = true }
    provided("com.tencent.tinker:tinker-android-anno:${TINKER_VERSION}") { changing = true }
3、其余粘贴sample 中的 配置但是要进行修改
注意修改 ignoreWarning = true **
修改tinkerId = "tinkerId" //getTinkerIdValue()**
如果涉及到 getTinkerIdValue 的都修改成 tinkerId
然后编译就能通过了
2、Application配置
与以往的很多库不同,这里并不是在自定义的Application 中进行初始化之类的‘
@SuppressWarnings("unused")
@DefaultLifeCycle(application = ".SampleApplication",
        flags = ShareConstants.TINKER_ENABLE_ALL,
        loadVerifyFlag = false)
public class SampleApplicationLike extends DefaultApplicationLike {
    private static final String TAG = "Tinker.SampleApplicationLike";

    public SampleApplicationLike(Application application, int tinkerFlags, boolean tinkerLoadVerifyFlag,
                                 long applicationStartElapsedTime, long applicationStartMillisTime, Intent tinkerResultIntent) {
        super(application, tinkerFlags, tinkerLoadVerifyFlag, applicationStartElapsedTime, applicationStartMillisTime, tinkerResultIntent);
    }

    /**
     * install multiDex before install tinker
     * so we don't need to put the tinker lib classes in the main dex
     *
     * @param base
     */
    @TargetApi(Build.VERSION_CODES.ICE_CREAM_SANDWICH)
    @Override
    public void onBaseContextAttached(Context base) {
        super.onBaseContextAttached(base);
        //you must install multiDex whatever tinker is installed!
        MultiDex.install(base);

        TinkerInstaller.install(this);
    }

    @TargetApi(Build.VERSION_CODES.ICE_CREAM_SANDWICH)
    public void registerActivityLifecycleCallbacks(Application.ActivityLifecycleCallbacks callback) {
        getApplication().registerActivityLifecycleCallbacks(callback);
    }

}
AndroidManifest.xml 文件进行配置
3、配置结束开始测试使用
module 执行DeBug 运行,将项目打包生成 apk 文件,运行在手机中。以App为例,会 在 build-> badApk->生成Apk文件 文件是以 日期时间来命名的 ,比较好区分
修改配置 build.gradle 文件
//for normal build
//old apk file to build patch apk
tinkerOldApkPath = "${bakPath}/app-debug-0629-17-10-31.apk"   //这里配置  刚刚生成的  oldApk 文件
//proguard mapping file to build patch apk
tinkerApplyMappingPath = "${bakPath}/app-debug-1018-17-32-47-mapping.txt" //proguard的map映射文件
//resource R.txt to build patch apk, must input if there is resource changed
tinkerApplyResourcePath = "${bakPath}/app-debug-0629-17-10-31-R.txt"   //如果修改了 resource内容,将该文件也更新到最新
修改项目中的代码,并构建 差异包
修改MainActivity 中的代码
public class MainActivity extends AppCompatActivity {

    private TextView test_main;

    @Override
    protected void onCreate(Bundle savedInstanceState) {
        super.onCreate(savedInstanceState);
        setContentView(R.layout.activity_main);
        test_main = (TextView) findViewById(R.id.test_main);
        //在差异包中修改了  界面中的显示文本   "I am In Path Apk"
        test_main.setText("I am In Patch Apk");
    }

    public void loadPath(View view) {
        String path = Environment.getExternalStoragePublicDirectory(DOWNLOAD_SERVICE).getAbsolutePath() + "/patch_signed_7zip.apk";
        File file = new File(path);
        if (file.exists()) {
            Toast.makeText(this, "补丁存在", Toast.LENGTH_SHORT).show();
            TinkerInstaller.onReceiveUpgradePatch(getApplicationContext(), path);
        } else {
            Toast.makeText(this, "补丁不存在", Toast.LENGTH_SHORT).show();
        }
    }
}
修改完成执行 tinker 的 gradle 命令 tinkerPatchDebug
可以在命令行或者这里点击运行,然后等待 构建生成 patch 包
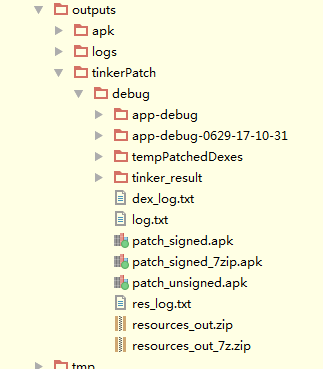
在此过程中可能会失败,重试一次,生成的差异包会在该目录下:
将生成的 patch_signed_7zip.apk 文件 导入到sd卡中,但是导入到哪个目录呢?看下面的代码
    public void loadPath(View view) {
      //这里制定了  加载差异包的文件名和目录
        String path = Environment.getExternalStoragePublicDirectory(DOWNLOAD_SERVICE).getAbsolutePath() + "/patch_signed_7zip.apk";
        File file = new File(path);
        if (file.exists()) {
            Toast.makeText(this, "补丁存在", Toast.LENGTH_SHORT).show();
            TinkerInstaller.onReceiveUpgradePatch(getApplicationContext(), path);
        } else {
            Toast.makeText(this, "补丁不存在", Toast.LENGTH_SHORT).show();
        }
    }
导入的目录要与 代码中的目录保持一致
再次运行刚刚打包到手机中的应用 点击 loadPath按钮看效果如下
这里只是体验了一下Tinker的简单实用,具体在项目中的使用还需要进一步的去研究,相信还有很多坑在等着我!


