Cell不变色、不可选
[A].Cell不变色
(a). Cell不能变色:
 cell.selectionStyle = UITableViewCellSelectionStyleNone;
 //不能变色  (选中的风格:无颜色)
Cell的其他选中色:
//蓝色
cell.selectionStyle = UITableViewCellSelectionStyleBlue;

//灰色
cell.selectionStyle = UITableViewCellSelectionStyleGray;
(b). Cell取消选中,变原色:
-(void)tableView:(UITableView *)tableView didSelectRowAtIndexPath:(NSIndexPath *)indexPath {
    //取消选中后,变为原色
    [tableView deselectRowAtIndexPath:indexPath animated:NO];
}
[B].Cell不可选
a. 处理tableView的“select”方法:
- (NSIndexPath *)tableView:(UITableView *)tableView willSelectRowAtIndexPath:(NSIndexPath *)indexPath{
     return nil; //tableview不可选
}
b. 不经过tableView的“select”方法
self.myTableView.allowsSelection = NO;//不响应select
cell.selectionStyle = UITableViewCellSelectionStyleNone;//选中:无色
header标题
[ 1 ].系统自带的方法:
titleForHeaderInSection(背景色:深灰)// 深灰色(背景色) -(NSString *)tableView:(UITableView *)tableView titleForHeaderInSection:(NSInteger)section { ClassesListCellModel * model = self.dataArray[section]; return model.date; }
[ 2 ].自己把headerView视图,设置为一个Label
-(UIView *)tableView:(UITableView *)tableView viewForHeaderInSection:(NSInteger)section {
    UIView * view = [[UIView alloc] init];

    UILabel * date_LB = [[UILabel alloc] init];
    CategoryListCellModel * model = self.dataArray[section];
    date_LB.text = model.date; //格式:@"2017-08-02"
    date_LB.textColor = [UIColor lightGrayColor];
    [view addSubview: date_LB];
    [date_LB mas_makeConstraints:^(MASConstraintMaker *make) {
        make.left.equalTo(view).with.offset(10.f);
        make.centerY.equalTo(view).with.offset(0.f);

    }];

    view.backgroundColor = All_BG_Color;
    return view;
}
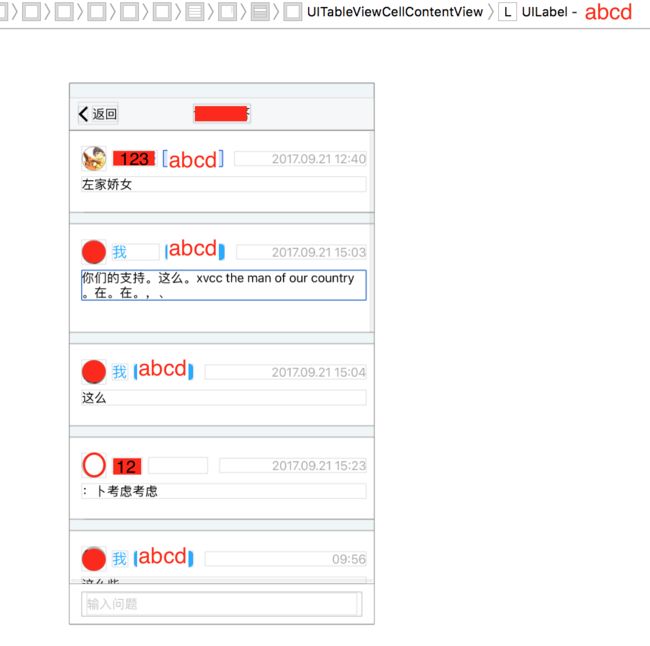
内容重复:cell复用问题
QuesListTableViewCell * cell = [tableView dequeueReusableCellWithIdentifier:@"cell"];
if (!cell) {
    cell = [[QuesListTableViewCell alloc] initWithStyle:UITableViewCellStyleDefault reuseIdentifier:@"cell"];
}
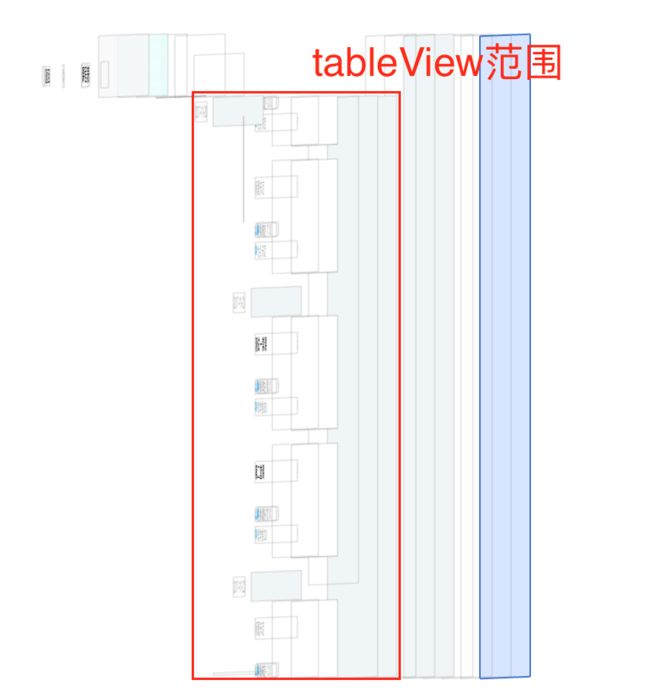
使用“Debug View Hierarchy”,查看视图关系:
解决
cell的复用,定位到每一行:[tableView cellForRowAtIndexPath:indexPath];
QuesListTableViewCell *cell = [tableView cellForRowAtIndexPath:indexPath];//定位到每一行
if (!cell) {
    cell = [[QuesListTableViewCell alloc] initWithStyle:UITableViewCellStyleDefault reuseIdentifier:@"cell"];
}
改善后效果:
分割线隐藏:separator
设置separator背景色:透明
self.quesListTabV.separatorColor = [UIColor clearColor];
设置cell相对于contentView的上左下右间距
在“-(UITableViewCell *)tableView:(UITableView *)tableView cellForRowAtIndexPath:(NSIndexPath *)indexPath { }”里:cell.separatorInset = UIEdgeInsetsMake(0, cell.contentView.frame.size.width/2.f, cell.contentView.frame.size.width/2.f, 0);
提前 注册Cell (“register”方法)
-
- (void)registerClass:(Class)cellClass forCellReuseIdentifier:(NSString *)identifier NS_AVAILABLE_IOS(6_0);在创建UITableView的时候,就可以顺带注册复用的Cell!!
[self.tableView registerClass:[FKTableViewCell class] forCellReuseIdentifier:@"FKCell"];这样,在“
- (UITableViewCell *)tableView:(UITableView *)tableView cellForRowAtIndexPath:(NSIndexPath *)indexPath { }”里,就只需要:FKTableViewCell *cell = [tableView dequeueReusableCellWithIdentifier:@"FKCell" forIndexPath:indexPath];
可以省去如下代码:static NSString *CellIdentifier = @"FKCell"; FKTableViewCell *cell = [tableView dequeueReusableCellWithIdentifier: CellIdentifier]; if (cell == nil) { cell = [[FKTableViewCell alloc] initWithStyle:UITableViewCellStyleDefault reuseIdentifier:CellIdentifier]; //设置cell }
-
如果已经用NIB来制作了一个Cell:
- (void)registerNib:(UINib *)nib forCellReuseIdentifier:(NSString *)identifier NS_AVAILABLE_IOS(5_0);注册复用的cell!!
[self.resourceTabV registerNib:[UINib nibWithNibName:@"ResourceTableViewCell" bundle:nil] forCellReuseIdentifier:@"cell"];在“
- (UITableViewCell *)tableView:(UITableView *)tableView cellForRowAtIndexPath:(NSIndexPath *)indexPath { }”里:ResourceTableViewCell * cell = [tableView dequeueReusableCellWithIdentifier:@"cell" forIndexPath:indexPath];
可以省去如下代码:ResourceTableViewCell * cell = [tableView dequeueReusableCellWithIdentifier:@"cell"]; if (!cell) { cell = [ResourceTableViewCell xibTableViewCell]; }
在“ResourceTableViewCell.m”里面:
//实现类方法
 +(instancetype)xibTableViewCell {
    //在类方法中加载xib文件    firstObject、lastObject都可以
    return [[[NSBundle mainBundle] loadNibNamed:@"ResourceTableViewCell" owner:nil options:nil] lastObject];
}
Xib关联的UITableViewCell
视图布局(Xib文件)
在“JobsTableViewCell.m”里面: (loadNibNamed:加载nib)
//实现类方法
+(instancetype)xibTableViewCell {
    //在类方法中加载xib文件   (仅一个元素 :firstObject、lastObject都可以)

    return [[[NSBundle mainBundle] loadNibNamed:@"JobsTableViewCell" owner:nil options:nil] lastObject];
    //loadNibNamed:关联的名字(本身名字)
}


- (void)awakeFromNib {
    [super awakeFromNib];

    /** 设置控件属性 */
    self.titleImgV.image = [UIImage imageNamed:@"hg_job_avatar"];
    self.titleLB.text = @"工作标题";
    self.detailInfoLB.text = @"工作安排";
    self.littlePicImgV.image = [UIImage imageNamed:@"hg_progress"];
}
使用Cell:
-
-
在“
-(UITableViewCell *)tableView:(UITableView *)tableView cellForRowAtIndexPath:(NSIndexPath *)indexPath { }”里:JobsTableViewCell * jobDataCell = [tableView dequeueReusableCellWithIdentifier:@"jobCell"]; //如果缓存池中没有,那么创建一个新的cell if (! jobDateCell) { //这里换成自己定义的cell,并调用类方法加载xib文件 jobDataCell = [JobsTableViewCell xibTableViewCell]; }
不能使用:“
alloc”方法创建Cell (❌❌❌❌❌❌❌)JobsTableViewCell * jobDataCell = [[JobsTableViewCell alloc] initWithStyle:UITableViewCellStyleDefault reuseIdentifier:@"jobCell"]; //❌❌❌ 不能使用 “alloc”方法 创建 ❌❌❌ -
-
-
另一种使用方式:(注册 复用的Cell)
在创建tableView时,直接注册 复用的Cell:[self.jobListTabV registerNib:[UINib nibWithNibName:@"JobsTableViewCell" bundle:nil] forCellReuseIdentifier:@"jobCell"];
在“-(UITableViewCell *)tableView:(UITableView *)tableView cellForRowAtIndexPath:(NSIndexPath *)indexPath { }”里的写法:JobsTableViewCell * jobDataCell = [tableView dequeueReusableCellWithIdentifier:@"jobCell" forIndexPath:indexPath];
-
自定义的Cell尺寸调整 (setFrame)
- (void)setFrame:(CGRect)frame {
    //上 分隔线的距离:SCREEN_WIDTH*30.f/750.f
    frame.origin.y += SCREEN_WIDTH*30.f/750.f;
    //下 分隔线的距离:0 (= size.hight偏差 - origin.y偏差)
    frame.size.height -= SCREEN_WIDTH*30.f/750.f;

    float distance_X = SCREEN_WIDTH*30.f/750.f;//左、右边间距
    frame.origin.x += distance_X;
    frame.size.width -= 2*distance_X;

    [super setFrame:frame];
}
效果:给layer层,加上边框!
添加 长按手势
// 添加长按手势
UILongPressGestureRecognizer * longPressGr = [[UILongPressGestureRecognizer alloc] initWithTarget:self action:@selector(longPressMyTableView:)];
longPressGr.minimumPressDuration = 1.5f; //长按手势的“最短时长”
[self.myTabV addGestureRecognizer:longPressGr];
//长按手势 的响应方法
-(void)longPressMyTableView:(UILongPressGestureRecognizer *)gesture {
    if(gesture.state == UIGestureRecognizerStateBegan) { //“手势开始”状态
        CGPoint point = [gesture locationInView: self.myTabV];
        NSIndexPath * indexPath = [self.myTabV indexPathForRowAtPoint:point];

        if(indexPath == nil) return; //其他 不是Cell所在的地方


        NSLog(@"longPress  indexPath.row:%ld",indexPath.row);//所点击cell的位置
        //根据 所点击Cell的位置,做响应操作!
        //add your code here

    }
}
tableView相对于导航栏的偏移
宏定义:
//忽略导航栏
#define SCREEN_WithOutNavBar CGRectMake(0, 0, [UIScreen mainScreen].bounds.size.width, [UIScreen mainScreen].bounds.size.height - 64.f)
定义tableView:
self.detailsListTabV = [[UITableView alloc] initWithFrame:SCREEN_WithOutNavBar style:UITableViewStylePlain];
self.detailsListTabV.separatorColor = [UIColor clearColor];

[self.view addSubview:self.detailsListTabV];
故障的效果:
原因:
视图控制器会根据状态栏,导航栏和标签栏,来调整它所包含的scrollview的偏移量!!
由于tableview、collectionview和textview等都是继承于scrollview,所以都会出现这种情况。
解决:
self.edgesForExtendedLayout = UIRectEdgeNone;//从导航栏开始
//self.extendedLayoutIncludesOpaqueBars = NO;
从导航栏开始,进行tableView的布局!!
效果:
Cell里的按钮响应
自定义的ResourceTableViewCell:
-
ResourceTableViewCell.xib:
-
“ResourceTableViewCell.h”里:
#import@protocol ClickCellDelegate //协议 各按钮点击响应 - (void)didClickIndexWithBtn:(UIButton *)button; @end @interface ResourceTableViewCell : UITableViewCell @property (nonatomic,weak) id delegate;//响应的协议 /** ⭐️⭐️⭐️直接拖的各个按钮⭐️⭐️⭐️ */ @property (weak, nonatomic) IBOutlet UIButton *collectionBtn;//收藏按钮 @property (weak, nonatomic) IBOutlet UIButton *sendToEmailBtn;//传到邮件按钮 @property (weak, nonatomic) IBOutlet UIButton *previewBtn;//预览按钮 +(instancetype)xibTableViewCell;//初始化方法 @end
-
“ResourceTableViewCell.m”里:
#import "ResourceTableViewCell.h"

#define Button_Tag 1000


@implementation ResourceTableViewCell

//实现类方法
+(instancetype)xibTableViewCell {
    //在类方法中加载xib文件    firstObject、lastObject都可以
    return [[[NSBundle mainBundle] loadNibNamed:@"ResourceTableViewCell" owner:nil options:nil] lastObject];
}


- (void)awakeFromNib {
    [super awakeFromNib];


    _collectionBtn.tag = Button_Tag;        //收藏按钮
    _sendToEmailBtn.tag = Button_Tag + 1;   //发送按钮
    _previewBtn.tag = Button_Tag + 2;       //阅览按钮
}


/** ⭐️⭐️⭐️各按钮直接拖的方法⭐️⭐️⭐️ */
- (IBAction)collectBtnPress:(id)sender {
    [self tapWithBtn:sender];
}
- (IBAction)sendToEmailBtnPress:(id)sender {
    [self tapWithBtn:sender];
}
- (IBAction)perviewBtnPress:(id)sender {
    [self tapWithBtn:sender];
}

-(void)tapWithBtn:(UIButton *)button {
    //声明好的代理
    if([self.delegate respondsToSelector:@selector(didClickIndexWithBtn:)]) {
        [self.delegate didClickIndexWithBtn:button];
    }
}

@end
使用
在使用了“ResourceTableViewCell”的tableView所在界面里:
满足协议:
设置全局变量:用来获取 做出响应的Cell 所在位置!!
NSIndexPath * _whole_IndexPath; //全局选择项
- 注册Cell:(在创建tableView时)
[self.reourcesTabV registerNib:[UINib nibWithNibName:@"ResourceTableViewCell" bundle:nil] forCellReuseIdentifier:@"cell"];
-
设置Cell的代理 (
在“
-(UITableViewCell *)tableView:(UITableView *)tableView cellForRowAtIndexPath:(NSIndexPath *)indexPath { }”里面:ResourceTableViewCell * cell = [tableView dequeueReusableCellWithIdentifier:@"cell" forIndexPath:indexPath]; cell.delegate = self;//设置代理
-
重写代理方法:
#pragma mark - ClickCellDelegate
-(void)didClickIndexWithBtn:(UIButton *)button {

  ResourceTableViewCell *cell = (ResourceTableViewCell *)[[[button superview] superview] superview];
  //cell、xib、view 三层
  / ** 解释:
    第1层:[button superview]是ResourceTableViewCell的“contentView”;
    第2层:第二个superview是ResourceTableViewCell⭐️自己本身⭐️的“cell”;
    第3层:第三个superview是⭐️UITableView⭐️的“cell”。
  * /


  _whole_IndexPath = [self.reourcesTabV indexPathForCell:cell];
  //⭐️⭐️⭐️获取到是哪一行的Cell  被点击!⭐️⭐️⭐️
  //NSLog(@"indexPath row is = %li",(long)_whole_IndexPath.row);


  //获取该行Cell的模型
  ResourceListCellModel * model = self.dataArray[_whole_IndexPath.row]; //获取该行Cell的模型

  //⭐️⭐️⭐️用Cell按钮的tag值,来判断是哪个按钮⭐️⭐️⭐️
  switch (button.tag - 1000) {
      case 0:{ //收藏

      }break;
      case 1:{ //发送邮件

      }break;
      case 2:{ //预览

      }break;
      default:
          break;

}
思路:
1.获取点击的Cell所在位置(indexPath);
2.根据tag值,判断是哪个按钮(子视图)被点击!
goyohol's essay


