【homebrew 系列文章】
- HomeBrew常规使用教程
- Homebrew进阶使用教程(一)
- Homebrew进阶使用教程(二)-用一个命令行天气客户端构建自己的仓库
- Homebrew进阶使用教程(三)-apue.h在mac下安装并使用连接
我的github地址:github地址:https://github.com/rangaofei/homebrew-saka
上篇文章讲了如何创建自己的仓库,这次简单讲解如何上传自己的库或者程序到自己的仓库。最近正在学习apue这本书,但是需要依赖作者的一个apue库,本篇将以unix环境高级编程的库apue.h和libapue.a文件的关联讲解如何上传库到自己的仓库然后用brew安装
1. 创建安装脚本
首先把自己的文件压缩为tar.gz(官方推荐为这种压缩格式,其他的没有尝试)格式文件,名称以"库名称-版本号"格式书写,这样便于homebrew识别自己的版本号自动填写。
此处我已下载好apue的源码并且编译好,我们只需要两个文件include文件夹下的apue.h文件和lib文件夹下的libapue.a文件,将这两个文件随便拷贝到一个文件夹下,只包含
apue.h和libapue.a,命令行进入这个文件夹并将这两个文件打包:
tar -cvzf apue-1.0.tar.gz ./*
此时会自动生成这个文件,将这个文件上传到某个所有人能访问的地址,此处我上传到了https://raw.githubusercontent.com/rangaofei/apue/master/lib/apue-1.0.tar.gz这个地址。
执行命令
brew create
即可创建我们的安装脚本,脚本名称默认为前边提到的库名称,对应我的命令为
brew create https://raw.githubusercontent.com/rangaofei/apue/master/lib/apue-1.0.tar.gz
生成的文件为apue.rb。
2. 改写安装脚本
执行上边的命令后会自动打开安装脚本为可编辑状态,此处我的电脑自动使用vim打开,并生成一系列的代码:
# Documentation: https://docs.brew.sh/Formula-Cookbook.html
#                http://www.rubydoc.info/github/Homebrew/brew/master/Formula
# PLEASE REMOVE ALL GENERATED COMMENTS BEFORE SUBMITTING YOUR PULL REQUEST!
 class Apue < Formula
  desc ""
  homepage ""
  url "https://raw.githubusercontent.com/rangaofei/apue/master/lib/apue-1.0.tar.gz"
  sha256 "7e84d03563f7f0119f2d946cc9f439192e582b65a504c39f4158fea7f38f7cbd"
   def install
    # ENV.deparallelize
    system "./configure", "--disable-debug",
                          "--disable-dependency-tracking",
                          "--disable-silent-rules",
                          "--prefix=#{prefix}"
    # system "cmake", ".", *std_cmake_args
    system "make", "install"
  end

   test do
    # `test do` will create, run in and delete a temporary directory.
    #
    # This test will fail and we won't accept that! For Homebrew/homebrew-core
    # this will need to be a test that verifies the functionality of the
    # software. Run the test with `brew test apue`. Options passed
    # to `brew install` such as `--HEAD` also need to be provided to `brew test`.
    #
    # The installed folder is not in the path, so use the entire path to any
    # executables being tested: `system "#{bin}/program", "do", "something"`.
    system "false"
  end
end
遵循ruby语法(我完全不懂ruby,现学现卖)。
class即为我们的目标库。
里边比较重要的字段就是列出来的几个desc,homepage,url,sha256。
url和sha256是创建时自动生成的,url是下载地址,sha256是验证码,假如不匹配则会停止安装,所以此处一定要填写正确。
desc是描述字段,对库的简介,homepage按官方的说法是这个库的官方网址。
3. 修改安装方式
install函数是安装时执行的动作,默认提供了make安装和cmake(注释部分)的安装方式。这次我们不用两个方式,而是采用直接复制文件到目标文件夹的方式。
def install
     lib.install "libapue.a"
     include.install "apue.h"
end
注意此处的lib和include这两个字段,和cmake中的install基本雷同。
看一下官方的说明:
prefix.install "file1", "file2" #安装部分文件
prefix.install Dir["output/*"] #安装整个output文件夹下的所有文件
prefix是一个前缀,这个前缀带包一系列的目标文件夹。
前缀代表的文件夹
| 前缀名称 | 目标文件夹 | 示例 |
|---|---|---|
| HOMEBREW_PREFIX | /usr/local | |
| prefix | #{HOMEBREW_PREFIX}/Cellar/#{name}/#{version} | /usr/local/Cellar/foo/0.1 |
| opt_prefix | #{HOMEBREW_PREFIX}/opt/#{name} | /usr/local/opt/foo |
| bin | #{prefix}/bin | /usr/local/Cellar/foo/0.1/bin |
| doc | #{prefix}/share/doc/foo | /usr/local/Cellar/foo/0.1/share/doc/foo |
| include | #{prefix}/include | /usr/local/Cellar/foo/0.1/include |
| info | #{prefix}/share/info | /usr/local/Cellar/foo/0.1/share/info |
| lib | #{prefix}/lib | /usr/local/Cellar/foo/0.1/lib |
| libexec | #{prefix}/libexec | /usr/local/Cellar/foo/0.1/libexec |
| man | #{prefix}/share/man | /usr/local/Cellar/foo/0.1/share/man |
| man[1-8] | #{prefix}/share/man/man[1-8] | /usr/local/Cellar/foo/0.1/share/man/man[1-8] |
| sbin | #{prefix}/sbin | /usr/local/Cellar/foo/0.1/sbin |
| share | #{prefix}/share | /usr/local/Cellar/foo/0.1/share |
| pkgshare | #{prefix}/share/foo | /usr/local/Cellar/foo/0.1/share/foo |
| etc | #{HOMEBREW_PREFIX}/etc | /usr/local/etc |
| var | #{HOMEBREW_PREFIX}/var | /usr/local/var |
| buildpath | A temporary directory somewhere on your system | /private/tmp/[formula-name]-0q2b/[formula-name] |
解释一下:
lib.install libapue.a将会将libapue.a文件复制到/usr/local/Celler/apue/lib文件夹下,同理include.iinstall apue.h将会将apue.h文件复制到/usr/local/Celler/apue/include文件夹下。
4. 发布到仓库
刚才我们编写的apue.rb文件在哪里呢?
brew默认会在core`仓库中创建这个文件,执行如下命令
cd $(brew --repo homebrew/core)
cd Formula/
ls |grep apue
在这里即可看到输出的文件中有我们刚才编辑的apue.rb。copy到自己的仓库文件夹下并加入git管理推送到远程仓库,此时其他人只要tap了这个仓库就可以安装这个库了。
mv apue.rb ../../../rangaofei/homebrew-saka/Formula #移动文件到自己的仓库
cd $(brew --repo rangaofei/saka) #打开自己的仓库
cd Formula  #进入文件夹
git add --all #加入git管理
git commit -m 'add new formula apue' #提交
git push #远程仓库提交
然后看一下我们的库的信息
通过brew install apue来安装库,安装成功后,来看一下有没有生成对应的文件
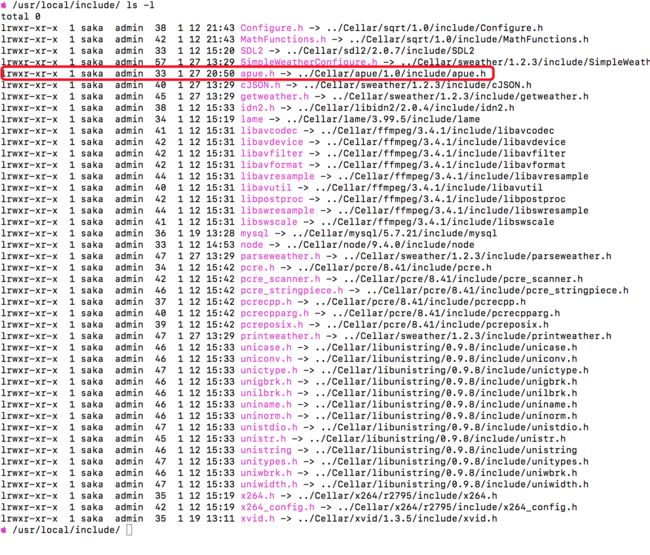
可以看到在/usr/local/lib与usr/local/include文件夹下已经生成了两个软连接,连接到我们的brew安装目录。这些工作都是homebrew自动执行的,当执行brew uninstall apue后这些软连接也会自动删除。这样我们的库就发布完成了。
5. 验证使用
我们已经安装好了apue这个库,那我们就可以立即使用了。这里我用clion编写了第一个示例代码:
#include "apue.h"
#include

int main(int argc, char *argv[]) {
    DIR *dp;
    struct dirent *dirp;

    if (argc != 2) {
        err_quit("usage:ls directory_name");
    }

    if ((dp = opendir(argv[1])) == NULL) {
        err_sys("can't open %s", argv[1]);
    }
    while ((dirp = readdir(dp)) != NULL) {
        printf("%s\n", dirp->d_name);
    }
    closedir(dp);
    exit(0);
}
第一行的头文件就是刚才我们安装的库,此处是可以正确引用的,然后修改cmakelists文件
cmake_minimum_required(VERSION 3.9)
project(apue C)

set(CMAKE_C_STANDARD 99)

add_executable(apue main.c)

target_link_libraries(apue apue.a)
在最后一行为我们的库添加了连接库apue.a。
然后执行外部构建,进入工程目录
mkdir build
cd build/
cmake ..
make
构建过程中没有发生错误,执行文件可正确输出。
至此验证玩意


