iOS13的beta5版本已经出来了,APP适配也应该提上日程了,本文记录下自己在适配时做的一些工作。
Q:我不想让用户使用DarkMode,可不可以?
A:当然可以,请往下看
在iOS13,为UIViewController和UIView扩展了一个新的API-overrideUserInterfaceStyle,使用方法,官方文档大致是这么说的:
通过设置
overrideUserInterfaceStyle属性以使该视图及其子视图具有特定的UIUserInterfaceStyle。但如果想要获取当前的UIUserInterfaceStyle,需要改用traitCollection.userInterfaceStyle。尽可能使用
UIViewController上的overrideUserInterfaceStyle属性。仅在以下时间使用此属性:
- 在单个视图或小视图层次结构上局部使用特定样式。
- 您希望在整个
UIWindow及其视图控制器和模态弹出的ViewController上使用特定样式,且不希望强制更改整个应用程序具有样式。 (如果您确实希望整个应用程序具有某种样式,请不要使用它,而是在Info.plist中设置UIUserInterfaceStyle键。)
- 当设置在普通的
UIView上时:
- 此属性仅影响此视图及其子视图的特征。
- 它不会影响任何视图控制器或其他视图控制器的子视图。
- 在
UIWindow上设置时:
- 此属性会影响
rootViewController,从而影响整个视图控制器和视图层次结构。- 它还会影响该
window模态出来的界面。
由此可见,overrideUserInterfaceStyle不仅会影响自己,还会影响自己的子视图,换做window就会影响整个window中的所有视图及视图控制器,包括模态跳转出来的视图控制器。
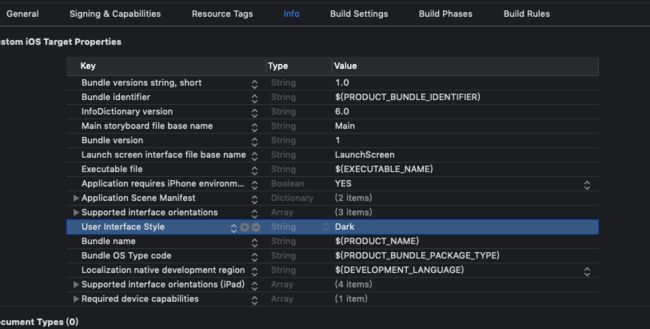
而且,文档中也特别强调了,你可以设置整个应用程序只是用某种样式,具体方法可以通过代码,也可以通过info.plist配置键User Interface Style,对应的Value为Light/Dark。
// 此方法只会影响该window及其所有子视图控制器和子视图,不会影响别的window
if #available(iOS 13.0, *) {
    window?.overrideUserInterfaceStyle = .light;
}
适配主要涉及的方面:
- 模拟器调试(simulator debug)
- 图片(assets)
- 颜色(color)
- 状态栏(status bar)
- 模态跳转(modal present)-2019.10.9更新
- ...
模拟器调试
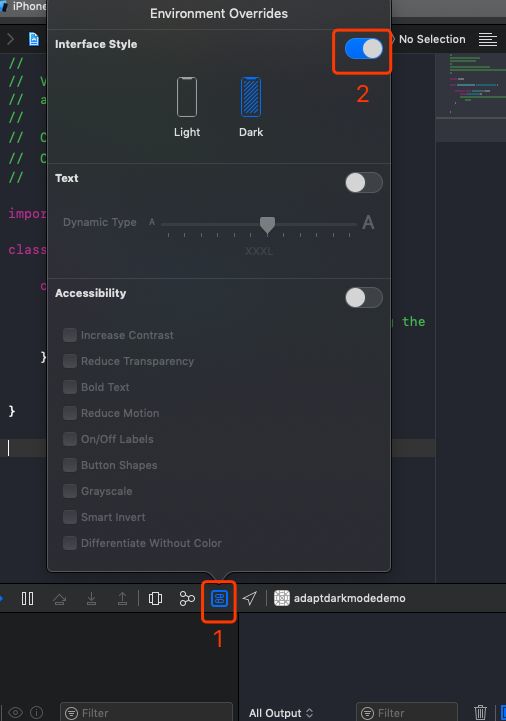
- 运行项目
- 点击Xcode底部调试栏中
Environment Overrides - 开启Interface Style,就可以切换了。
图片适配
图片适配,主要是我们本地图片资源适配,网络图片的话,还是比较繁琐的,目前我们还没做,只做下本地图片适配。
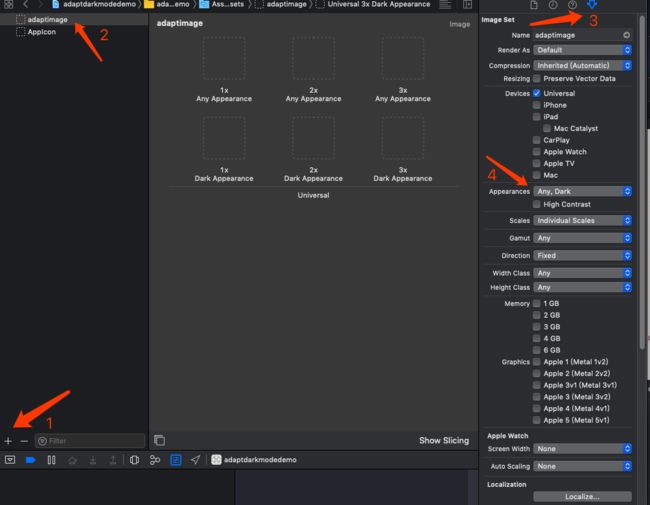
图片适配比较方便的就是通过Assets.xcassets进行图片管理:
- 添加一个image set,重命名如"adaptimage",选中该image set;
- 选中Attributes Inspector;
- 将Appearances由"None"改为"Any,Dark";
- 不同模式下设置不同图片即可,mode 改变会自动选择不同的图片
当然图片适配,你也可以直接使用判断当前系统mode的方式进行区分,就我个人而言不是很喜欢这种方式,因为还需要监听系统模式的变化,重写UITraitEnvironment协议方法traitCollectionDidChange(_:),我们先看下协议方法:
/** Trait environments expose a trait collection that describes their environment. */
public protocol UITraitEnvironment : NSObjectProtocol {

    @available(iOS 8.0, *)
    var traitCollection: UITraitCollection { get }

    /** To be overridden as needed to provide custom behavior when the environment's traits change. */
    @available(iOS 8.0, *)
    func traitCollectionDidChange(_ previousTraitCollection: UITraitCollection?)
}
所以,我们只需要在改变系统mode的时候,重写代理:
func updateImageView() {
    let image = traitCollection.userInterfaceStyle == .light ? UIImage(named: "dark-ios") : UIImage(named: "white-ios")
    imageView.image = image
}

override func traitCollectionDidChange(_ previousTraitCollection: UITraitCollection?) {
    super.traitCollectionDidChange(previousTraitCollection)
    updateImageView()
}
颜色适配
像图片适配一样,颜色适配有三种方式。
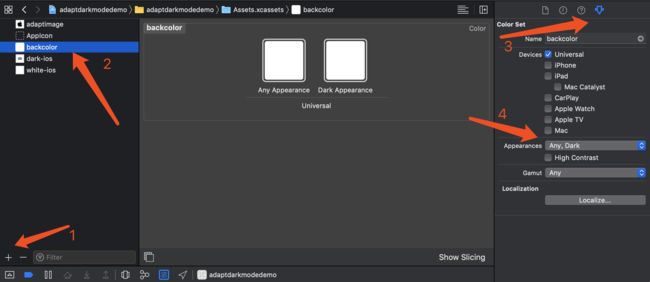
方法一:是通过Assets.xcassets添加一个Color Set,目前系统支持≥iOS11.0
extension UIColor {
    @available(iOS 11.0, *)
    public /*not inherited*/ init?(named name: String) // load from main bundle

    @available(iOS 11.0, *)
    public /*not inherited*/ init?(named name: String, in bundle: Bundle?, compatibleWith traitCollection: UITraitCollection?)
}
方法二:代码创建动态颜色init(dynamicProvider: @escaping (UITraitCollection) -> UIColor),目前系统支持≥iOS 13.0
// 方法二
let titleColor = UIColor.init(dynamicProvider: { (trait) -> UIColor in
    return trait.userInterfaceStyle == .light ? UIColor.black : UIColor.white
})
btn.setTitleColor(titleColor, for: .normal)
方法三:像图片一样,监听模式转变,重写traitCollectionDidChange(_:)方法,不推荐
状态栏(StatusBar)
目前状态栏也增加了一种模式,由之前的两种,变成了三种, 其中default由之前的黑色内容,变成了会根据系统模式,自动选择当前展示lightContent还是darkContent。
public enum UIStatusBarStyle : Int {
    case `default` // Automatically chooses light or dark content based on the user interface style

    @available(iOS 7.0, *)
    case lightContent // Light content, for use on dark backgrounds

    @available(iOS 13.0, *)
    case darkContent // Dark content, for use on light backgrounds
}
我们在使用的时候,就可以重写preferredStatusBarStyle的get方法:
override var preferredStatusBarStyle: UIStatusBarStyle{
    get{
        return .lightContent
    }
}
模态跳转(modal present)
iOS13模态跳转出来的界面,不再像之前版本是全屏的了,什么意思呢?我们看下官方的注释:
Defines the presentation style that will be used for this view controller when it is presented modally. Set this property on the view controller to be presented, not the presenter.
If this property has been set to UIModalPresentationAutomatic, reading it will always return a concrete presentation style. By default UIViewController resolves UIModalPresentationAutomatic to UIModalPresentationPageSheet, but system-provided subclasses may resolve UIModalPresentationAutomatic to other concrete presentation styles. Participation in the resolution of UIModalPresentationAutomatic is reserved for system-provided view controllers.
Defaults to UIModalPresentationAutomatic on iOS starting in iOS 13.0, and UIModalPresentationFullScreen on previous versions. Defaults to UIModalPresentationFullScreen on all other platforms.
大致意思是,如果将此属性设置为UIModalPresentationAutomatic,则读取该属性将始终返回具体的呈现样式。 默认情况下,UIViewController将UIModalPresentationAutomatic解析为UIModalPresentationPageSheet,但是系统提供的子类可以将UIModalPresentationAutomatic解析为其他具体的呈现样式。 保留UIModalPresentationAutomatic的分辨率供系统提供的视图控制器使用。从iOS 13.0开始,在iOS上默认为UIModalPresentationAutomatic,在以前的版本上默认为UIModalPresentationFullScreen。 在所有其他平台上,默认为UIModalPresentationFullScreen。
UIModalPresentationPageSheet就是下面的样子:
知道了原因,我们做适配也简单了,就是设置下属性的事:
let second = SecondViewController()
second.modalPresentationStyle = .fullScreen
present(second, animated: true, completion: nil)
目前我们iOS的适配只做了这些,后续如果有其他需要适配的地方,再更新文章。
