博文目录
一、MySQL主从复制原理
二、MySQL读写分离原理
三、搭建MySQL主从复制
四、配置MySQL读写分离
在实际生产环境中,如果对数据库的读和写都在同一个数据库服务器中操作,无论是在安全性、高可用性还是高并发等各个方面都是完全不能满足实际需求的。因此,一般来说实际生产环境中都是通过主从复制(Master——Slave)的方式来同步数据,再通过读写分离来提升数据库的并发负载能力这样的方案来进行部署与实施的。
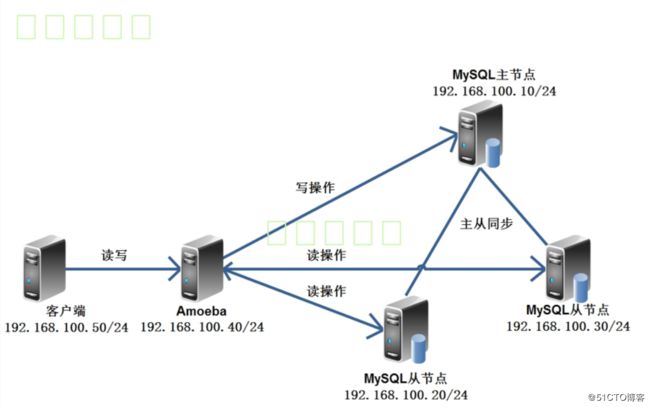
如下图所示,一台MySQL主服务器带两台MySQL从服务器做数据复制,前端应用在进行数据库写操作时,对主服务器进行操作;在进行数据库读操作时,对两台从服务器进行操作,这样大大减轻了主服务器的压力。
一、MySQL主从复制原理
MySQL的主从复制和MySQL的读写分离两者有紧密的联系,首先要部署主从复制,只有主从复制完成了,才能在此基础上进行数据的读写分离。
1、MySQL支持的复制类型
基于语句的复制:在主服务器上执行的SQL语句,在从服务器上执行同样的语句。MySQL默认采用基于语句的复制,效率比较高。
基于行的复制:把改变的内容复制过去,而不是把命令在从服务器上执行一遍;
- 混合类型的复制:默认采用基于语句的复制,一旦发现基于语句无法精确复制时,就会采用基于行的复制;
2、复制的工作过程
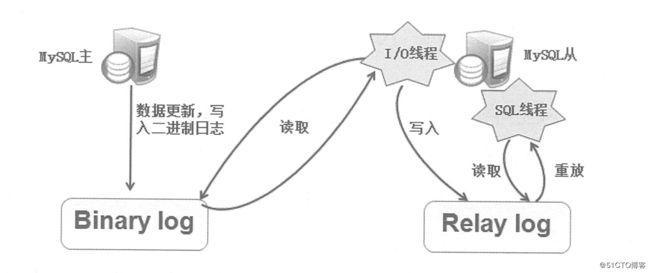
MySQL复制的工作过程如图所示:
1)在每个事物更新数据完成之前,Master在二进制日志记录这些变化。写入二进制日志完成后,Master通知存储引擎提交事务。
2)Slave将Master的Binary log复制到其中继日志。首先,Slave开始一个工作进程——I/O线程在Master上打开一个普通的连接,然后开始Binlog dump process(二进制日志转储过程)。Binlog dump process从Master的二进制日志中读取事件,如果已经跟上Master,它就会睡眠并等待Master产生新的事件。I/O线程将这些时间写入中继日志。
3)SQL slave thread(SQL从线程)处理该过程的最后一步。SQL线程从中继日志中读取事件,并重放其中的事件而更新Slave的数据,使其与Master中的数据一致,只要该线程与I/O线程保持一致,中继日志通常会位于OS的缓存中,所以中继日志的开销很小。
复制过程有一个很重要的限制,即复制在Slave上是串行化的,也就是说Master上的并行更新操作不能在Slave上并行操作。
二、MySQL读写分离原理
简单来说,读写分离就是只在主服务器上写、只在从服务器上读。基本的原理是让主数据库处理事务性查询,而从数据库处理select查询。数据库复制被用来把事务性查询导致的变更同步到群集中的从数据库。如图所示:
目前常见的MySQL读写分离分为两种:
1、基于程序代码内部实现
在代码中根据select、insert进行路由分类,这类方法也是目前生产环境应用最广泛的。优点是性能较好,因为在程序代码中实现,不需要增加额外的设备作为硬件开支,缺点是需要开发人员来实现,运维人员无从下手。
2、基于中间代理层实现
代理一般位于客户端和服务器之间,代理服务器接到客户端的请求后通过判断后转发到后端数据库,有两个代表性程序:
1)MySQL—Proxy:为MySQL开源项目,通过其自带的lua脚本进行SQL判断,虽然是MySQL官方产品。但是MySQL官方并不建议将MySQL—Proxy用到生产环境中。
2)Amoeba(变形虫):由陈思儒开发,其层就职于阿里巴巴。该程序用Java语言进行开发,阿里巴巴将其用于生产环境。它不支持事务和存储过程。
经过上述简单的比较,通过程序代码实现MySQL读写分离自然是一个不错的选择,但是并不是所有的应用都适合在程序代码中实现读写分离。例如:一些大型复杂Java应用,如果在程序代码中实现分离对代码改动较大。所以,像这种代行复杂的应用一般会考虑使用Amoeba来实现。
三、搭建MySQL主从复制
本案例所需镜像及软件请访问网盘:https://pan.baidu.com/s/10jnaPKqkqtG3j1WJEsLx8A
提取码:4j1e
1、安装NTP时间同步服务器
[root@centos01 ~]# mount /dev/cdrom /mnt/
mount: /dev/sr0 写保护,将以只读方式挂载
[root@centos01 ~]# rm -rf /etc/yum.repos.d/CentOS-*
[root@centos01 ~]# yum -y install ntp
[root@centos01 ~]# vim /etc/ntp.conf
restrict 192.168.100.0 mask 255.255.255.0 nomodify notrap
server 127.127.1.0
fudge 127.127.1.0 stratum 8
[root@centos01 ~]# systemctl start ntpd
[root@centos01 ~]# systemctl enable ntpd
2、安装MySQL及配置主节点
1)安装MySQL服务器
[root@centos01 ~]# groupadd mysql
[root@centos01 ~]# useradd -M -s /sbin/nologin mysql -g mysql

[root@centos01 ~]# yum -y install ncurses-devel
[root@centos01 ~]# umount /mnt/
[root@centos01 ~]# mount /dev/cdrom /mnt/
mount: /dev/sr0 写保护,将以只读方式挂载
[root@centos01 ~]# tar zxvf /mnt/cmake-2.8.6.tar.gz -C /usr/src/

[root@centos01 ~]# tar zxvf /mnt/mysql-5.5.22.tar.gz -C /usr/src/

[root@centos01 ~]# cd /usr/src/cmake-2.8.6/
[root@centos01 cmake-2.8.6]# ./configure && gmake && gmake install

[root@centos01 ~]# cd /usr/src/mysql-5.5.22/
[root@centos01 mysql-5.5.22]# cmake -DCMAKE_INSTALL_PREFIX=/usr/local/mysql
-DDEFAULT_CHARSET=utf8 -DDEFAULT_COLLATION=utf8_general_ci
-DWITH_EXTRA_CHARSETS=all -DSYSCONFDIR=/etc
[root@centos01 mysql-5.5.22]# make && make install
[root@centos01 mysql-5.5.22]# cp support-files/my-medium.cnf /etc/my.cnf

cp:是否覆盖"/etc/my.cnf"? y
[root@centos01 mysql-5.5.22]# cp support-files/mysql.server /etc/init.d/mysqld

[root@centos01 ~]# echo "PATH=$PATH:/usr/local/mysql/bin" >> /etc/profile
[root@centos01 ~]# source /etc/profile
[root@centos01 ~]# chmod +x /etc/init.d/mysqld
[root@centos01 ~]# chown -R mysql:mysql /usr/local/mysql/
[root@centos01 ~]# chkconfig --add mysqld
[root@centos01 ~]# chkconfig --level 35 mysqld on
[root@centos01 ~]# /usr/local/mysql/scripts/mysql_install_db --user=mysql
--basedir=/usr/local/mysql --datadir=/usr/local/mysql/data
[root@centos01 ~]# systemctl start mysqld
[root@centos01 ~]# netstat -antpu | grep mysqld
tcp        0      0 0.0.0.0:3306            0.0.0.0:*               LISTEN      22053/mysqld
[root@centos01 ~]# mysqladmin -uroot password
[root@centos01 ~]# mysqladmin -uroot -ppwd@123

[root@centos01 ~]# scp /mnt/cmake-2.8.6.tar.gz /mnt/mysql-5.5.22.tar.gz  [email protected]:/root
The authenticity of host '192.168.100.20 (192.168.100.20)' can't be established.
ECDSA key fingerprint is SHA256:PUueT9fU9QbsyNB5NC5hbSXzaWxxQavBxXmfoknXl4I.
ECDSA key fingerprint is MD5:6d:f7:95:0e:51:1a:d8:9e:7b:b6:3f:58:51:51:4b:3b.
Are you sure you want to continue connecting (yes/no)? yes
Warning: Permanently added '192.168.100.20' (ECDSA) to the list of known hosts.
[email protected]'s password:
cmake-2.8.6.tar.gz                                                  100% 5453KB  44.0MB/s   00:00
mysql-5.5.22.tar.gz                                                 100%   23MB  57.9MB/s   00:00

[root@centos01 ~]# scp /mnt/cmake-2.8.6.tar.gz /mnt/mysql-5.5.22.tar.gz  [email protected]:/root
The authenticity of host '192.168.100.30 (192.168.100.30)' can't be established.
ECDSA key fingerprint is SHA256:PUueT9fU9QbsyNB5NC5hbSXzaWxxQavBxXmfoknXl4I.
ECDSA key fingerprint is MD5:6d:f7:95:0e:51:1a:d8:9e:7b:b6:3f:58:51:51:4b:3b.
Are you sure you want to continue connecting (yes/no)? yes
Warning: Permanently added '192.168.100.30' (ECDSA) to the list of known hosts.
[email protected]'s password:
cmake-2.8.6.tar.gz                                                  100% 5453KB  44.2MB/s   00:00
mysql-5.5.22.tar.gz                                                 100%   23MB  59.2MB/s   00:00
2)配置MySQL服务器主节点
[root@centos01 ~]# vim /etc/my.cnf
log-bin=mysql-bin
log-slave-updates = true
server-id       = 10
[root@centos01 ~]# systemctl restart mysqld
[root@centos01 ~]# netstat -antpu | grep mysqld
tcp        0      0 0.0.0.0:3306            0.0.0.0:*               LISTEN      22663/mysqld

[root@centos01 ~]# mysql -uroot -ppwd@123
mysql> grant replication slave on *.* to 'slave'@'192.168.100.%' identified by 'pwd@123';

mysql> show master status;
+------------------+----------+--------------+------------------+
| File             | Position | Binlog_Do_DB | Binlog_Ignore_DB |
+------------------+----------+--------------+------------------+
| mysql-bin.000004 |      263 |              |                  |
+------------------+----------+--------------+------------------+
3、安装MySQL及配置从节点
1)安装MySQL服务器
[root@centos02 ~]# yum -y install ntpdate
[root@centos02 ~]# ntpdate 192.168.100.10
[root@centos02 ~]# groupadd mysql
[root@centos02 ~]# useradd -M -s /sbin/nologin mysql -g mysql
[root@centos02 ~]# mount /dev/cdrom /mnt/
mount: /dev/sr0 写保护,将以只读方式挂载
[root@centos02 ~]# rm -rf /etc/yum.repos.d/CentOS-*
[root@centos02 ~]# yum -y install ncurses-devel
[root@centos02 ~]# ls
anaconda-ks.cfg  cmake-2.8.6.tar.gz  initial-setup-ks.cfg  mysql-5.5.22.tar.gz
[root@centos02 ~]# tar zxvf cmake-2.8.6.tar.gz -C /usr/src/
[root@centos02 ~]# tar zxvf mysql-5.5.22.tar.gz -C /usr/src/
[root@centos02 ~]# cd /usr/src/cmake-2.8.6/
[root@centos02 cmake-2.8.6]# ./configure && gmake && gmake install
[root@centos02 ~]# cd /usr/src/mysql-5.5.22/
[root@centos02 mysql-5.5.22]# cmake -DCMAKE_INSTALL_PREFIX=/usr/local/mysql -DDEFAULT_CHARSET=utf8 -DDEFAULT_COLLATION=utf8_general_ci -DWITH_EXTRA_CHARSETS=all -DSYSCONFDIR=/etc
[root@centos02 mysql-5.5.22]# make && make install
[root@centos02 mysql-5.5.22]# cp support-files/my-medium.cnf /etc/my.cnf
[root@centos02 mysql-5.5.22]# cp support-files//mysql.server /etc/init.d/mysqld
[root@centos02 ~]# echo "PATH=$PATH:/usr/local/mysql/bin/" >> /etc/profile
[root@centos02 ~]# source /etc/profile
[root@centos02 ~]# chmod +x /etc/init.d/mysqld
[root@centos02 ~]# chown -R mysql:mysql /usr/local/mysql/
[root@centos02 ~]# chkconfig --add mysqld
[root@centos02 ~]# chkconfig --level 35 mysqld on
[root@centos02 ~]# /usr/local/mysql/scripts/mysql_install_db --user=mysql --basedir=/usr/local/mysql --datadir=/usr/local/mysql/data
[root@centos02 ~]# systemctl start mysqld
nets[root@centos02 ~]# netstat -anptu | grep mysqld
tcp        0      0 0.0.0.0:3306            0.0.0.0:*               LISTEN      35808/mysqld
2)部署MySQL服务器从节点
[root@centos02 ~]# vim /etc/my.cnf
log-bin=mysql-bin
relay-log=relay-log-bin
relay-log-index=slave-relay-bin.index
server-id       = 11
[root@centos02 ~]# systemctl restart mysqld
[root@centos02 ~]# netstat -anptu | grep mysqld
tcp        0      0 0.0.0.0:3306            0.0.0.0:*               LISTEN      36399/mysqld
mysql> change master to master_host='192.168.100.10',master_user='slave',
master_password='pwd@123',master_log_file='mysql-bin.000004',
master_log_pos=263;
mysql> start slave;
mysql> show slave status\G;
*************************** 1. row ***************************
               Slave_IO_State: Waiting for master to send event
                  Master_Host: 192.168.100.10
                  Master_User: slave
                  Master_Port: 3306
                Connect_Retry: 60
              Master_Log_File: mysql-bin.000004
          Read_Master_Log_Pos: 263
               Relay_Log_File: relay-log-bin.000002
                Relay_Log_Pos: 253
        Relay_Master_Log_File: mysql-bin.000004
             Slave_IO_Running: Yes
            Slave_SQL_Running: Yes
              Replicate_Do_DB:
          Replicate_Ignore_DB:
           Replicate_Do_Table:
       Replicate_Ignore_Table:
      Replicate_Wild_Do_Table:
  Replicate_Wild_Ignore_Table:
                   Last_Errno: 0
                   Last_Error:
                 Skip_Counter: 0
          Exec_Master_Log_Pos: 263
              Relay_Log_Space: 407
              Until_Condition: None
               Until_Log_File:
                Until_Log_Pos: 0
           Master_SSL_Allowed: No
           Master_SSL_CA_File:
           Master_SSL_CA_Path:
              Master_SSL_Cert:
            Master_SSL_Cipher:
               Master_SSL_Key:
        Seconds_Behind_Master: 0
Master_SSL_Verify_Server_Cert: No
                Last_IO_Errno: 0
                Last_IO_Error:
               Last_SQL_Errno: 0
               Last_SQL_Error:
  Replicate_Ignore_Server_Ids:
             Master_Server_Id: 10
1 row in set (0.00 sec)

ERROR:
No query specified
第二台MySQL从节点自行配置,除了MySQL主配置文件里优先级需要改动其他配置和以上配置一模一样。
4、测试MySQL服务器主从复制
[root@centos01 ~]# mysql -uroot -ppwd@123
mysql> create database liyanxin;
Query OK, 1 row affected (0.00 sec)

mysql> show databases;
+--------------------+
| Database           |
+--------------------+
| information_schema |
| liyanxin           |
| mysql              |
| performance_schema |
| test               |
+--------------------+
5 rows in set (0.00 sec)
[root@centos02 ~]# mysql -uroot -ppwd@123
mysql> show databases;
+--------------------+
| Database           |
+--------------------+
| information_schema |
| liyanxin           |
| mysql              |
| performance_schema |
| test               |
+--------------------+
5 rows in set (0.00 sec)

[root@centos03 ~]# mysql -uroot -ppwd@123
mysql> show databases;
+--------------------+
| Database           |
+--------------------+
| information_schema |
| liyanxin           |
| mysql              |
| performance_schema |
| test               |
+--------------------+
5 rows in set (0.00 sec)
四、配置MySQL读写分离
1、配置安装JDK环境
[root@centos04 ~]# mount /dev/cdrom /mnt/
mount: /dev/sr0 写保护,将以只读方式挂载
[root@centos04 ~]# rm -rf /etc/yum.repos.d/CentOS-*
[root@centos04 ~]# mkdir /usr/src/jdk
[root@centos04 ~]# cp /mnt/jdk-6u14-linux-x64.bin /usr/src/jdk/

[root@centos04 ~]# cd /usr/src/jdk/
[root@centos04 jdk]# ./jdk-6u14-linux-x64.bin
[root@centos04 jdk]# mv ./jdk1.6.0_14/* ./
[root@centos04 jdk]# rm -rf jdk1.6.0_14/
[root@centos04 ~]# chmod -R 755 /usr/src/jdk/
2、安装amoeba服务器
[root@centos04 ~]# mkdir /usr/src/amoeba
[root@centos04 ~]# tar zxvf /mnt/amoeba-mysql-binary-2.2.0.tar.gz -C /usr/src/amoeba

[root@centos04 ~]# chmod -R 755 /usr/src/amoeba/
[root@centos04 ~]# java -version
openjdk version "1.8.0_131"
OpenJDK Runtime Environment (build 1.8.0_131-b12)
OpenJDK 64-Bit Server VM (build 25.131-b12, mixed mode)
[root@centos04 ~]# vim /etc/profile.d/java.sh
export JAVA_HOME=/usr/src/jdk/
export CLASSPATH=$CLASSPATH:$JAVA_HOME/LIB:$JAVA_HOME/jre/lib
export PATH=$JAVA_HOME/lib:$JAVA_HOME/jre/bin:$PATH:$HOME/bin
export AMOEBA_HOME=/usr/src/amoeba/
export PATH=$PATH:$AMOEBA_HOME/bin
[root@centos04 ~]# source /etc/profile.d/java.sh
[root@centos04 ~]# java -version
java version "1.6.0_14"
Java(TM) SE Runtime Environment (build 1.6.0_14-b08)
Java HotSpot(TM) 64-Bit Server VM (build 14.0-b16, mixed mode)
3、配置amoeba服务器
[root@centos01 ~]# mysql -uroot -ppwd@123
mysql> grant all on *.* to 'bob'@'192.168.100.%' identified by 'pwd@123';

[root@centos04 ~]# vim /usr/src/amoeba/conf/amoeba.xml
30                                         amoeba

 31
 32                                         pwd@123

114                 1500
115                 master
116

117                 master
118                 slaves
119                 true
[root@centos04 ~]# vim /usr/src/amoeba/conf/dbServers.xml

26                         bob

28                         pwd@123

43

44
45                         192.168.100.10

46
47
48

49
50
51                         192.168.100.20

52
53
54

55
56
57                         192.168.100.30

58
59
60

61
62
63                         1
64

65                         server01,server02
66
67
[root@centos04 ~]# /usr/src/amoeba/bin/amoeba start&

[root@centos04 ~]# netstat -anptu | grep 8066
tcp6       0      0 :::8066                 :::*                    LISTEN      3153/java
[root@centos04 ~]# netstat -anptu | grep java
tcp6       0      0 :::8066                 :::*                    LISTEN      3153/java
tcp6       0      0 127.0.0.1:54084         :::*                    LISTEN      3153/java
tcp6       0      0 192.168.100.40:60980    192.168.100.30:3306     ESTABLISHED 3153/java
tcp6       0      0 192.168.100.40:44082    192.168.100.10:3306     ESTABLISHED 3153/java
tcp6       0      0 192.168.100.40:53840    192.168.100.20:3306     ESTABLISHED 3153/java
4、客户端验证
[root@centos05 ~]# mount /dev/cdrom /mnt/
mount: /dev/sr0 写保护,将以只读方式挂载
[root@centos05 ~]# rm -rf /etc/yum.repos.d/CentOS-*
[root@centos05 ~]# yum -y install mysql
[root@centos05 ~]# mysql -uamoeba -ppwd@123 -h192.168.100.40 -P8066

MySQL [(none)]> create database benet;

[root@centos01 ~]# mysql -uroot -ppwd@123

mysql> show databases;
+--------------------+
| Database           |
+--------------------+
| information_schema |
| benet              |
| mysql              |
| performance_schema |
| test               |
+--------------------+
5 rows in set (0.00 sec)
MySQL [(none)]> create table student (姓名 char(10),性别 char(3),年龄 char(4),电话
char(13),primary key(电话) );
MySQL [(none)]> use benet;
MySQL [benet]> insert into benet.student value ('马云','男','40','110120119114');
[root@centos02 ~]# mysql -uroot -ppwd@123
mysql> select * from benet.student;
+--------+--------+--------+--------------+
| 姓名   | 性别   | 年龄   | 电话         |
+--------+--------+--------+--------------+
| 马云   | 男     | 40     | 110120119114 |
+--------+--------+--------+--------------+

9)模拟从节点故障,客户端通过amoeba服务器继续写入数据
[root@centos02 ~]# mysql -uroot -ppwd@123
mysql> slave stop;
[root@centos03 ~]# mysql -uroot -ppwd@123
mysql> slave stop;
[root@centos05 ~]# mysql -uamoeba -ppwd@123 -h192.168.100.40 -P8066

MySQL [(none)]> use benet;
MySQL [benet]> insert into benet.student value ('彤彤','女','18','22222222222');

[root@centos01 ~]# mysql -uroot -ppwd@123
mysql> select * from benet.student;
+--------+--------+--------+--------------+
| 姓名   | 性别   | 年龄   | 电话         |
+--------+--------+--------+--------------+
| 马云   | 男     | 40     | 110120119114 |
| 彤彤   | 女     | 18     | 22222222222  |
+--------+--------+--------+--------------+

[root@centos02 ~]# mysql -uroot -ppwd@123
mysql> select * from benet.student;
+--------+--------+--------+--------------+
| 姓名   | 性别   | 年龄   | 电话         |
+--------+--------+--------+--------------+
| 马云   | 男     | 40     | 110120119114 |
+--------+--------+--------+--------------+

[root@centos05 ~]# mysql -uamoeba -ppwd@123 -h192.168.100.40 -P8066
MySQL [benet]> select * from benet.student;
+--------+--------+--------+--------------+
| 姓名   | 性别   | 年龄   | 电话         |
+--------+--------+--------+--------------+
| 马云   | 男     | 40     | 110120119114 |
+--------+--------+--------+--------------+
至此MySQL主从复制+读写分离已经完全实现......
—————— 本文至此结束,感谢阅读 ——————
