ElasticSearch是一个开源的分布式搜索引擎,具备高可靠性,支持非常多的企业级搜索用例。像Solr4一样,是基于Lucene构建的。支持时间时间索引和全文检索。官网:http://www.elasticsearch.org
它对外提供一系列基于java和http的api,用于索引、检索、修改大多数配置。
本文从Ubuntu1604下的Docker安装启动ElasticSearch、创建索引、搜索三方面说明ElasticSearch的易用性。
一、启动ElasticSearch
docker run -d -p 9200:9200 -p 9300:9300 elasticsearch:2
注:
-
-p 9200:9200 -p 9300:9300参数可以让运行ElasticSearch外的其他终端访问ElasticSearch; - docker加速器请参考加速器安装。
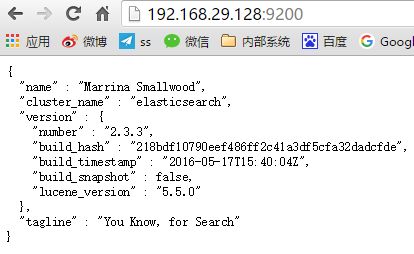
浏览器中打开http://192.168.29.128:9200/,如果结果如下:
说明安装和启动成功。
二、创建索引
在服务器上插入15条数据:
curl -XPUT 'http://localhost:9200/dept/employee/1' -d '{ "empname": "emp1"}'
curl -XPUT 'http://localhost:9200/dept/employee/2' -d '{ "empname": "emp2"}'
curl -XPUT 'http://localhost:9200/dept/employee/3' -d '{ "empname": "emp3"}'
curl -XPUT 'http://localhost:9200/dept/employee/4' -d '{ "empname": "emp4"}'
curl -XPUT 'http://localhost:9200/dept/employee/5' -d '{ "empname": "emp5"}'
curl -XPUT 'http://localhost:9200/dept/employee/6' -d '{ "empname": "emp6"}'
curl -XPUT 'http://localhost:9200/dept/employee/7' -d '{ "empname": "emp7"}'
curl -XPUT 'http://localhost:9200/dept/employee/8' -d '{ "empname": "emp8"}'
curl -XPUT 'http://localhost:9200/dept/employee/9' -d '{ "empname": "emp9"}'
curl -XPUT 'http://localhost:9200/dept/employee/10' -d '{ "empname": "emp10"}'
curl -XPUT 'http://localhost:9200/dept/employee/11' -d '{ "empname": "emp11"}'
curl -XPUT 'http://localhost:9200/dept/employee/12' -d '{ "empname": "emp12"}'
curl -XPUT 'http://localhost:9200/dept/employee/13' -d '{ "empname": "emp13"}'
curl -XPUT 'http://localhost:9200/dept/employee/14' -d '{ "empname": "emp14"}'
curl -XPUT 'http://localhost:9200/dept/employee/15' -d '{ "empname": "emp15"}'
其中http://localhost:9200/dept/employee/1的dept代表索引,employee代表文档类型,1代表文档编号。
ElasticSearch的基本概念:
ElasticSearch-->indices(索引)-->types(文档类型)-->documents(文档)
通过http://192.168.29.128:9200/dept/employee/_search查看刚才添加的所有索引,结果如下:
{
  "took": 5,
  "timed_out": false,
  "_shards": {
    "total": 5,
    "successful": 5,
    "failed": 0
  },
  "hits": {
    "total": 16,
    "max_score": 1,
    "hits": [
      {
        "_index": "dept",
        "_type": "employee",
        "_id": "14",
        "_score": 1,
        "_source": {
          "empname": "emp14"
        }
      },
      {
        "_index": "dept",
        "_type": "employee",
        "_id": "32",
        "_score": 1,
        "_source": {
          "empname": "emp32"
        }
      },
      {
        "_index": "dept",
        "_type": "employee",
        "_id": "5",
        "_score": 1,
        "_source": {
          "empname": "emp5"
        }
      },
      {
        "_index": "dept",
        "_type": "employee",
        "_id": "8",
        "_score": 1,
        "_source": {
          "empname": "emp8"
        }
      },
      {
        "_index": "dept",
        "_type": "employee",
        "_id": "9",
        "_score": 1,
        "_source": {
          "empname": "emp9"
        }
      },
      {
        "_index": "dept",
        "_type": "employee",
        "_id": "10",
        "_score": 1,
        "_source": {
          "empname": "emp10"
        }
      },
      {
        "_index": "dept",
        "_type": "employee",
        "_id": "12",
        "_score": 1,
        "_source": {
          "empname": "emp12"
        }
      },
      {
        "_index": "dept",
        "_type": "employee",
        "_id": "2",
        "_score": 1,
        "_source": {
          "empname": "emp2"
        }
      },
      {
        "_index": "dept",
        "_type": "employee",
        "_id": "4",
        "_score": 1,
        "_source": {
          "empname": "emp4"
        }
      },
      {
        "_index": "dept",
        "_type": "employee",
        "_id": "6",
        "_score": 1,
        "_source": {
          "empname": "emp6"
        }
      }
    ]
  }
}
三、简单搜索
刚才已经查看了所有新创建的索引,现在更新一下第10条记录:
curl -XPUT 'http://localhost:9200/dept/employee/10' -d '{ "empname": "emp10 emp1 emp3"}'
然后搜索empname包含emp1的文档:
http://192.168.29.128:9200/dept/employee/_search?q=empname:emp1
结果如下:
{
  "took": 12,
  "timed_out": false,
  "_shards": {
    "total": 5,
    "successful": 5,
    "failed": 0
  },
  "hits": {
    "total": 2,
    "max_score": 1.4054651,
    "hits": [
      {
        "_index": "dept",
        "_type": "employee",
        "_id": "1",
        "_score": 1.4054651,
        "_source": {
          "empname": "emp1"
        }
      },
      {
        "_index": "dept",
        "_type": "employee",
        "_id": "10",
        "_score": 1.1263815,
        "_source": {
          "empname": "emp10 emp1 emp3"
        }
      }
    ]
  }
}
上面通过http get的方式进行的搜索也可以用DSL(Domain Specific Language特定领域语言)代替,结果一样:
{
  "query" : {
    "match" : {
      "empname" : "emp1"
    }
  }
}
结束
暂时记录这么多,为了快速上手,并说明ElasticSearch的易用性。
参考文档:
- ElasticSearch权威指南
- docker环境搭建elasticsearch
