搭建Zabbix监控
一,搭建Zabbix监控 服务器 192.168.4.21
1.1 部署服务运行环境 (LAMP/LNMP)
1.2 安装zabbix 软件(源码)
软件包:
zabbix-3.2.3.tar.gz
php-bcmath-5.4.45-13.el7.remi.x86_64.rpm
php-mbstring-5.4.45-13.el7.remi.x86_64.rpm
1.2.1 安装准备
# yum -y install gcc gcc-c++//安装编译工具
# rpm -q gcc gcc-c++
gcc-4.8.5-4.el7.x86_64
gcc-c++-4.8.5-4.el7.x86_64
# useradd zabbix//创建运行帐号
1.2.2 安装Zabbix
# tar -zxf zabbix-3.2.3.tar.gz
# cd zabbix-3.2.3/
# ./configure --help
--prefix=PREFIX install architecture-independent files in PREFIX
[/usr/local]
--enable-server Turn on build of Zabbix server
--enable-agent Turn on build of Zabbix agent and client utilities
--with-mysql[=ARG] use MySQL client library [default=no], optionally
specify path to mysql_config
# ./configure --prefix=/usr/local/zabbix --enable-server --enable-agent --with-mysql
...
Now run 'make install'
...
# make install
# ls /usr/local/zabbix/
bin etc lib sbin share
1.2.3 做初始化配置
# cp -r frontends/php/ /var/www/html/zabbix
# ls /var/www/html/zabbix/
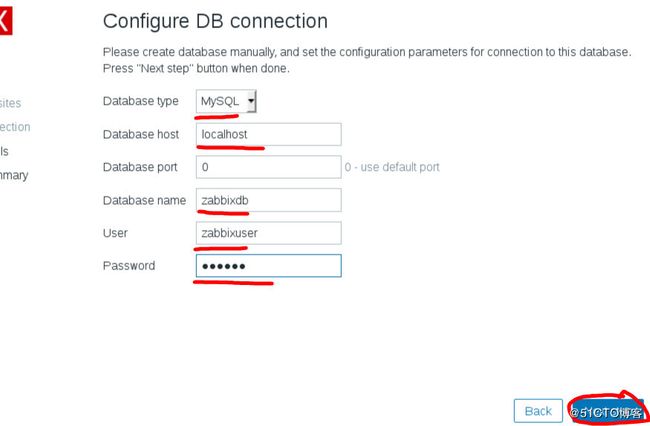
# mysql -uroot -p123456
MariaDB [(none)]> create database zabbixdb;
MariaDB [(none)]> grant all on zabbixdb.* to zabbixuser@'localhost' identified by '123456';
# cd /root/zabbix/zabbix-3.2.3/database/mysql/
# ls
data.sql images.sql schema.sql
# mysql -uzabbixuser -p123456 zabbixdb < schema.sql
# mysql -uzabbixuser -p123456 zabbixdb < images.sql
# mysql -uzabbixuser -p123456 zabbixdb < data.sql
# firefox http://192.168.4.21/zabbix
# vim /etc/php.ini
672 post_max_size = 16M
384 max_execution_time = 300
394 max_input_time = 300
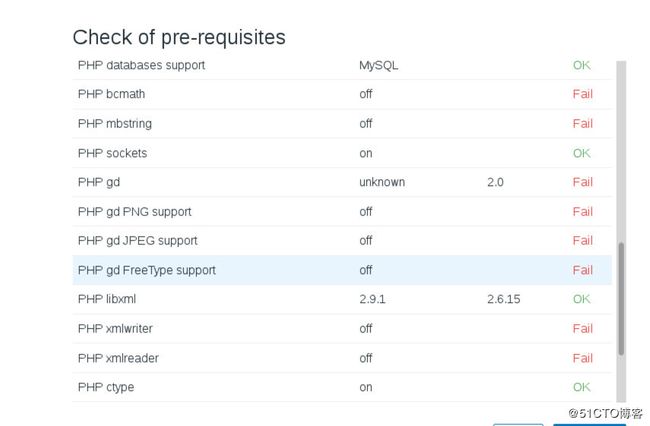
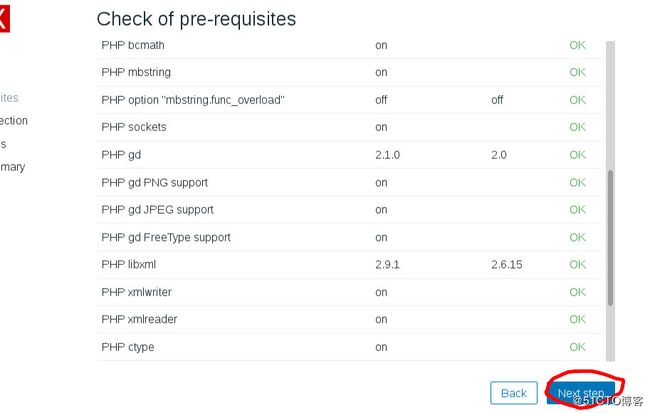
# yum list | grep -i php-gd
php-gd.x86_64 5.4.16-36.el7_1 dvd
# yum -y install php-gd.x86_64
# yum list | grep -i php-xml
php-xml.x86_64 5.4.16-36.el7_1 dvd
php-xmlrpc.x86_64 5.4.16-36.el7_1 dvd
# yum -y install php-xml
# rpm -ivh --nodeps php-mbstring-5.4.45-13.el7.remi.x86_64.rpm
# rpm -ivh --nodeps php-bcmath-5.4.45-13.el7.remi.x86_64.rpm
# chmod o+w /var/www/html/zabbix/conf
# ls /var/www/html/zabbix/conf
maintenance.inc.php zabbix.conf.php zabbix.conf.php.example
# cat /var/www/html/zabbix/conf/zabbix.conf.php
// Zabbix GUI configuration file.
global $DB;
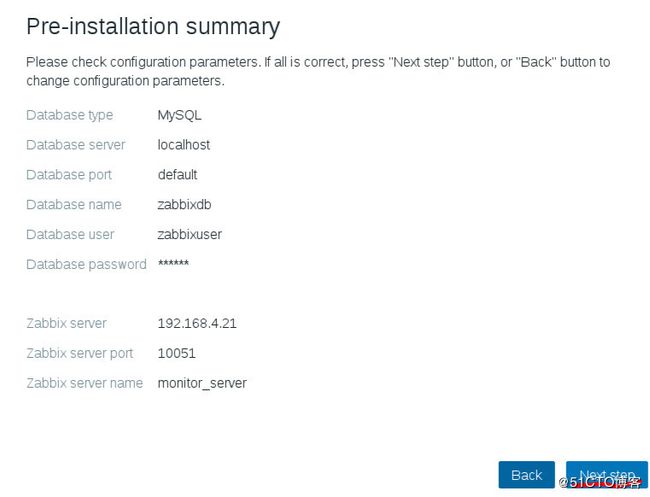
$DB['TYPE'] = 'MYSQL';
$DB['SERVER'] = 'localhost';
$DB['PORT'] = '0';
$DB['DATABASE'] = 'zabbixdb';
$DB['USER'] = 'zabbixuser';
$DB['PASSWORD'] = '123456';
// Schema name. Used for IBM DB2 and PostgreSQL.
$DB['SCHEMA'] = '';
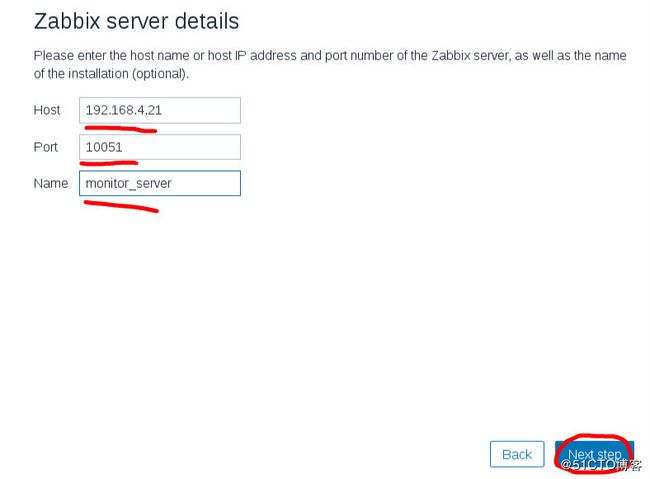
$ZBX_SERVER = '192.168.4.21';
$ZBX_SERVER_PORT = '10051';
$ZBX_SERVER_NAME = 'monitor_server';
$IMAGE_FORMAT_DEFAULT = IMAGE_FORMAT_PNG;
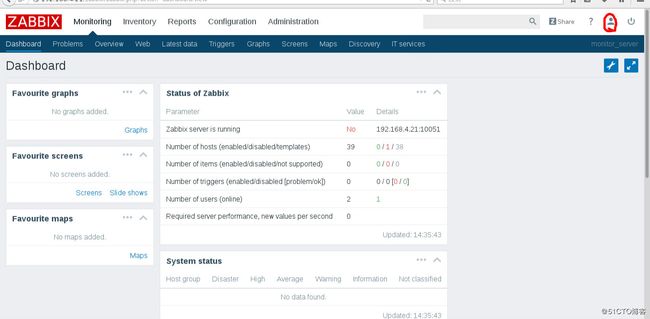
登录管理页面
初始用户名 admin 初始密码 zabbix
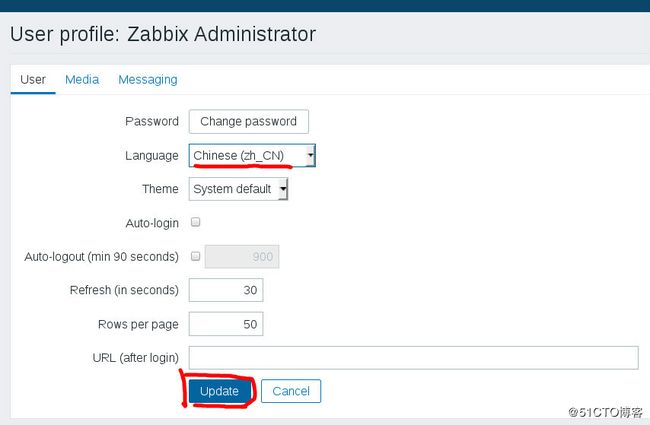
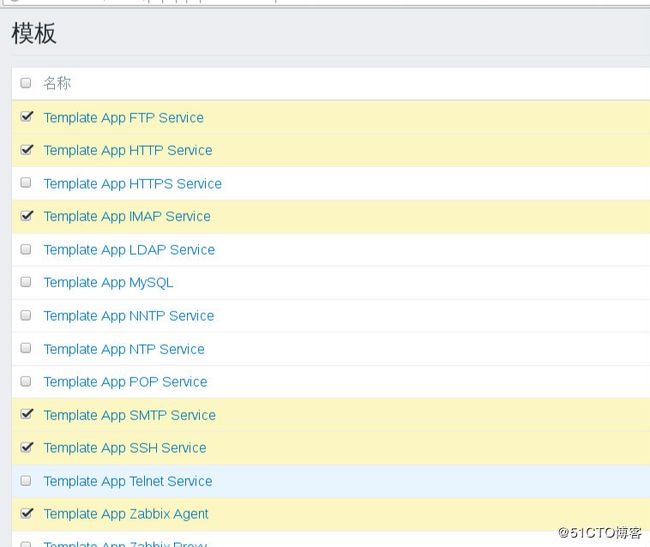
软件使用 :修改语言 修改管理员登录密码 监控模版 监控主机
1.2.4 修改配置文件
# vim /usr/local/zabbix/etc/zabbix_server.conf
38 LogFile=/tmp/zabbix_server.log//日志 记录启动信息
87 DBName=zabbixdb
103 DBUser=zabbixuser
111 DBPassword=123456
# cp /root/zabbix/zabbix-3.2.3/misc/init.d/fedora/core/zabbix_server /etc/init.d/
# chmod +x /etc/init.d/zabbix_server
# sed -i '22s;/usr/local;/usr/local/zabbix;' /etc/init.d/zabbix_server
# sed -n '22p' /etc/init.d/zabbix_server
BASEDIR=/usr/local/zabbix/
1.2.5 启动服务
# chkconfig --add zabbix_server
# chkconfig --list zabbix_server
# systemctl start zabbix_server
# systemctl status zabbix_server
# systemctl enable zabbix_server
# netstat -pantu | grep :10051
tcp 0 0 0.0.0.0:10051 0.0.0.0:* LISTEN 29635/zabbix_server
tcp 0 0 192.168.4.21:40338 192.168.4.21:10051 TIME_WAIT -
tcp 0 0 192.168.4.21:40337 192.168.4.21:10051 TIME_WAIT -
tcp 0 0 192.168.4.21:40336 192.168.4.21:10051 TIME_WAIT -
tcp 0 0 192.168.4.21:40335 192.168.4.21:10051 TIME_WAIT -
tcp 0 0 192.168.4.21:40334 192.168.4.21:10051 TIME_WAIT -
tcp 0 0 192.168.4.21:40339 192.168.4.21:10051 TIME_WAIT -
二,监控远端主机 192.168.4.12
2.1.1 配置被监控端 12
a 运行 zabbix_agentd 服务 : 装包 修改配置文件 启动服务
# rpm -q gcc gcc-c++
gcc-4.8.5-4.el7.x86_64
gcc-c++-4.8.5-4.el7.x86_64
# useradd zabbix
# tar -zxf zabbix-3.2.3.tar.gz
# cd zabbix-3.2.3/
# ./configure --prefix=/usr/local/zabbix --enable-agent
# make install
# ls /usr/local/zabbix/
bin etc lib sbin share
# vim /usr/local/zabbix/etc/zabbix_agentd.conf
30 LogFile=/tmp/zabbix_agentd.log//服务日志文件 目录
91 Server=127.0.0.1,192.168.4.21//允许连接服务地址
132 ServerActive=192.168.4.21:10051//监控服务器的IP 和端口
# cp misc/init.d/fedora/core/zabbix_agentd /etc/init.d/
# chmod +x /etc/init.d/zabbix_agentd
# chkconfig --add zabbix_agentd
# sed -i '22s;/usr/local;/usr/local/zabbix;' /etc/init.d/zabbix_agentd
# sed -n '22p' /etc/init.d/zabbix_agentd
# systemctl daemon-reload
# systemctl start zabbix_agentd
# systemctl enable zabbix_agentd
# netstat -pantu | grep :10050
tcp 0 0 0.0.0.0:10050 0.0.0.0:* LISTEN 17579/zabbix_agentd
2.1.2 配置监控服务器 21
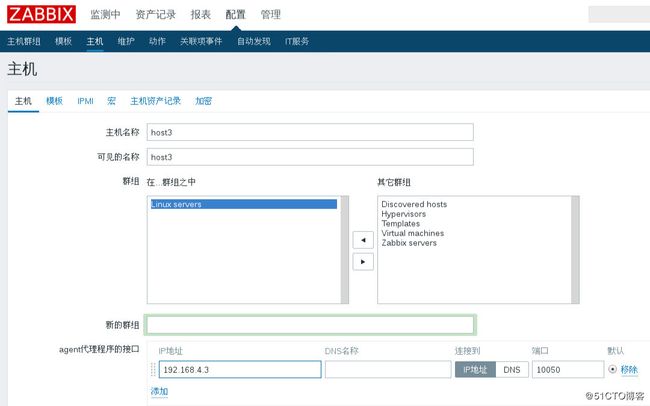
登录管理界面 添加监控新主机 查看监控信息
三.监控本机
a 运行 zabbix_agentd 服务 : 修改配置文件 启动服务
# vim /usr/local/zabbix/etc/zabbix_agentd.conf
# sed -n '132p' /usr/local/zabbix/etc/zabbix_agentd.conf
ServerActive=127.0.0.1:10051
# cp /root/zabbix/zabbix-3.2.3/misc/init.d/fedora/core/zabbix_agentd /etc/init.d/
# chmod +x /etc/init.d/zabbix_agentd
# chkconfig --add zabbix_agentd
# sed -i '22s;/usr/local;/usr/local/zabbix;' /etc/init.d/zabbix_agentd
# sed -n '22p' /etc/init.d/zabbix_agentd
# systemctl daemon-reload
# systemctl start zabbix_agentd
# systemctl enable zabbix_agentd
# netstat -pantu | grep :10050
tcp 0 0 0.0.0.0:10050 0.0.0.0:* LISTEN 4970/zabbix_agentd
b 登录管理界面 添加监控新主机 查看监控信息
系统自动生成监控主机 主机名为Zabbix server
四. 自定义监控
环境准备 监控主机192.168.4.3上 sshd httpd
# systemctl stop firewalld
# setenforce 0
# sed -n '42p' /etc/httpd/conf/httpd.conf
Listen 8090
# systemctl restart httpd
# netstat -pantu | grep httpd
tcp6 0 0 :::8090 :::* LISTEN 2994/httpd
# sed -n '17p' /etc/ssh/sshd_config
Port 2222
# systemctl restart sshd
# netstat -pantu | grep sshd
tcp 0 0 0.0.0.0:2222 0.0.0.0:* LISTEN 3085/sshd
# yum -y install gcc gcc-c++
# useradd zabbix
# scp 192.168.4.21:/root/zabbix/zabbix-3.2.3.tar.gz /root/
# tar -zxf zabbix-3.2.3.tar.gz
# cd zabbix-3.2.3/
# ./configure --prefix=/usr/local/zabbix --enable-agent
# make install
# ls /usr/local/zabbix/
bin etc lib sbin share
# sed -ri '91s/(.*)/\1,192.168.4.21/' /usr/local/zabbix/etc/zabbix_agentd.conf
# sed -n '91p;' /usr/local/zabbix/etc/zabbix_agentd.conf
Server=127.0.0.1,192.168.4.21
# sed -i '132s/172.0.0.1/192.168.4.21:10051/' /usr/local/zabbix/etc/zabbix_agentd.conf
# sed -n '132p' /usr/local/zabbix/etc/zabbix_agentd.conf
ServerActive=192.168.4.21:10051
# cp /root/zabbix-3.2.3/misc/init.d/fedora/core/zabbix_agentd /etc/init.d/
# chmod +x /etc/init.d/zabbix_agentd
# sed -i '22s;/usr/local;/usr/local/zabbix;' /etc/init.d/zabbix_agentd
# sed -n '22p' /etc/init.d/zabbix_agentd
BASEDIR=/usr/local/zabbix
# chkconfig --add zabbix_agentd
# systemctl enable zabbix_agentd
# systemctl start zabbix_agentd
# netstat -pantu | grep :10050
tcp 0 0 0.0.0.0:10050 0.0.0.0:* LISTEN 10480/zabbix_agentd
使用软件自带的命令定义监控项
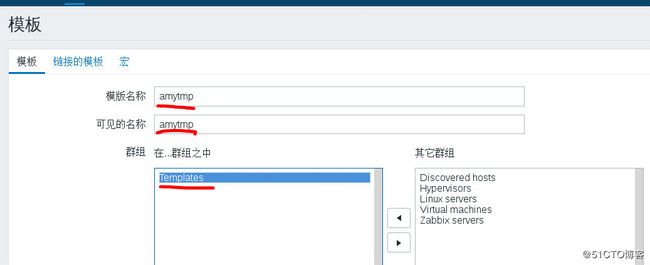
1)创建监控模版 amytmp
配置 ---> 模版 ---> 创建模版
2)创建应用集someser
![]()
3)创建监控项(名称 命令)
![]()
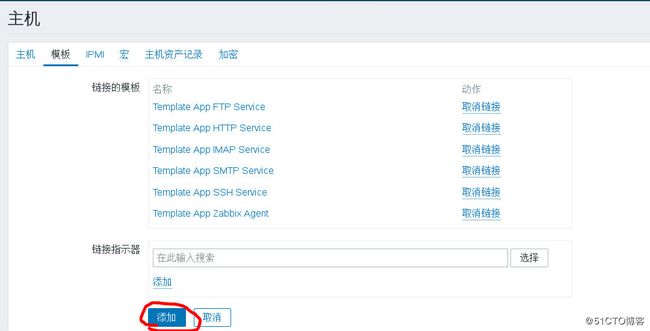
4)监控主机时 调用自定义模版
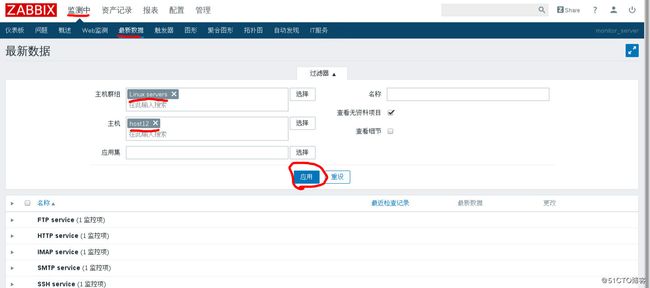
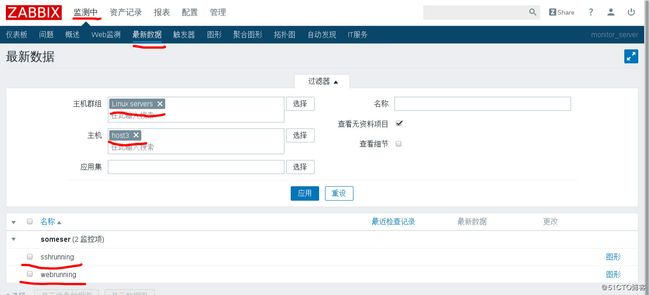
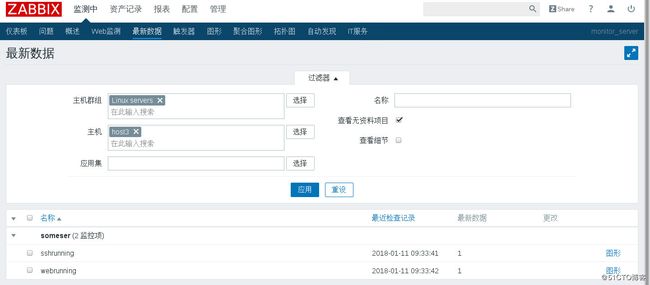
5)查看监控信息
测试 监控信息
# systemctl stop httpd
五.自定义命令 定义监控项
1)配置被监控端 主机3
a 启用自定义监控项功能
# vim /usr/local/zabbix/etc/zabbix_agentd.conf
263 Include=/usr/local/zabbix/etc/zabbix_agentd.conf.d/*.conf//声明自定义监控命令文件目录
278 UnsafeUserParameters=1//允许自定义
282 # Format: UserParameter=
b 定义监控命令
# vim /usr/local/zabbix/etc/zabbix_agentd.conf.d/getuser.conf
UserParameter=get_sum_users,cat /etc/passwd | wc -l
UserParameter=get_login_users,grep -c "/bin/bash" /etc/passwd
UserParameter=get_nologin_users,grep -v -c "/bin/bash" /etc/passwd
c 重启服务 zabbix_agentd
# systemctl restart zabbix_agentd.service
# netstat -pantu | grep zabbix_agentd
tcp 0 0 0.0.0.0:10050 0.0.0.0:* LISTEN 6399/zabbix_agentd
d 测试配置
# cd /usr/local/zabbix/bin/
# ls
zabbix_get zabbix_sender
# ./zabbix_get -h//查看命令帮助
# ./zabbix_get -s 127.0.0.1 -p 10050 -k get_sum_users
45
# ./zabbix_get -s 127.0.0.1 -p 10050 -k get_login_users
3
# ./zabbix_get -s 127.0.0.1 -p 10050 -k get_nologin_users
42
2)配置监控服务器
a 测试能否时用监控端定义的命令
# cd /usr/local/zabbix/bin/
# ls
zabbix_get zabbix_sender
# ./zabbix_get -s 192.168.4.3 -p 10050 -k get_sum_users
45
# ./zabbix_get -s 192.168.4.3 -p 10050 -k get_login_users
3
# ./zabbix_get -s 192.168.4.3 -p 10050 -k get_nologin_users
42
c 监控主机时 调用自定义模版
d 查看监控信息
测试 监控信息
# useradd test
六. 监控报警
监控 主机3 当系统的总用户数大于50时 发报警邮件
给 zabbix@localhost 邮箱帐号
1)准备邮件服务器
# systemctl restart postfix.service
//收件人 zabbix@localhost
//发件人 root@localhost
测试邮件服务器
# echo 'test' | mail -s 'test' zabbix
# mail -u zabbix
Heirloom Mail version 12.5 7/5/10. Type ? for help.
"/var/mail/zabbix": 1 message 1 new
>N 1 root Wed Jan 10 22:23 18/595 "test"
&
2) 创建触发器 名称 ---> 监控项名称
3)创建动作 名称 ---> 动作:发邮件
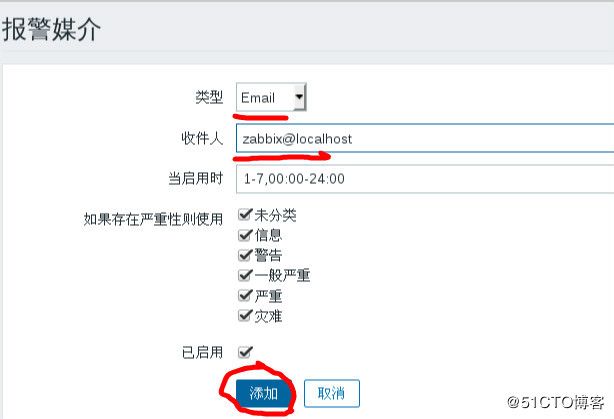
3) 指定收件人
5)测试:触发器被触发后 收件人是否收到邮件
# useradd test1
# useradd test2
# useradd test3
# useradd test4
# useradd test5
# cat /etc/passwd | wc -l
51
//查看本机 邮箱
# mail -u zabbix
Heirloom Mail version 12.5 7/5/10. Type ? for help.
"/var/mail/zabbix": 2 messages 1 new 2 unread
U 1 root Wed Jan 10 22:23 19/605 "test"
>N 2 [email protected] Wed Jan 10 22:50 22/996 "taruserbig50"
& 2
Message 2:
From [email protected] Wed Jan 10 22:50:03 2018
Return-Path:
X-Original-To: zabbix@localhost
Delivered-To: [email protected]
From:
To:
Date: Wed, 10 Jan 2018 22:50:03 -0500
Subject: taruserbig50
Content-Type: text/plain; charset="UTF-8"
Status: R
Trigger: taruserbig50
Trigger status: PROBLEM
Trigger severity: Warning
Trigger URL:
Item values:
1. sumusers (host3:get_sum_users): 51
2. *UNKNOWN* (*UNKNOWN*:*UNKNOWN*): *UNKNOWN*
3. *UNKNOWN* (*UNKNOWN*:*UNKNOWN*): *UNKNOWN*
Original event ID: 26&
# userdel -r test5
# userdel -r test4
# userdel -r test3
# userdel -r test2
# cat /etc/passwd | wc -l
47


