系列文章
python爬虫实战(1) -- 抓取boss直聘招聘信息
python爬虫实战(2) -- MongoDB和数据清洗
python爬虫实战(3) -- 数据可视化
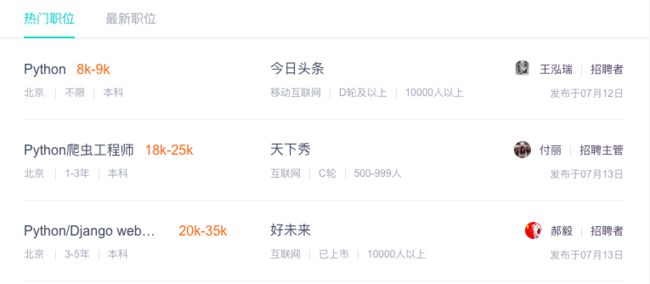
实验内容:爬取boss直聘的岗位信息,存储在数据库,最后通过可视化展示出来
参考:jtahstu https://segmentfault.com/a/1190000012390223
0 环境搭建
- MacBook Air (13-inch, 2017)
- CPU:1.8 GHz Intel Core i5
- RAM:8 GB 1600 MHz DDR3
- IDE:anaconda3.6 | jupyter notebook
- Python版本:Python 3.6.5 :: Anaconda, Inc.
1 安装scrapy
过程在参考链接中,我只说与上面不一致的地方
pip install scrapy
- 遇到报错,无法调用gcc
*解决方案:mac自动弹出安装gcc提示框,点击“安装”即可 - 安装成功,安装过程中,终端打印出“distributed 1.21.8 requires msgpack, which is not installed.”
- 解决方案:
conda install -c anaconda msgpack-python
pip install msgpack
参考:https://stackoverflow.com/questions/51050257/distributed-1-21-8-requires-msgpack-which-is-not-installed
2 新建项目
scrapy startproject www_zhipin_com
可以通过 scrapy -h 了解功能
tree这个命令挺好用,微软cmd中自带,Python没有自带的,可以参考网上代码,自己写一个玩玩。
3 定义要抓取的item
与源代码基本一致
# -*- coding: utf-8 -*-

# Define here the models for your scraped items
#
# See documentation in:
# https://doc.scrapy.org/en/latest/topics/items.html

import scrapy


class WwwZhipinComItem(scrapy.Item):
    # define the fields for your item here like:
    # name = scrapy.Field()
    pid = scrapy.Field()
    positionName = scrapy.Field()
    positionLables = scrapy.Field()
    city = scrapy.Field()
    experience = scrapy.Field()
    educational = scrapy.Field()
    salary = scrapy.Field()
    company = scrapy.Field()
    industryField = scrapy.Field()
    financeStage = scrapy.Field()
    companySize = scrapy.Field()
    time = scrapy.Field()
    updated_at = scrapy.Field()
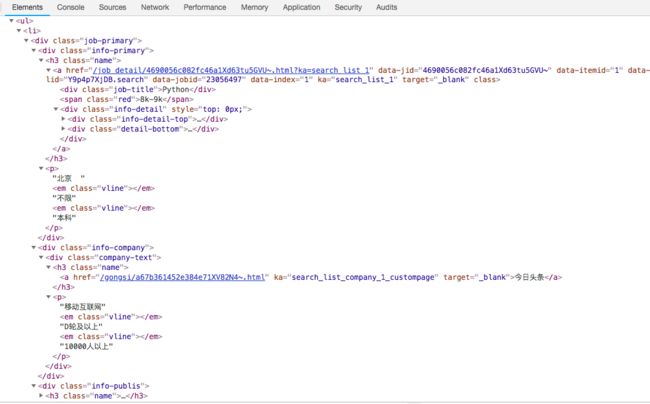
4 分析页面
现在页面改版了,发布时间有了小幅度调整
5 爬虫代码
这一步有些看不懂,硬着头皮往下写,不懂得先记着
5.1关于request headers
比如headers中,我在自己的浏览器中找不到下面内容
x-devtools-emulate-network-conditions-client-id ??
postman-token ??
参考有x-devtools的网页
https://bbs.csdn.net/topics/390893160
http://www.cnblogs.com/iloverain/p/9198217.html
我该学习一下request headers中内容
目前采用的方法是把作者的headers拷贝过去,然后我这边有的我替换掉,没有的比如x-devtools我就用作者原有的。
5.2 关于extract_first()和extract()
scrapy实战还是蛮多的
看到有个爬取豆瓣内容的 https://www.jianshu.com/p/f36460267ac2
extract_first()和extract()的区别:
提取全部内容: .extract(),获得是一个列表
提取第一个:.extract_first(),获得是一个字符串
Selectors根据CSS表达式从网页中选择数据(CSS更常用)
response.selector.css('title::text') ##用css选取了title的文字内容
由于selector.css使用比较普遍,所以专门定义了css,所以上面也可以写成:
response.css('title::text')
看到有个运维学python的,使用py3.6,写的很实战,mark
运维学python之爬虫高级篇(五)scrapy爬取豆瓣电影TOP250
运维学python之爬虫高级篇(四)Item Pipeline介绍(附爬取网站获取图片到本地代码)
运维学python之爬虫高级篇(三)spider和items介绍
运维学python之爬虫高级篇(二)用Scrapy框架实现简单爬虫
运维学python之爬虫高级篇(一)Scrapy框架入门
运维学python之爬虫中级篇(九)Python3 MySQL 数据库连接
运维学python之爬虫中级篇(八)MongoDB
运维学python之爬虫中级篇(七)Sqlite3
运维学python之爬虫中级篇(六)基础爬虫
运维学python之爬虫中级篇(五)数据存储(无数据库版)
运维学python之爬虫中级篇(四)网络编程
运维学python之爬虫中级篇(三)分布式进程
运维学python之爬虫中级篇(二)线程、协程
运维学python之爬虫中级篇(一)进程
运维学python之爬虫工具篇(六)Pyquery的用法
运维学python之爬虫工具篇(五)Selenium的用法
运维学python之爬虫工具篇(四)PhantomJS的用法
运维学python之爬虫工具篇(三)Xpath语法与lxml库的用法
运维学python之爬虫工具篇(二)Beautiful Soup的用法
运维学python之爬虫工具篇(一)Requests库的用法
运维学python之爬虫基础篇实战(七)爬取伯乐在线面向对象图片
运维学python之爬虫基础篇实战(六)爬取百度贴吧
运维学python之爬虫基础篇(五)正则表达式
运维学python之爬虫基础篇(四)Cookie
运维学python之爬虫基础篇(三)urllib模块高级用法
运维学python之爬虫基础篇(二)urllib模块使用
运维学python之爬虫基础篇(一)开篇
运行脚本,会在项目目录下生成一个包含爬取数据的item.json文件
scrapy crawl zhipin -o item.json
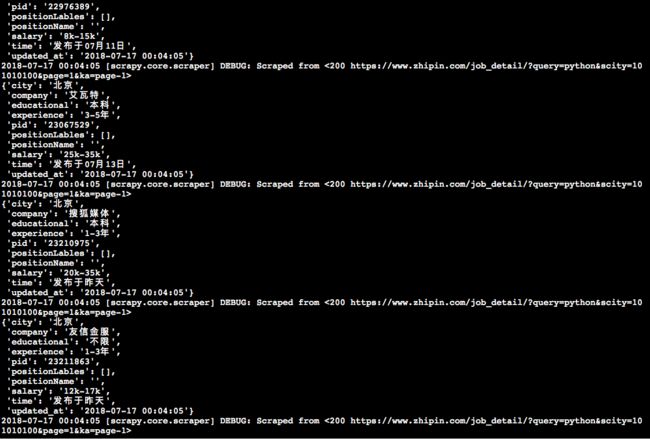
debug完最后一个错误之后,第五步终于跑通了,截个图
存入json文件的模样有点奇怪,没汉字,第六步应该会解决:
{"pid": "23056497", "positionName": "", "salary": "8k-9k", "city": "\u5317\u4eac", "experience": "\u4e0d\u9650", "educational": "\u672c\u79d1", "company": "\u4eca\u65e5\u5934\u6761", "positionLables": [], "time": "\u53d1\u5e03\u4e8e07\u670812\u65e5", "updated_at": "2018-07-17 00:04:05"},
{"pid": "23066797", "positionName": "", "salary": "18k-25k", "city": "\u5317\u4eac", "experience": "1-3\u5e74", "educational": "\u672c\u79d1", "company": "\u5929\u4e0b\u79c0", "positionLables": [], "time": "\u53d1\u5e03\u4e8e07\u670813\u65e5", "updated_at": "2018-07-17 00:04:05"},
第五步因为网页发生改版,所以发布时间time这块需要修改一下,其他都没有问题。
我也把源码贴一下:
# 2018-07-17
# Author limingxuan
# [email protected]
# blog:https://www.jianshu.com/p/a5907362ba72

import scrapy
import time
from www_zhipin_com.items import WwwZhipinComItem

class ZhipinSpider(scrapy.Spider):
    name = 'zhipin'
    allowed_domains = ['www.zhipin.com']
    start_urls = ['http://www.zhipin.com/']
    positionUrl = 'https://www.zhipin.com/job_detail/?query=python&scity=101010100'
    curPage = 1
    #我的浏览器找不到源码中的一些字段,比如
    #x-devtools-emulate-network-conditions-client-id
    #upgrade-insecure-requests
    #dnt
    #cache-control
    #postman-token
    #所以就没有加,按我的浏览器查到的信息填写的,现在看起来貌似也能跑起来
    headers = {
    'accept': "application/json, text/javascript, */*; q=0.01",
    'accept-encoding': "gzip, deflate, br",
    'accept-language': "zh-CN,zh;q=0.9,en;q=0.8",
    'content-type': "application/x-www-form-urlencoded; charset=UTF-8",
    'cookie': "JSESSIONID=""; __c=1530137184; sid=sem_pz_bdpc_dasou_title; __g=sem_pz_bdpc_dasou_title; __l=r=https%3A%2F%2Fwww.zhipin.com%2Fgongsi%2F5189f3fadb73e42f1HN40t8~.html&l=%2Fwww.zhipin.com%2Fgongsir%2F5189f3fadb73e42f1HN40t8~.html%3Fka%3Dcompany-jobs&g=%2Fwww.zhipin.com%2F%3Fsid%3Dsem_pz_bdpc_dasou_title; Hm_lvt_194df3105ad7148dcf2b98a91b5e727a=1531150234,1531231870,1531573701,1531741316; lastCity=101010100; toUrl=https%3A%2F%2Fwww.zhipin.com%2Fjob_detail%2F%3Fquery%3Dpython%26scity%3D101010100; Hm_lpvt_194df3105ad7148dcf2b98a91b5e727a=1531743361; __a=26651524.1530136298.1530136298.1530137184.286.2.285.199",
    'origin': "https://www.zhipin.com",
    'referer': "https://www.zhipin.com/job_detail/?query=python&scity=101010100",
    'user-agent': "Mozilla/5.0 (Macintosh; Intel Mac OS X 10_13_5) AppleWebKit/537.36 (KHTML, like Gecko) Chrome/67.0.3396.99 Safari/537.36"
    }

    def start_requests(self):
        return [self.next_request()]

    def parse(self,response):
        print("request -> " + response.url)
        job_list = response.css('div.job-list > ul > li')
        for job in job_list:
            item = WwwZhipinComItem()
            job_primary = job.css('div.job-primary')
            item['pid'] = job.css(
                'div.info-primary > h3 > a::attr(data-jobid)').extract_first().strip()

            #job-title这里和源码不同,页面改版所导致
            item['positionName'] = job_primary.css(
                'div.info-primary > h3 > a > div.job-title::text').extract_first().strip()
            item['salary'] = job_primary.css(
                'div.info-primary > h3 > a > span::text').extract_first().strip()
            #提取全部内容: .extract(),获得是一个列表
            #提取第一个:.extract_first(),获得是一个字符串
            info_primary = job_primary.css(
                'div.info-primary > p::text').extract()
            item['city'] = info_primary[0].strip()
            item['experience'] = info_primary[1].strip()
            item['educational'] = info_primary[2].strip()
            item['company'] = job_primary.css(
                'div.info-company > div.company-text > h3 > a::text').extract_first().strip()
            company_infos = job_primary.css(
                'div.info-company > div.company-text > p::text').extract()
            if len(company_infos)== 3:
                item['industryField'] = company_infos[0].strip()
                item['financeStage'] = company_infos[1].strip()
                item['companySize'] = company_infos[2].strip()

            #页面改版,已没有标签,所以这一段代码
            item['positionLables'] = job.css(
                'li > div.job-tags > span::text').extract()

            #Python strip() 方法用于移除字符串头尾指定的字符(默认为空格)或字符序列。
            #注意:该方法只能删除开头或是结尾的字符,不能删除中间部分的字符。
            #此处页面已改版,和源代码不同
            item['time'] = job_primary.css(
                'div.info-publis > p::text').extract_first().strip()

            item['updated_at'] = time.strftime("%Y-%m-%d %H:%M:%S",time.localtime())
            yield item

        self.curPage += 1
        time.sleep(5) #爬的慢一点,免得被封ip
        yield self.next_request()

    def next_request(self):
        return scrapy.http.FormRequest(
            self.positionUrl + ("&page=%d&ka=page-%d" %
                               (self.curPage, self.curPage)),
            headers=self.headers,
            callback=self.parse)
5.3 json数据汉化
还记得之前贴出来的item.json文件吗,全是英文和字符,按照这一步,重新爬取,将转换成汉字
Point 1 设置 UTF-8 编码
但是不巧,往往这是一个 Unicode 编码的文件,所以需要加个设置
在 settings.py中添加(PS:也可以在运行的时候带上这个参数)FEED_EXPORT_ENCODING = 'utf-8'
重新爬取后
{"pid": "23200059", "positionName": "高级后端工程师(Python)", "salary": "20k-40k", "city": "北京", "experience": "3-5年", "educational": "本科", "company": "Kavout", "positionLables": [], "time": "发布于昨天", "updated_at": "2018-07-17 12:43:14"},
{"pid": "23199912", "positionName": "Python开发工程师", "salary": "12k-16k", "city": "北京", "experience": "3-5年", "educational": "本科", "company": "北京南天", "positionLables": [], "time": "发布于昨天", "updated_at": "2018-07-17 12:43:14"},
预告
下一篇,python爬虫实战(2) -- MongoDB和数据清洗


