最近有个项目需要迁移,项目中数据库用的是oracle,期间折腾了好久,特此记录。
一,下载Oracle
1,首先下载Oracle 11gR2,地址如下:
http://www.oracle.com/technetwork/database/enterprise-edition/downloads/index.html?spm=a2c4e.11153940.blogcont566703.10.36ae6c23iChOrf
2,在页面上方勾选同意许可:
3,在下方选择对应的oracle版本,这里选择11gR2的linux x86_64版本: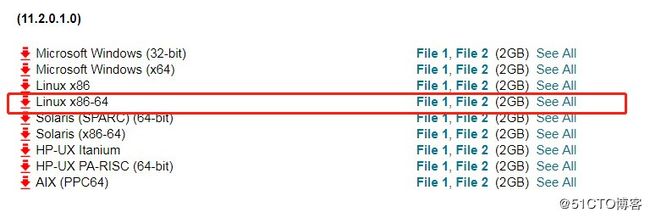
一共有两个文件,注意下载前需要登录oracle账号,没有的话,注册一个就好。
下载完这两个包即可
linux.x64_11gR2_database_1of2.zip
linux.x64_11gR2_database_2of2.zip
二,安装前检查
1,查看操作系统版本:
[root@oracle ~]# cat /etc/redhat-release
CentOS Linux release 7.4.1708 (Core)
2,查看内核版本:
[root@oracle ~]# uname -r
3.10.0-693.2.2.el7.x86_64
3,查看系统内存大小(oracle 11g官方建议物理内存在2G以上):
[root@oracle ~]# cat /proc/meminfo | grep MemTotal
MemTotal:        8010460 kB
4,检查防火墙是否开启:
[root@oracle ~]# systemctl status firewalld
● firewalld.service - firewalld - dynamic firewall daemon
   Loaded: loaded (/usr/lib/systemd/system/firewalld.service; disabled; vendor preset: enabled)
   Active: active (running) since Mon 2018-07-02 17:50:42 CST; 1s ago
     Docs: man:firewalld(1)
 Main PID: 20136 (firewalld)
   CGroup: /system.slice/firewalld.service
           └─20136 /usr/bin/python -Es /usr/sbin/firewalld --nofork --nopid
关闭防火墙:
[root@oracle ~]# systemctl stop firewalld关闭自启动:
[root@oracle ~]# systemctl is-enabled firewalld
enabled

[root@oracle ~]# systemctl disable firewalld
Removed symlink /etc/systemd/system/multi-user.target.wants/firewalld.service.
Removed symlink /etc/systemd/system/dbus-org.fedoraproject.FirewallD1.service.

[root@oracle ~]# systemctl is-enabled firewalld
disabled
5,关闭selinux:
[root@oracle ~]# sed -i 's#SELINUX=enforcing#SELINUX=disabled#g' /etc/sysconfig/selinux
[root@oracle ~]# setenforce 0
6,安装相关依赖包:
yum -y install binutils compat-libstdc++-33 compat-libcap1 gcc gcc-c++ glibc glibc-devel ksh libgcc libstdc++ libstdc++-devel libaio libaio-devel make elfutils-libelf-devel sysstat7,设置/dev/shm空间:
[root@oracle ~]# vi /etc/fstab
在fstab文件中追加如下内容:
shmfs                     /dev/shm            tmpfs   size=7g         0 0

[root@oracle ~]# mount -a

[root@oracle ~]# df -Th
Filesystem     Type      Size  Used Avail Use% Mounted on
/dev/vda1      ext4       59G  3.8G   53G   7% /
devtmpfs       devtmpfs  3.9G     0  3.9G   0% /dev
shmfs          tmpfs     7.0G     0  7.0G   0% /dev/shm
三,安装Oracle 11g
1,创建相关用户:
[root@oracle ~]# /usr/sbin/groupadd oinstall
[root@oracle ~]# /usr/sbin/groupadd dba
[root@oracle ~]# /usr/sbin/groupadd asmadmin
[root@oracle ~]# /usr/sbin/groupadd asmdba
[root@oracle ~]# /usr/sbin/useradd -g oinstall -G dba,asmdba oracle -d /home/oracle
[root@oracle ~]# id oracle
uid=1000(oracle) gid=1000(oinstall) groups=1000(oinstall),1001(dba),1003(asmdba)
[root@oracle ~]# passwd oracle
2,调整内核参数(编辑/etc/sysctl.conf,追加如下内容):
kernel.shmall = 2097152
kernel.shmmax = 4294967295
kernel.shmmni = 4096
kernel.sem = 250 32000 100 128
fs.file-max = 6553600
net.ipv4.ip_local_port_range = 1024 65000
net.core.rmem_default = 4194304
net.core.rmem_max = 4194304
net.core.wmem_default = 262144
net.core.wmem_max = 262144

#配置生效
[root@oracle ~]# sysctl -p
3,增加shell限制(编辑/etc/security/limits.conf,追加如下内容):
oracle   soft    nproc    2047
oracle   hard    nproc    16384
oracle   soft    nofile     1024
oracle   hard    nofile    65536
oracle   soft    stack    10240
oracle   hard   stack    10240
修改/etc/pam.d/login文件
session   required    /lib/security/pam_limits.so
session   required    pam_limits.so
修改/etc/profile文件,追加如下内容:
if [ $USER = "oracle" ]; then
  if [ $SHELL = "/bin/ksh" ]; then
     ulimit -p 16384
     ulimit -n 65536
  else
     ulimit -u 16384 -n 65536
  fi
fi
4,创建必要的目录,并修改权限:
[root@oracle ~]# mkdir -p /home/app/oracle/
[root@oracle ~]# chown -R oracle:oinstall /home/app/
[root@oracle ~]# chmod -R 755 /home/app/
[root@oracle ~]# chown -R oracle:oinstall /home/oracle
[root@oracle ~]# chmod -R 775 /home/oracle
5,配置/etc/hosts文件:
10.56.90.212 oracle6,配置oracle用户的环境变量:
[root@oracle ~]# su - oracle
[oracle@oracle ~]$ vi .bash_profile
#添加如下内容
export ORACLE_HOSTNAME=oracle
export ORACLE_UNQNAME=ora11g
export ORACLE_BASE=/home/app/oracle
export ORACLE_HOME=$ORACLE_BASE/product/11.2.0/
export ORACLE_SID=ORCL
export PATH=/usr/sbin:$PATH
export PATH=$ORACLE_HOME/bin:$PATH
export LD_LIBRARY_PATH=$ORACLE_HOME/lib:/lib:/usr/lib
export CLASSPATH=$ORACLE_HOME/jlib:$ORACLE_HOME/rdbms/jlib
export NLS_LANG=AMERICAN_AMERICA.ZHS16GBK
export TMP=/tmp
export TMPDIR=$TMP
umask 022
7,解压oracle安装文件:
[oracle@oracle ~]$ unzip linux.x64_11gR2_database_1of2.zip
[oracle@oracle ~]$ unzip linux.x64_11gR2_database_2of2.zip
进入到database目录,并生成响应文件:
[oracle@oracle ~]$ mkdir scripts
[oracle@oracle ~]$ cp -R database/response/ scripts/
修改response目录中的db_install.rsp文件的参数:
oracle.install.option=INSTALL_DB_SWONLY
ORACLE_HOSTNAME=oracle
UNIX_GROUP_NAME=oinstall
INVENTORY_LOCATION=/home/app/oracle/oraInventory
SELECTED_LANGUAGES=en,zh_CN
ORACLE_HOME=/home/app/oracle/product/11.2.0
ORACLE_BASE=/home/app/oracle
oracle.install.db.InstallEdition=EE
oracle.install.db.isCustomInstall=true
oracle.install.db.DBA_GROUP=dba
oracle.install.db.OPER_GROUP=oinstall
oracle.install.db.config.starterdb.type=GENERAL_PURPOSE
oracle.install.db.config.starterdb.globalDBName=ORCL
oracle.install.db.config.starterdb.SID=ORCL
oracle.install.db.config.starterdb.characterSet=ZHS16GBK
oracle.install.db.config.starterdb.memoryOption=true
oracle.install.db.config.starterdb.installExampleSchemas=false
oracle.install.db.config.starterdb.enableSecuritySettings=true
oracle.install.db.config.starterdb.password.ALL=oracle
oracle.install.db.config.starterdb.control=DB_CONTROL
oracle.install.db.config.starterdb.dbcontrol.enableEmailNotification=false
oracle.install.db.config.starterdb.automatedBackup.enable=false
8,开始静默安装数据库软件:
[oracle@oracle database]$ ./runInstaller -silent -responseFile /home/oracle/scripts/response/db_install.rsp -ignorePrereq

Starting Oracle Universal Installer...

Checking Temp space: must be greater than 120 MB.   Actual 51039 MB    Passed
Checking swap space: 0 MB available, 150 MB required.    Failed <<<<

Some requirement checks failed. You must fulfill these requirements before

continuing with the installation,
这里有一个报错,提示swap不够,由于是阿里云的机器,默认没有swap空间,因此要手动创建:
[root@oracle ~]# dd if=/dev/zero of=/home/swapfile bs=1M count=2049
[root@oracle ~]# mkswap /home/swapfile
[root@oracle ~]# swapon /home/swapfile
再次执行静默安装,发现又有一个报错:
Preparing to launch Oracle Universal Installer from /tmp/OraInstall2018-07-02_08-45-55PM. Please wait ...[oracle@oracle database]$ Exception in thread "main" java.lang.UnsatisfiedLinkError: /tmp/OraInstall2018-07-02_08-45-55PM/jdk/jre/lib/amd64/xawt/libmawt.so: libXext.so.6: cannot open shared object file: No such file or directory
    at java.lang.ClassLoader$NativeLibrary.load(Native Method)
    at java.lang.ClassLoader.loadLibrary0(ClassLoader.java:1751)
    at java.lang.ClassLoader.loadLibrary(ClassLoader.java:1647)
    at java.lang.Runtime.load0(Runtime.java:769)
    at java.lang.System.load(System.java:968)
    at java.lang.ClassLoader$NativeLibrary.load(Native Method)
    at java.lang.ClassLoader.loadLibrary0(ClassLoader.java:1751)
    at java.lang.ClassLoader.loadLibrary(ClassLoader.java:1668)
    at java.lang.Runtime.loadLibrary0(Runtime.java:822)
    at java.lang.System.loadLibrary(System.java:993)
    at sun.security.action.LoadLibraryAction.run(LoadLibraryAction.java:50)
    at java.security.AccessController.doPrivileged(Native Method)
    at java.awt.Toolkit.loadLibraries(Toolkit.java:1509)
    at java.awt.Toolkit.(Toolkit.java:1530)
    at java.awt.Font.(Font.java:141)
    at oracle.sysman.oii.oiif.oiifo.OiifoOCMUI.(OiifoOCMUI.java:104)
    at oracle.sysman.oii.oiif.oiifo.OiifoOCMInterfaceManager.(OiifoOCMInterfaceManager.java:79)
    at oracle.sysman.oii.oiif.oiifo.OiifoOCMInterfaceManager.getInstance(OiifoOCMInterfaceManager.java:124)
    at oracle.install.ivw.db.driver.DBInstaller.run(DBInstaller.java:123)
    at oracle.install.commons.util.Application.startup(Application.java:869)
    at oracle.install.commons.flow.FlowApplication.startup(FlowApplication.java:164)
    at oracle.install.commons.flow.FlowApplication.startup(FlowApplication.java:181)
    at oracle.install.commons.base.driver.common.Installer.startup(Installer.java:265)
    at oracle.install.ivw.db.driver.DBInstaller.startup(DBInstaller.java:114)
    at oracle.install.ivw.db.driver.DBInstaller.main(DBInstaller.java:132)
解决办法是安装libXext:
[root@oracle ~]# yum install libXext -y看到如下信息时,表示数据库安装完成:
 #!/bin/sh
 #Root scripts to run

/home/app/oracle/oraInventory/orainstRoot.sh
/home/app/oracle/product/11.2.0/root.sh
To execute the configuration scripts:
     1. Open a terminal window
     2. Log in as "root"
     3. Run the scripts
     4. Return to this window and hit "Enter" key to continue

Successfully Setup Software.
之后,根据提示,需要执行两个相关修改权限的脚本(要切换为root用户):
[root@oracle ~]# sh /home/app/oracle/oraInventory/orainstRoot.sh

[oracle@oracle ~]$ more /etc/oraInst.loc
inventory_loc=/home/app/oracle/oraInventory
inst_group=oinstall

[root@oracle ~]# sh /home/app/oracle/product/11.2.0/root.sh
9,配置静默监听:
通过response文件运行netca, 生成sqlnet.ora和listener.ora文件, 位于$ORACLE_HOME/network/admin目录下
[oracle@oracle ~]$ netca -silent -responsefile /home/oracle/scripts/response/netca.rsp这里可能会有一个报错:
****DISPLAY environment variable not set!
    Oracle Net Configuration Assistant is a GUI tool
    which requires that DISPLAY specify a location
    where GUI tools can display.
    Set and export DISPLAY, then re-run.
需要设置一个DISPLAY环境变量:
[oracle@oracle ~]$ export DISPLAY=10.66.90.222:0.0 #ip设为本机即可配置好后查看端口,发现1521已监听:
[oracle@oracle ~]$ netstat -tnlp
(Not all processes could be identified, non-owned process info
 will not be shown, you would have to be root to see it all.)
Active Internet connections (only servers)
Proto Recv-Q Send-Q Local Address           Foreign Address         State       PID/Program name
tcp        0      0 0.0.0.0:1521            0.0.0.0:*               LISTEN      23795/tnslsnr
tcp        0      0 0.0.0.0:22              0.0.0.0:*               LISTEN      -
10,最后一步,静默建库。
修改response目录下的dbca.rsp文件:
SID = "ORCL"开始静默建库:
[oracle@oracle ~]$ dbca -silent -responseFile  /home/oracle/scripts/response/dbca.rsp
Copying database files
1% complete
3% complete
11% complete
18% complete
26% complete
37% complete
Creating and starting Oracle instance
40% complete
45% complete
50% complete
55% complete
56% complete
60% complete
62% complete
Completing Database Creation
66% complete
70% complete
73% complete
85% complete
96% complete
100% complete
Look at the log file "/home/app/oracle/cfgtoollogs/dbca/orcl11g/orcl11g.log" for further details.
启动oracle:
[oracle@oracle ~]$ sqlplus / as sysdba

SQL*Plus: Release 11.2.0.1.0 Production on Mon Jul 2 21:53:11 2018

Copyright (c) 1982, 2009, Oracle.  All rights reserved.

Connected to an idle instance.

SQL> startup;
ORACLE instance started.

Total System Global Area 3273641984 bytes
Fixed Size          2217792 bytes
Variable Size        1795164352 bytes
Database Buffers     1459617792 bytes
Redo Buffers           16642048 bytes
Database mounted.
Database opened.
至此,oracle11g安装完成。