Mysql读写分离是为了提高网站的访问速度,提高数据库的并发负载能力。
但在实际的生产环境中,由单台Mysql作为独立的数据库是完全不能满足实际需求的,无论是在安全性,高可用性以及高并发等各个方面。
因此,一般来说都是通过 主从复制(Master-Slave)的方式来同步数据,再通过读写分离来提升数据库的并发负载能力, 这样的方案来进行部署与实施的。
注意:先做主从复制,再度读写分离。
MySQL主从复制结构是基于mysql bin-log日志基础上,从库通过打开IO进程收到主库的bin-log日志增量信息,并保存到本地relay log,而后再通过打开MYSQL进程从relay log上获取的增量信息并翻译成SQL语句后写到从数据库。
实验环境:
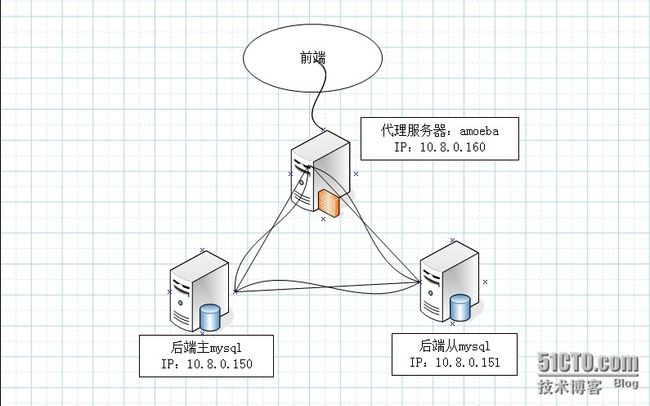
主:10.8.0.150
从:10.8.0.151
amoeba:10.8.0.160
PS:为了方便实验,可直接yum mysql 或者直接脚本执行lnmp。
拓扑图如下:
实验第一步:
登陆主服务器操作命令
mysql> GRANT REPLICATION CLIENT,REPLICATION SLAVE ON *.* TO 'cong151'@'10.8.0.151' IDENTIFIED BY "123456";
mysql> show master status;
+------------------+----------+--------------+------------------+
| File | Position | Binlog_Do_DB | Binlog_Ignore_DB |
+------------------+----------+--------------+------------------+
| mysql-bin.000008 | 5722410 | | |
+------------------+----------+--------------+------------------+
记住file和Position。
登陆从服务器操作命令
1、编辑my.ini 文件 ,修改 server-id = 2 (默认为1,因做mysql的主从复制,需要修改ID和主服务器上不一样即可,也不可和同内网mysql服务器其他的ID一样)
2、登入mysql
mysql> change master to master_host='10.8.0.150',master_user='cong151',master_password='123456',master_log_file='mysql-bin.000008',master_log_pos=5722410;
mysql> start slave;
mysql> show slave status\G
*************************** 1. row ***************************
Slave_IO_State: Waiting for master to send event
Master_Host: 10.8.0.150
Master_User: cong151
Master_Port: 3306
Connect_Retry: 60
Master_Log_File: mysql-bin.000008
Read_Master_Log_Pos: 5722410
Relay_Log_File: localhost-relay-bin.000061
Relay_Log_Pos: 251
Relay_Master_Log_File: mysql-bin.000008
Slave_IO_Running: Yes
Slave_SQL_Running: Yes
Replicate_Do_DB:
Replicate_Ignore_DB:
Replicate_Do_Table:
Replicate_Ignore_Table:
Replicate_Wild_Do_Table:
Replicate_Wild_Ignore_Table:
Last_Errno: 0
Last_Error:
Skip_Counter: 0
Exec_Master_Log_Pos: 5722410
Relay_Log_Space: 3466785
Until_Condition: None
Until_Log_File:
Until_Log_Pos: 0
Master_SSL_Allowed: No
Master_SSL_CA_File:
Master_SSL_CA_Path:
Master_SSL_Cert:
Master_SSL_Cipher:
Master_SSL_Key:
Seconds_Behind_Master: 0
Master_SSL_Verify_Server_Cert: No
Last_IO_Errno: 0
Last_IO_Error:
Last_SQL_Errno: 0
Last_SQL_Error:
这样说明从服务器复制主服务器的数据是正常的了,且可以指定复制的库,可以在my.ini里面修改即可。
为了做主从复制,即从复制主且主复制从。
继续在从服务器上操作。
mysql> GRANT REPLICATION CLIENT,REPLICATION SLAVE ON *.* TO 'zhu150'@'10.8.0.150' IDENTIFIED BY "123456";
mysql> show master status;
+------------------+----------+--------------+------------------+
| File | Position | Binlog_Do_DB | Binlog_Ignore_DB |
+------------------+----------+--------------+------------------+
| mysql-bin.000006 | 786 | | |
+------------------+----------+--------------+------------------+
登陆主服务器
mysql> change master to master_host='10.8.0.151',master_user='zhu150',master_password='123456',master_log_file='mysql-bin.000006',master_log_pos=786;
mysql> start slave;
mysql> show slave status\G
*************************** 1. row ***************************
Slave_IO_State: Waiting for master to send event
Master_Host: 10.8.0.151
Master_User: zhu150
Master_Port: 3306
Connect_Retry: 60
Master_Log_File: mysql-bin.000006
Read_Master_Log_Pos: 786
Relay_Log_File: localhost-relay-bin.000003
Relay_Log_Pos: 251
Relay_Master_Log_File: mysql-bin.000006
Slave_IO_Running: Yes
Slave_SQL_Running: Yes
Replicate_Do_DB:
Replicate_Ignore_DB:
Replicate_Do_Table:
Replicate_Ignore_Table:
Replicate_Wild_Do_Table:
Replicate_Wild_Ignore_Table:
Last_Errno: 0
Last_Error:
Skip_Counter: 0
Exec_Master_Log_Pos: 786
Relay_Log_Space: 935
Until_Condition: None
Until_Log_File:
Until_Log_Pos: 0
Master_SSL_Allowed: No
Master_SSL_CA_File:
Master_SSL_CA_Path:
Master_SSL_Cert:
Master_SSL_Cipher:
Master_SSL_Key:
Seconds_Behind_Master: 0
Master_SSL_Verify_Server_Cert: No
Last_IO_Errno: 0
Last_IO_Error:
Last_SQL_Errno: 0
Last_SQL_Error:
这样,mysql的主从复制实验OK。
Amoeba的安装:
安装Amoeba前要先安装JDK,因为Amoeba是用java开发的所要有JDK支持。
下载jdk-6u15-linux-i586.bin (sh jdk-6u15-linux-i586.bin 执行程序)
编辑/etc/profile 添加如下代码
export JAVA_HOME=/usr/local/jdk1.6.0_15
export CLASSPATH=.:$JAVA_HOME/jre/lib/rt.jar:$JAVA_HOME/lib/dt.jar:$JAVA_HOME/lib/tools.jar
export PATH=$PATH:$JAVA_HOME/bin
[root@localhost ~]# source /etc/profile
[root@localhost ~]# java -version
java version "1.6.0_15"
Java(TM) SE Runtime Environment (build 1.6.0_15-b03)
Java HotSpot(TM) Client VM (build 14.1-b02, mixed mode, sharing)
下载amoeba-mysql-binary-2.0.1-BETA.tar.gz
[root@localhost ~]# mkdir /usr/local/amoeba && cd /usr/local/amoeba/ && tar /root/amoeba-mysql-binary-2.0.1-BETA.tar.gz
那么剩下来的就是如何配置amoeba(配置文件在conf目录下,主要是dbServers.xml和amoeba.xml两个文件)
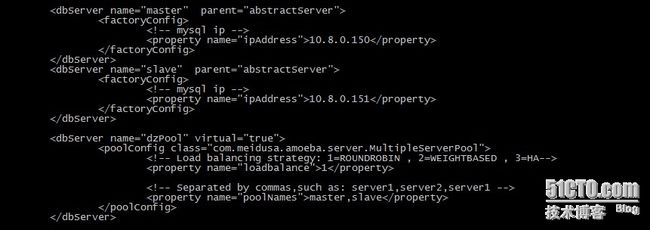
先编辑dbServers.xml 文件
注意此时的用户名和密码,为后端数据库的用户名和密码,需要在两台数据库服务器上开启远程,远程的用户名和密码自己设置,我是为了方便。
添加两个节点,分别是master和slave,同时修改下一个虚拟组,将master和slave加入进去。后面会需要的。
在编辑amoeba.xml 文件
建议修改下IP为AMOEBA的代理服务器的IP,不建议写127.0.0.1 或者localhost。
下面的用户名和密码,是对外提供的数据库用户名和密码,也就是AMOEBA登陆的用户名和密码,不需要在主从服务器上添加这个用户名和密码的,我这样设置也是为了方便。
默认的组是master,说明利用amoeba登陆后,其实是登陆到主服务器上的。
写入组是master,说明数据写入在主服务器上。
读取组是我们之前设置的虚拟组(包括master和slave,带来的效果是,查询两次,分别是在主上面查询一次和从上面查询一次)
以上,amoeba的服务器配置OK,剩下的是检查配置,
直接利用 /usr/local/amoeba/bin/amoeba start 来检查,如果出现问题,请立即解决。
如果没发现问题,类似如此日志,请ctrl+c 关闭进程。同时利用 /usr/local/amoeba/bin/amoeba start & 启动并将程序放入后台。
最后剩下的就是测试。
先需要测试通过amoeba连接服务器,
案例命令:mysql -uroot -pu2ktgshc#@dq -h10.8.0.160 -P8066
第二,直接操作数据库,新建库,新建表,表里写入数据,查看数据是否正常。主要是测试mysql的主从同步效果如何。
最后,关闭主从相互同步,命令:stop slave; 两个后端的服务器都需要操作,这样主从复制被停止,再次插入数据,查看两次,看下对比即可。
如果发现了变化,那么您的实验OK了,没发现效果,请检查amoeba的两个配置文件。
注意一点:<--! --> 这个表示注释,之前我个人做实验也是因为这个问题导致第一次没成功。
望各位好运。
如有成功者,且切实弄到测试环境中(搭建网站测试),请告知如何php调用amoeba,个人没搞定。为感!
后续的实验,可通过两个前端服务器来做amoeba,后端的mysql服务器和两台amoeba利用LVS+Keepalived来做集群和热备。


