Displaying an AR Experience with Metal
通过渲染摄像机图像和使用位置跟踪信息来显示覆盖内容,构建自定义AR视图。
arkit包括查看容易显示AR的经验与SceneKit或SpriteKit类。但是,如果你建立你自己的渲染引擎(或与第三方引擎集成),ARKit还提供了所有必要的支持,以显示一个自定义视图AR体验。
在任何AR经验中,第一步是配置一个arsession对象来管理摄像机捕获和运动处理。会话定义并保持设备所在的真实世界空间与虚拟空间之间的对应关系,并在其中模拟AR内容。要在自定义视图中显示AR体验,您需要:
1.从会话中检索视频帧和跟踪信息。
2.将这些框架图像渲染为视图的背景。
3.使用跟踪信息在相机图像上方定位和绘制AR内容。
Note
本文介绍Xcode项目模板代码中找到。对于完整的示例代码,使用增强现实模板创建新的iOS应用程序,并从“内容技术”弹出菜单中选择“金属”菜单。
Get Video Frames and Tracking Data from the Session
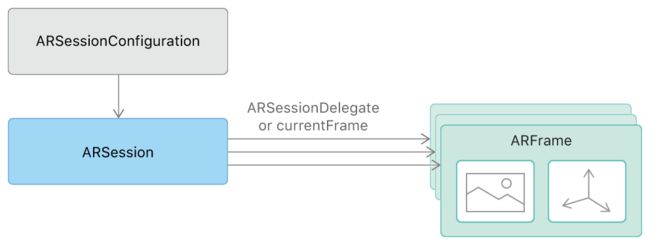
创建和维护自己arsession实例,并运行一个会话配置,该会话配置适合于要支持的AR体验。(要做到这一点,请参见建立一个基本的AR体验)会话捕获摄像机的视频,跟踪设备的位置和方向在一个模拟的3D空间,并提供arframe物体.每一个这样的对象都包含一个单独的视频帧图像和从帧被捕获的时刻的位置跟踪信息。有两种访问方式arframe AR会话产生的对象,取决于您的应用程序是否支持拉或推设计模式。
如果你喜欢控制帧定时(拉设计模式),使用会话的帧属性获取当前帧图像和跟踪信息每次重画视图的内容。使用这种方法的arkit Xcode模板:
// in Renderer class, called from MTKViewDelegate.draw(in:) via Renderer.update()
func updateGameState(){
guardletcurrentFrame = session.currentFrameelse{return} updateSharedUniforms(frame: currentFrame)
updateAnchors(frame: currentFrame)
updateCapturedImageTextures(frame: currentFrame)
if viewportSizeDidChange {
viewportSizeDidChange =false
updateImagePlane(frame: currentFrame)
}
}
另外,如果您的应用程序设计有利于推模式,实现会议:didupdateframe:委托方法,该会话将为它捕获的每个视频帧调用一次(默认为每秒60帧)。
在获得一个框架,你需要绘制相机图像,并更新和渲染任何内容覆盖你的AR经验包括。
Draw the Camera Image
创建和维护自己arsession实例,并运行一个会话配置,该会话配置适合于要支持的AR体验。(要做到这一点,请参见建立一个基本的AR体验)会话捕获摄像机的视频,跟踪设备的位置和方向在一个模拟的3D空间,并提供arframe物体.每一个这样的对象都包含一个单独的视频帧图像和从帧被捕获的时刻的位置跟踪信息。
有两种访问方式arframe AR会话产生的对象,取决于您的应用程序是否支持拉或推设计模式。
如果你喜欢控制帧定时(拉设计模式),使用会话的帧属性获取当前帧图像和跟踪信息每次重画视图的内容。使用这种方法的arkit Xcode模板:
// in Renderer class, called from MTKViewDelegate.draw(in:) via Renderer.update()
func updateGameState(){
guardletcurrentFrame = session.currentFrameelse{return}
updateSharedUniforms(frame: currentFrame)
updateAnchors(frame: currentFrame)
updateCapturedImageTextures(frame: currentFrame)
if viewportSizeDidChange {
viewportSizeDidChange =false
updateImagePlane(frame: currentFrame)
}
}
Draw the Camera Image
每个arframe对象的capturedimage属性包含从设备照相机捕获的像素缓冲区。若要将此图像作为自定义视图的背景绘制,则需要从图像内容创建纹理并提交使用这些纹理的GPU渲染命令。
像素缓冲区的内容是biplanar YCbCr编码(也称为YUV)数据格式;渲染的图像就需要将像素数据的图像的RGB格式。用金属渲染,可以在GPU着色器代码中最有效地执行转换。API的使用cvmetaltexturecache创建从像素缓冲区一个缓冲的亮度两金属材质(Y)和色度(CbCr)飞机:
func updateCapturedImageTextures(frame: ARFrame){/
/ Create two textures (Y and CbCr) from the provided frame's captured imageletpixelBuffer = frame.capturedImage
if(CVPixelBufferGetPlaneCount(pixelBuffer) <2) {return}
capturedImageTextureY = createTexture(fromPixelBuffer: pixelBuffer, pixelFormat:.r8Unorm, planeIndex:0)!
capturedImageTextureCbCr = createTexture(fromPixelBuffer: pixelBuffer, pixelFormat:.rg8Unorm, planeIndex:1)!
}
func createTexture(fromPixelBuffer pixelBuffer: CVPixelBuffer, pixelFormat: MTLPixelFormat, planeIndex: Int)->MTLTexture? {
varmtlTexture:MTLTexture? =nilletwidth =CVPixelBufferGetWidthOfPlane(pixelBuffer, planeIndex)letheight =CVPixelBufferGetHeightOfPlane(pixelBuffer, planeIndex)vartexture:CVMetalTexture? =nilletstatus =CVMetalTextureCacheCreateTextureFromImage(nil, capturedImageTextureCache, pixelBuffer,nil, pixelFormat, width, height, planeIndex, &texture)ifstatus == kCVReturnSuccess {
mtlTexture =CVMetalTextureGetTexture(texture!)
}returnmtlTexture
}
其次,编码渲染命令,画两个纹理使用分段函数执行YCbCr到RGB转换颜色的变换矩阵:
fragment float4 capturedImageFragmentShader(ImageColorInOut in [[stage_in]],
texture2d capturedImageTextureY [[ texture(kTextureIndexY) ]],
texture2d capturedImageTextureCbCr [[ texture(kTextureIndexCbCr) ]]) {
constexpr sampler colorSampler(mip_filter::linear,
mag_filter::linear,
min_filter::linear);
const float4x4 ycbcrToRGBTransform = float4x4(
float4(+1.164380f, +1.164380f, +1.164380f, +0.000000f),
float4(+0.000000f, -0.391762f, +2.017230f, +0.000000f),
float4(+1.596030f, -0.812968f, +0.000000f, +0.000000f),
float4(-0.874202f, +0.531668f, -1.085630f, +1.000000f)
);
// Sample Y and CbCr textures to get the YCbCr color at the given texture coordinate
float4 ycbcr = float4(capturedImageTextureY.sample(colorSampler, in.texCoord).r,
capturedImageTextureCbCr.sample(colorSampler, in.texCoord).rg, 1.0);
// Return converted RGB color
return ycbcrToRGBTransform * ycbcr;
}
Note
使用displaytransformwithviewportsize:定位:方法确保相机图像覆盖整个视图。对于这种方法的例子,以及完整的金属管道安装代码,看到完整的Xcode模板。(创建一个新的iOS应用程序的增强现实模板,并选择金属从内容技术弹出菜单。)
Track and Render Overlay Content
AR的经验通常侧重于渲染3D覆盖内容,使内容似乎是在相机图像中看到的真实世界的一部分。为了实现这种错觉,使用aranchor类来模拟你自己3D内容相对于真实世界空间的位置和方向。锚提供转换,您可以在渲染过程中引用。
例如,Xcode模板创建一个锚位于设备前端约20厘米,每当用户点击屏幕
func handleTap(gestureRecognize: UITapGestureRecognizer){
// Create anchor using the camera's current position
if letcurrentFrame = session.currentFrame {// Create a transform with a translation of 0.2 meters in front of the cameravartranslation = matrix_identity_float4x4
translation.columns.3.z = -0.2lettransform = simd_mul(currentFrame.camera.transform, translation)// Add a new anchor to the sessionletanchor =ARAnchor(transform: transform)
session.add(anchor: anchor)
}
}
