前面已经说了关于TE的保护的原理了。今天重点来说明一下FRR- fast-reroute在TE里面的保护是如何配置,以及怎么看状态的。
在介绍配置以前,要说明的是,FRR快速重路由是一种保护机制。
试想一下,如果图中R2到R6就是普通的IGP网络。中间链路down了以后,是一个什么情况呢?
应该是首先问题路由器通过其他接口发送LSA然后泛红到整个区域。
然后整个区域要重新计算拓扑图,并且同步拓扑数据库。
然后再加上MPLS环境,当IGP同步完拓扑数据库以后,MPLS LDP还要重新建立邻居,然后分发标签,如果有流量工程,在前面的基础上,还要加上RSVP.建立隧道,发送Path和Resv,建立邻居。
最后才会重新转发数据,也就是说,在MPLS TE环境中,如果没有一种快速有效的保护机制,那么切换时间会比普通的IGP还要慢很多。先要IGP收敛,然后BGP收敛,MPLS LDP或者RSVP工作,最后数据转发。没有个十几秒是根本下不来的。这就是为什么要引入FRR的原因了。
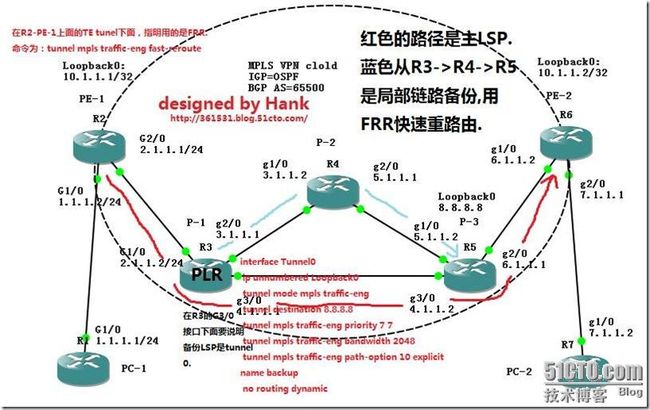
这个图中,就是配置FRR的全过程。
首先在R2上面要建立一个单向隧道到R6.然后将客户侧的流量引进到隧道中。然后再在隧道下面使能FRR快速重路由。
然后在R3上面建立一个MPLS TE隧道做局部保护。
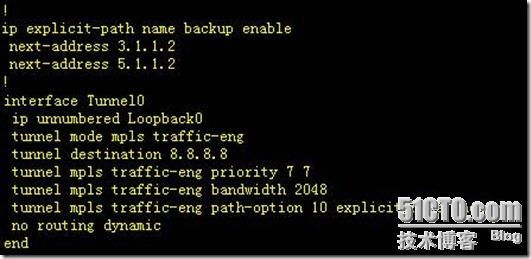
在R3上面的隧道建立一条局部隧道。R3-->R4-->R5.显式路径:
最后,在R3上面的物理接口G3/0下面。说明备份链路是tunnel0,大功告成。
下面是各台设备的配置与注释.与FRR有关的配置一律用红色字体进行标示。
R1(PC-1):
interface GigabitEthernet1/0
ip address 1.1.1.1 255.255.255.0
negotiation auto
!
ip route 0.0.0.0 0.0.0.0 1.1.1.2
//模拟一台PC,出接口地址为1.1.1.1/24,一个默认路由全部甩到1.1.1.2的网关去。
R2-PE-1:
hostname R2-PE-1
!
ip cef
!
ip vrf maipu
rd 1:1
route-target export 1:1
route-target import 1:1
!
multilink bundle-name authenticated
mpls traffic-eng tunnels //在全局使能MPLS TE
mpls label protocol ldp //在全局说明MPLS 环境用的标签分发协议是LDP.
!
interface Loopback0
ip address 10.1.1.1 255.255.255.255 //该环回口将作为OSPF,IBGP和LDP的router-ID.
!
interface Tunnel0 //建立一条显式路径的流量工程隧道从R2到R6
ip unnumbered Loopback0 //隧道的IP地址就用环回口,便于管理
tunnel mode mpls traffic-eng //隧道工作模式为流量工程
tunnel destination 10.1.1.2 //隧道目的地址为R6的环回口
tunnel mpls traffic-eng autoroute announce //将客户VRF侧的数据流量引入到TE隧道中进行转发
tunnel mpls traffic-eng priority 7 7
tunnel mpls traffic-eng bandwidth 2048 //隧道预留带宽为2M
tunnel mpls traffic-eng path-option 10 explicit name short //隧道的路径调用"short"的显示路径
tunnel mpls traffic-eng fast-reroute //最后使能快速重路由功能进行保护
no routing dynamic
!
interface GigabitEthernet1/0
ip vrf forwarding maipu
ip address 1.1.1.2 255.255.255.0
negotiation auto
!
interface GigabitEthernet2/0
ip address 2.1.1.1 255.255.255.0
negotiation auto
mpls traffic-eng tunnels
mpls label protocol ldp
mpls ip
ip rsvp bandwidth //这里如果不指定带宽,那么会将接口带宽的75%分配给RSVP,这里接口是千兆口,也就是750M.
!
router ospf 1
mpls traffic-eng router-id Loopback0 //在OSPF下面指定流量工程的环回口
mpls traffic-eng area 0 //流量工程将在area0里面工作,实际上就是让OSPF产生第十类LSA在区域内进行传播
router-id 10.1.1.1
network 0.0.0.0 255.255.255.255 area 0
!
router bgp 65500 //下面都是MPLS ×××的BGP配置了
bgp router-id 10.1.1.1
bgp log-neighbor-changes
neighbor 10.1.1.2 remote-as 65500
neighbor 10.1.1.2 update-source Loopback0
neighbor 10.1.1.2 next-hop-self
!
address-family ***v4
neighbor 10.1.1.2 activate
neighbor 10.1.1.2 send-community extended
exit-address-family
!
address-family ipv4 vrf maipu
redistribute connected
redistribute static
exit-address-family
!
!
ip explicit-path name long enable
next-address 2.1.1.2
next-address 3.1.1.2
next-address 5.1.1.2
next-address 6.1.1.2
!
ip explicit-path name short enable //上面interface tunnel 0调用的显式路径策略就是short.
next-address 2.1.1.2
next-address 4.1.1.2
next-address 6.1.1.2
!
mpls ldp router-id Loopback0 force //loopback 0接口会作为LDP的router-ID,而且是强制性的.
R3-P-1:
hostname R3-P-1 //主机名
ip cef //开启cisco express forwarding 快转系统.
!
mpls traffic-eng tunnels //在全局使能MPLS TE
mpls label protocol ldp //在全局说明MPLS 环境用的标签分发协议是LDP.
!
interface Loopback0
ip address 100.100.101.102 255.255.255.255
!
interface Tunnel0 //建立局部链路保护隧道.R2-->R4-->R5
ip unnumbered Loopback0 //隧道的IP地址就用环回口,便于管理
tunnel mode mpls traffic-eng //隧道工作模式:流量工程
tunnel destination 8.8.8.8 //目的是R5的环回口loopback 0.
tunnel mpls traffic-eng priority 7 7 //隧道优先级。默认为7
tunnel mpls traffic-eng bandwidth 2048 //隧道预留带宽2M.
tunnel mpls traffic-eng path-option 10 explicit name backup //这里走的是backup这条显式路径
no routing dynamic
!//注意,在隧道中并没有和R2一样将流量引入进去.因为是条备份隧道,只需要UP起来就可以了。随时准备等候主链路出故障的时候才会进行调用。
interface GigabitEthernet1/0
ip address 2.1.1.2 255.255.255.0
negotiation auto
mpls traffic-eng tunnels
mpls label protocol ldp
mpls ip
ip rsvp bandwidth
!
interface GigabitEthernet2/0
ip address 3.1.1.1 255.255.255.0
negotiation auto
mpls traffic-eng tunnels
mpls label protocol ldp
mpls ip
ip rsvp bandwidth
!
interface GigabitEthernet3/0
ip address 4.1.1.1 255.255.255.0
negotiation auto
mpls traffic-eng tunnels
mpls traffic-eng backup-path Tunnel0 //这里在R3的G3/0中,指明备份局部隧道为tunnel 0.
mpls label protocol ldp
mpls ip
keepalive 2
ip rsvp bandwidth
!
router ospf 1
mpls traffic-eng router-id Loopback0
mpls traffic-eng area 0
router-id 100.100.101.102
network 0.0.0.0 255.255.255.255 area 0
!
ip explicit-path name backup enable
next-address 3.1.1.2
next-address 5.1.1.2
!
R4-P-2:
hostname R4-P-2
ip cef
!
mpls traffic-eng tunnels
mpls label protocol ldp
!
interface GigabitEthernet1/0
ip address 3.1.1.2 255.255.255.0
negotiation auto
mpls traffic-eng tunnels
mpls label protocol ldp
mpls ip
ip rsvp bandwidth
!
interface GigabitEthernet2/0
ip address 5.1.1.1 255.255.255.0
negotiation auto
mpls traffic-eng tunnels
mpls label protocol ldp
mpls ip
ip rsvp bandwidth
!
router ospf 1
mpls traffic-eng router-id GigabitEthernet1/0
mpls traffic-eng area 0
network 0.0.0.0 255.255.255.255 area 0
!
R5-P-3:
hostname R5-P-3
!
ip cef
!
mpls traffic-eng tunnels
mpls label protocol ldp
!
interface Loopback0
ip address 8.8.8.8 255.255.255.255
!
interface GigabitEthernet1/0
ip address 5.1.1.2 255.255.255.0
negotiation auto
mpls traffic-eng tunnels
mpls label protocol ldp
mpls ip
ip rsvp bandwidth
!
interface GigabitEthernet2/0
ip address 6.1.1.1 255.255.255.0
negotiation auto
mpls traffic-eng tunnels
mpls label protocol ldp
mpls ip
ip rsvp bandwidth
!
interface GigabitEthernet3/0
ip address 4.1.1.2 255.255.255.0
negotiation auto
mpls traffic-eng tunnels
mpls label protocol ldp
mpls ip
ip rsvp bandwidth
!
router ospf 1
mpls traffic-eng router-id Loopback0
mpls traffic-eng area 0
router-id 8.8.8.8
network 0.0.0.0 255.255.255.255 area 0
R6-PE-2:
hostname R6-PE-2
ip cef
!
ip vrf maipu
rd 1:1
route-target export 1:1
route-target import 1:1
!
mpls traffic-eng tunnels
mpls label protocol ldp
!
interface Loopback0
ip address 10.1.1.2 255.255.255.255
!
interface GigabitEthernet1/0
ip address 6.1.1.2 255.255.255.0
negotiation auto
mpls traffic-eng tunnels
mpls label protocol ldp
mpls ip
ip rsvp bandwidth
!
interface GigabitEthernet2/0
ip vrf forwarding maipu
ip address 7.1.1.1 255.255.255.0
negotiation auto
mpls label protocol ldp
mpls ip
!
router ospf 1
mpls traffic-eng router-id Loopback0
mpls traffic-eng area 0
router-id 10.1.1.2
network 0.0.0.0 255.255.255.255 area 0
!
router bgp 65500
bgp router-id 10.1.1.2
bgp log-neighbor-changes
neighbor 10.1.1.1 remote-as 65500
neighbor 10.1.1.1 update-source Loopback0
neighbor 10.1.1.1 next-hop-self
!
address-family ***v4
neighbor 10.1.1.1 activate
neighbor 10.1.1.1 send-community extended
exit-address-family
!
address-family ipv4 vrf maipu
redistribute connected
redistribute static
exit-address-family
!
R7-PC-2:
interface GigabitEthernet1/0
ip address 7.1.1.2 255.255.255.0
negotiation auto
!
ip route 0.0.0.0 0.0.0.0 7.1.1.1
实验过程:
下面让我们看看实验过程:
依旧是这张拓扑图,隧道正常工作的时候,在R3上面我们可以看到隧道的状态是Ready的。
然后我再检验,到底PC-1的数据送进R2的TE隧道进行转发没有:
在R1-PC1上面traceroute 7.1.1.2。发现路径为下:
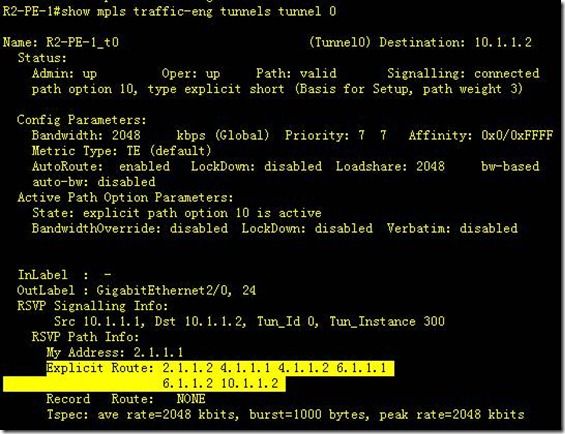
而在R2上面,显式路径为:
这里可以看到数据流量是成功引入隧道了的。
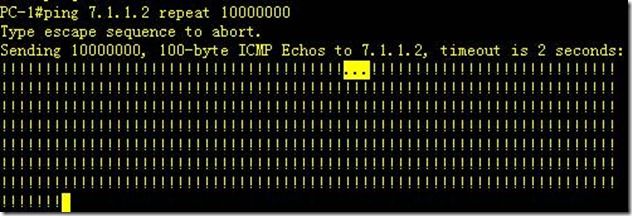
然后我从PC-1 1.1.1.1作为源ping PC 2 7.1.1.2 repeat 1000000....现在要验证的是FRR的快速切换。
当我在R1 ping R7的时候,我把R3的G3/0 接口shutdown.那么这个时候,R3上面的备份隧道就会工作。从PC1到PC2仍然可以正常转发在比较短的时间内。
当我把R3的Interface G3/0 shutdown以后,在R3上面查看fast-reroute的状态,已经由前期的ready变成了active状态。
证明备份隧道成功切换工作.
然后再到R1上面看看保护倒换时间:
当然50ms只是理论时间,这里实际测试为3个RTO.
也不算慢。
当然要做这个实验需要2011年的最新cisco 7200的IOS做支撑,以前的老IOS根本就没有fast-reroute这个命令。
可能是模拟器的原因,以后又机会再拿公司的产品进行实际测试。应该收敛时间会更短,正常情况下应该不会有掉包才对。


![clip_p_w_picpath002[1] MPLS TE的保护与恢复机制----实验版_第3张图片](http://img.e-com-net.com/image/info3/bd4d689244b84790b856c3d45093cbd1.jpg)


