后续的小实验:
RIP实验总结之二RipV2的手动汇总
RIP实验总结之一rip v2的认证
前言:以前觉得rip只需要学NA的那种水平就行了,但在后来自己的许多实验中不断做过不少rip相关的实验,在这总结一下。
实验目的:
1)
掌握rip被动接口的配置
2)
掌握rip单播更新
3)
掌握rip v2手动汇总
4)
掌握rip v2的认证
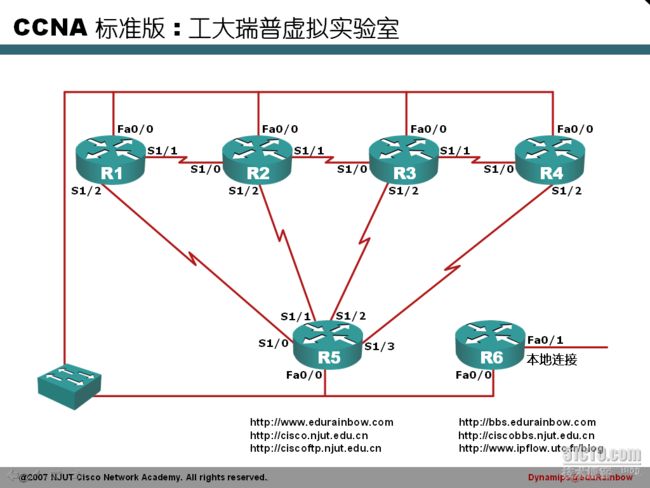
实验拓朴:
话外:我喜欢用工大瑞普的来做实验,资源占用少,适合老爷机使用,慢慢摸索出怎样写net文件,如果机子配置高,还是建议使用GNS3,不仅方便,而且还可以手抓包。
注:对于接口地址,我习惯使用两个路由器的编号,小的为1,大的为2,如R3和R4之间,使用34.1.1.1和34.1.1.2,对于以太口使用 10.1.1 .3和10.1.1.4,环回口使用全路由器编号即3.3.3.3 和4.4.4.4,掩码都为24.
实验1:rip的被动接口和单播更新。
实验步骤:
1.启动R1、R2和R3,完成串口基本接口的配置,使用ping保证每个接口的连通性。
R1(config)#int s1/1
R1(config-if)#ip add 12.1.1 .1 255.255.255.0
R1(config-if)#no sh
R1(config-if)#int s1/2
R1(config-if)#ip add 14.1.1 .1 255.255.255.0
R1(config-if)#no sh
R1(config-if)#ip add 10.1.1 .1 255.255.255.0
R1(config-if)#no sh
R1(config-if)#int lo0
R1(config-if)#ip add 1.1.1 .1 255.255.255.0
R2和R3做相应配置,不在此列出。
2.启用rip,将每个接口都添加进rip进程。
R1(config-if)#router rip
R1(config-router)#net 10.1.1 .1
R1(config-router)#net 12.1.1 .1
R1(config-router)#net 1.1.1 .1
在R1上show ip route
R1#sh ip
00:36:11: %SYS-5-CONFIG_I: Configured from console by console
R1#sh ip route
1.0.0 .0/24 is subnetted, 1 subnets
C 1.1.1 .0 is directly connected, Loopback0
R 2.0.0 .0/8 [120/1] vi a 12.1.1 .2, 00:00:01, Serial1/1
R 3.0.0 .0/8 [120/2] vi a 12.1.1 .2, 00:00:01, Serial1/1
R 23.0.0 .0/8 [120/1] vi a 12.1.1 .2, 00:00:01, Serial1/1
12.0.0 .0/24 is subnetted, 1 subnets
C 12.1.1 .0 is directly connected, Serial1/1
看到了到R2和R3的路由。
将R1的s1/1设置为被动接口
R1(config)#router rip
R1(config-router)#passive-interface s1/1
到R2和R3上去show ip route
R2#sh ip route
R 1.0.0 .0/8 [120/1] vi a 12.1.1 .1, 00:01:51, Serial1/0
2.0.0 .0/24 is subnetted, 1 subnets
C 2.2.2 .0 is directly connected, Loopback0
R 3.0.0 .0/8 [120/1] vi a 23.1.1 .2, 00:00:01, Serial1/1
23.0.0 .0/24 is subnetted, 1 subnets
C 23.1.1 .0 is directly connected, Serial1/1
12.0.0 .0/24 is subnetted, 1 subnets
C 12.1.1 .0 is directly connected, Serial1/0
此时R3上:
R3#sh ip route
R 1.0.0 .0/8 [120/2] vi a 23.1.1 .1, 00:00:14, Serial1/0
R 2.0.0 .0/8 [120/1] vi a 23.1.1 .1, 00:00:14, Serial1/0
3.0.0 .0/24 is subnetted, 1 subnets
C 3.3.3 .0 is directly connected, Loopback0
23.0.0 .0/24 is subnetted, 1 subnets
C 23.1.1 .0 is directly connected, Serial1/0
R 12.0.0 .0/8 [120/1] vi a 23.1.1 .1, 00:00:14, Serial1/0
注意两个打红字的时间,R1的s1/1已设置为被动接口,R2上收不到R1的路由更新,上次收到时间为00:01:51之前并未超时,此时应该为holdtime,但R3扔收到R2关于R1上的路由更新。所以在失效之前R2Rip仍要向R3发布更新。
等路由收敛完成后,再看:
R1#sh ip route
1.0.0 .0/24 is subnetted, 1 subnets
C 1.1.1 .0 is directly connected, Loopback0
R 2.0.0 .0/8 [120/1] vi a 12.1.1 .2, 00:00:13, Serial1/1
R 3.0.0 .0/8 [120/2] vi a 12.1.1 .2, 00:00:13, Serial1/1
R 23.0.0 .0/8 [120/1] vi a 12.1.1 .2, 00:00:13, Serial1/1
12.0.0 .0/24 is subnetted, 1 subnets
C 12.1.1 .0 is directly connected, Serial1/1
R2#sh ip route
2.0.0 .0/24 is subnetted, 1 subnets
C 2.2.2 .0 is directly connected, Loopback0
R 3.0.0 .0/8 [120/1] vi a 23.1.1 .2, 00:00:22, Serial1/1
23.0.0 .0/24 is subnetted, 1 subnets
C 23.1.1 .0 is directly connected, Serial1/1
12.0.0 .0/24 is subnetted, 1 subnets
C 12.1.1 .0 is directly connected, Serial1/0
R3#sh ip route
R 2.0.0 .0/8 [120/1] vi a 23.1.1 .1, 00:00:11, Serial1/0
3.0.0 .0/24 is subnetted, 1 subnets
C 3.3.3 .0 is directly connected, Loopback0
23.0.0 .0/24 is subnetted, 1 subnets
C 23.1.1 .0 is directly connected, Serial1/0
R 12.0.0 .0/8 [120/1] vi a 23.1.1 .1, 00:00:11, Serial1/0
即被动接口的特点:能收到rip的更新但不从此接口发送更新。
3.把R2、R3上的所有串口都设为被动接口。并开启所有路由器的以太口。配置R1使路由更新只“单播”给R2。
R1(config)#router rip
R1(config-router)#net 10.1.1 .1
R1(config-router)#passive-interface fastEthernet 0/0
R1(config-router)#neighbor 10.1.1 .2
在R2和R3上show ip route
R2#sh ip route
R 1.0.0 .0/8 [120/1] vi a 10.1.1 .1, 00:00:03, FastEthernet0/0
2.0.0 .0/24 is subnetted, 1 subnets
C 2.2.2 .0 is directly connected, Loopback0
R 3.0.0 .0/8 [120/1] vi a 10.1.1 .3, 00:00:12, FastEthernet0/0
10.0.0 .0/24 is subnetted, 1 subnets
C 10.1.1 .0 is directly connected, FastEthernet0/0
R3#sh ip route
R 2.0.0 .0/8 [120/1] vi a 10.1.1 .2, 00:00:24, FastEthernet0/0
3.0.0 .0/24 is subnetted, 1 subnets
C 3.3.3 .0 is directly connected, Loopback0
10.0.0 .0/24 is subnetted, 1 subnets
C 10.1.1 .0 is directly connected, FastEthernet0/0
可以看到R2学到了R1环回口的路由,R3没学到。
R2由于水平分割没有将R1环回口的路由更新到R3
