关于
Android使用FFmpeg(一)--编译ffmpeg
Android使用FFmpeg(二)--Android Studio配置ffmpeg
Android使用FFmpeg(三)--ffmpeg实现视频播放
Android使用FFmpeg(四)--ffmpeg实现音频播放(使用AudioTrack进行播放)
Android使用FFmpeg(五)--ffmpeg实现音频播放(使用openSL ES进行播放)
Android使用FFmpeg(六)--ffmpeg实现音视频同步播放
Android使用FFmpeg(七)--ffmpeg实现暂停、快退快进播放
前言
如果你已经准备好ffmpeg的开发环境,那么我们在这篇文章中实现对视频的一个播放,如果还没有准备好,请看前面的内容。
正文
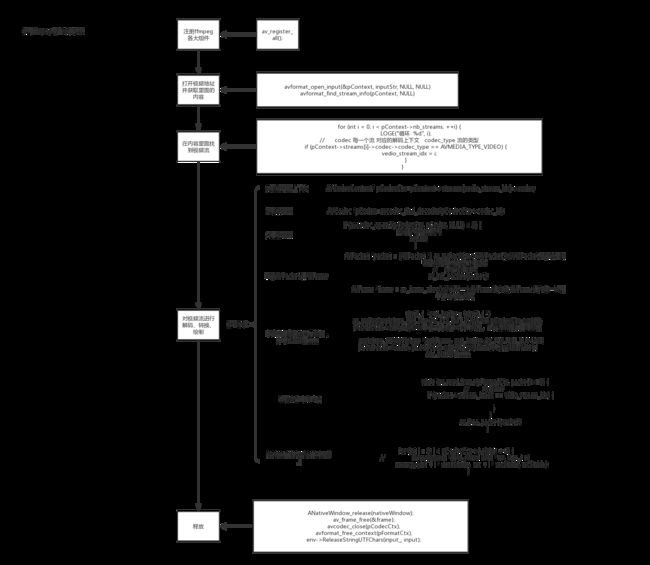
Ok,上图就是使用ffmpeg实现了一个视频的播放的大概流程图,那么,我们将根据流程图来编写代码,这样子,代码的编写就会显得比较简单,比较好理解了。
1.注册各大组件,这一步很重要,如果不注册就无法使用后面的函数了。
av_register_all();
2.在解码之前我们得获取里面的内容吧,所以这一步就是打开地址并且获取里面的内容。其中avFormatContext是内容的一个上下文,inputPath为输入的地址。
AVFormatContext *avFormatContext = avformat_alloc_context();//获取上下文
avformat_open_input(&avFormatContext, inputPath, NULL, NULL)//解封装
avformat_find_stream_info(avFormatContext, NULL)
3.我们在上面已经获取了内容,但是在一个音视频中包括了音频流,视频流和字幕流,所以在所有的内容当中,我们应当找出相对应的视频流。
int video_index=-1;
    for (int i = 0; i < avFormatContext->nb_streams; ++i) {
        if (avFormatContext->streams[i]->codec->codec_type == AVMEDIA_TYPE_VIDEO) {
            //如果是视频流,标记一哈
            video_index = i;
        }
    }
4.在第三步的时候已经找到了视频流,那么我们就对视频流进行解码、转换和绘制。
a.如果要进行解码,那么得有解码器并打开解码器。
   //获取解码器上下文
    AVCodecContext *avCodecContext = avFormatContext->streams[video_index]->codec;
    //获取解码器
    AVCodec *avCodec = avcodec_find_decoder(avCodecContext->codec_id);
    //打开解码器
    if (avcodec_open2(avCodecContext, avCodec, NULL) < 0) {
        LOGE("打开失败")
        return;
    }
b.申请AVPacket和AVFrame,其中AVPacket的作用是:保存解码之前的数据和一些附加信息,如显示时间戳(pts)、解码时间戳(dts)、数据时长,所在媒体流的索引等;AVFrame的作用是:存放解码过后的数据。
具体可参考:http://blog.csdn.net/leixiaohua1020/article/details/11693997
 //申请AVPacket
    AVPacket *packet = (AVPacket *) av_malloc(sizeof(AVPacket));
    av_init_packet(packet);
    //申请AVFrame
    AVFrame *frame = av_frame_alloc();//分配一个AVFrame结构体,AVFrame结构体一般用于存储原始数据,指向解码后的原始帧
    AVFrame *rgb_frame = av_frame_alloc();//分配一个AVFrame结构体,指向存放转换成rgb后的帧
c.因为rgb_frame是一个缓存区域,所以需要设置。
 //缓存区
    uint8_t  *out_buffer= (uint8_t *)av_malloc(avpicture_get_size(AV_PIX_FMT_RGBA,
                                                                         avCodecContext->width,avCodecContext->height));
    //与缓存区相关联,设置rgb_frame缓存区
    avpicture_fill((AVPicture *)rgb_frame,out_buffer,AV_PIX_FMT_RGBA,avCodecContext->width,avCodecContext->height);
d.因为是原生绘制,即是说需要ANativeWindow。
 //取到nativewindow
    ANativeWindow *nativeWindow=ANativeWindow_fromSurface(env,surface);
    if(nativeWindow==0){
        LOGE("nativewindow取到失败")
        return;
    }
    //视频缓冲区
    ANativeWindow_Buffer native_outBuffer;
e.一切准备妥当,那么我们开始解码。
while (av_read_frame(avFormatContext, packet) >= 0) {
        LOGE("解码 %d",packet->stream_index)
        LOGE("VINDEX %d",video_index)
        if(packet->stream_index==video_index){
            LOGE("解码 hhhhh")
            //如果是视频流
            //解码
            avcodec_decode_video2(avCodecContext, frame, &frameCount, packet)
        }
        av_free_packet(packet);
    }
f.以下均在循环里面进行,当解码一帧成功过后,我们转换成rgb格式并且绘制。
if (frameCount) {
                LOGE("转换并绘制")
                //说明有内容
                //绘制之前配置nativewindow
                ANativeWindow_setBuffersGeometry(nativeWindow,avCodecContext->width,avCodecContext->height,WINDOW_FORMAT_RGBA_8888);
                //上锁
                ANativeWindow_lock(nativeWindow, &native_outBuffer, NULL);
                //转换为rgb格式
                sws_scale(swsContext,(const uint8_t *const *)frame->data,frame->linesize,0,
                          frame->height,rgb_frame->data,
                          rgb_frame->linesize);
              //  rgb_frame是有画面数据
                uint8_t *dst= (uint8_t *) native_outBuffer.bits;
//            拿到一行有多少个字节 RGBA
                int destStride=native_outBuffer.stride*4;
            //像素数据的首地址
                uint8_t * src=  rgb_frame->data[0];
//            实际内存一行数量
                int srcStride = rgb_frame->linesize[0];
                //int i=0;
                for (int i = 0; i < avCodecContext->height; ++i) {
//                memcpy(void *dest, const void *src, size_t n)
                    //将rgb_frame中每一行的数据复制给nativewindow
                    memcpy(dst + i * destStride,  src + i * srcStride, srcStride);
                }
//解锁
                ANativeWindow_unlockAndPost(nativeWindow);
                usleep(1000 * 16);

            }
在上面的代码中,因为转换成rgb格式过后的内容是存在ffmpeg所指向的地址而不是ANativeWindow所指向的所在地址,所以要绘制的话我们需要将内容复制到ANativeWindow中。
5.完成过后得释放资源,不然就造成内存泄露了。
  ANativeWindow_release(nativeWindow);
    av_frame_free(&frame);
    av_frame_free(&rgb_frame);
    avcodec_close(avCodecContext);
    avformat_free_context(avFormatContext);
    env->ReleaseStringUTFChars(inputStr_, inputPath);
6.java层代码,因为是原生绘制,所以需要传入Surface,所以创建一个类继承SurfaceView。
class VideoView : SurfaceView {
    constructor(context: Context) : super(context) {}

    constructor(context: Context, attrs: AttributeSet) : super(context, attrs) {
        init()

    }

    private fun init() {
        val holder = holder
        holder.setFormat(PixelFormat.RGBA_8888)
    }

    constructor(context: Context, attrs: AttributeSet, defStyleAttr: Int) : super(context, attrs, defStyleAttr) {}

    fun player(input: String) {
        Thread(Runnable {
            //        绘制功能 不需要交给SurfaveView        VideoView.this.getHolder().getSurface()
            render(input, [email protected])
        }).start()
    }

    external fun render(input: String, surface: Surface)

    companion object {
        init {
            System.loadLibrary("avcodec-56")
            System.loadLibrary("avdevice-56")
            System.loadLibrary("avfilter-5")
            System.loadLibrary("avformat-56")
            System.loadLibrary("avutil-54")
            System.loadLibrary("postproc-53")
            System.loadLibrary("swresample-1")
            System.loadLibrary("swscale-3")
            System.loadLibrary("native-lib")
        }
    }
}
小结
以上就是对视频的解封装,解码,转换,绘制的一个过程,过程清晰明了,按着这个步奏来就应该来说比较简单,另外,请在真机上测试,同时导入自己想测试的视频,什么格式都可以。
源码地址
