废话:
强行开启了Retrofit的学习模式,但是发现啊,我找到的一些入门文章,简直不要太坑,敲不出来demo不要紧啊,你得讲的让我看懂吧?好,有一篇能看懂的了,喂能不能讲完啊,讲一半死球了不做完一套demo几个意思!
OK既然没有好的Retrofit第一炮的文章,那么我的机会就来了
看完本文并且do it你将收获
- 使用Retrofit进行一次基础的不能再基础的网络请求
- 没了
正文开始
-
Retrofit是啥?
我想既然朋友你找到这篇文章,一定心里有个底,简单说就是一个简化网络操作的库
-
准备工作
1. 添加依赖
//这是Retrofit的包
    compile 'com.squareup.retrofit2:retrofit:2.2.0'
//这是Retrofit用来将得到的json转化成bean对象的包
    compile 'com.squareup.retrofit2:converter-gson:2.0.2'
2. 用于请求数据的api,这里送你一个
//最后面的num=3,这个数字可以自己改,需要几条数据就写几
http://www.imooc.com/api/teacher?type=4&num=3
3. json对应的javabean
咱们先将2中的url用浏览器访问一下,会得到一串json字符串
根据json内容自己敲一个bean
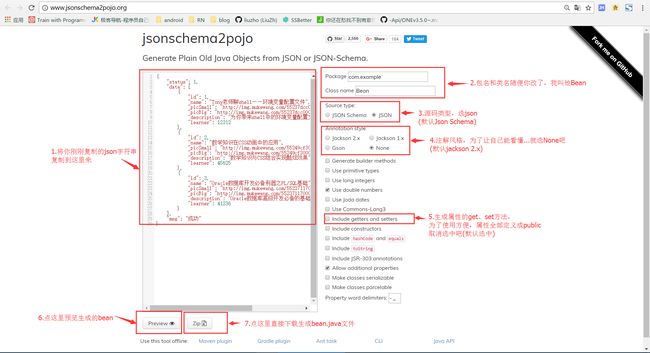
复制json字符串,然后去jsonschema2pojo将他转化成一个bean
下载之后你得到了: Bean.java和 Datum.java两个源文件
/**Bean.java**/
public class Bean {
        public Integer status;
        public List data = null;
        public String msg;
        private Map additionalProperties = new HashMap<>();

        public Map getAdditionalProperties() {
            return this.additionalProperties;
        }

        public void setAdditionalProperty(String name, Object value) {
            this.additionalProperties.put(name, value);
        }
}
/**Datum.java**/
public class Datum {
        public Integer id;
        public String name;
        public String picSmall;
        public String picBig;
        public String description;
        public Integer learner;
        private Map additionalProperties = new HashMap<>();

        public Map getAdditionalProperties() {
            return this.additionalProperties;
        }

        public void setAdditionalProperty(String name, Object value) {
            this.additionalProperties.put(name, value);
        }
}
接下来你需要将他们复制到你项目的包下,因为你要用到他们
至此,准备就工作就全部做完了
-
正式开始使用Retrofit
1. 首先需要写一个接口
这个接口规定get、post请求的url参数;规定一个返回Call对象(这个call对象用于正式发起请求并获得返回数据)的方法,这个方法接收的参数为url参数值,用开始给的url举例:
http://www.imooc.com/api/teacher?type=4&num=3
//num=3,num是一个参数,3是参数值,而这个接口内就规定了url中有哪些参数
//返回Call对象 的方法 接收的参数,就是url的参数值
那么对于这个api,我们需要写的接口应该是这样:
public interface ApiService {
        @GET("teacher?type=4")
        Call getCall(@Query("num") int count);
    }
//这个"@GET"是Retrofit的注解,表示进行get请求,()括号内的字符串就是url的*参数信息*
//那为什么"&num=3"不见了呢?看官请看我下面...
//-------Call getCall(@Query("num") int count);-------
//这个方法返回一个Call对象,等会儿正式发起请求并获取数据就靠他了
//对头,Bean就对应于Bean.java!因为我们需要解析json变成一个Bean实例嘛
//(@Query("num") int count)就厉害了,他表示:
//在@GET("teacher?type=4")之中的字符串的后面,再添加"&num="
//那么num等于多少呢,这就在使用getCall方法的时候由参数int count决定了
好了,一个进行get请求的接口就写完了,也就这么两行,太简单了!
其实,在这里还有另外一种情况,如果url不是在后面&添加参数,而需要指定的变量在url的路径中呢?比如github这个api:
https://api.github.com/users/{user}/repos
{user}是需要查找的用户名
这个时候接口就应该这样写:
public interface ApiService {
      @GET("users/{user}/repos")
      Call getCall(@Path("user") String u);
  }
//{user}直接理解为一个变量,这个变量的值由↓决定
//@Path("user")表示将以上路径中的{user}变量赋值为参数u的值
//当然切记,这里的Call的Bean应该换成另外你根据API返回的json生成的bean
以上内容,请另外尝试,与本次demo无关呀
什么?post请求的接口该怎么写?
**我也不知道(/▽╲)**
2. 接下来创建一个Retrofit实例,通过Retrofit实例创建 接口的实例
        Retrofit retrofit = new Retrofit.Builder()
                .baseUrl("http://www.imooc.com/api/")
                .addConverterFactory(GsonConverterFactory.create())
                .build();
        ApiService apiService = retrofit.create(ApiService.class);
//机智,就是通过baseUrl补全整个url信息了!是不是上面@GET中残缺url的疑惑一下就解决了?!
//当然在刚刚的接口中,你也可以一次性写全url,但是这样就不够灵活了!
//----------------addConverterFactory(GsonConverterFactory.create())
//这一句规定解析json用哪个库,这就是最开始要你导入Gson库的原因啦,咱们用Gson解析json
//当然你也可以用其他的库解析json,比如jackson,写法是一样的,注意引入别人的库就是了
//然后很完美的创建了一个retrofit实例,并且通过retrofit实例来创建了一个接口的实例
3. 紧接着我们需要一个Call实例来正式的发起请求获取数据
//请求3条数据,最后url就拼接成了最顶上给的url,是一毛一样的
//没错,网络请求有异常,得try/catch一下
        Call call = apiService.getCall(3);
        try {
            call.execute();//执行call,也就是正式发起网络请求咯!
        } catch (IOException e) {
            e.printStackTrace();
        }
那么问题来了,发起网络请求之后,我去哪儿得到数据呢!机智的我把鼠标放在"execute()"上,然后按下ctrl键:
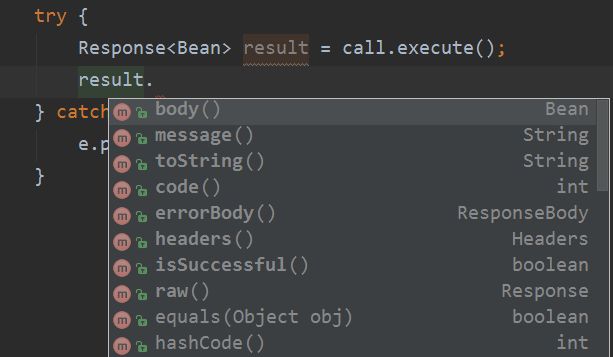
原来call.execute()直接返回了一个请求结果,那么我们拿到这个结果来看看都有啥:
Response response= call.execute();
result.//看下图
哇,这么多方法,返回的都是什么?其实一看方法名和返回类型便知,这里我们挑两个打印出来看看:
        try {
            Response response= call.execute();
            Log.i(TAG, "response.body()----->" + response.body());
            Log.i(TAG, "response.message()----->" + response.message());
            Log.i(TAG, "response.code()----->" + response.code());
            //明明打印了3个!!
        } catch (IOException e) {
            e.printStackTrace();
        }
-
拿到返回结果之后
好的,现在所有代码如下:
public class MainActivity extends AppCompatActivity {
        private static final String TAG = "MainActivity";
        public interface ApiService {
            @GET("teacher?type=4")
            Call getCall(@Query("num") int count);
        }
        @Override
        protected void onCreate(Bundle savedInstanceState) {
            super.onCreate(savedInstanceState);
            setContentView(R.layout.activity_main);
            Retrofit retrofit = new Retrofit.Builder()
                    .baseUrl("http://www.imooc.com/api/")
                    .addConverterFactory(GsonConverterFactory.create())
                    .build();
            ApiService apiService = retrofit.create(ApiService.class);
            Call call = apiService.getCall(3);
            try {
                Response response= call.execute();
                Log.i(TAG, "response.body()----->" + response.body());
                Log.i(TAG, "response.message()----->" + response.message());
                Log.i(TAG, "response.code()----->" + response.code());
            } catch (IOException e) {
                e.printStackTrace();
            }
        }
}
好像很完美了,马上就能收获利用retrofit发起网络请求获得数据的喜悦了!
来,Run起来!
------------别Run了,你的结果一定是:
因为你没有添加网络权限!!
好,这下OK了,这次我们真正的Run起来!
报错信息:
//这尼玛我怎么在主线程进行网络请求了呢!!
Caused by: android.os.NetworkOnMainThreadException
好了,这下要真正的解决问题了!真正的所有代码MainActivity.java:
public class MainActivity extends AppCompatActivity {
    private static final String TAG = "MainActivity";
    public interface ApiService {
        @GET("teacher?type=4")
        Call getCall(@Query("num") int count);
    }
    @Override
    protected void onCreate(Bundle savedInstanceState) {
        super.onCreate(savedInstanceState);
        setContentView(R.layout.activity_main);
        Retrofit retrofit = new Retrofit.Builder()
                .baseUrl("http://www.imooc.com/api/")
                .addConverterFactory(GsonConverterFactory.create())
                .build();
        ApiService apiService = retrofit.create(ApiService.class);
        final Call call = apiService.getCall(3);
//----这里直接new了一个子线程来进行网络请求,看下方有一个Retrofit自带的异步请求方法
        new Thread(new Runnable() {
            @Override
            public void run() {
                try {
                    Response response= call.execute();
                    Log.i(TAG, "response.body()----->" + response.body());
                    Log.i(TAG, "response.message()----->" + response.message());
                    Log.i(TAG, "response.code()----->" + response.code());
                } catch (IOException e) {
                    e.printStackTrace();
                }
            }
        }).start();
//如果你选择了这种写法
//可千万别忘了start()!不然等会儿看不到log,你又要拿起砍刀找我了!
//-------------------------------------
    }
Retrofit还有一个本身就是异步请求的方法:
        //call.enqueue()方法接收一个Callback回调,我们直接new出来,这是异步请求方法
        call.enqueue(new Callback() {
            @Override
            public void onResponse(Call call, Response response) {
                //当获取到返回结果的时候回调这个方法
                Log.i(TAG, "response.body()----->" + response.body());
                Log.i(TAG, "response.message()----->" + response.message());
                Log.i(TAG, "response.code()----->" + response.code());
            }
            @Override
            public void onFailure(Call call, Throwable t) {
                //网络请求失败的时候回调这个方法
            }
        });
把上面的上面的new Thread(......).start();全部换成上面的代码,也一样OK了!
- 当然更推荐这里写法了!
好了,废话这么多,来看看log到底打印出来了一些什么吧:
真的太完美了,这个结果告诉我们请求码是200,请求信息是OK,还给了我一个Bean对象!
噢对了,看看我会不会拿到一个假的Bean对象!眼见为实
        ......
            Bean b = response.body();
            Log.i(TAG, "Bean内容:" + b.msg);
            Log.i(TAG, "Bean内容:" + b.data.get(0).description);
         ......
好了,至此我们已经成功利用Retrofit进行网络请求,并且将得到的json直接变成了Bean对象,简直不要太爽
- 如果我的文章确实有帮助到你,请不要忘了点一下文末的"♡"让他变成"❤"
- 作为新手难免很多地方理解不到位,文中若有错误请直(bu)接(yao)指(ma)出(wo)
- 写作不易!


