沙盒
每一个iOS应用程序都会为自己创建一个文件系统目录(文件夹),这个独立,封闭,安全的空间,叫做沙盒。
沙盒机制的特点:
- 每个应用程序的活动范围都限定在自己的沙盒里
- 不能随意跨越自己的沙盒去访问别的应用程序中沙盒中的内容(iOS8已部分开放访问)
- 应用程序向外请求或者接收数据都需要经过权限认证
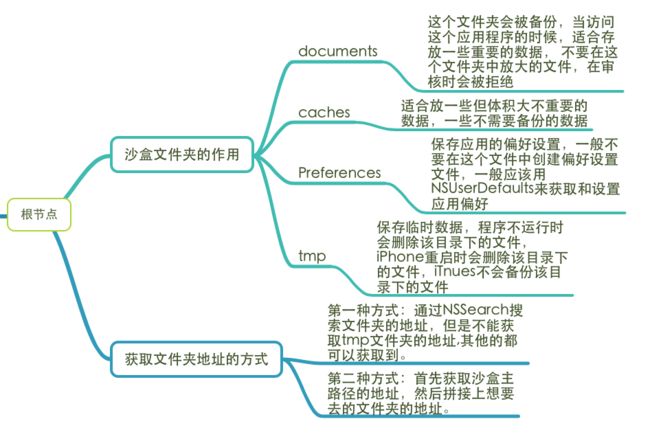
沙盒文件
上面这张图是我在印象笔记上总结的,下面是获取文件夹地址的相关代码:
//第一种获取文件夹地址的方式
NSString *documentPathStr = [NSSearchPathForDirectoriesInDomains (NSDocumentDirectory, NSUserDomainMask, YES)  objectAtIndex:0];
    NSLog(@"%@", documentPathStr);

#其中 NSSearchPathForDirectoriesInDomains获取的是一个数组,而且数组只有一个元素[因为在移动端,不存在多用户问题。而PC端,涉及到多用户问题(管理员、访客)],所以可以用 objectAtIndex:0或者firstObject的方式直接获取.
// 第二种方式获取documents文件夹的路径
    // 第一步:获取沙盒主路径的地址
    NSString *homePathStr = NSHomeDirectory();

    NSLog(@"homePathStr ==== %@", homePathStr);

    // 第二步:在沙盒主路径后拼接Documents,拼接出来documents文件夹的路径
    NSString *documentPathStr = [homePathStr stringByAppendingPathComponent:@"Documents"];

    NSLog(@"documentPathStr ===== %@", documentPathStr);
简单对象本地化操作
关于简单对象的写入的步骤,大致遵循下面四步:
- 我要知道存到哪里,所以需要一个文件夹的路径
- 我要知道要存什么,所以创建一条数据
- 我要知道我存的东西到底放在哪里,所以创建了一条路径,路径的终点就是存数据的文件(注意:这个时候没有创建出文件,只是创建出一条路径,打印一下地址可以看到并没有显示)
- 准备工作做好了,开始写入的操作
具体代码:
//1.
 NSString *documentPathStr = [NSSearchPathForDirectoriesInDomains(NSDocumentDirectory, NSUserDomainMask, YES) objectAtIndex:0];
//2.
NSString *str = @"hello world";
//3.
NSString *strPath = [documentPathStr stringByAppendingPathComponent:@"str.mp4"];
或者 NSString *newPath = [documentPath stringByAppendingString:@"/123.txt"];
//4.
[str writeToFile:strPath atomically:YES encoding:NSUTF8StringEncoding error:nil];

其他的简单对象如NSArray,NSDictionary,NSData的步骤基本类似.
#数组
 NSString *documentPath = [NSSearchPathForDirectoriesInDomains(NSDocumentDirectory, NSUserDomainMask, YES)firstObject];
    NSArray *array = @[@"A",@"B",@"C"];

    NSString *newPath = [documentPath stringByAppendingPathComponent:@"/eqw.txt"];
    [array writeToFile:newPath atomically:YES];

    NSLog(@"*********%@",newPath);
#字典
NSString *documentPath = [NSSearchPathForDirectoriesInDomains(NSDocumentDirectory, NSUserDomainMask, YES) objectAtIndex:0];

    NSDictionary *dict = @{@"张三":@"name",@"男":@"gender"};
    NSString *newPath = [documentPath stringByAppendingString:@"/zhangsan.txt"];
    [dict writeToFile:newPath atomically:YES];
    NSLog(@"********%@",newPath);

    NSDictionary *dic = [NSDictionary dictionaryWithContentsOfFile:newPath];
    NSLog(@"%@",dic);
#NSData类型
NSData类型稍微麻烦一点,需要转化为相应的格式
NSString *documentPath = [NSSearchPathForDirectoriesInDomains(NSDocumentDirectory, NSUserDomainMask, YES) objectAtIndex:0];

    UIImage *iamge = [UIImage imageNamed:@"1.jpg"];
//第二个参数为压缩系数
    NSData *data = UIImageJPEGRepresentation(iamge, 1);

    NSString *pathFile = [documentPath stringByAppendingString:@"/7898.jpg"];
    [data writeToFile:pathFile atomically:YES];

    NSLog(@"%@",pathFile);

    UIImage *newImage = [[UIImage alloc]initWithData:data];
    UIImageView *imageView = [[UIImageView alloc] initWithImage:newImage];
    [self.view addSubview:imageView];

######读取

//NSString
NSString *newStr = [NSString stringWithContentsOfFile:documents encoding:4 error:nil];
    NSLog(@"%@",newStr);
//NSArray
NSArray *NewArr = [NSArray arrayWithContentsOfFile:arrPath];
    NSLog(@"数组内容:%@",NewArr);
//NSDictionary
NSDictionary *newDic = [NSDictionary dictionaryWithContentsOfFile:DicPath];
    NSLog(@"字典内容:%@",newDic);
文件管理器
    //1.初始化一个NSFileManager对象(使用单例)
    NSFileManager *manager = [NSFileManager defaultManager];
    //2.获取根路径
    NSString *rootPath = NSHomeDirectory();
    //3.创建文件
    rootPath = [rootPath stringByAppendingPathComponent:@"/Documents/man"];
    //4.创建目录
     //createDirectoryAtPath:文件路径
********withIntermediateDirectories:是否在当前路径下创建/text/myApp
    [manager createDirectoryAtPath:rootPath withIntermediateDirectories:YES attributes:nil error:nil];
    //添加并写入
    rootPath = [rootPath stringByAppendingPathComponent:@"/string.txt"];
    NSString *str = @"12345";
    [str writeToFile:rootPath atomically:YES encoding:NSUTF8StringEncoding error:nil];
#或者可以使用另一种比较简单的创建方法
//初始化一个NSFileManager对象
    NSFileManager *fileManager = [NSFileManager defaultManager];
    NSString *secondPath = [[NSSearchPathForDirectoriesInDomains(NSDocumentDirectory, NSUserDomainMask, YES)firstObject] stringByAppendingString:@"secondPathString.txt"]
    NSString *stringContent = @"12345";
    //第二个参数为文件的内容,由于是NSData类型,所以需要转化
    [fileManager createFileAtPath:secondPath contents:[stringContent dataUsingEncoding:NSUTF8StringEncoding] attributes:nil];
可以使用一个BOOL类型的对象接收,判断是否成功.
   #pragma mark ---- 文件管理 复制 ----
     //创建另一个路径,然后复制
[fileManager createFileAtPath:secondPath contents:[stringContent dataUsingEncoding:NSUTF8StringEncoding] attributes:nil];
    NSString *copyPath = [[NSSearchPathForDirectoriesInDomains(NSDocumentDirectory, NSUserDomainMask, YES)firstObject]stringByAppendingString:@"copyPathString.txt"];
    BOOL result = [manager copyItemAtPath:secondPath toPath:copyPath error:nil];
    if (result) {
        NSLog(@"成功");
    }else{
        NSLog(@"失败啦!!!");
    }
####注意,创建另一个路径的时候,只创建路径即可,不要创建出文件,不然会失败的..

#pragma Mark ---  文件管理 删除  ---
    //移除的是创建的文件,并不是存放的文件夹
    [FileManager removeItemAtPath:rootPath error:nil];

    NSLog(@"移除后路径:%@",rootPath);
复杂对象存储(归档和反归档)
如果一个对象想直接写入本地,那么这个对象需要遵守NSCoding协议
     #iOS的数据持久化方式
     *   1、属性列表(Plist文件),NSUserDefault
     *   2、归档(NSKeyedArchiver)
     *   3、数据库(SQLite、CoreData、FMDB(第三方))
// 将复杂对象归档之后存入本地
    // 第一步 : 创建一个NSMutableData,用于初始化归档工具
    NSMutableData *data = [NSMutableData data];
    NSLog(@"data ==== %@", data);
    // 第二步 : 创建一个归档工具
    NSKeyedArchiver *keyedArchiver = [[NSKeyedArchiver alloc] initForWritingWithMutableData:data];
    NSLog(@"data1 ==== %@", data);
    // 第三步 :使用归档工具 对需要归档的对象进行归档
    [keyedArchiver encodeObject:person forKey:@"person"];
    NSLog(@"data2 ==== %@", data);
    // 第四步 :结束归档
    [keyedArchiver finishEncoding];
    NSLog(@"data3 ==== %@", data);
    //第五步:写入文件
     BOOL result = [data writeToFile:path atomically:YES];
     if (result) {
        NSLog(@"归档成功:%@",path);
    }
#pragma mark- 解档并使用
    // 第一步 : 从本地获取到Data
    NSData *newData = [NSData dataWithContentsOfFile:mutableDataPath];
    // 第二步 : 通过获取到的data 创建一个解档工具
    NSKeyedUnarchiver *keyedUnarchiver = [[NSKeyedUnarchiver alloc] initForReadingWithData:newData];
    // 第三步 : 创建一个person对象,接收解档结果
    Person *newPerson = [keyedUnarchiver decodeObjectForKey:@"person"];
    // 第四步 : 结束解档
    [keyedUnarchiver finishDecoding];
    #归解档是一种编码方式,不是数据本地化的方式
    # 复杂对象写入本地实际上使用的还是writeToFile 的简单写入本地的方法
    // 直接写入本地 是整存整取
    #在一个路径下存数据,最后一次存进去的东西会覆盖掉之前的
NSUserDefault
#pragma mark --- NSUserDefault ---
-(void)NSUserDefault{
    /** NSUserDefault:是一个单例,在整个程序中只有一个实例对象,他可以用于数据的永久保存,而且简单实用,这是他可以让数据自由传递的一个前提。(可以存储用户信息、夜间模式、字体大小)

     *  在实用NSUserDefault存储自定义对象的最初,我们必须知道可以存哪些类型的数据:
        1、NSNumber(NSInteger、float、double)
        2、NSString、NSArray、NSDictionary、BOOL、NSDate
     */
    //存
    //1、创建要存储的数组
    NSArray *array = @[@"A",@"B",@"C"];
    //2、创建NSUserDefault对象
    NSUserDefaults *user = [NSUserDefaults standardUserDefaults];
    [user setObject:array forKey:@"userArray"];
    NSLog(@"%@",user);

    //取
    NSArray *type = [user objectForKey:@"userArray"];
    NSLog(@"%@",[type objectAtIndex:2]);
}
新手小白,欢迎交流指正~~~

