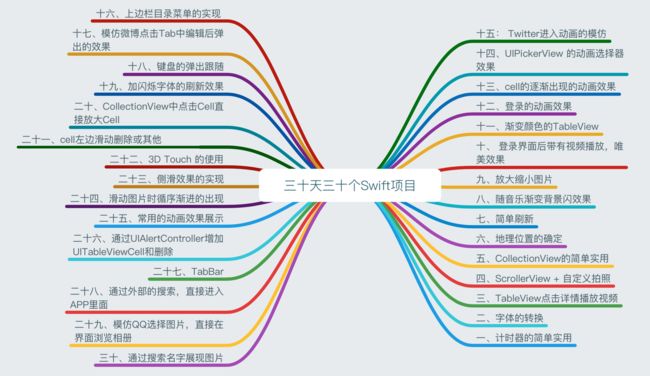
前几天在github上有一个叫30DaysofSwift比较火,作为一直也在关注Swift这块的我,果断下载下来学习,发现确实简单实用,所以自己也跟随作者试着重写,并将每一个Demo中的一些重点记录了一下,特此也非常感谢Allen朝辉的开源精神。
另外作者在上也有记录,自学 iOS - 三十天三十个 Swift 项目
一、 计时器的简单使用(day01)
注意小数点的保留小数位,否则会出现异常。
timeLabel.text = String(format: "%.1f", Counter)
当然NSTimer的基本使用也是需要OK的
Timer = NSTimer.scheduledTimerWithTimeInterval(0.1, target: self, selector: Selector("UpdateTimer"), userInfo: nil, repeats: true)
二、 字体的转换(day02)
了解 常用的字体
   for family in UIFont.familyNames() {
        for font in UIFont.fontNamesForFamilyName(family){
            print(font)
        }
   }
然后通过这方法使用就OK了
public /*not inherited*/ init?(name fontName: String, size fontSize: CGFloat)
三、 TableView点击详情播放视频(day03)
我觉的其中播放视频这块,路径别写错了
  let path = NSBundle.mainBundle().pathForResource("emoji zone", ofType: "mp4")
  playerView = AVPlayer(URL: NSURL(fileURLWithPath: path!))
  playViewController.player = playerView
  self.presentViewController(playViewController, animated: true) {
        self.playViewController.player?.play()
  }
另外作者用MVC模式也是简单经典的。
四、 ScrollerView + 自定义拍照(day04)
首先作者使用
  addChildViewController
  didMoveToParentViewController
让第一层永远只有一个 Controller ,很多场景都是实用的
当然自定义拍照这块,需要学习了解下
// MARK:- 属性
var captureSession : AVCaptureSession?
var stillImageOutput : AVCaptureStillImageOutput?
var previewLayer : AVCaptureVideoPreviewLayer?
@IBOutlet var cameraView: UIView!


//MARK:- CilcleLife
override func viewDidAppear(animated: Bool) {
    super.viewDidAppear(animated)
    previewLayer?.frame = cameraView.bounds
}

override func viewWillAppear(animated: Bool) {
    super.viewWillAppear(animated)
    // 初始化 session 对象来执行输入设备和输出设备之间的数据传递
    captureSession = AVCaptureSession()
    // 设置session 的规格
    captureSession?.sessionPreset = AVCaptureSessionPreset1920x1080
    // 输出设备的类型
    let backCamera = AVCaptureDevice.defaultDeviceWithMediaType(AVMediaTypeVideo)
    var error : NSError?
    // 输入流
    var input: AVCaptureDeviceInput!

    do {
        input = try AVCaptureDeviceInput(device: backCamera)
    } catch let error1 as NSError {
        error = error1
        input = nil
    }

    if (error == nil && captureSession?.canAddInput(input) != nil){
        // 加入输入流
        captureSession?.addInput(input)
        // 初始化照片输出流以及规格
        stillImageOutput = AVCaptureStillImageOutput()
        stillImageOutput?.outputSettings = [AVVideoCodecKey : AVVideoCodecJPEG]

        if (captureSession?.canAddOutput(stillImageOutput) != nil){
          // 加入输出流
            captureSession?.addOutput(stillImageOutput)
          // 图片预览层的输出
            previewLayer = AVCaptureVideoPreviewLayer(session: captureSession)
            previewLayer?.videoGravity = AVLayerVideoGravityResizeAspect
            previewLayer?.connection.videoOrientation = AVCaptureVideoOrientation.Portrait
             // View  加上 预览层
            cameraView.layer.addSublayer(previewLayer!)
            //  开始执行
            captureSession?.startRunning()

        }


    }


}
五、 CollectionView的简单实用 (day05)
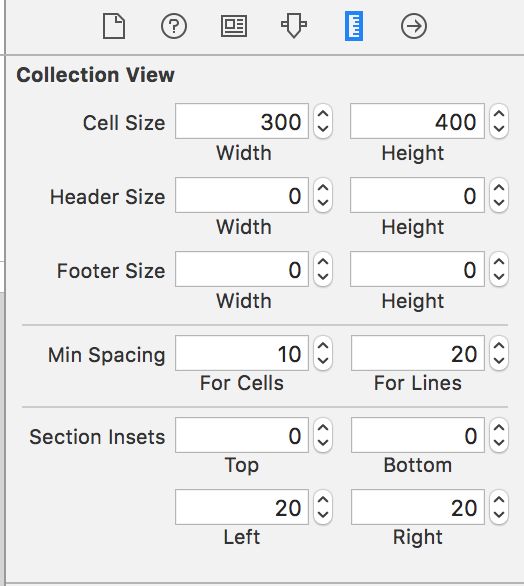
此处用的是IB 设置CollectionView,以前设置那个 UICollectionViewFlowLayout的地方就在这里啦
六、地理位置的确定(day06)
一定要记住iOS8之后,一定要在infoPlist 中加入
NSLocationAlwaysUsageDescription 和 NSLocationWhenInUseUsageDescription 才能正常使用地理位置。
七、简单刷新 (day07)
这个Demo是作者用UITableViewController加UIRefreshControl实现刷新的
// 核心代码
 tableViewController.refreshControl = self.refreshControl
 self.refreshControl.addTarget(self, action: "didRoadEmoji", forControlEvents: .ValueChanged)
 self.refreshControl.backgroundColor = UIColor(red:0.113, green:0.113, blue:0.145, alpha:1)
 let attributes = [NSForegroundColorAttributeName: UIColor.whiteColor()]
 self.refreshControl.attributedTitle = NSAttributedString(string: "Last updated on \(NSDate())", attributes: attributes)
 self.refreshControl.tintColor = UIColor.whiteColor()
而我是就是简单用UITableView + UIRefreshControl 实现的
 tableView.tableFooterView = UIView()
 refreshControl.addTarget(self, action: Selector("refreshTheData"), forControlEvents: UIControlEvents.ValueChanged)
  // 增加备注文字
 let attributes = [NSForegroundColorAttributeName: UIColor.grayColor()]
 refreshControl.attributedTitle = NSAttributedString(string: "上次刷新时间 \(NSDate())", attributes: attributes)
 tableView.addSubview(refreshControl)
八、随音乐渐变背景闪效果 (day08)
首先我们需要了解下CagradientLayer,它是用来生成两种或更多颜色平滑渐变的。
整个流程:通过定时改变背景颜色,并在上面添加一个预览颜色层。
// 随机改变背景颜色
    let redValue = CGFloat(drand48())
    let blueValue =  CGFloat(drand48())
    let greenValue = CGFloat(drand48())
    self.view.backgroundColor = UIColor(red: redValue, green: greenValue, blue: blueValue, alpha: 1.0)
// 制作预览层
    let gradientLayer = CAGradientLayer()
    // 先设置的大小
    gradientLayer.frame = self.view.frame
    // 设置五个不同的颜色
    let color1 = UIColor(white: 0.5, alpha: 0.2).CGColor as CGColorRef
    let color2 = UIColor(red: 1.0, green: 0, blue: 0, alpha: 0.4).CGColor as CGColorRef
    let color3 = UIColor(red: 0, green: 1, blue: 0, alpha: 0.3).CGColor as CGColorRef
    let color4 = UIColor(red: 0, green: 0, blue: 1, alpha: 0.3).CGColor as CGColorRef
    let color5 = UIColor(white: 0.4, alpha: 0.2).CGColor as CGColorRef
    // 放入颜色层中
    gradientLayer.colors = [color1, color2, color3, color4, color5]
    // 并为这五个颜色确定 locations
    gradientLayer.locations = [@0.10, @0.30, @0.50, @0.70, @0.90]
    // 设置开始点 和 结束点
    gradientLayer.startPoint = CGPointMake(0, 0)
    gradientLayer.endPoint = CGPointMake(1, 1)
    // 添加到上面
    self.view.layer.addSublayer(gradientLayer)
九、放大缩小图片(day09)
之前我的第一反应是用UIPinchGestureRecognizer,但是缩放出来的效果不怎么好,还是按作者的思路,UIScrollerView添加UIImageView,通过UIScrollerView的代理来解决。
此时要注意ScrollView的以下几个属性和代理方法:
// 视图在scrollView中的位置(UIEdgeInsetsZero)  也相当于设置内边距
public var contentInset: UIEdgeInsets
// 设置缩放系数
public var minimumZoomScale: CGFloat
public var maximumZoomScale: CGFloat

   // 返回将要缩放的UIView对象。要执行多次
func viewForZoomingInScrollView(scrollView: UIScrollView) -> UIView? {
}

// 当scrollView缩放时,调用该方法。在缩放过程中,回多次调用
func scrollViewDidZoom(scrollView: UIScrollView) {
}
十、 登录界面后带有视频播放,唯美效果(day10)
这个主要是对于视频播放的一个优化,其中这里面作者引用的两个类很有参考价值。
十一、渐变颜色的TableView (day11)
注意tableView中某个代理的使用
 func tableView(tableView: UITableView, willDisplayCell cell: UITableViewCell, forRowAtIndexPath indexPath: NSIndexPath)     {
}
同事继续使用CAGradientLayer,让其cell有凸出的感觉
十二、登录的动画效果 (day12)
注意这两个基本的动画效果,以及调整 constant 后需要 self.view.layoutIfNeeded()
UIView.animateWithDuration(0.5, delay: 0.00, options: UIViewAnimationOptions.CurveEaseOut, animations: {

        self.centerAlignUsername.constant += self.view.bounds.width
        self.view.layoutIfNeeded()

        }, completion: nil)

UIView.animateWithDuration(1.0, delay: 0.0, usingSpringWithDamping: 0.2, initialSpringVelocity: 10, options: UIViewAnimationOptions.CurveLinear, animations: {

        self.loginButton.bounds = CGRect(x: bounds.origin.x - 20, y: bounds.origin.y, width: bounds.size.width + 60, height: bounds.size.height)

        }, completion: nil)
后者是一个横向变宽的View弹出的动画效果,同时我们进一步了解下这个方法,通过Oc来看,更清楚一些。
+ (void)animateWithDuration:(NSTimeInterval)duration
                  delay:(NSTimeInterval)delay
 usingSpringWithDamping:(CGFloat)dampingRatio
  initialSpringVelocity:(CGFloat)velocity
                options:(UIViewAnimationOptions)options
             animations:(void (^)(void))animations
             completion:(void (^)(BOOL finished))completion
-
dampingRatio:usingSpringWithDamping的范围为0.0f到1.0f,数值越小「弹簧」的振动效果越明显。 -
velocity:initialSpringVelocity则表示初始的速度,数值越大一开始移动越快。 -
options: 自然是动画效果啦,看我们自己选择吧
详细可以看这篇使用 iOS 8 Spring Animation API 创建动画
十三、cell的逐渐出现的动画效果 (day13)
只要注意以下这个在viewWillAppear处理就OK了,以后我们的动画cell思路确实可以这样做。
override func viewWillAppear(animated: Bool) {
    super.viewWillAppear(animated)

    self.tableView.reloadData()
    // 该方法是获取界面上能显示出来了cell
    let cells = tableView.visibleCells
    // 获取总的高度
    let tableHeight: CGFloat = tableView.bounds.size.height

    // 先让每一cell 都在下面
    for i in cells {
        let cell: UITableViewCell = i as UITableViewCell
        // 改变位置
        cell.transform = CGAffineTransformMakeTranslation(0, tableHeight)
    }

    var index = 0

    for a in cells {

        let cell: UITableViewCell = a as UITableViewCell

        UIView.animateWithDuration(1.5, delay: 0.05 * Double(index), usingSpringWithDamping: 0.8, initialSpringVelocity: 0, options: [], animations: {
            // 回归位置
            cell.transform = CGAffineTransformMakeTranslation(0, 0);

            }, completion: nil)

        index += 1
    }

}
十四、UIPickerView 的动画选择器效果(day14)
此处考查的可以说是UIPickerView的用法,常用的几个代理方法以及下面这个方法:
  //主动去选择 改变的
 public func selectRow(row: Int, inComponent component: Int, animated: Bool)
以及随机数arc4random()的使用
通过arc4random()获取0到x-1之间的整数的代码如下
let value = (Int)arc4random()%x;
获取1到x之间的整数的代码如下
let  value = (Int)(arc4random()%x )+1
十五: Twitter进入动画的模仿 (day15)
我们得大致了解下CAKeyframeAnimation, keyframe顾名思义就是关键点的frame,你可以通过设定CALayer的始点、中间关键点、终点的frame,时间,动画会沿你设定的轨迹进行移动。以及C�ALayer的基本使用。
CALayer
    self.mask = CALayer()
    self.mask?.contents = UIImage(named: "twitter")?.CGImage
    // 缩放常量
    self.mask?.contentsGravity = kCAGravityResizeAspect
    // 大小
    self.mask?.bounds = CGRect(x: 0, y: 0, width: 100, height: 80)
    // 锚点
    self.mask?.anchorPoint = CGPoint(x: 0.5, y: 0.5)
    // 位置点
    self.mask?.position = CGPoint(x: imageView.frame.size.width / 2, y: imageView.frame.size.height / 2)
    // 真正将mask 赋值给 UIImageView上的mask
    imageView.layer.mask = self.mask
CAKeyframeAnimation
    let keyFrameAnimation = CAKeyframeAnimation(keyPath: "bounds")
    keyFrameAnimation.delegate = self
    // 持续的时间
    keyFrameAnimation.duration = 0.6
    // 开始的时间
    keyFrameAnimation.beginTime = CACurrentMediaTime() + 0.5
    // 这个属性用以指定时间函数,类似于运动的加速度,有以下几种类型
    /*

    1 kCAMediaTimingFunctionLinear//线性
    2 kCAMediaTimingFunctionEaseIn//淡入
    3 kCAMediaTimingFunctionEaseOut//淡出
    4 kCAMediaTimingFunctionEaseInEaseOut//淡入淡出
    5 kCAMediaTimingFunctionDefault//默认

    */
    keyFrameAnimation.timingFunctions = [CAMediaTimingFunction(name: kCAMediaTimingFunctionEaseInEaseOut), CAMediaTimingFunction(name: kCAMediaTimingFunctionEaseInEaseOut)]

    // 初始化大小
    let initalBounds = NSValue(CGRect: mask!.bounds)
    // 中间的大小
    let secondBounds = NSValue(CGRect: CGRect(x: 0, y: 0, width: 90, height: 73))
    // 最后的大小
    let finalBounds = NSValue(CGRect: CGRect(x: 0, y: 0, width: 1600, height: 1300))
    // values属性指明整个动画过程中的关键帧点,例如下面"initalBounds, secondBounds, finalBounds通过values指定的。需要注意的是,起点必须作为values的第一个值
    keyFrameAnimation.values = [initalBounds, secondBounds, finalBounds]
    // 该属性是一个数组,用以指定每个子路径(initalBounds, secondBounds, finalBounds)的时间
    keyFrameAnimation.keyTimes = [0, 0.3, 1]
    // 最后是看将其此效果放在哪里
    self.mask!.addAnimation(keyFrameAnimation, forKey: "bounds")
总的来说,动画这块需要继续学习,暂时好多地方还不太熟。

