LNMMP之nginx+“php-fpm”及memcached
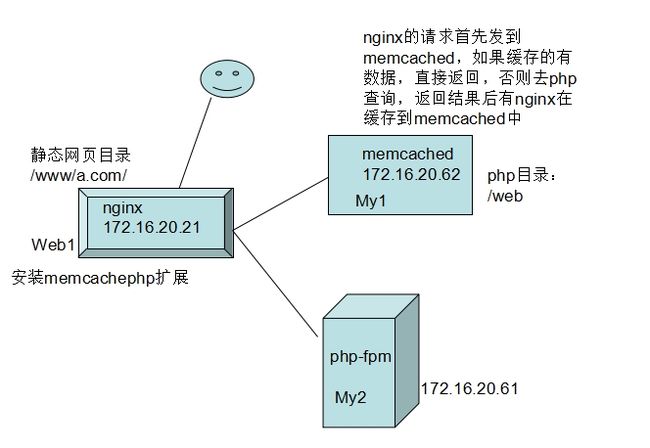
说明:nginx不能像apache一样动态的装卸载php模块,所以只能使用fastcgi协议跟后端php建立连接。Nginx提供静态页面,并将动态页面提交给后端php-fpm服务器处理,
为了应付更大的访问量对服务器造成的压力,方案引进了memcached做为缓存服务器。
Memcached是一种开发工具,作为一个服务器启动使用。要想使用它需要程序员在php代码中调用使用。需要结合使用memcachephp扩展来实现调用这一功能。
Memcached简介:
Memcached是一种免费、开源、高性能、分布式内存对象缓存系统,用于加速动态web应用程序,减轻数据库负载。可应用各种需要缓存的场景,其主要目的是通过降低对Database的访问来加速web应用程序。它是一个基于内存的“键值对”存储,用于存储数据库调用、API调用或页面引用结果的直接数据,如字符串、对象等。
Memcached简单而强大。它的简单的设计促进快速部署,易于开发,解决了大数据缓存面临许多问题。是一款比较常用的开发工具。
Memcached工作机制
1. 简单key/value存储:服务器不关心数据本身的意义及结构,只要是可序列化数据即可。、
2. 功能的实现一半依赖于客户端,一半基于服务器端:客户负责发送存储项至服务器端、从服务端获取数据以及无法连接至服务器时采用相应的动作;服务端负责接收、存储数据,并负责数据项的超时过期;
3. 各服务器间彼此无视:不在服务器间进行数据同步;
4. O(1)的执行效率
5. 清理超期数据:默认情况下,Memcached是一个LRU缓存,同时,它按事先预订的时长清理超期数据;memcached不会删除任何已缓存数据,只是在其过期之后不再为客户所见;而且,memcached也不会真正按期限清理缓存,而仅是当get命令到达时检查其时长;
官网下载地址:http://www.memcached.org/
安装:
l Nginx源码安装:
编译安装nginx需要事先需要安装开发包组"Development Tools"和 "Development Libraries"。同时,还需要专门安装pcre-devel包:
首先添加用户nginx,实现以之运行nginx服务进程:
# groupadd -r nginx
# useradd -r -g nginx nginx
接着开始编译和安装:
# ./configure \
  --prefix=/usr/local/nginx \
  --sbin-path=/usr/local/nginx/sbin/nginx \
  --conf-path=/etc/nginx/nginx.conf \
  --error-log-path=/var/log/nginx/error.log \
  --http-log-path=/var/log/nginx/access.log \
  --pid-path=/var/run/nginx/nginx.pid  \
  --lock-path=/var/lock/nginx.lock \
  --user=nginx \
  --group=nginx \
  --with-http_ssl_module \
  --with-http_flv_module \
  --with-http_stub_status_module \
  --with-http_gzip_static_module \
  --http-client-body-temp-path=/var/tmp/nginx/client/ \
  --http-proxy-temp-path=/var/tmp/nginx/proxy/ \
  --http-fastcgi-temp-path=/var/tmp/nginx/fcgi/ \
  --http-uwsgi-temp-path=/var/tmp/nginx/uwsgi \
  --http-scgi-temp-path=/var/tmp/nginx/scgi \
  --with-pcre
# make && make install
l 工作于fastcgi模式的php的安装
# yum -y groupinstall "X Software Development"
如果想让编译的php支持mcrypt、mhash扩展和libevent,此处还需要如下几个rpm包并安装之:
libmcrypt-2.5.8-4.el5.centos.i386.rpm
libmcrypt-devel-2.5.8-4.el5.centos.i386.rpm
mhash-0.9.9-1.el5.centos.i386.rpm
mhash-devel-0.9.9-1.el5.centos.i386.rpm
mcrypt-2.6.8-1.el5.i386.rpm
# tar xf php-5.4.4.tar.bz2
# cd php-5.4.4
#  ./configure --prefix=/usr/local/php --with-mysql=/usr/local/mysql --with-openssl --enable-fpm --enable-sockets --enable-sysvshm  --with-mysqli=/usr/local/mysql/bin/mysql_config --enable-mbstring --with-freetype-dir --with-jpeg-dir --with-png-dir --with-zlib-dir --with-libxml-dir=/usr --enable-xml  --with-mhash --with-mcrypt  --with-config-file-path=/etc --with-config-file-scan-dir=/etc/php.d --with-bz2 --with-curl
实验步骤:
一、配置nginx
1、配置nginx提供虚拟主机
server {
        listen       80;
        server_name  www.a.com;
#       root /www/a.com;
        location ~\.php$ {
            fastcgi_pass   172.16.20.61:9000;
            root /web;
            fastcgi_index  index.php;
            fastcgi_param  SCRIPT_FILENAME  /scripts$fastcgi_script_name;
            include        fastcgi_params;
            fastcgi_cache fcgi;
            fastcgi_cache_valid 200 10m;
            fastcgi_cache_valid 301 302 3m;
            fastcgi_cache_valid any 1m;
        }
        location ~*/(status|ping){-----------可以查看php—fpm状态信息
#               root /www/a.com;
                fastcgi_pass 172.16.20.61:9000;
                fastcgi_param SCRIPT_FILENAME  $fastcgi_script_name;
                include fastcgi_params;
        }
2、测试nginx和php的结合是否成功运行
后端php监听端口已开启
[root@My1 ~]# ss -tunlp
tcp   LISTEN     0      128       172.16.20.61:9000                *:*      users:(("php-fpm",2148,7),("php-fpm",2149,0),("php-fpm",2150,0))
二、memcached服务器的配置
1、安装启动memcached
[root@My2 ~]# yum install memcached
   [root@My1 ~]# memcached -u memcached
[root@My1 ~]# ss -tunlp
udp    UNCONN     0      0                                                        :::11211                                                   :::*      users:(("memcached",2428,29))
tcp    LISTEN     0      128                                                      :::11211                                                   :::*      users:(("memcached",2428,27))
tcp    LISTEN     0      128                                                       *:11211                                                    *:*      users:(("memcached",2428,26))
tcp    LISTEN     0      128                                                      :::111                                                     :::*
2、查看memcached详细信息
[root@My2 ~]# memcached -u memcached -vv
3、slab class   1: chunk size        96 perslab   10922
4、slab class   2: chunk size       120 perslab    8738
5、slab class   3: chunk size       152 perslab    6898
6、slab class   4: chunk size       192 perslab    5461
7、slab class   5: chunk size       240 perslab    4369
8、slab class   6: chunk size       304 perslab    3449
9、slab class   7: chunk size       384 perslab    2730
10、slab class   8: chunk size       480 perslab    2184
11、slab class   9: chunk size       600 perslab    1747
3、使用telnet连接查看memcached信息
Memcached提供一组基本命令用于基于命令行调用其服务或查看服务器状态等。
[root@My2 ~]# telnet 127.0.0.1 11211
Trying 127.0.0.1...
Connected to 127.0.0.1.
Escape character is '^]'.
Stats------------------键入stats查看详情
STAT pid 2480
STAT uptime 46
STAT time 1398506695
STAT version 1.4.4
STAT pointer_size 64
STAT rusage_user 0.003999
STAT rusage_system 0.000000
STAT curr_connections 10
STAT total_connections 12
add xuxu 0 50 12
hello xuxuxu
STORED
get xuxu
VALUE xuxu 0 12
hello xuxuxu
END
三、安装memcachephp扩展,让php连接测试memcached
程序员在开发的时候,自行调用了memcached的API,memcached的功能才能生效,而且要想使用还需要安装php和memcached 的扩展。可以去php官网下载memcache扩展包
在php所在的主机安装
[root@My1 ~]# cd memcache-2.2.7
[root@My1 memcache-2.2.7]# /usr/local/php/bin/ph
phar        phar.phar   php         php-cgi     php-config  phpize
[root@My1 memcache-2.2.7]# /usr/local/php/bin/phpize
Configuring for:
PHP Api Version:         20100412
Zend Module Api No:      20100525
Zend Extension Api No:   220100525
[root@My1 memcache-2.2.7]# ./configure --with-php-config=/usr/local/php/bin/php-config --enable-memcache
[root@My1 memcache-2.2.7]# make && make install
安装完成的时候会生成一个memcache.so模块的路径,记得把这个路径记下来写到php的配置文件中。
编辑/usr/local/php/lib/php.ini,在“动态模块”相关的位置添加如下一行来载入memcache扩展:
extension=/usr/local/php/lib/php/extensions/no-debug-non-zts-20090626/memcache.so
然后就可以写一个测试页面,来测试php是否能与后端缓存服务器联系了。
[root@My1 php]# vim /web/testmem.php
connect("172.16.20.62", 11211)  or die("Could not connect");
写上你的缓存服务器的ip地址。
$version = $mem->getVersion();
echo "Server's version: ".$version."
\n";
$mem->set('hellokey', 'Hello World', 0, 600) or die("Failed to save data at the memcached server");
echo "Store data in the cache (data will expire in 600 seconds)
\n";
$get_result = $mem->get('hellokey');
echo "$get_result is from memcached server.";
?>
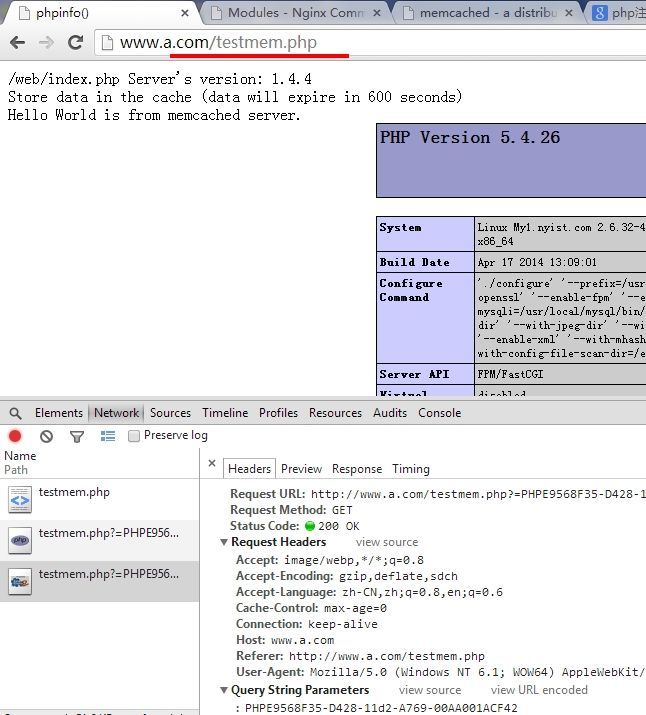
Ok.打开浏览器测试吧。
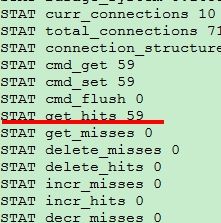
刷新可见此值变大
四、好用的查看memcached服务器工作情况的工具的安装使用
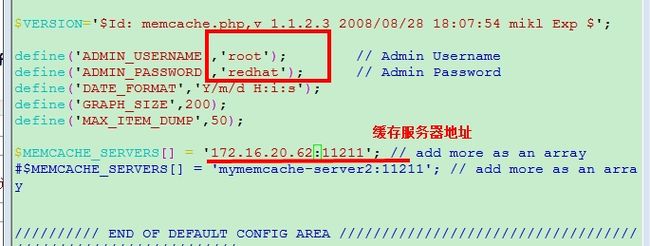
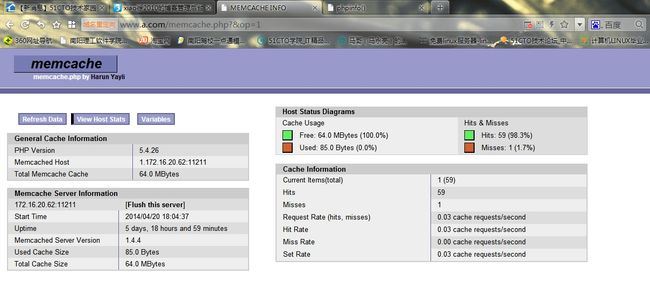
1.直接解压各种memcache管理类工具到页面目录下,修改连接的缓存服务器ip即可
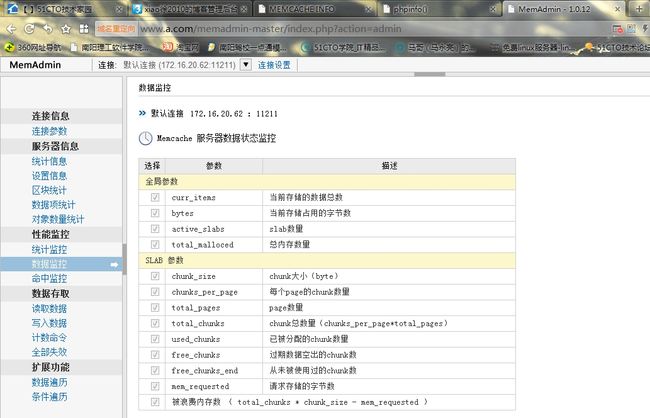
2、好用的中文节目缓存服务器查看工具admin-master
统计信息
| 参数 | 值 | 描述 |
|---|---|---|
| pid | 8337 | memcache服务器进程ID |
| uptime | 6536 | 服务器已运行秒数 |
| time | 1398023613 | 服务器当前Unix时间戳 |
| version | 1.4.4 | memcache版本 |
| pointer_size | 64 | 操作系统指针大小 |
| rusage_user | 0.070989 | 进程累计用户时间 |
| rusage_system | 0.378942 | 进程累计系统时间 |
| curr_connections | 11 | 当前连接数量 |
| total_connections | 164 | Memcached运行以来连接总数 |
| connection_structures | 12 | Memcached分配的连接结构数量 |
| cmd_get | 60 | get命令请求次数 |
| cmd_set | 59 | set命令请求次数 |
| cmd_flush | 3 | flush命令请求次数 |
| get_hits | 59 | get命令命中次数 |
| get_misses | 1 | get命令未命中次数 |
| delete_misses | 0 | delete命令未命中次数 |
| delete_hits | 0 | delete命令命中次数 |
| incr_misses | 0 | incr命令未命中次数 |
| incr_hits | 0 | incr命令命中次数 |
| decr_misses | 0 | decr命令未命中次数 |
| decr_hits | 0 | decr命令命中次数 |
| cas_misses | 0 | cas命令未命中次数 |
| cas_hits | 0 | cas命令命中次数 |
| cas_badval | 0 | 使用擦拭次数 |
| auth_cmds | 0 | 认证命令处理的次数 |
| auth_errors | 0 | 认证失败数目 |
| bytes_read | 4337 | 读取总字节数 |
| bytes_written | 74120 | 发送总字节数 |
| limit_maxbytes | 67108864 | 分配的内存总大小(字节) |
| accepting_conns | 1 | 接受新的连接 |
| listen_disabled_num | 0 | 失效的监听数 |
| threads | 4 | 当前线程数 |
| conn_yields | 0 | 连接操作主动放弃数目 |
| bytes | 0 | 当前存储占用的字节数 |
| curr_items | 0 | 当前存储的数据总数 |
| total_items | 59 | 启动以来存储的数据总数 |
| evictions | 0 | LRU释放的对象数目 |
| 参数 | 值 | 描述 |
|---|---|---|
| maxbytes | 67108864 | 最大字节数限制(0无限制) |
| maxconns | 1024 | 允许最大连接数 |
| tcpport | 11211 | TCP端口 |
| udpport | 11211 | UDP端口 |
| inter | NULL | IP地址 |
| verbosity | 0 | 日志(0=none,1=som,2=lots) |
| oldest | 3397 | 最老对象过期时间 |
| evictions | on | LRU可用(on/off) |
| domain_socket | NULL | Socketpath |
| umask | 700 | 创建Socket的掩码 |
| growth_factor | 1.25 | 增长因子 |
| chunk_size | 48 | chunk大小(key+value+flags) |
| num_threads | 4 | 线程数(默认4,可通过-t参数设置) |
| stat_key_prefix | : | stats分隔符 |
| detail_enabled | no | 显示stats细节信息(yes/no) |
| reqs_per_event | 20 | 最大IO吞吐量(每event) |
| cas_enabled | yes | 是否启用CAS(yes/no,-C禁用) |
| tcp_backlog | 1024 | TCP监控日志 |
| binding_protocol | auto-negotiate | 绑定协议 |
| auth_enabled_sasl | no | 是否启用SASL验证(yes/no) |
| item_size_max | 1048576 | 数据最大尺寸 |
