一.rsync客户端与服务端结构图:
日常维护中,数据备份算是比较基本的一个了,rsync很好的解决了繁琐的数据时时同步,不需要手动指定变化的数据,而是由rsync自动检测,发现数据不一致时,就开始备份或者推送到其他rsync主机上。inotify是linux监控文件变化的监控工具,可以配合rsync更好的完成工作。很多公司操作系统可能都是不统一的,上面就又添加的一个windows的主机,已实现将在windows主机上将linux主机中的数据拉取到win主机上。
二.rsync简介。
1.)rsync简介,rsync是一个数据同步工具,可以根据数据的变化时时同步,和cp命令及scp命令使用相差不多,命令选项方面也几乎一致。
2.)rsync的特点:可以镜像保存整个目录树或文件系统,传输速率可观,支持ssh实现安全数据传输,支持匿名传输。
3.)rsync工作模式:
shell模式,和cp命令相似,也称为本地文件传输模式。
远程shell模式,和scp命令相似,可以利用ssh协议承载远程传输过程。
列表模式,列表方式出数据源中的内容,也可以远程使用。
服务模式,此时rsync是一个守护进程,能接收客户端数据同步。
4.)rsync命令选项:
5.)rsync几种模式使用。rsync默认就是安装好的。
rsync远端shell模式,本地传输数据到远端。
# rsync -r --stats -e ssh --progress /etc/pam.d [email protected]:/backup/data
# ls
pam.d

#注意/pam.d 和/pam.d/ 传输时候的差距。

# rsync -r --stats -e ssh --progress /etc/pam.d/[email protected]:/backup/data
# ls
atd         cvs                  newrole           polkit-1  runuser           sshd        su-l
chfn        eject                other             poweroff  runuser-l          ssh-keycat  system-auth-ac
chsh        fingerprint-auth-ac  pam.d             reboot   setup              su          system-config-network
config-util halt                 passwd            remote    smartcard-auth-ac  sudo       system-config-network-cmd
crond       login               password-auth-ac  run_init  smtp.postfix       sudo-i
6.)远端接收数据到本地。
# rsync -a --stats --progress [email protected]:/etc /tmp
# ls /tmp/
etc
7.)rsync列表模式。
# rsync -nv [email protected]:/tmp/
[email protected]'s password:
receiving file list ... done
drwxrwxrwt       4096 2014/08/22 03:40:01 .
-rw-r--r--     813976 2014/08/12 17:59:44apr-1.5.0.tar.bz2
-rw-r--r--     695303 2014/08/12 17:59:44 apr-util-1.5.3.tar.bz2
-rw-r--r--    4780289 2014/08/12 17:59:44 httpd-2.4.4.tar.bz2
-rw-r--r--    4724343 2012/06/29 19:27:06 phpMyAdmin-3.5.1-all-languages.tar.bz2
-rw-r--r--    4657514 2012/03/12 16:58:14 wordpress-3.3.1-zh_CN.zip
-rw-------          0 2014/08/12 17:05:23 yum.log
drwxrwxrwt       4096 2014/08/21 21:44:13 .ICE-unix
drwxr-xr-x       4096 2014/08/12 18:08:03 apr-1.5.0
drwxr-xr-x       4096 2014/08/12 18:10:18 apr-util-1.5.3
drwxr-xr-x       4096 2014/08/12 18:17:58 httpd-2.4.4
drwxr-xr-x       4096 2014/08/12 23:53:21 phpMyAdmin-3.5.1-all-languages

sent 11 bytes received 369 bytes  152.00bytes/sec
total size is 15671425  speedup is 41240.59 (DRY RUN)
8.)rsync服务模式。
8.1)安装超级守护进程,并开启rsync服务。
# yum -y install xinetd #安装超级守护进程。

# vim /etc/xinetd.d/rsync
# default: off
# description: The rsync server is a good additionto an ftp server, as it \
#      allows crc checksumming etc.
service rsync
{
       disable = no     #启用rsync
       flags           = IPv6
       socket_type     = stream
       wait            = no
       user            = root
       server          = /usr/bin/rsync
       server_args     = --daemon
       log_on_failure  += USERID
}

# chkconfig rsync on #开机启动
8.2)编辑rsync配置文件,默认是没有的。
# vim /etc/rsyncd.conf
# Global Settings
uid = nobody                   #运行进程的用户。
gid = nobody                   #运行进程的组。
use chroot = no                #运行rsync时不可以使用chroot。
max connections = 10           #最多允许多少客户端同时请求数据。
strict modes = yes             #启用严格模式。
pid file = /var/run/rsyncd.pid #rsync的pid文件位置。
log file = /var/log/rsyncd.log #rsync日志位置。

# Directory to be synced
[tools]                        #类似于共享名。
path = /backup/data            #数据同步目录。
ignore errors = yes            #传输时忽略错误信息。
read only = no                 #是否只读。
write only = no                #是否为只写。
hosts allow = 172.16.0.0/16    #允许同步的网段。
hosts deny = *                 #由上面过滤下来,超出172.16.0.0网段的都不允许同步。
list = false                   #是否允许远端列出目录下的文件。
uid = root                     #共享使用哪个用户身份运行。
gid = root                     #共享使用哪个组身份运行。
8.3)重启xinetd,查看rsync监听端口。
# /etc/init.d/xinetd start #启动超级守护进程。
Starting xinetd:                                          [  OK  ]
# ss –tnl  #rsync监听在873端口
State     Recv-Q Send-Q                                   Local Address:Port                                     PeerAddress:Port
LISTEN     0     64                                                 :::873
9)客户主机向rsync服务主机推送数据。
切换到172.16.32.10主机
# rsync /etc/fstab 172.16.32.11::tools
10.)在回到rsync主机看看/backup/data下的数据。
# ls /backup/data/ #rsync服务端主机查看
fstab
11.)另外一种方法,基于rsync协议的推送。
# rsync -a /etc/pam.d  rsync://172.16.32.11/tools

# ls /backup/data/  #rsync服务端主机查看
pam.d
12.)远端主机向rsync主机拉取数据。
# rsync -a 172.16.32.11::tools/ /tmp

# ls /tmp/ #rsync服务端主机操作
  pam.d
三.rsync + inotify 实现数据时时同步。
1.)infotify简介:
inotify在Linux内核2.6.13上已经被添加到内核中,是一个可以跟踪文件数据变化的监控工具,结合rsync,对发生变化的数据时时推进同步。
2.)查看内核版本,以及infotify文件位置。
# uname -r
2.6.32-431.el6.x86_64
# ls -l /proc/sys/fs/inotify/
total 0
-rw-r--r-- 1 root root 0 Aug 20 17:26max_queued_events
-rw-r--r-- 1 root root 0 Aug 20 17:26max_user_instances
-rw-r--r-- 1 root root 0 Aug 20 17:26max_user_watches
3.)客户端安装inotify-tools,实现两个主机目录数据同步。
# rpm -ql inotify-tools
/usr/bin/inotifywait #监控文件变化命令。
/usr/bin/inotifywatch #监控时间变化,访问次数等。
…
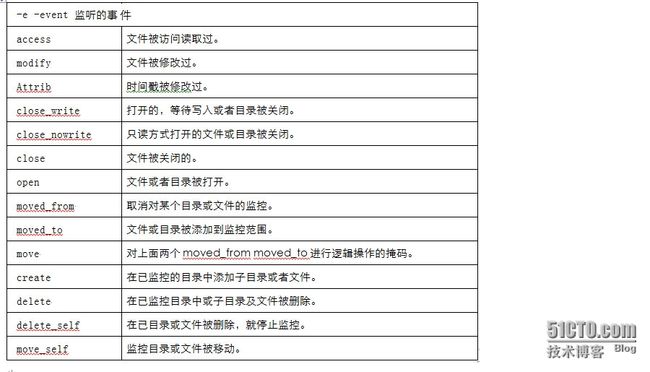
4.)inotify命令选项。
5.)添加inotify时时监控脚本,实现数据时时同步。
# vim /usr/local/bin/inotify.sh
#!/bin/bash
/usr/bin/inotifywait -mrq --timefmt '%d/%m/%y%H:%M' --format '%T %w%f' -e modify,delete,create,attrib /data/ | while readfile
do
/usr/bin/rsync -vzrtopg --delete --progress /data/  [email protected]::tools
echo "${files} was rsynced" >>/var/log/rsync.log 2>&1
done
6.)客户端添加一个数据,测试是否rsync+inotify客户端和rsync服务端数据是否同步。
使用bash –x 可以看到脚本的执行过程。
# bash -x /usr/local/bin/inotify.sh
+ read file
+ /usr/bin/inotifywait -mrq --timefmt '%d/%m/%y%H:%M' --format '%T %w%f' -e modify,delete,create,attrib /data/
#当我在客户端创建一个nihao的时候
sending incremental file list
./
nihao/ #这里会显示出来新创建的数据

sent 68 bytes received 16 bytes  168.00bytes/sec
total size is 0 speedup is 0.00
+ echo ' was rsynced'
+ read file
7.)再去rsync服务端查看下是否同步。
# ls /backup/data/
nihao
可以定义cron任务计划,每分钟执行一次。
*/1 * * * */bin/sh /usr/local/bin/inotify.sh & &>/dev/null
四.在windows rsync客户端主机上拉取linux数据实现同步。
window操作系统为WindwosServer 2008 R2。
1.)提前安装好rsync软件,window版本。
2.)使用2008系统的PowerShell查看rsync的端口号。检查是否启动。
3.)开始拉取linux主机上的数据。
数据可以同步了。
总结:即使在rsync服务器端删除了数据也没关系,在下一次执行脚本的时候,会把缺失的数据一起补回去。这里没有使用rsync用户验证,一般服务器都是有两块网卡,同步数据的时候都是使用内网网卡,外网卡需要支撑线上业务。既然使用内网网卡,rsync主机端也定义了合法网段才给同步数据,所以就不做用户认证了。


