Linux裁剪---【kernel+busyboxy+dropbear+nginx】
本文将介绍通过完全手动定制内核,在此基础上添加busybox,并实现远程登陆,使裁剪的linux能够运行nginx。在此之前介绍一下linux系统的启动流程。
为虚拟机准备一块1G(大小自定)的硬盘 为新的硬盘分区
/dev/sdb1=50M剩余的容量全部给/dev/sdb2
echo -e "n \n p \n 1 \n \n +50M \n n \n p \n 2 \n \n \n w \n" |fdisk /dev/sdb
查看结果:
Device Boot Start End Blocks Id System
/dev/sdb1 1 7 56196 83 Linux
/dev/sdb2 8 130 987997+ 83 Linux
格式化分区
mke2fs -t ext4 /dev/sdb1
mke2fs -t ext4 /dev/sdb2
安装grub引导程序
mkdir /mnt/boot
mkdir /mnt/sysroot
挂载/dev/sdb1 到 /mnt/boot
mount /dev/sdb1 /mnt/boot
grub-install --root-directory=/mnt /dev/sdb
执行结果如下
[root@localhost ~]# grub-install --root-directory=/mnt /dev/sdb
Probing devices to guess BIOS drives. This may take a long time.
Installation finished. No error reported.
This is the contents of the device map /mnt/boot/grub/device.map.
Check if this is correct or not. If any of the lines is incorrect,
fix it and re-run the script `grub-install'.
(fd0)/dev/fd0
(hd0)/dev/sda
(hd1)/dev/sdb
查看是否安装成功
[root@localhost ~]# ls /mnt/boot/grub/
device.map fat_stage1_5 iso9660_stage1_5 minix_stage1_5 stage1ufs2_stage1_5 xfs_stage1_5
e2fs_stage1_5 ffs_stage1_5 jfs_stage1_5 reiserfs_stage1_5 stage2 vstafs_stage1_5
查看自己的硬件类型
[root@localhost ~]# lspci
00:00.0 Host bridge: Intel Corporation 440FX - 82441FX PMC [Natoma] (rev 02)
00:01.0 ISA bridge: Intel Corporation 82371SB PIIX3 ISA [Natoma/Triton II]
00:01.1 IDE interface: Intel Corporation 82371AB/EB/MB PIIX4 IDE (rev 01)
00:02.0 VGA compatible controller: InnoTek Systemberatung GmbH VirtualBox Graphics Adapter
00:03.0 Ethernet controller: Intel Corporation 82540EM Gigabit Ethernet Controller (rev 02)
00:04.0 System peripheral: InnoTek Systemberatung GmbH VirtualBox Guest Service
00:05.0 Multimedia audio controller: Intel Corporation 82801AA AC'97 Audio Controller (rev 01)
00:06.0 USB controller: Apple Inc. KeyLargo/Intrepid USB
00:07.0 Bridge: Intel Corporation 82371AB/EB/MB PIIX4 ACPI (rev 08)
00:14.0 SCSI storage controller: LSI Logic / Symbios Logic 53c1030 PCI-X Fusion-MPT Dual Ultra320 SCSI
编译内核:
[root@localhost ~]# tar -xf linux-3.12.26.tar.xz -C /usr/src/
[root@localhost ~]# ls /usr/src/
linux-3.12.26
[root@localhost ~]# ln -sv /usr/src/linux-3.12.26/ /usr/src/linux
`/usr/src/linux' -> `/usr/src/linux-3.12.26/'
[root@localhost ~]# cd /usr/src/linux
[root@localhost linux]# ls
arch COPYING crypto drivers fs init Kbuild kernel MAINTAINERS mm README samples security tools virt
block CREDITS Documentation firmware include ipc Kconfig lib Makefile net REPORTING-BUGS scripts sound usr
[root@localhost linux]# make allnoconfig
HOSTCC scripts/basic/fixdep
HOSTCC scripts/kconfig/conf.o
SHIPPED scripts/kconfig/zconf.tab.c
SHIPPED scripts/kconfig/zconf.lex.c
SHIPPED scripts/kconfig/zconf.hash.c
HOSTCC scripts/kconfig/zconf.tab.o
HOSTLD scripts/kconfig/conf
scripts/kconfig/conf --allnoconfig Kconfig
#
# configuration written to .config
#
[root@localhost linux]# make menuconfig
下面开始配置所有功能直接编译进内核
进入General setup 选项
返回首界面进入Processor type and features
进入Processor family (Generic-x86-64)选择cpu类型 默认即可
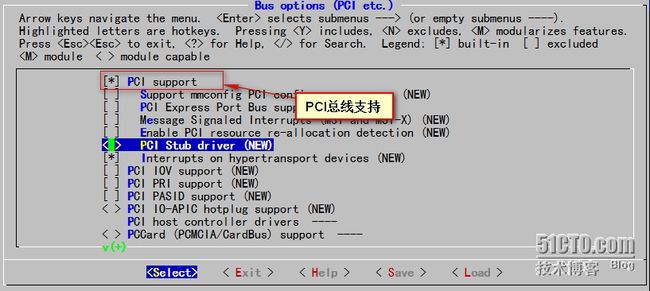
返回首界面进入Bus options (PCI etc.)
返回首界面进入 Executable file formats / Emulations
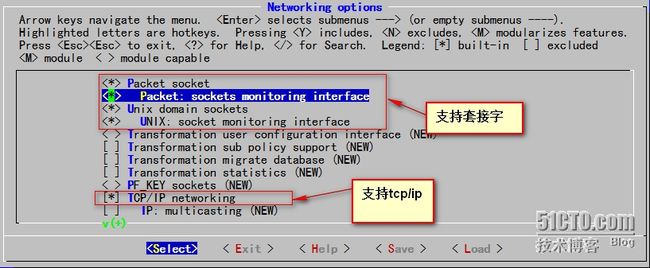
返回首界面进入Networking support ---> Networking options
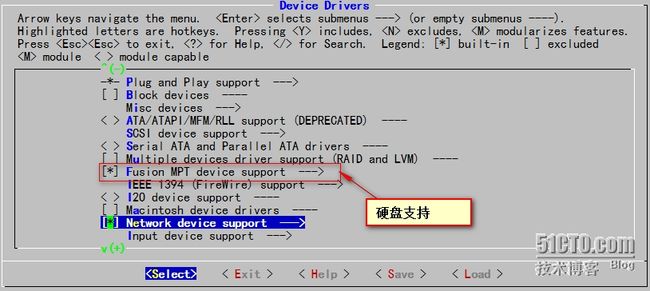
返回首界面进入 Device Drivers --->Generic Driver Options
返回上级界面
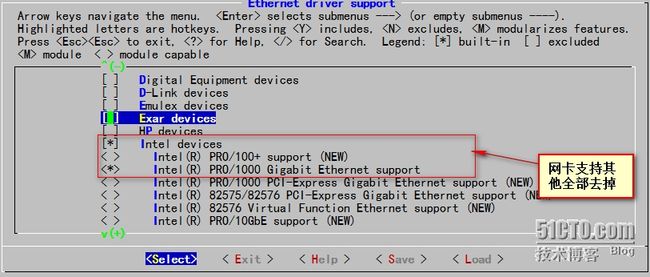
返回上级进入Network device support---> Ethernet driver support (NEW)
返回到Network device support此界面下选择Input device support
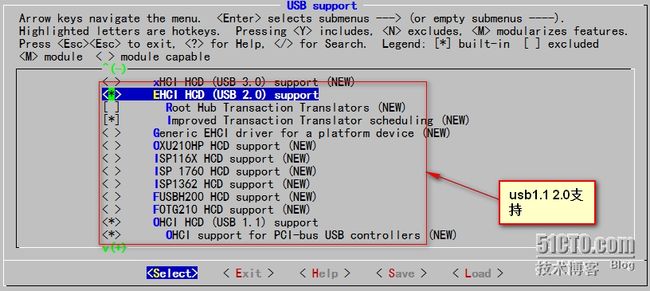
返回上级添加usb支持 USB support
返回首界面File systems
退出保存配置
[root@localhost linux]# make
[root@localhost linux]# make bzImage
make[1]: Nothing to be done for `all'.
make[1]: Nothing to be done for `relocs'.
CHK include/config/kernel.release
CHK include/generated/uapi/linux/version.h
CHK include/generated/utsrelease.h
CALL scripts/checksyscalls.sh
CHK include/generated/compile.h
make[3]: `arch/x86/realmode/rm/realmode.bin' is up to date.
Kernel: arch/x86/boot/bzImage is ready (#1)
[root@localhost linux]# cp ./arch/x86/boot/bzImage /mnt/boot
[root@localhost linux]# ls /mnt/boot/
bzImage grub lost+found
为新系统添加rootfs 及 二进制程序 由busybox提供
[root@localhost ~]# tar -xf busybox-1.22.1.tar.bz2 -C /usr/src/
[root@localhost ~]# ls /usr/src/
busybox-1.22.1 linux linux-3.12.26
busybox-1.22.1.tar.bz2 glibc-static-2.12-1.132.el6.x86_64.rpm mariadb-5.5.36-linux-x86_64.tar.gz
[root@localhost ~]# cd /usr/src/busybox-1.22.1/
[root@localhost busybox-1.22.1]# ls
applets configs editors libbb Makefile.custom printutils shell
编译busybox
[root@localhost linux-3.12.26]# make menuconfig
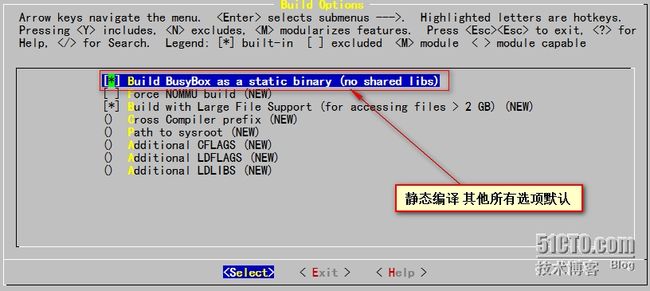
进入Busybox Settings ---->Build Options
yum install glibc-static
[root@localhost busybox-1.22.1]# make
[root@localhost busybox-1.22.1]# make install
此时会在当前目录生成_install目录
[root@localhost busybox-1.22.1]# ls _install/
bin linuxrc sbin usr
挂在/dev/sdb2 到 /mnt/sysroot
[root@localhost busybox-1.22.1]# mount /dev/sdb2 /mnt/sysroot/
[root@localhost busybox-1.22.1]# cp -a ./_install/* /mnt/sysroot/
[root@localhost busybox-1.22.1]# ls /mnt/sysroot/
bin linuxrc lost+found sbin usr
[[email protected]]#mkdir/mnt/sysroot/{etc,root,mnt,media,proc,sys,dev,home,lib,lib64,var,tmp}
由于busybox启动时默认的init程序为/etc/init.d/rcS
[root@localhost busybox-1.22.1]# mkdir -pv /mnt/sysroot/etc/init.d
mkdir: created directory `/mnt/sysroot/etc/init.d'
[root@localhost busybox-1.22.1]# vim /mnt/sysroot/etc/init.d/rcS
#!/bin/sh
mount -n -t ext4 -o remount,rw /dev/sda2 /
mount -n -t ext4 /dev/sda1 /boot
mount -n -t tmpfs none /dev
mount -n -t proc proc /proc
mount -n -t sysfs sysfs /sys
mkdir /dev/pts/
mount -n -t devpts devpys /dev/pts
[ -r /etc/sysconfig/network ]&&source /etc/sysconfig/network
if [ ! -z $HOSTNAME ];then
/bin/hostname $HOSTNAME
else
/bin/hostname localhost
fi
[root@localhost busybox-1.22.1]# vim /mnt/sysroot/etc/profile
export PS1="[\u@\h \w]\$"
[root@localhost linux]# mkdir -pv /mnt/sysroot/etc/sysconfig
mkdir: created directory `/mnt/sysroot/etc/sysconfig'
[root@localhost linux]# vim /mnt/sysroot/etc/sysconfig/network
HOSTNAME=www.mylinux.com
编辑grub配置文件
[root@localhost busybox-1.22.1]# vim /mnt/boot/grub/grub.conf
default=0
timeout=5
title busy-box-1.0
root(hd0,0)
kernel /bzImage ro root=/dev/sda2
先测试下看能否启动
下面使其能够以用户名密码进行登录
[root@localhost ~]# vim /mnt/sysroot/etc/inittab
::sysinit:/etc/init.d/rcS
tty1::respawn:/sbin/getty 19200 tty1
tty2::respawn:/sbin/getty 19200 tty2
为其提供/etc/passwd /etc/shadow /etc/group /etc/gshadow
直接从当前系统复制
[root@localhost ~]# cp -p /etc/passwd /mnt/sysroot/etc/
[root@localhost ~]# cp -p /etc/shadow /mnt/sysroot/etc/
[root@localhost ~]# cp -p /etc/group /mnt/sysroot/etc/
[root@localhost ~]# cp -p /etc/gshadow /mnt/sysroot/etc/
编辑/mnt/sysroot/passwd 将登录shell改为/bin/sh
测试是否成功
正常登录
下面为其提供远程连接功能
编译安装dropbear(ssh)
为了进行登录名解析需要 linss库文件和/etc/nsswitch.conf
启用网络功能
[root@localhost ~]# cd dropbear-2014.65
./configure
make PROGRAMS="dropbear dbclient dropbearkey dropbearconvert scp"
[root@localhost dropbear-2014.65]# make install
默认安装在/usr/local/{bin,sbin}
将此应用移植到目标系统移植脚本如下
#!/bin/bash
#

MntDIR1="/mnt/boot"

MntDIR2="/mnt/sysroot"

PORAPP ()

{

  read -p "Plz input the app: " APPLI

  until [ "$APPLI" == quit ];do

        while true;do

            if  which --skip-alias $APPLI ;then

                WHERE=$(which --skip-alias $APPLI)

                DIRAPP=$(dirname $WHERE)

                [ -d ${MntDIR2}${DIRAPP} ]||mkdir -p ${MntDIR2}${DIRAPP}

                [ -e ${MntDIR2}${WHERE} ]||cp $WHERE ${MntDIR2}${DIRAPP}

                LIBS=$(ldd $WHERE|grep -oE "(/[[:alnum:]]*/[^[:space:]]*[[:space:]])")

                for i in $LIBS;do

                    DIRLIB=$(dirname $i)

                    [ -d ${MntDIR2}$DIRLIB ]||mkdir -p ${MntDIR2}$DIRLIB

                    cp $i ${MntDIR2}$i

                done

               read -p "Do you want to another app? or quit: " APPLI

               continue 2

            else

                read -p "Input is not app!! Plz input again or quit: " APPLI

                continue 2

            fi

          done

 done

}

##################MAIN##################

MAIN ()

{
 PORAPP

}

MAIN
运行脚本
[root@localhost dropbear-2014.65]# bash 123.sh
bash: 123.sh: No such file or directory
[root@localhost dropbear-2014.65]# bash /root/123.sh
Plz input the app: /usr/local/bin/dbclient
/usr/local/bin/dbclient
Do you want to another app? or quit: /usr/local/bin/dropbearkey
/usr/local/bin/dropbearkey
Do you want to another app? or quit: /usr/local/bin/dropbearconvert
/usr/local/bin/dropbearconvert
Do you want to another app? or quit: /usr/local/sbin/dropbear
/usr/local/sbin/dropbear
Do you want to another app? or quit: quit
查看移植结果
[root@localhost dropbear-2014.65]# ls /mnt/sysroot/usr/local/{bin,sbin}
/mnt/sysroot/usr/local/bin:
dbclient dropbearconvert dropbearkey
/mnt/sysroot/usr/local/sbin:
dropbear
[root@localhost dropbear-2014.65]# ls /mnt/sysroot/lib64/
ld-linux-x86-64.so.2 libcrypt.so.1 libc.so.6 libdl.so.2 libfreebl3.so libutil.so.1 libz.so.1
创建主机密钥
[root@localhost dropbear-2014.65]# mkdir /mnt/sysroot/etc/dropbear
dropbearkey-t dss -f /mnt/sysroot/etc/dropbear/dropbear_dss__host_key
[root@localhost dropbear-2014.65]#
dropbearkey -t rsa -f /mnt/sysroot/etc/dropbear/dropbear_rsa__host_key
移植linss库
[root@localhost dropbear-2014.65]# find /lib64/libnss* -exec cp {} /mnt/sysroot/lib64/ \;
[root@localhost dropbear-2014.65]# find /usr/lib64/libnss* -exec cp {} /mnt/sysroot/usr/lib64/ \;
创建/etc/nsswitch.conf
passwd: files
shadow: files
group: files
编辑/etc/init.d/rcS添加如下内容
ifconfig eth0 192.168.253.22 netmask 255.255.255.0 up
ifconfig lo 127.0.0.0 netmask 255.0.0.0
/usr/local/sbin/dropbear -E 验证
移植nginx到目标机
编译安装
./confgiure --prefix=/usr/local/nginx --without-httpd_rewrite_module
make && make install
运行移植脚本输入/usr/local/nginx/sbin/nginx
cp -a -r /usr/local/nginx/* /mn t/sysroot/usr/local/nginx/
完成测试
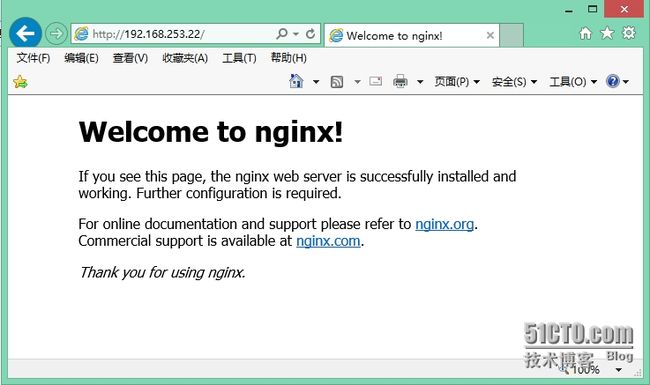
客户端访问测试
整个过程完毕


