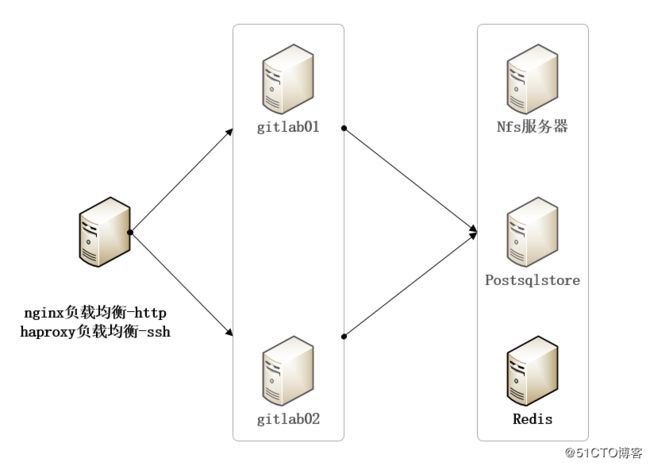
系统环境
操作系统:centos7.6
gitlab版本:12.6.1
数据库版本:postgresql9.6
redis版本:3.2
postgresql数据库部署
安装yum源
yum -y install https://download.postgresql.org/pub/repos/yum/9.6/redhat/rhel-7-x86_64/pgdg-redhat96-9.6-3.noarch.rpm
安装数据库
yum -y install postgresql96
yum -y install postgresql96-server postgresql96-devel
初始化数据库
/usr/pgsql-9.6/bin/postgresql96-setup initdb
修改启动文件名称
mv /usr/lib/systemd/system/postgresql-9.6.service /usr/lib/systemd/system/postgresql.service
开机自启动
systemctl enable postgresql
设置环境变量
export PATH=/usr/pgsql-9.6/bin:$PATH
source /etc/profile
启动数据库
systemctl start postgresql
修改配置文件
vim /var/lib/pgsql/9.6/data/pg_hba.conf
在最后增加网络信任
host all all 0.0.0.0/0 trust
vim /var/lib/pgsql/9.6/data/postgresql.conf
修改侦听地址
listen_addresses = '*'
安装扩展插件
yum -y install postgresql96-contrib
注:不要使用默认yum install postgresql-contrib安装,原因:默认安装版本是9.2,版本太低
重启服务
systemctl restart postgresql
登录数据库进行初始设置
[root@localhost ~]# su - postgres
-bash-4.2$ psql
查看信息
\l
退出数据库
lq
查看用户
\du
CREATE USER gitlab WITH PASSWORD 'pass';
CREATE DATABASE gitlabhq_production;
ALTER ROLE gitlab CREATEROLE CREATEDB;
ALTER ROLE gitlab CREATEROLE SUPERUSER;
退出登录,重新登入
su - postgres
-bash-4.2$ psql gitlabhq_production
psql (9.6.6)
Type "help" for help.
postgres=# CREATE EXTENSION pg_trgm;
退出重启数据库服务
systemctl restart postgresql
注:数据库高可用可参考https://www.cnblogs.com/linkenpark/p/8339936.html
或者官网https://docs.gitlab.com/ee/administration/high_availability/database.html#configure-using-omnibus-for-high-availability
redis安装部署可参考其他文档
NFS文件共享
[root@git-235 gitlab]# cat /etc/exports
/var/opt/gitlab/.ssh 172.28.13.0/24(rw,sync,no_root_squash)
/var/opt/gitlab/gitlab-rails/uploads 172.28.13.0/24(rw,sync,no_root_squash)
/var/opt/gitlab/gitlab-rails/shared 172.28.13.0/24(rw,sync,no_root_squash)
/var/opt/gitlab/gitlab-ci/builds 172.28.13.0/24(rw,sync,no_root_squash)
/var/opt/gitlab/git-data 172.28.13.0/24(rw,sync,no_root_squash)
服务端创建文件夹
mkdir -p /var/opt/gitlab/.ssh /var/opt/gitlab/gitlab-rails/uploads /var/opt/gitlab/gitlab-rails/shared /var/opt/gitlab/gitlab-ci/builds /var/opt/gitlab/git-data
服务端文件授权
chmod 777 -R /var/opt/
在gitlab应用程序节点创建文件夹
mkdir -p /var/opt/gitlab/.ssh /var/opt/gitlab/gitlab-rails/uploads /var/opt/gitlab/gitlab-rails/shared /var/opt/gitlab/gitlab-ci/builds /var/opt/gitlab/git-data
在gitlab应用程序节点挂载目录
mount -t nfs 172.28.13.235:/var/opt/gitlab/.ssh /var/opt/gitlab/.ssh
mount -t nfs 172.28.13.235:/var/opt/gitlab/gitlab-rails/uploads /var/opt/gitlab/gitlab-rails/uploads
mount -t nfs 172.28.13.235:/var/opt/gitlab/gitlab-rails/shared /var/opt/gitlab/gitlab-rails/shared
mount -t nfs 172.28.13.235:/var/opt/gitlab/gitlab-ci/builds /var/opt/gitlab/gitlab-ci/builds
mount -t nfs 172.28.13.235:/var/opt/gitlab/git-data /var/opt/gitlab/git-data
在gitlab应用程序节点修改挂载文件
vim /etc/fstab
gitlab双节点部署
git01配置
创建gitlab的yum仓库文件
vim /etc/yum.repos.d/gitlab-ce.repo
[gitlab-ce]
name=Gitlab CE Repository
baseurl=https://mirrors.tuna.tsinghua.edu.cn/gitlab-ce/yum/el$releasever/
gpgcheck=0
enabled=1
安装依赖
yum install -y curl policycoreutils-python openssh-server sudo systemctl enable sshd postfix
systemctl enable sshd
systemctl restart sshd
systemctl enable postfix
systemctl restart postfix
yum安装gitlab-ce
yum install -y gitlab-ce
注:如果无法访问外网,可以自行下载https://mirrors.tuna.tsinghua.edu.cn/gitlab-ce/yum/el7/gitlab-ce-12.6.1-ce.0.el7.x86_64.rpm
然后使用本地yum安装
yum localinstall -y gitlab-ce-12.6.1-ce.0.el7.x86_64.rpm
修改配置文件
vim /etc/gitlab/gitlab.rb
external_url 'http://qijian.example.com'
gitlab_rails['time_zone'] = 'Asia/Shanghai'
roles ['application_role']
high_availability['mountpoint'] = '/var/opt/gitlab/git-data'
postgresql['enable'] = false
gitlab_rails['db_adapter'] = "postgresql"
gitlab_rails['db_encoding'] = "utf8"
gitlab_rails['db_database'] = "gitlabhq_production"
gitlab_rails['db_username'] = "gitlab"
gitlab_rails['db_password'] = "pass"
gitlab_rails['db_host'] = "172.28.13.235"
gitlab_rails['db_port'] = 5432
redis['enable'] = false
gitlab_rails['redis_host'] = "172.28.13.235"
gitlab_rails['redis_port'] = 6379
gitlab_rails['redis_password'] = "123456"
gitlab_rails['redis_database'] = 0
nginx['enable'] = true
创建启动服务
gitlab启动脚本
vim /etc/systemd/system/gitlab.service
[Unit]
Description=gitlab
[Service]
Type=oneshot
RemainAfterExit=yes
ExecStart=/bin/gitlab-ctl start
ExecStop=/bin/gitlab-ctl stop
[Install]
WantedBy=multi-user.target
开机自启动
systemctl enable gitlab
使配置生效
gitlab-ctl reconfigure
注:如要再次初始化数据,运行 gitlab-rake gitlab:setup(一般前面执行了gitlab-ctl reconfigure已经初始化数据)
gitlab-ctl start
注:常用命令
查看日志:gitlab-ctl tail gitlab-rails
检测环境:gitlab-rake gitlab:check
git02配置
从git01把/etc/gitlab/gitlab-secrets.json 复制到 git2的/etc/gitlab目录下
touch /etc/gitlab/skip-auto-migrations
cat /etc/gitlab/gitlab.rb
external_url 'http://qijian.example.com'
gitlab_rails['time_zone'] = 'Asia/Shanghai'
roles ['application_role']
high_availability['mountpoint'] = '/var/opt/gitlab/git-data'
gitlab_rails['auto_migrate'] = false
postgresql['enable'] = false
gitlab_rails['db_adapter'] = "postgresql"
gitlab_rails['db_encoding'] = "utf8"
gitlab_rails['db_database'] = "gitlabhq_production"
gitlab_rails['db_username'] = "gitlab"
gitlab_rails['db_password'] = "pass"
gitlab_rails['db_host'] = "172.28.13.235"
gitlab_rails['db_port'] = 5432
redis['enable'] = false
gitlab_rails['redis_host'] = "172.28.13.235"
gitlab_rails['redis_port'] = 6379
gitlab_rails['redis_password'] = "123456"
gitlab_rails['redis_database'] = 0
nginx['enable'] = true
使配置生效
gitlab-ctl reconfigure
前端负载均衡
前端再分别对http负载(可用nginx反向代理)
[root@git-235 conf.d]# pwd
/etc/nginx/conf.d
[root@git-235 conf.d]# cat qijian.example.com.conf
upstream gitlab_backend {
ip_hash;
server 172.28.13.236:80;
server 172.28.13.237:80;
}
server {
server_name qijian.example.com;
location / {
    proxy_pass http://gitlab_backend;
    proxy_set_header Host       $http_host;
    proxy_set_header x-forwarded-for $proxy_add_x_forwarded_for;
}
}
网页版访问测试
http://qijian.example.com/
ssh(可用HAproxy代理,或nginx TCP代理)
yum install haproxy -y
[root@git-235 src]# cat /etc/haproxy/haproxy.cfg
global
log         127.0.0.1 local2

chroot      /var/lib/haproxy
pidfile     /var/run/haproxy.pid
maxconn     4000
user        haproxy
group       haproxy
daemon

# turn on stats unix socket
stats socket /var/lib/haproxy/stats level admin
defaults
retries 3
timeout client 360s
timeout server 360s
timeout connect 360s
maxconn 32000
option redispatch
option abortonclose
log global
timeout queue 1m
timeout http-request 360s
timeout check 3s
listen admin_stats
bind 0.0.0.0:11011
mode http
maxconn 10
stats refresh 10s
stats uri /web/status
stats auth admin:example
stats hide-version
listen sshd_22
bind 0.0.0.0:22
mode tcp
balance source
server sshd_vxi01 172.28.13.236:22 maxconn 2048 check inter 3000 rise 2 fall 3 weight 1
server sshd_vxi02 172.28.13.237:22 maxconn 2048 check inter 3000 rise 2 fall 3 weight 1
测试验证
将客户端密钥对公钥添加到gitlab
git clone [email protected]:chanping/front.git
gitlab集成域控制器AD验证
修改gitlab应用成程序节点配置文件
gitlab_rails['ldap_enabled'] = true
gitlab_rails['ldap_servers'] = YAML.load <<-'EOS'
main: # 'main' is the GitLab 'provider ID' of this LDAP server
label: 'LDAP'
host: '172.28.15.69'
port: 389
uid: 'sAMAccountName'
bind_dn: 'cn=admin001,cn=users,dc=vxiqijian,dc=com'
password: 'pwdpwd'
encryption: 'plain' # "start_tls" or "simple_tls" or "plain"
verify_certificates: true
active_directory: true
allow_username_or_email_login: false
lowercase_usernames: false
block_auto_created_users: false
base: 'dc=example,dc=com'
user_filter: ''
EOS
使配置生效
gitlab-ctl reconfigure
检测gitlab与域控验证
gitlab-rake gitlab:ldap:check
注:如检测失败可以重启服务再次检测
gitlab-ctl restart
登录界面
至此,gitlab集群架构部署完成。
