Xcode工程项目配置
-
Flutter混合开发不支持bit code,所以在iOS工程检查项目并关闭bit code
-
flutter module创建 (不要耦合近Xcode项目中,放到与项目目录同级)
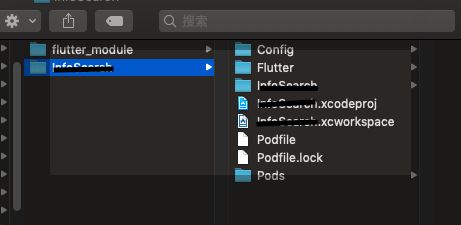
目录结构如下:
创建Xcode项目中的Config文件,引向flutter module
新建Config目录,管理Xcode工程的配置衔接文件,分别创建 Flutter.xcconfig 、Debug.xcconfig、Release.xcconfig 三个配置文件;其中Flutter.xcconfig 是指向外目录flutter module的Generated.xcconfig 文件路径引用文件,其他两个代表Xcode的环境配置文件。
- 三个文件的引入内容 (所引用的都是绝对路径,最终都是指引到
Generated.xcconfig)
In Flutter.xcconfig:
  #include "../../flutter_module/.ios/Flutter/Generated.xcconfig"
  ENABLE_BITCODE=NO
In Debug.xcconfig:
    #include "Flutter.xcconfig"
    // 如果你是使用的pod管理你的项目,需要添加对pod的引用
    #include "Pods/Target Support Files/Pods-xxxxx/Pods-xxxxx.debug.xcconfig"
In Release.xcconfig:
    #include "Flutter.xcconfig"
    // 如果你是使用的pod管理你的项目,需要添加对pod的引用
    #include "Pods/Target Support Files/Pods-xxxxx/Pods-xxxxx.release.xcconfig"
    FLUTTER_BUILD_MODE=release
这里有个值得注意的地方,如果你是使用的pod管理你的项目,则
Debug.xcconfig、Release.xcconfig都需要添加一行pod的引用
-
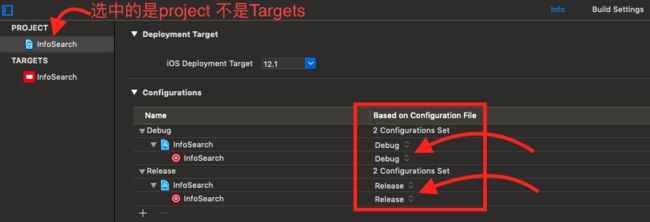
Xcode project环境配置选择
-
最重要: 引入
xcode-backend.sh在iOS工程里添加运行脚本(创建Run Scrip)
$FLUTTER_ROOT/packages/flutter_tools/bin/xcode_backend.sh" build
并且确保
Run Script这一行在"Target dependencies"或者"Check Pods Manifest.lock"后面(必须放在这里,否者flutter工程修改代码后,xcode运行app,flutter的修改不及时生效)。此时点击Xcode的运行,会执行到
xcode-backend.sh脚本;此时在iOS工程目录,也会生成一个Flutter文件夹,里面是Flutter工程的产物(这个就是flutter最终与Native交互的产物) -
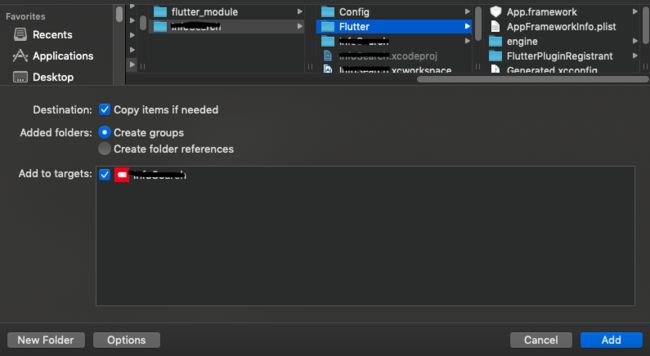
添加Flutter编译产物到工程
但是
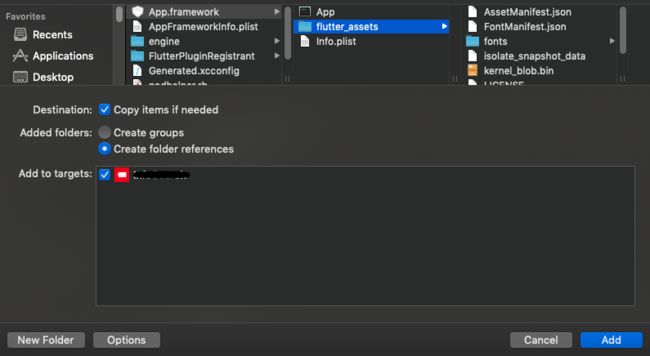
flutter_assets并不能使用Create groups的方式添加,只能使用Creat folder references的方式添加进Xcode项目内,否则跳转flutter会页面渲染失败(页面空白)。
同时FlutterPluginRegistrant文件夹不会自动添加进来,需要手动添加一遍,使用Create groups的方式添加。如果是swift工程,需要在bridge里添加对FlutterPluginRegistrant内部文件的引用以及添加对Flutter的引用。In
xxxxx-Bridging-Header.h#import#import "GeneratedPluginRegistrant.h" 应该删除
flutter_assets,文件夹再Add Files to 'xxx',选择Creat folder references;最终如下图:
添加完成后进入Build Phases->Copy Bundle Resources, 查看是否已经添加进了flutter_assets资源文件夹。
将iOS工程目录下的Flutter文件夹添加到工程,然后确保文件夹下的两个framework添加到
Embeded Binaries里
如果执行脚本后Flutter文件夹里缺少文件(如没有App.framework、Flutter.framework),请参考如下文章进行解决。传送门
AppDelegate改造
class AppDelegate: FlutterAppDelegate {

    var _lifeCycleDelegate: FlutterPluginAppLifeCycleDelegate = FlutterPluginAppLifeCycleDelegate.init()

    override func application(_ application: UIApplication, didFinishLaunchingWithOptions launchOptions: [UIApplication.LaunchOptionsKey: Any]?) -> Bool {
        // Override point for customization after application launch
        GeneratedPluginRegistrant.register(with: self)
        return _lifeCycleDelegate.application(application, didFinishLaunchingWithOptions: launchOptions ?? [:])
    }

    override func applicationWillResignActive(_ application: UIApplication) {
        // Sent when the application is about to move from active to inactive state. This can occur for certain types of temporary interruptions (such as an incoming phone call or SMS message) or when the user quits the application and it begins the transition to the background state.
        // Use this method to pause ongoing tasks, disable timers, and invalidate graphics rendering callbacks. Games should use this method to pause the game.
        _lifeCycleDelegate.applicationWillResignActive(application)
    }

    override func applicationDidEnterBackground(_ application: UIApplication) {
        // Use this method to release shared resources, save user data, invalidate timers, and store enough application state information to restore your application to its current state in case it is terminated later.
        // If your application supports background execution, this method is called instead of applicationWillTerminate: when the user quits.
        _lifeCycleDelegate.applicationDidEnterBackground(application)
    }

    override func applicationWillEnterForeground(_ application: UIApplication) {
        // Called as part of the transition from the background to the active state; here you can undo many of the changes made on entering the background.
        _lifeCycleDelegate.applicationWillEnterForeground(application)
        getUserInfo()
    }

    override func applicationDidBecomeActive(_ application: UIApplication) {
        // Restart any tasks that were paused (or not yet started) while the application was inactive. If the application was previously in the background, optionally refresh the user interface.
        _lifeCycleDelegate.applicationDidBecomeActive(application)
    }

    override func applicationWillTerminate(_ application: UIApplication) {
        // Called when the application is about to terminate. Save data if appropriate. See also applicationDidEnterBackground:.
        _lifeCycleDelegate.applicationWillTerminate(application)
    }

    override func application(_ application: UIApplication, didRegisterForRemoteNotificationsWithDeviceToken deviceToken: Data) {
        _lifeCycleDelegate.application(application, didRegisterForRemoteNotificationsWithDeviceToken: deviceToken)
    }

    override func application(_ app: UIApplication, open url: URL, options: [UIApplication.OpenURLOptionsKey : Any] = [:]) -> Bool {
        return _lifeCycleDelegate.application(app, open: url, options: options)
    }

    override func application(_ application: UIApplication, performActionFor shortcutItem: UIApplicationShortcutItem, completionHandler: @escaping (Bool) -> Void) {
        _lifeCycleDelegate.application(application, performActionFor: shortcutItem, completionHandler: completionHandler)
    }

    override func application(_ application: UIApplication, handleEventsForBackgroundURLSession identifier: String, completionHandler: @escaping () -> Void) {
        _lifeCycleDelegate.application(application, handleEventsForBackgroundURLSession: identifier, completionHandler: completionHandler)
    }

    override func application(_ application: UIApplication, performFetchWithCompletionHandler completionHandler: @escaping (UIBackgroundFetchResult) -> Void) {
        _lifeCycleDelegate.application(application, performFetchWithCompletionHandler: completionHandler)
    }

    override func addApplicationLifeCycleDelegate(_ delegate: FlutterPlugin) {
        _lifeCycleDelegate.add(delegate)
    }

    // MARK: - Flutter
    // Returns the key window's rootViewController, if it's a FlutterViewController.
    // Otherwise, returns nil.
    var rootFlutterViewController: FlutterViewController? {
        get {
            if let vc = UIApplication.shared.keyWindow?.rootViewController, vc.isKind(of: FlutterViewController.self) {
                return vc as? FlutterViewController
            }
            return nil
        }
    }

    override func touchesBegan(_ touches: Set, with event: UIEvent?) {
        super.touchesBegan(touches, with: event)
        // Pass status bar taps to key window Flutter rootViewController.
        if let rootVC = self.rootFlutterViewController {
            rootVC.handleStatusBarTouches(event)
        }
    }

}
新建FlutterViewController
在需要跳转Flutter模块的地方添加代码:
    self.flutterViewController = [[FlutterViewController alloc] initWithProject:nil nibName:nil bundle:nil];
    [self.navigationController pushViewController:self.flutterViewController animated:YES];
后语
到这里现有iOS工程引入Flutter的工作就完成了,一些细节上的修改需要根据场景进行修改,例如Flutter和Native的数据通信等。


